Advantages of polypropylene pipes
The advantages of these products include:
- Durability - if the basic rules of operation of the system are observed, as well as the temperature in it up to 75 degrees, the products can last over 25 years.
- The tightness of the joints is ensured by the use of a special technology for connecting individual components of the pipeline using a soldering iron.
- Elasticity, high mechanical strength and frost resistance. Even if the transported liquid freezes, the products expand slightly and then return to their original dimensions.
- Non-corrosive, resistant to solvents and acids, and salt deposits on internal surfaces.
- The absence of bacterial flora in them.
- Low thermal conductivity and the absence of condensation are due to the same temperature of the coolant at the inlet and outlet of the system.
- Low cost of pipes and connecting elements compared to alternative options. High environmental performance of the material makes it possible not to harm the environment during its operation and disposal.
- Light weight compared to products made of steel.
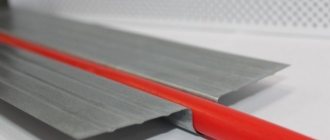
Polypropylene pipes used for heated floors are exposed to high temperatures and change their size. Typically, the coefficients of thermal and linear expansion are fixed in their characteristics. Therefore, experts recommend during installation to give preference to products reinforced with fiberglass or aluminum.
Polyethylene and polypropylene: advantages and disadvantages
Before giving preference to one option or another, let’s take a closer look at pipes made of cross-linked polyethylene and polypropylene.
Cross-linked polyethylene
Modern polyethylene pipes do not have a seam
When hearing the word “polyethylene,” and even cross-linked, most ordinary people immediately have an image of something fragile and short-lived, but this is by no means the case. Modern technologies make it possible to sew materials together in such a way that there is no seam left on the surface of the pipe that weakens the strength of the structure.
More recently, polyethylene hoses were welded with a longitudinal seam, which did not make them particularly durable. As a result, the most common area of their use was in summer cottages and homesteads, where they were used for watering plantings.
But polyethylene, cross-linked using modern technologies, has increased strength. This is especially true for PE-RT polyethylene pipes, that is, with increased heat resistance. The structure of the wall of such a pipe is a three-dimensional network with strong molecular bonds. This is achieved by the fact that pipe welding occurs at the molecular level, resulting in an almost monolithic connection.
Such pipes, according to manufacturers, can withstand pressures of up to 20 atmospheres. This strength is achieved partly by the fact that underfloor heating systems use a single flexible pipe that has no joints.
Among the disadvantages of polyethylene heated floors, one can note their insufficient resistance to external physical influences.
External pressure can compress the pipe, which will lead to problems with the circulation of coolant through the system, so it is recommended to cover polyethylene heating elements with a concrete screed, which plays the role of a kind of shell that protects them from pressure from the floor covering.
Polypropylene
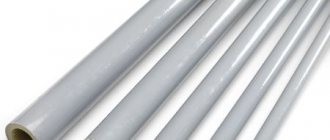
Pipes made from this material are known to almost everyone today. Over the past decade, they have almost replaced the “classics” in the form of metal water pipes in construction.
Polypropylene pipes have a whole range of undeniable advantages:
- Long service life, reaching up to 50 years with proper installation.
- High resistance to various chemicals. In this regard, not only water, but also antifreeze or ethylene glycol can be used as a coolant.
Polypropylene corrodes less and makes less noise when water passes through pipes
- Resistant to corrosion and salt and rust deposits. Polypropylene is absolutely indifferent to water molecules, so the pipes are not threatened by either corrosion or rust, and the smooth inner surface prevents the deposition of various sediments contained in the coolant on the walls.
- Reduced noise level. When liquid circulates through pipes, noise is almost completely absorbed by thick multilayer polypropylene walls.
- High mechanical strength. It is almost impossible to crush a polypropylene pipe, unlike soft polyethylene types, so it is not at all necessary to hide polypropylene heating elements in a concrete screed.
Heating systems have their drawbacks. First of all, these are load restrictions, which are 7.5 atmospheres of pressure and + 95 C maximum temperature. The recommended operating temperature is + 75 C.
In order to bend such material you will need special equipment.
When these parameters are exceeded, polypropylene begins to deform and significantly increase in volume. Another disadvantage of such pipes is excessive rigidity.
Laying polypropylene with a “snake” or a spiral, like polyethylene pipes, is unlikely to work, so when installing a heated polypropylene floor, it will be impossible to do without an “iron” for welding pipes and adapters-angles for connecting individual elements.
The strength of the entire heating structure depends on how well the welding is done, so special attention should be paid to the strength and tightness of the connections.
After familiarizing yourself with all the advantages and disadvantages of polypropylene and polyethylene, you can make the most suitable choice for you.
If you decide to use polypropylene pipes as a material for underfloor heating, you should familiarize yourself with the main criteria for their selection.
Heated floor installation
Do-it-yourself heating from polypropylene pipes in a private house
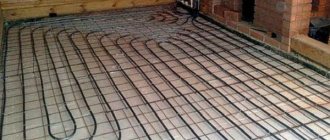
Warm floors are pipes laid on the floor, in most cases, in the thickness of a cement screed. Warm water flows through the pipes, the source of which may be a heating boiler or heating system.
So, the process of installing a heated floor has several stages:
- Drafting:
- Laying and connecting pipes;
- Checking the system functionality;
- Execution of the screed;
- Laying the finishing coating.
Based on this, we will then consider all the stages in detail.
Creating a Project
The project is needed to calculate the amount of materials and the temperature that this heating system can provide. In addition, you need to find out in advance the location of the boiler and collector.
In addition, the diagram must indicate the length and diameter of the pipes, and other nuances of the system. Based on this, it is better to entrust the calculations to experts so that the heating efficiency does not suffer.
Execution of preparatory work
It is necessary to begin the construction of the system with preparatory work; instructions for their implementation are as follows:
- First of all, a manifold cabinet is installed, in which the circuits are connected to the heating system. All adjustment elements are located there. It is optimal to place the collector on the wall near the floor.
- Then you need to connect the warm water supply and return pipe to the collector.
- Then a layer of waterproofing is laid on the floor. Much more often polyethylene is used for these purposes.
- A special damper tape is glued around the perimeter of the room to prevent cracking of the screed due to thermal expansion.
- After this, thermal insulation is laid, which reduces heat loss.
- At the end of the work, an iron mesh is laid on the floor.
Advice! As insulation, it is possible to use a special material for heated floors with a reflective aluminum surface.
Laying contours
In order for the heating system to be effective, the circuits must be installed correctly, following the following rules:
- The usual contour diameter is 2 cm.
- The length of the circuit should not be more than 80 m, but the most optimal length is 50 m. This will allow them to warm up evenly.
- The course of the circuit depends on the location where it is located. In a cold place, for example, near a door, the stroke should be less. In places where furniture will be placed, the contours by and large do not fit.
Laying can be done in two ways:
- Snake;
- "Snail."
The second method is preferable because it ensures uniform heat distribution due to the parallel placement of inlet and outlet pipes.
Once the polypropylene pipes for the heated floor are laid, they must be attached to the iron mesh using clamps. Then you need to connect the pipes to the circuits and fill the system with water.
This will allow you to check it for leaks.
Note! When checking the system, the pressure should be one and a half times the working pressure, but not less than 6 bar. After this, every thirty minutes the pressure rises three times to the previous level
The last time the system must be left for a few days - if during this time the pressure drops by no more than 2 bar, then the installation was completed successfully.
Pouring the floor with concrete
The final stage of the work is pouring the floor with concrete. To do this, you must first install a special iron beacon profile, using it to ensure a horizontal level along which the surface of the screed will be leveled as a rule.
The thickness of the screed can be 30-70 mm.
Once the concrete has hardened and completely gained strength, which will take at least 28 days, it is possible to install the finishing coating. This may be laminate, linoleum, carpet or other material.
Installation
Installation of the heating system occurs in several stages.
Lining
To ensure effective heating, the floor must be prepared before installation.
If there is no base as such, first make a rough screed from sand-cement mortar. If concrete slabs serve as the base, they are leveled, covering all the cracks and ensuring that there is no level difference above 1 cm.
The rough screed is cleaned of dirt and dust, after which a layer of waterproofing is laid. The material for this is usually a thick film. Experts recommend placing the film on the walls at a distance of 10–20 centimeters. In rooms with high humidity, in country houses, this is mandatory. The film is overlapped by 10–20 centimeters and taped at the joints with mounting tape.
Damper tape is glued around the perimeter of the room. Its edges should be approximately 20 mm higher than the future screed. After the screed has dried, the edges of the tape are usually cut off.
Then thermal insulation is laid so that the warm floors heat the room most efficiently. There are different heat-insulating materials, both rolled and in the form of plates; the choice of coating depends on personal preferences, price, thickness. All cracks between them should be sealed with polyurethane foam to eliminate the possibility of heat leakage. The thickness of the thermal insulation when installed on a cold floor or ground should be from 5 centimeters, otherwise 3 centimeters is sufficient.
If the thermal insulation material is not foil-coated, a foil film is placed on top of it. At the joints it should be taped with aluminum tape.
We recommend that you read: How to connect metal-plastic pipes with polypropylene pipes yourself?
Once completed, the floor is ready for installation of the heating circuit.
Pipe laying
When working with polypropylene indoors, it is necessary to maintain the operating temperature above 5°C.
There are two ways to fasten the pipe: using dowels through thermal insulation and fastening to a reinforced mesh. The preferred option is to attach it to a grid as it is more reliable. Plus, the mesh allows you to strengthen the layer of screed that will cover the heating system.
The mesh for fastening is placed on a heat-insulating substrate. Then pipes for a warm water floor are laid along it according to the previously chosen scheme and secured with plastic clamps or wire. The fastening should not be over-tightened - this can lead to deformation of the pipes during operation and reduce their service life. At the junctions they are fastened together using a special welding machine. It comes in several variants and is easy to work with.
Laying begins with the collector. First, one end is connected to it, and after laying the pipes throughout the room, the second is connected.
Testing
After laying and securing the pipes, they are connected to the collector and tested. To test heating equipment, water is supplied while simultaneously removing air. In this case, the water pressure should be higher than the working one, but not more than 6 bar.
After a day, the pressure is checked, and if it has dropped by no more than 2 Bar, then you can start coating. If the pressure is less, then there is an error in the gasket.
Calculation and distribution of pipes
Do-it-yourself heating installation in a private house from polypropylene pipes
For each room, the calculation of the length of the pipe and the pitch of its installation must be made separately. Calculations of water heated floors can be performed using specialized programs or using the services of design organizations. It is very difficult to independently calculate the required power for each circuit; a lot of parameters and nuances are taken into account. If you make a mistake in the calculations, this can negate the entire operation of the system or lead to unpleasant consequences, including: insufficient water circulation, the appearance of a “thermal zebra” when warm and cold areas alternate across the floor, uneven heating of the floor and the formation of leakage points heat.
To carry out calculations, the following parameters are required:
- Room dimensions;
- Material of walls, ceilings and thermal insulation;
- Type of thermal insulation for underfloor heating;
- Type of flooring;
- Diameter of pipes in the underfloor heating system and material;
- Boiler power (water temperature).
Using these data, you can determine the required length of the pipe used for the room and the pitch of its installation to achieve the required heat transfer power.
When distributing pipes, you should choose the optimal laying route
It is important to consider that water gradually cools as it passes through the pipes. By the way, this is not a disadvantage, but rather a plus of water heated floors, because heat loss in the room does not occur evenly
When distributing water heated floor pipes in each circuit, a number of rules should be followed:
- It is advisable to start laying pipes from the outer, colder walls of the room;
Important: If the pipe entry into the room is not from the outside wall, then the section of the pipe from the entry to the wall is insulated.
- To gradually reduce the heating of the floor from the outer wall to the inner one, the “snake” laying method is used;
- To uniformly heat the floor in rooms with all internal walls (in the bathroom, wardrobe, etc.), laying in a spiral is used from the edge of the room to the center. The pipe is brought in a spiral to the center with a double pitch between the turns, after which it turns around and unwinds in the opposite direction until it leaves the room and goes to the collector.
In addition to the length and distribution shape of the pipes, their hydraulic resistance should be calculated. It increases with increasing length and every turn. In all circuits connected to the same collector, it is desirable to bring the resistance to the same value. To resolve such situations, it is necessary to divide large circuits with a pipe length of more than a hundred meters into several smaller ones.
For each circuit, a single piece of pipe of the required length is purchased. It is unacceptable to use joints and couplings on pipes that are laid in a screed. So the length calculation and order should be carried out after carefully carried out calculations with thinking through the entire laying route.
Important: Calculations are carried out for each room separately. It is also undesirable to use one circuit to heat several rooms.
To insulate a loggia, veranda, or attic, a separate circuit is laid, not combined with adjacent rooms. Otherwise, most of the heat will go to heating it, and the room will remain cold. Insulation under a heated floor is carried out in the same way as with a floor located on the ground. Otherwise, there are no differences in terms of installing heated floors on the loggia.
Pipes: marking and correct choice
The marking of polypropylene pipes is the first thing people pay attention to when choosing a suitable conductor for hot water, since not every product is suitable for these purposes. What is hidden under the encryption:
Working pressure PN, which the pipe must withstand throughout its entire service life at a water temperature of 20°C. For heated floors, you should choose a designation not lower than PN20-25 - they are intended for hot water. Type of material: PP - polypropylene.
Its addition PP-1, PP-2, PPV indicates the type of raw material used - homopolymer or block copolymer. Pipes marked PPR, sometimes PPB, are suitable for hot water. The diameter of the conductors and the thickness of their walls in millimeters range from 10 to 1200 mm. For internal heating systems and the organization of heated floors, pipes with an internal diameter of no more than 30 mm are used. Marking - manufacturer’s designation, year of manufacture.
Water floor system calculations and pipe distribution
Do-it-yourself warm floor
It is difficult to calculate a heated floor system yourself. It is better to contact a specialized organization involved in the design of such devices. Any error can lead to a malfunction of the entire system. For each room where heated floors are used, they create their own diagram and make individual calculations.
Before laying pipes, the optimal route for their placement is selected. At the same time, they take into account the fact that the hot water in them cools as it moves. This is not bad at all: there is no noticeable heat loss.
In order for the water floor to function normally, a number of rules are followed at the stage of distributing plastic pipes:
- installation begins from the external cold walls;
- the pipes are arranged in the form of a “snake”;
- in a room without external walls, spirals are placed from the edge to the center;
- pipes are placed at a distance of 10-30 cm from each other, depending on the nature of the room;
- when creating a multi-circuit system, buy a solid plastic product of the required length. It is desirable that all lines be the same length.
Attention! Pipes laid in a screed cannot be joined. You cannot use 1 underfloor heating circuit to heat the entire house.
A loggia, attic or veranda is insulated by laying a separate pipeline without its contact with the main system.
Collector installation
- Approximately in the middle of the underfloor heating system, at a level of 1 meter from the finished floor, a cabinet for the collector is installed. To hide it, create a niche in the wall or place it in a place inaccessible to first glance.
- They assemble the main unit or install a ready-made one with the required number of bends.
Attention! The most budget option is a manifold with 5 outlets and fittings with manual adjustment.
- The plastic pipe coming from the boiler is connected to the manifold using a nut, bushing, rubber gasket and union nut with a detachable connection.
- Next, the accompanying devices are attached: air vent, adapters, drain valve.
- A ball valve is installed on the second (return) manifold.
Advice! The threads are wrapped with a sealing thread to prevent leakage.
- The assembled collectors are placed in a cabinet on movable guides.
- Next, pipes are attached to them and secured with nuts.
- Install the air vent valve and drain.
Installation of the main system
For full operation of the system, a water heating boiler with a built-in pump is installed. It can be equipped with a gas or electric element. Shut-off valves are installed at the inlet/outlet. They will come in handy when it becomes necessary to turn off the boiler.
Warm floors made of plastic pipes are placed according to the diagram. The main elements are attached to the base using special fasteners, which are fixed with dowel nails. The pipe is installed in the socket. Sometimes platinum ties are used. They are attached to a reinforcing mesh. The ends of the pipes are connected to the manifold using a compression fitting.
After installing all the elements, the heated floor must be tested. Water is released into it under high pressure and kept there for 24 hours. If any pipe leaks, it is replaced.
After making sure that all parts are working properly, fill the floor with concrete. They do this while the system is running. In a month, the surface of the heated floor will be ready and you can lay the finishing coating.
Plastic heated floors can be installed under any finishing material. If you plan to lay laminate, parquet, linoleum, make the screed thin. Another layer of reinforcement is placed on the system itself.
The water heated floor system is one of the most labor-intensive to install, but the most effective to operate.
Connection of underfloor heating pipes in a screed
Although experts advise laying a water-heated floor under a screed without joints, it is not prohibited to do so.
But it is worth noting that it is impossible to connect the floor contours using a threaded method: “American” or PRH. It is better if the pipes are connected using a press fitting or coupling.
Important! When filling such areas with screed, fittings or couplings should be isolated from the concrete solution. This can be done by wrapping them in plastic film.
Design and execution of heated floors
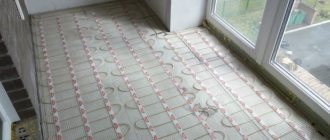
This system saves usable space because it is located under any floor covering or cement screed. You can create a warm floor from polypropylene pipes with your own hands by filling them with concrete or other plasticizer. At the same time, the coolant circulates through them and distributes heat evenly, starting from the bottom throughout the room.
Appearance of the heated floor system
In this case, the heat source can be a boiler or other types of heating. Temperature sensors ensure timely shutdown of the system immediately after the set temperature is reached, which saves energy.
Do-it-yourself installation of heated floors is carried out in several stages:
- project preparation;
- laying and connecting pipes;
- checking and monitoring system performance;
- screed arrangement;
- performing the final coating.
Let's take a closer look at all the stages.
It is impossible to make a heated floor without preparing a project, which is needed to calculate the need for materials, the heated area, the temperature capable of ensuring the operation of the system, the location of the boiler and other nuances, including the diameter and length of the pipes. For efficient heating operation, it would be better to entrust all calculations to professionals.
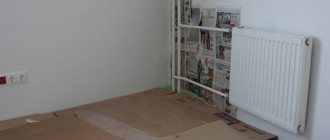
Installation of the system begins with the installation of a manifold cabinet, which is necessary to connect the circuits to the base line, through which warm water is supplied and cooled water is taken.
Distribution manifold cabinet
The cabinet is installed above the floor level in order for the pipes to go down, while ensuring air removal and normal functioning of the system.
One of the key points when installing a heated floor is waterproofing, which can protect the room from water leaks. Film materials, such as polyethylene, are often used for this purpose.
To prevent cracking of the screed during thermal expansion, experts recommend using damper tape, which is glued around the perimeter of the room.
In order to reduce heat losses, thermal insulation is installed that can cope with heavy loads and has a high thermal resistance. For this purpose, a foil coating is used, which has excellent mechanical strength, a low degree of compression and evenly distributes heat over the floor surface. To fasten the pipes and fix the screed, a reinforcing metal mesh is used.
Which pipes are better for a water floor - conclusions
These are the characteristics of four types of products that are used to construct underfloor heating systems. Each of them has both advantages and disadvantages, so any buyer must decide for himself which of the advantages of these communications is more important to him. As for popularity in the market, pipes made of metal-plastic and cross-linked polyethylene are most often used for installing heated floors.
They are considered the best in terms of quality and cost. It is undesirable to use polypropylene communications due to the significant disadvantages described above. Well, if the financial capabilities of the owners of a house or apartment allow them to purchase the best and highest quality materials, then a warm floor made from copper pipes would be an ideal option.
You can buy pipes for heated floors in an assortment by familiarizing yourself with such communications from the catalog of our online store. With their help, you can create an effective and economical heating system that will evenly heat any room. Pipes for heated floors, the price of which depends on the material from which they are made, are modern plumbing products, the proper installation of which allows you to design heating networks that provide a high level of comfort in cold seasons for many years.
There is a need for additional floor heating in all regions of our country: the first floors of residential buildings are cooled most of the year. The solution to the problem is to install a separate heating system under the screed. Most often, polypropylene pipes are used as a conductor.
How to understand the marking of polypropylene pipes
To avoid errors during installation, the assembler of heated floors must be guided by the existing markings of polypropylene pipes
This is especially important for the owner who assembles the circuit with his own hands.
Typical marking of polypropylene pipe:
- PN10 – index of polymers with a homogeneous structure. Consumables are used in water supply systems up to 20 degrees Celsius at 10 atmospheres. PN10 pipes have a diameter from 20 to 110 mm;
- PN16 is an index of homogeneous polymers suitable for installation of water floor heating. The coolant should not warm up above 80 degrees Celsius at 10 atmospheres of operating pressure. The diameters of PN16 are similar to PN10, but have thicker walls;
- PN20 - homogeneous pipes for coolant with operating modes at 95 degrees Celsius and 6 atmospheres of pressure. Pipe diameters PN20 from 20 to 110 mm;
- PN20 GF or PN20 AL – polypropylene pipes with fiberglass or aluminum reinforcement. All other characteristics are similar to PN20, but have lower thermal expansion parameters.
Pros and cons of heated floors made of polypropylene pipes
Is it worth choosing products for organizing floor heating and can propylene pipes be poured with concrete under the screed?
Let's start with the advantages of using the material:
- Resistance to temperature and pressure changes;
- Low thermal conductivity minimizes thermal energy loss;
- Low cost of pipes and their installation and maintenance;
- There are no deposits on the inner walls.
- The low flexibility of pipes of at least 8 diameters makes contours difficult”;
- The room temperature during installation is limited - not lower than +15°C;
- High coefficient of linear expansion - conductors can change their dimensions when exposed to hot water. Polypropylene pipes can be laid in a floor screed, but they must be correctly calculated and selected so that internal stresses do not arise, which can lead to rapid wear.
Installation of water heated floor pipes and pouring screed
Basically, heated floors are laid using special fastening profiles, which are secured to the floor with dowels and screws. They have sockets for securing pipes. With their help, it is much easier to maintain the pitch distance between the turns of the pipe.
Tip: To secure it, it is enough to use plastic ties that press the pipe to the reinforcing mesh
It is important not to tighten the pipe too tightly; it is better to keep the tie loop free.
Pipes are most often supplied in the form of coils. Do not pull the pipe out of the coil, turn by turn. It is necessary to unwind it gradually as it is laid and secured to the floor. All bends are made carefully in compliance with the minimum possible radius limit. Most often, for polyethylene pipes this radius is equal to 5 diameters.
If you compress a polyethylene pipe too much, a whitish stripe may appear on the bend. This means that the material began to sharply stretch and a crease formed. Unfortunately, such defects cannot be installed in a heated floor system due to the increasing risk of a breakthrough in this place.
The ends of the pipes that are supplied to the collector are, if necessary, laid through the walls and enclosed in insulation made of foamed polyethylene. To connect the pipes to the manifold, either a Eurocone system or a compression fitting is used.
If this is your first time encountering polypropylene pipes, we recommend reading about their welding and installation.
There are several schemes for laying underfloor heating pipes. You can choose the right one based on your needs
Along with other factors, it is worth paying attention to the arrangement of furniture and plans for rearranging it.
When the installation of underfloor heating is completed, a mandatory high-pressure system check is performed. To do this, water is poured into the pipes and a pressure of 5-6 bar is applied for 24 hours. If no leaks or significant expansions are noticed on the pipes, then you can begin pouring the concrete screed. Filling is carried out at connected operating pressure in the pipes. Only after 28 days can we consider that the screed is ready and begin further work on installing the floor covering.
Important nuances of forming a heated floor screed
There are some peculiarities in the formation of screeds over water-heated floors. This is due to the principle of heat distribution in its thickness and the floor covering used.
- If the heated floor is laid under the tiles, then you should make a screed about 3-5 cm thick, or distribute the pipes at intervals of 10-15 cm. Otherwise, the heat from the pipes will not properly warm the space between them, and this phenomenon will appear like a "thermal zebra". In this case, the alternation of warm and cold stripes will be quite clearly felt by the foot.
- Under laminate, linoleum, etc. It is advisable to form a thinner screed. For strength, in this case, another reinforcing mesh is used on top of the heated floor. This will reduce the heat path from the pipes to the flooring surface. Also, a layer of thermal insulation is not placed under the laminate, because it will only worsen the efficiency of the heated floor.
You can turn on the water heated floor heating at the first hint of the onset of autumn cold. The initial warm-up may take several days, after which the system will already maintain the required temperature. The greater inertia of water heated floors can also play a good role, even if for some reason the boiler is not able to heat the water for some time, the system will continue to transfer heat to the premises for a long time. In addition, you can keep the underfloor heating system at low power throughout the year, turning off most of the circuits and leaving only the part that heats the rooms where the flooring is made of ceramic tiles or self-leveling floors (hallway, bathroom, etc.), because even In hot weather, such coatings feel cold.
Heating system installation
After you have chosen and purchased the appropriate material, we proceed directly to the installation of the heating elements.
Preparing the base
Waterproofing will protect neighbors below from flooding
Work on laying the heating pipeline should begin with preparing the base. First of all, you should lay an insulating layer.
This will help you avoid troubles with your neighbors below in the event of force majeure in the form of a pipeline break.
For these purposes, you can use both liquid moisture-repellent mastic and conventional rolled waterproofing material: roofing felt and similar materials. In the first case, waterproofing is applied using paint brushes or a roller. Liquid mastic fills all the pores and microcracks of the concrete base, leaving no path for moisture to penetrate through the interfloor ceilings.
Coat the joints of the waterproofing material with mastic
Rolled waterproofing is laid overlapping each other, gluing to the subfloors using bitumen mastic. The joints of the insulation sheets are also carefully coated with mastic, and if necessary, the roll insulation sheets are laid on top of each other in 2 - 3 layers.
The next step is insulating the base. If this work is not done, then your underfloor heating design will only heat the room by 50%. The remaining 50% of the heat will go to warming the ceiling of the neighbors below or the basement.
Expanded polystyrene
To optimize thermal energy consumption, we lay thermal insulation on top of the waterproofing layer.
For this, sheets of dense material, preferably not afraid of moisture, are best suited.
The ideal option would be dense polystyrene foam (extruded polystyrene foam), penoplex, etc. You can also use polyethylene foam insulation with a foil surface.
You should not use a mini-slab for laying thermal insulation under a warm water floor. Firstly, mineral wool is afraid of moisture and if it gets wet, it will lose its insulating qualities. Secondly, the mini-slab will be crushed and flattened under the weight of the pipeline, flooring and furniture standing on it, which will also negatively affect its properties.
Drafting
Next, you need to decide how the pipeline will be laid. It depends on whether it will be mounted with a “snake”, a spiral, a “double snake”, etc. depends on its total length. For more information on how to design a water floor, see this view:
The length of the underfloor heating pipe should not be more than 50 m
When drawing up a project, you should remember that polypropylene pipes are quite rigid, so you should not include too sharp turns and bends in the plan.
For efficient heating operation, a distance between the threads of 25–30 cm is sufficient.
The length of the pipeline should not exceed 50 m - otherwise, at its far end the heat transfer will be extremely low, and this will lead to uneven heating of the room.
To calculate the total length of the heating pipeline, you should lay out its outline on the floor with thread or twine. Afterwards, all that remains is to measure the length of the thread to find out the exact footage of the future pipeline.
The table shows the pipe flow depending on the distance between the loops.
Pipe laying
The easiest way to lay out the outline is with a snake
After all the preparatory work has been completed, you can proceed directly to laying the heating circuit. The most effective from the point of view of thermodynamic parameters is laying the contour in a spiral.
However, such a scheme may be too complex for a not very experienced home craftsman, so if you decide to install heated floors at home with your own hands, it is better to opt for the “snake”. It is much easier to design, and in this case the parts should be prepared in only two sizes: a large piece of pipe is for the long side, and a smaller piece is used to connect two long pipes.
To bend pipes, use coupling angles
Also during installation we will need corner couplings to bend the structure and a soldering iron for polypropylene pipes. To secure the pipeline more rigidly, a metal or fiberglass mesh is placed underneath it, to which heating elements are attached in several places, at each bend.
The next step is to create a protective layer over the mounted heating circuit to relieve pressure on it from furniture and household appliances. For this you can use a concrete screed. This option will perfectly protect the pipes and also allow you to create a perfectly smooth base for the finishing coat. To learn how to make a polypropylene floor, watch this video:
As an option, install a slatted floor. In this case, slats or blocks are installed between the turns of the pipeline, which should rise 1.5-2 cm above the pipe. They form a base on which a layer of plywood is laid, on top of which a decorative floor covering is laid - linoleum, laminate, carpet.
The option with a concrete screed is more preferable, since concrete is an excellent conductor of heat from heating elements to the environment.
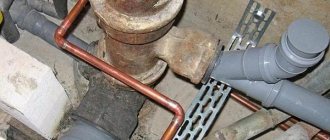
PVC collector device
A slatted floor is many times inferior to a concrete floor in this indicator, so it should be installed only if it is impossible to install a concrete screed or when water floors are planned to be used as auxiliary heating.
As a finishing touch, we lay the final floor covering. In this case, preference should be given to materials without a heat-insulating effect, so as not to reduce the efficiency of the heating system.
The best posts
- Installing an entrance door in a wooden house
- [Create at home] DIY shoebox decor
- 5 interior ideas if there is a cat living in the house
- Types of generators for power plants
- Installing a ceiling cornice on a suspended ceiling: expert advice
- Crafts from autumn leaves
- 8 options for decorating with branches for the home
- Crochet winter beret pattern and description of the knitting process with photo
Related article: Choosing fashionable wallpaper for the living room 2021: photos and 7 varieties
Differences between water and electric floors
One of the important differences today between water and electric floors is the possibility of installing the latter in city apartments without any approval from housing offices, while the installation of water floors in apartments is prohibited.
Water floors use hot water from central or autonomous heating. Installing a water floor in country houses with large areas is more economical than installing electric floors in the same area. But for small areas it will be more economical to use electric heating. Each heating system has its own characteristics.
The advantages of water heated floors are:
- visible absence of heating devices;
- uniform heating of the floor over the entire area;
- heating large areas without special material costs;
- installation costs are quickly recouped by further savings in electricity bills.
The disadvantages of a water floor include:
- complexity of installation;
- reduction of pressure in the system;
- using a pump to increase pressure in the system;
- complexity of temperature control;
- loss of temperature for the following rooms, as water passes through the circuit and gives off heat and cools;
- difficulty in finding a leak that has occurred;
- ban on installation in city apartments.
Electric floors also have disadvantages:
- high energy consumption;
- electromagnetic radiation emitted by the cable;
- Do not install under heavy objects to avoid overheating.
The advantages of electric floors include:
- visible absence of heating devices;
- installation in city apartments without special equipment;
- uniform heating over the entire heated floor area;
- ease of temperature control and maintaining physiological comfort - the bottom is warmer than the top;
- the ability to quickly find and repair circuit faults.
Everyone focuses on their own conditions when choosing a heated floor system; however, it wouldn’t hurt to give recommendations:
- if you have a city apartment and you want to additionally heat a bathroom or balcony, then it is better to use an electric heating system;
- you have a heated house, but you need to add heat, for example, to a children's room - again, the choice is up to the electric floor;
- If you have not yet installed heating in the house, its area is large - it is better to resort to installing a water heating circuit.
Still haven't decided which type of underfloor heating to choose? We bring to your attention reviews from those who have installed water-heated floors, their problems, and pleasant moments.
Polyethylene pipes
For heated floors, two types of polyethylene are used - cross-linked PEX and specialized PERT. The term "sewn" does not mean the presence of any seams. It is not sheets of material that are stitched together, but its molecules. “Crosslinking” refers to physical or chemical processing methods that change the molecular structure of polyethylene.
As a result of cross-linking, new molecular bonds appear in polyethylene, making it stronger and more reliable.
Due to this procedure, the strength and flexibility of the material increases significantly, and the temperature of the transported medium increases (40°C is the maximum for untreated polyethylene and 95°C for cross-linked). So that cross-linked polyethylene (as well as its properties) can be distinguished, it has different designations, depending on the type of processing:
- PE-Xa: heat treatment using peroxides. As a result, the cross-linking strength is 75%.
- PE-Xc: electron bombardment and strength increased by 60% (irradiation, i.e. physical impact).
- PE-Xb: wet silane treatment with catalyst. Stitching - 65%.
- PE-Xd: Nitrogen treatment is the rarest technology available today.
For heated floors, cross-linked polyethylene with a cross-linking strength of 65% to 80% is used. It is clear that the more durable the material used, the better, but as this indicator increases, the price also increases. However, it is recommended to use PE-Xa or PE-Xc cross-linked polyethylene for underfloor heating, as it has the most suitable characteristics. Moreover, the PE-Xc pipe is preferable, since when bombarded with electrons, cross-linking occurs evenly, but with chemical methods of exposure, the outer layers of the material acquire greater strength, and with deepening, the degree of processing decreases.
The best pipes for water floors - PERT
Actually, this material has one drawback - high elasticity. This leads to the fact that although the pipe bends well, it must be rigidly tied to the frame, otherwise it will return to its original shape. That is, such installation is not the easiest. Many companies produce special backing mats that perform two functions at once: they serve to improve thermal insulation and have a fixation system in which cross-linked polyethylene pipes are well secured. This installation method is much faster and easier. And the result in any case is high reliability, durability and a relatively low price. In addition, at any speed of coolant movement, the system remains silent. So PEX pipe for underfloor heating is a good choice and is recommended by many professionals.
There is another polyethylene pipe that has better characteristics - PE-RT (perth). Moreover, these characteristics are not acquired, like those of cross-linked polyethylene, but “innate” - the molecular structure of this material is such that it has high flexibility and tolerates elevated temperatures and pressure well. Therefore, a PERT pipe for underfloor heating is the best choice: the performance of PEX pipes depends on the quality of chemical treatment (PEX-a and PEX-b), and in this material they are constant. There is only one advantage of PEX-a pipes - the presence of molecular memory, which is why it is easier to connect them (use regular compression fittings) and you can restore the original shape after bending. How to do this, watch the video where a Rehau pipe for heated floors is tested.
It is also worth noting that a polyethylene pipe for underfloor heating of any type must necessarily have an oxygen-proof barrier made from a layer of EVOH film (this name must be present on the pipe marking). Only in this case will the metal parts of the system be protected from oxidation and the heating will be durable. That is, it turns out that for heating both PERT pipes and PERT pipes must be five-layer.
It is often difficult to decide which pipes to use for a warm water floor, which ones are better and why - similar characteristics, many varieties that are difficult for a non-specialist to understand. The difference between PE-Rt and PE-X pipes, between them and metal-plastic products, their features and signs of good quality pipes is described in the video.
Pipe calculation
There are two methods for calculating the required number of pipes. First you need to decide on the installation scheme. There are only two of them: a snake and a snail. Sometimes they are combined. There is double and single installation.
There are several points to follow:
- The optimal total length of pipes for water heated floors is up to 50 meters. If desired, you can extend it up to 80 meters, but in this case the system may not work efficiently.
- Between turns you should take a step of no more than 30 centimeters. This is usually sufficient for effective heating. In places with high heat loss, for example, near windows, you can lay them in increments of 10–15 centimeters.
- With double installation (double snake), heat is distributed evenly throughout the entire system. Otherwise, the first half should be laid near windows as in places with high heat loss. This is due to the fact that hot water cools down as it moves.
- It should be remembered that polypropylene is a material with low flexibility. When laying, you need to take this into account and not make too “sharp” turns.
When calculating the number of pipes, two methods are used - thread and graph paper. The calculation for the thread is simple: the thread is placed on the floor in the places where the pipes will be located and then measured.
We recommend that you read: How to select and install a polypropylene ball valve?
When making calculations, a plan of the room in which they will be installed is first drawn on graph paper, a diagram is drawn on it, and the required length of the pipes is calculated.
When calculating the number of pipes, 10% must be added to the final calculations for possible overruns.
Surface preparation. Features of insulation of the base under a warm floor
The old screed is completely dismantled down to the base. Unlike the process of forming a conventional screed, when installing a heated floor, the floor should be leveled horizontally at the initial stage if there are differences of more than 10 mm.
Next, a layer is laid on the cleaned surface. A damper tape is fixed around the entire perimeter. It will compensate for the thermal expansion of the floor when heated.
Important: When using a water heated floor, the device of which has several circuits, the damper tape is also laid along the line between the circuits. . To prevent heat from escaping downwards, it is necessary to insulate the base of the floor.
Depending on the location of the room and the type of floor, as well as the target orientation of the heating system, the appropriate insulation is selected:
To prevent heat from escaping downwards, it is necessary to insulate the base of the floor. Depending on the location of the room and the type of floor, as well as the target orientation of the heating system, the appropriate insulation is selected:
- If the heated floor is an addition to the main heating system, then it is enough to use foamed polyethylene with a reflective foil coating as a substrate for the heated floor (penofol).
- For apartments with heated rooms on the floor below, it is enough to use sheets of expanded polystyrene or extruded polystyrene foam with a thickness of 20 to 50 mm or other durable insulation of suitable thickness.
- For first-floor apartments with an unheated basement or houses in which the floor is located on the ground, more serious insulation should be used in the form of expanded clay and expanded polystyrene sheets 50-100 mm thick.
Tip: You can use specialized insulation for heated floors. On the one hand, such materials are already equipped with special channels for laying pipes of underfloor heating systems.
A reinforcing mesh is laid on top of the insulation. It is necessary to secure the screed layer that will cover the entire underfloor heating system. Among other things, it is possible to subsequently attach the heated floor pipe to the mesh, instead of using special fastening strips and clips. In this case, ordinary plastic ties are used.
Diagram of the heated floor surface
How to solder a heated floor pipe
Soldering is a common method of connecting plastic pipes for underfloor heating. The technology is simple and does not require large financial investments. There are two soldering techniques:
- Coupling - for this, a shaped part is used (coupling or contour with a large diameter). This method is suitable for tubes measuring 63 mm. The welding process consists of melting the edge of the product on the outside and part of the coupling on the inside. After which, the parts are joined, forming a tight connection.
- Direct - involves melting small sections of two plastic pipes, which are then joined at the ends. This fairly simple method reliably combines two parts into a single outline.
For your information! Along with hot technologies, the method of “cold” soldering is practiced. A special solvent is used that softens the plastic.
Preparatory work
Before laying pipes, it is important to carry out a number of mandatory preparatory work. Otherwise, you will not heat the air in the room, but the base lying under the pipes
Therefore, thermal insulation is carried out to effectively distribute thermal energy. All preparatory work is carried out in several steps:
- A layer of waterproofing is placed on the rough screed. To do this, you can use thick polyethylene film. If you live in your own house, then the existing moisture in the soil will not rise to the top. The film should be rolled 100 mm onto the wall.
- At the next stage, the thermal insulation material is laid. In most cases, extruded polystyrene foam is used for this purpose. This material is highly resistant to mechanical loads. It is resistant to moisture, so extruded polystyrene foam is best suited for thermal insulation of a concrete floor. Installation of the material is carried out in a checkerboard pattern. If the rough screed is uneven, then gaps may form at the joints of the slabs, which can be filled with polyurethane foam. But here we must exercise prudence. If the floor is too uneven, this can negatively affect the heating system. Additional hydraulic resistance will form in the pipes. It is also recommended to fill the gaps between the wall and polystyrene foam boards with foam.
- To increase the quality of insulation, penofol, which is a material made of polyethylene foam, can be laid on top. On one side it has a layer of aluminum foil. Thanks to reflection, thermal energy will rise upward and, accordingly, warm the air in the room. Penofol joints are glued together with construction tape.
Expanded polystyrene
Note! Each preparatory stage must be carried out accurately and in accordance with existing technology. In this case, you will be able to create heating