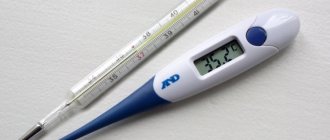
Actually, it stands but doesn’t really show anything. The indicator from VAZ is installed, but the temperature sensor is from Renault Rapid. The resistance of the pointer and the sensor are different - as a result, the pointer, roughly speaking, shows the average temperature on the moon. The VAZ sensor doesn’t seem to fit (purely visually the diameter is larger + thread for a cone).
Now, actually, the question for knowledgeable people is which sensor to install instead of the standard one so that the indicator readings are correct.
Well, some photos and a wiring diagram for all this. Perhaps it will be useful.
The white wire and the white and black wire go to the indicator light bulb (I connected it like this - white and black - to ground, and the white wire - to the dimensions on the dragonfly. It turns out that the light is turned on - the indicator lights up)
Green - to the temperature sensor, which is located on the engine (located on the left side behind the pump closer to the cabin)
Orange to any positive from the ignition switch (do not throw directly on the battery, otherwise it will work constantly, regardless of whether the ignition is on). You shouldn’t connect it to the white wire either - as soon as you turn on the dimensions, it will lie (mine constantly showed a temperature of 120 degrees)
I also installed the original expansion tank, instead of the VAZ garbage.
The coolant temperature sensor (CTS) is an important element of the engine management system that monitors the coolant temperature in the cooling system. The engine control unit receives information from the DTOZH and, in accordance with it, adjusts the composition of the fuel-air mixture, crankshaft speed, and ignition timing.
Design and principle of operation of the coolant temperature sensor
The “progenitor” of the modern coolant temperature sensor was a thermal relay
, which was installed on some engines (for example, in the K-Jetronic distributed injection system). The thermal relay contact is open - the engine is warming up, the contact is closed - the engine is operating at its normal temperature.
Currently, the basis of the coolant temperature sensor is a thermistor
(a resistor that measures resistance depending on temperature). The coolant temperature is monitored continuously. The material used to make a thermistor is usually nickel or cobalt oxide. The peculiarity of these compounds is that as the temperature increases, the number of free electrons increases and, accordingly, the resistance decreases.
Most often, the thermistor, which is located inside the DTOZH, has a negative temperature coefficient
. The sensor has maximum resistance when the engine is cold. A voltage (5V) is applied to the coolant temperature sensor, and as the resistance changes, it decreases. The engine control unit records voltage changes and, in accordance with it, determines the coolant temperature.
Brief overview of popular digital temperature sensors
The choice of temperature sensor must be made taking into account a number of parameters. We are talking not only about metrological characteristics - temperature range, accuracy, bit depth. Very often, when searching for the optimal sensor, the first place is given to such qualities as consumption level, dimensions, ease of connection, the possibility of parallel operation of several sensors in a network configuration, and so on. All this leads to the fact that there is no “ideal” sensor suitable for all situations, and developers have to look for compromise options.
Nowadays, temperature sensors that work with one- or two-wire bus interfaces are popular among developers: 1-wire, I²C, SMAART, and so on. This allows the use of microcontrollers with a small number of pins to simultaneously work with many sensors. Let's look at the advantages and features of some popular sensors (Table 2).
Table 2. Characteristics of popular temperature sensors
| Parameter | DS18B20 | STLM75 | TMP107 | LMT01 |
| Manufacturer | Maxim Integrated | STMicroelectronics | Texas Instruments | Texas Instruments |
| Range of measured temperatures, °C | -55…125 | -55…125 | -55…125 | -50…150 |
| Resolution, bit | 9/10/11/12 | 9 | 14 | 12 |
| Accuracy, °С | ±0,5…±2 | ±0,5…±2 | ±0,4…±0,7 | ±0,5…±0,6875 |
| Measurement time, ms | 93,75…750 | 150 | 18 | 54 |
| Supply voltage | 3…5.5 V | 2.7…5.5 V | 1.7…5.5 V | 2…5.5 V |
| Current consumption (active state), µA | 1500 | 150 | 400 | 125 |
| Current consumption (standby mode), µA | 1 | 1 | 10 | 34 |
| Interface | 1-Wire | I²C/SMBus | USART/SMAART | Single wire with current output |
| Frame | SOIC8, uSOP8, TO-92 | SOIC8, TSSOP8, | SOIC8 | TO-92 |
DS18B20 is a popular temperature sensor that operates in the range -55...125°C. Its main advantages are availability, low cost, programmable measurement depth of 9/10/11/12 bits, the ability to connect multiple sensors to a common two-wire 1-Wire bus, low consumption in sleep mode up to 1 µA. At the same time, this sensor also has disadvantages, including a fairly high consumption in active mode up to 1.5 mA, low performance with a high measurement depth, and a relatively narrow range of operating voltages from 3 V.
STLM75 is a temperature sensor that also works with a range of -55...125°C. Compared to the DS18B20, this sensor boasts ultra-low consumption in both active and sleep modes (150 µA and 1 µA, respectively), as well as operation with supply voltages of 2.7 ... 5.5 V. I²C- is used for communication with STLM75 bus with the ability to simultaneously connect up to nine devices. The disadvantage of the sensor is its low resolution - only 9 bits.
TMP107 manufactured by Texas Instruments has the maximum bit depth among the sensors under consideration - 14 bits, excellent accuracy - ±0.4...±0.7 ° C, minimum conversion time - 18 ms. A special feature of the sensor is the SMAART interface, with which you can connect up to 32 sensors to a 3-wire bus. However, the consumption level of TMP107 is quite high both in active mode (up to 400 μA) and in sleep mode (10 μA). and to work with it you will need one external buffer with three states, for example, SN74LVC1G125. As a result, the measurement unit will take up more space on the board.
LMT01 is similar in ideology to the DS18B20 sensor, but surpasses it in a number of parameters: a wider range of operating voltages (2...5.5 V), lower consumption and conversion time (54 ms). The output capacity of the sensor is 12 bits. LMT01 is distinguished by the widest operating temperature range of -50...150°C, and maximum accuracy - ±0.5...±0.6875°C. Unlike TMP107, this sensor in the simplest case requires a single external resistor for connection, since it works with a current interface.
Where is the coolant temperature sensor located?
The thermistor is located inside a protective heat-conducting housing, and on the housing itself there is a thread for attaching the sensor, as well as an electrical connector. Typically, the DTOZH is screwed into the exhaust pipe of the cylinder head. Some engines have two sensors at once: one records the temperature at the engine outlet, the second - from the radiator.
The coolant temperature sensor is positioned so that its tip has direct contact with the coolant. Accordingly, if there is little antifreeze in the system, then the DTO indicators may be inaccurate.
Signs of DTOZH malfunction
Like any other sensor, the DTOZH can fail, causing engine malfunctions. The first signs by which you can recognize a breakdown of the coolant temperature sensor:
- problems starting the engine in cold weather,
- bad exhaust on a cold engine,
- increased fuel consumption, etc.
Most often, if such symptoms occur, replacing the coolant temperature sensor is not necessary.
. Most likely, the problem is a loose or damaged contact, damaged wiring, or a coolant leak. Therefore, first you should conduct a visual inspection of the sensor for damage or corrosion.
Checking the coolant temperature sensor
If the inspection does not produce results, it is necessary to measure the resistance and voltage of the sensor at different temperatures
. After starting a cold engine, as it warms up, the resistance should drop (or increase in the case of a positive temperature coefficient of the sensor) in accordance with normal values.
You can check the coolant temperature sensor yourself
Normal resistance and voltage readings for a NTC coolant temperature sensor
| Coolant temperature (°C) | Resistance (Ohm) | Voltage (V) |
| 4800 – 6600 | 4,00 – 4,50 | |
| 10 | 4000 | 3,75-4,00 |
| 20 | 2200 – 2800 | 3,00 – 3,50 |
| 30 | 1300 | 3,25 |
| 40 | 1000-1200 | 2,50 – 3,00 |
| 50 | 1000 | 2,5 |
| 60 | 800 | 2,00-2,50 |
| 80 | 270 – 380 | 1,00-1,30 |
| 110 | 0,5 | |
| open circuit | 5,0 ±0,1 | |
| short circuit to ground |
Normal resistance and voltage indicators for DTOZh with a positive temperature coefficient
AutoOt.ru » Car repair » Where is the coolant temperature sensor located?
How to check the coolant temperature sensor?
In order to check the device, it must first be removed.
Dismantling is very simple:
- As a rule, the sensor is located on the cylinder head pipe and in order to remove it, you first need to remove the air filter;
- then the negative cable is removed from the battery;
- coolant is drained from the radiator;
- the wiring is disconnected from the device;
- using a suitable wrench (most often 19–21), the tightening is loosened, after which the sensor can be easily dismantled.
After the sensor has been removed, it is placed in a container with coolant and it is gradually heated. The process is accompanied by constant monitoring of the temperature and the readings of an ohmmeter, which is connected to the sensor.
There is a special table corresponding to the coolant temperature and ohmmeter readings.
| Temperature, °C | Resistance, Ohm | Voltage, V |
| 4800 — 6600 | 4,00 — 4,50 | |
| 10 | 4000 | 3,75-4,00 |
| 20 | 2200 — 2800 | 3,00 — 3,50 |
| 30 | 1300 | 3,25 |
| 40 | 1000-1200 | 2,50 — 3,00 |
| 50 | 1000 | 2,50 |
| 60 | 800 | 2,00-2,50 |
| 80 | 270 — 380 | 1,00-1,30 |
| 110 | 0,50 | |
| open circuit | 5,0 + 0,1 | |
| short circuit to ground |
When the readings from your device do not agree with the data from the table, the sensor must be replaced, since it can no longer be repaired.
If it turns out that the sensor is in working order, the fault needs to be looked for further. There may be some problem with the thermostat.
You can see an example of how to check the coolant temperature sensor by watching this video:
conclusions
The Dallas DS18B20 chip is a very interesting device. Temperature sensors and thermometers created on its basis have characteristics acceptable for most tasks, well-developed functionality, and are relatively inexpensive. The DS18B20 sensor has gained particular popularity as a waterproof device for measuring the temperature of liquids.
Additional capabilities come at the price of relative complexity in working with the sensor. To connect the DS18B20 we will definitely need a resistor with a value of about 5K. To work with the sensor in Arduino sketches, you need to install an additional library and gain certain skills to work with it - everything is not entirely trivial. However, you can buy a ready-made module, and in most cases the simple examples given in this article will suffice for a sketch.
Signs of DTOZH malfunction
The liquid cooling sensor, like any other sensor, can have malfunctions that will someday lead to engine malfunctions.
The main signs that indicate a device failure:
- increased fuel consumption;
- poor exhaust when the engine is cold;
- Problems starting the engine in cold weather.
As a rule, if such problems occur, replacement of the sensor is not required. The problem may have arisen due to a loose or damaged contact, a wiring problem, or a leak of cooling fluid.
Sometimes a cold engine stalls and stalls, and its idle speed jumps from minimum to maximum values per minute, and after a few minutes or after a restart the situation is corrected.
This problem can occur due to a breakdown of the cooling fluid temperature sensor.
You can check the condition of the device using an ohmmeter. There is no need to unscrew it. It is not its resistance that is checked, but the mass sensor.
When the sensor is in order, the resistance tends to infinity, but if it is broken, then the resistance is 10 kOhm or less.
Purpose of the device
DTOZH should not be confused with an antifreeze level controller. If the first is intended to detect the temperature of the power unit, then the second is used to control the volume of consumables - refrigerant. Based on the DTOZH readings, the control unit detects temperature changes and transmits data to the on-board computer about the state in which the engine is operating. Using the controller, engine warm-up, overheating, and the optimal temperature of the operating internal combustion engine are determined. Pulses transmitted to the control module determine the functionality of the internal combustion engine control system as a whole.
The engine temperature determines the following nuances:
- fuel consumption per 100 km;
- volume and quality of gases;
- ignition of the air-fuel mixture;
- optimal operation of the gearbox.
All these factors are controlled by a control device, which, based on the information received, determines the optimal operating mode of the engine. Therefore, the performance of the temperature sensor is important for the vehicle. If the device is faulty and sends incorrect pulses to the control module, this can lead to problems.
How does DTOZh affect the operation of the internal combustion engine?
Based on the parameters supplied to the control device, the module performs the following functions:
- Enrichment of the air-fuel mixture or its depletion. If the controller detects that the temperature is too low, it will begin to increase the duration of the signal sent to the injectors, which helps to enrich the fuel mixture. In accordance with the normalization of the temperature regime, the fuel is gradually depleted, which prevents possible excessive consumption of gasoline and reduces the volume of exhaust gases. If the sensor breaks down, it can regularly lower the temperature in the engine, which will lead to fuel contamination and increased consumption.
- The control unit sets the ignition. It can be early or late. If the temperature increases, the control module adjusts the ignition timing to reduce exhaust toxicity.
- Thanks to DTOZH, proper recirculation of gases is performed during warming up. The recirculation valve closes tightly when the power unit warms up. If the car’s engine is still cold, then recirculation will cause fluctuations in idle speed and random engine stops.
- With the help of DTOZH, the control unit purges the filtration system, which traps fuel vapors. To achieve better machine controllability, the carbon filter element is not purged until the engine is completely warmed up.
- Locking of the gearbox torque converter when the internal combustion engine warms up. The control module should not limit the operation of the device until the machine warms up.
- The ECU controls the operation of the unit's cooling fan. Based on the temperature controller readings, the module activates and deactivates the ventilation device to correctly select the temperature of the unit. If the DTOZ gives incorrect impulses, there is a possibility of the motor overheating.
We recommend: Fuses and relays in Lada Priora: electrical faults
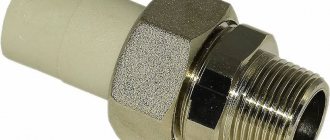
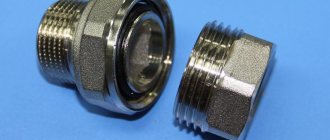
How to connect the coolant temperature sensor?
The sensor is installed very easily: it is screwed into the mounting socket, after which the thread is tightened and the wiring is connected, the air filter is put in place and the main air flow sensor power supply block is connected.
It is strictly forbidden to use sealant in this case. When the engine is running, the cooling system and metal elements become very hot, and the sealant may melt.
If this happens, the sealant will get into the antifreeze and the cooling system may fail.
Coolant temperature sensor connection diagram:
Replacing DTOZH, video:
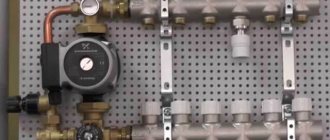
The design of the cooling system on the VAZ-2114
Coolant temperature sensor location
Before proceeding directly to the replacement process, it is necessary to understand the design of the cooling system and the location of the sensor in the main power unit:
Everything here is trivial
1 – element in the form of a plug for the expansion tank; 2 – expansion tank; 3 – hose for draining liquid from the pipe; 4 – hose passing between the radiator and the expansion tank; 5 – hose leading from the radiator; 6 – tank to the left of the radiator; 7 – aluminum tube; 8 – plug systems; 9 – tank to the right of the radiator; 10 – drain plug; 11 – middle of the radiator; 12 – casing for electric fan; 13 – plastic wings of the electric fan; 14 – electric motor; 15 – toothed pump pulley; 16 – pump impeller; 17 – camshaft drive belt; 18 – engine block; 19 – pump pipe; 20 – radiator hose with supply function; 21 – heater radiator hose with drain function; 22 – hose supplying coolant to the throttle pipe; 23 – exhaust pipe; 24 – hose for refilling; 25 – heater radiator hose with supply function; 26 – thermostat; 27 – coolant temperature sensor; 28 – coolant level indicator sensor.
The process of replacing the sensor (DTOZH)
As mentioned earlier, the replacement process is too simple and will only take 10-15 minutes.
Therefore, as practice shows, motorists carry out the operation with their own hands. So, let's look at the sequence of actions aimed at replacing the coolant sensor:
- Remove the terminal from the battery.
We dismantle the battery terminal
- Unscrew and remove the air filter. This is necessary in order to ensure maximum access to the sensor.
In order to get to the sensor you need to remove the air filter
- Disconnect the wires that power the element.
Disconnect the sensor power supply connectorCoolant temperature sensor with removed chip
- Using a 19 key, we dismantle the product.
Dismantling of DTOZHUsing a 19mm wrench, unscrew the sensor.
- Assembly proceeds in reverse order.
We recommend: How to replace a VAZ-2114 pump with your own hands
Product selection
The choice of product should be approached carefully, since its quality will directly depend on its service life, as well as engine operating modes. So, let's consider all the options for purchasing a coolant temperature sensor for the VAZ-2114.
Original
Original view of the coolant sensor produced by AvtoVAZ
2101-3808600 – original catalog number of the part, which is installed on almost all cars of the Lada family. This product is produced at the AvtoVAZ plant. The cost is 300 rubles. Installed in a standard mounting location and does not require modifications.
Analogs
In addition to the original part, there are a number of analogues that can be installed on a car. Some of them are much better quality than the original.
It was not the original sensor
So, let's consider all the analogue options for the coolant temperature sensor:
| Manufacturer's name | Catalog number | Cost, in rubles |
| Fenox | TSN22101 | 210 |
| LUZAR | LS 0101 | 240 |
| Fenox | TSN22101O7 | 240 |
| Vernet | 2509 | 250 |
| Patron | PE13059 | 300 |
| Intermotor | 52400 | 300 |
| Era | 330082 | 350 |
| Facet | 7.3000 | 350 |
| Eps | 1.830.000 | 400 |
| KW | 530.000 | 550 |
| H+B Elparts | 70511515 | 600 |
| Cargo | 180804 | 700 |
| Hella | 6PT 009 107-151 | 750 |
Coolant sensor made by Hella
Consequences of untimely sensor replacement
Not many car enthusiasts know that a malfunction of the coolant temperature sensor affects the operation of the engine as a whole. Let's consider the main consequences of a malfunction of this unit for a car:
- Incorrect operation of the electronic engine control unit . Thus, the sensor does not provide reliable data to the ECU, which in hot weather may not turn on the cooling fan in time. So, in turn, the consequence will be that the car will boil. This can lead to the fact that in the worst case, it can cause deformation and sagging of the head.
- Due to incorrect operation of the sensor, the following functions may be impaired: engine performance, driving dynamics, thermostat operation .
- Other consequences to which the sensor is indirectly linked.
Checking the coolant level
Many car owners often check the coolant level visually without using special instruments. You just need to look at the expansion tank.
If the engine is cold, the coolant should be between the maximum and minimum marks on the reservoir. When the engine is warm, the level of the substance may increase slightly.
If your car is in full working order, then when the antifreeze level decreases, the sensor immediately lets you know about it. The driver sees a special signal on the dashboard and adds antifreeze or coolant.
It is also contraindicated to add water alone. After all, antifreeze has special properties that protect cylinder heads from corrosion.
If checking the coolant temperature sensor does not show the coolant temperature. In this case, you better contact technical service.
In any car, everything is interconnected. The car system could fail for some related reason. For example, you could remove some part located with the sensor and place it incorrectly.
But it also happens that the problem is related specifically to the temperature sensor. The coolant level may be inconsistent or there may be a problem with the coolant level sensor.
The service can replace the sensor, and they provide a guarantee for its high-quality replacement and the correct assembly of all parts in the right places.
Thus, the coolant temperature sensor is a very important component of your car, which requires constant attention and care.
If repair of this device is necessary, then do it efficiently, without regretting the money spent. After repair, the engine will run smoothly, this will be especially noticeable at low speeds.
>