Design features of a classic stove
Typically, the dimensions of a Russian stove with a stove bench were:
- width – at least 1.5 meters;
- length – more than 2 meters;
- the height of the fireplace is 0.45 meters.
The polati was set up at a height of approximately 1.8 meters, so the temperature at this level was the most comfortable. The foundation for the stove was laid out from stones and broken bricks, and it was not combined with the general foundation of the house.
In this case, both separate foundations were erected simultaneously. Currently, the foundation for a Russian stove with a stove bench is made of concrete, brick or reinforced concrete.
Previously, stoves were made of baked bricks, and chimneys were built of wood, then they were replaced with brick and stone. To make it convenient to prepare food, the box was raised about a meter. The oven was used to store household utensils. It was covered with boards, and under it an upper chamber called “under” was built.
In modern versions of the Russian stove with a deckchair, they also often equip the oven and under, which is subjected to heavy loads and therefore it is laid out as carefully as possible. A special brick is used for it. After completing the masonry, the surface of the hearth should be sanded until it is completely smooth.
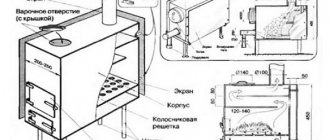
Below the hearth there was a pole for pots. Now a hob is being installed instead. A cross-pipe is placed above the pole. To adjust the draft, a damper is installed, and a view is installed to block the pipe.
A step-by-step guide to building a Russian stove
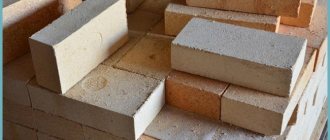
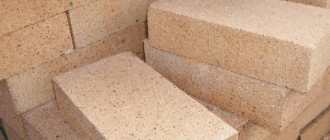
1) We use refractory fireclay bricks. To achieve correct ligation (brick seams), we cut each brick by ¾ and install three such bricks in the corners of the masonry so that they exactly adjoin each other.
2) We are building the walls of the future guardianship.
3) In this row we use four ¾ bricks.
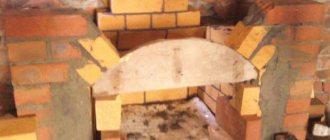
4) We build row number 4 from solid bricks. We break off the corners of those bricks that will be located at the base of the oven. These bricks will become the supports (heels) of the arch. We install a wooden form for laying the arch, then we lay the arch. We bevel the bricks, for accuracy using a thread stretched from the center of the formwork to the upper edge of the brick.
5) In this row, 20 bricks need to be beveled at an angle. This angle is necessary for the construction of the arch of the oven.
6) We make the walls on the sides one brick thick. We lay out the front and rear walls in two layers thick. We insert wooden semicircular formwork between the side walls. Using this form we lay out the roof of the oven. In the future, the formwork will need to be removed, so it must be collapsible.
Let's start laying the vault. We make the gaps between the bricks the same and fill them with mortar. For strength, you can insert a small piece of brick into the gaps.
7-8) We carry out construction, strictly observing dressing. We use plumb lines to check the verticality of the edges. In the eighth row we make the base for the cold stove.
9) We build a stove, a row of solid fireclay, on the corners of 1/2 and 3/4 parts.
10) We line up a row, pour a layer of fine sand between the walls.
11) We make a continuous masonry-slab on top of the sand backfill.
12) We are building for stoves and hearths. The fireclays that form under the stoves do not need to be fastened with cement. We fill the space (cracks) between them with sand. In the left corner of the hearth we make a furnace - a recess for hot coals.
13) We build the walls of the cooking chamber and the walls of the hearth. For the mouth of the furnace, we install a metal perforated arc between the furnace and the hearth. We insert a ductile iron or copper wire into the perforation, which is then embedded in the mortar between the brickwork.
14-16) We build rows of crucible and hearth.
17) We lay the supports for the roof of the furnace - 8 beveled fireclays. We strengthen wooden formwork on them. We lay out an arch of ½ bricks.
18) We build an arch.
19-22) Lay out continuous rows (we are building a roof on which the bed
). In front of 22, we fill up the sand next to it. We leave an open opening above the pole.
23) We build up the walls. We make a hole on the right for easy cleaning of the stove from ash.
24-26) We close the over-pipe. We leave an opening for the chimney and views.
27-28) Install the half-door opposite the view.
29-30) We are still building the walls of the overpipe.
31) We make a number of additional bricks (3 pcs).
32) We overlap the overpipe and attach the valve to the right.
33) We are building a chimney. All rows are the same, six bricks each. We make a brick overlap near the ceiling.
After construction, we let the stove dry, check the draft and carry out external finishing.
Reasons for the popularity of modern Russian stoves with a stove bench
Russian stoves with a stove bench have many advantages, including:
- High efficiency. The bricks from which structures are built are capable of accumulating heat and gradually releasing it. Thanks to this property, the room remains warm for a long time even when the stove is not heated.
- If the heating structure is laid out correctly, it is completely fireproof and can be used for 30 years or more.
- When the location of the unit is calculated accurately, it is possible to provide high-quality heating of a house consisting of several living rooms with minimal fuel consumption.
- When installing a multifunctional stove, it will not only be a source of heat, but will also become a place for preparing hot food, drying wet laundry, and heating water. This type of heating structure is believed to have a therapeutic effect.
Advantages of a stove bench
Before the advent of modern medicine, our ancestors were treated with decoctions, steaming in a bathhouse and lying on the stove. The latter was always at hand and at my back during non-working hours. A few nights in a warm building, and not only the cold went away, but also severe pain in the joints.
Sometimes more serious ailments receded. But it’s not just about the healing properties. Lying on a heated bed is very pleasant. It’s not for nothing that the hero from the fairy tale stubbornly refused to get off the stove. Therefore, the popularity of classic “heating equipment” is returning.
You can order the oven from a specialist, or you can make it yourself. To learn how to make a bell-type stove, follow the link.
Disadvantages of stoves
In addition to its advantages, a Russian stove with a stove bench and a stove also has disadvantages, like all solid fuel units:
- To store firewood you need to equip a special place.
- During operation, debris from coal or logs is collected.
- Heating the house turns out to be uneconomical. Even with the improved changes, fuel consumption is high.
- Laying a Russian stove with a stove bench and stove is possible only if the contractor has the appropriate knowledge and skills. It is advisable to entrust this work to an experienced stove-maker, whose services are expensive, which means that there will be additional costs.
How to build a Russian stove yourself
Classic stoves had dimensions of approximately 2000x3000 mm. Modern designs are considered dimensional if they reach a size of 1500x2300 mm. Small structures include structures with a length and width of up to 1800 mm.
There are several types of similar designs. But they all consist of a number of common elements:
- heating stove;
- bed;
- oven;
- hob;
- ash pit.
There may also be a place for utensils and a woodshed. To build a structure, you need to have an ordering diagram. The article discusses in detail the order of masonry. But first you need to take care of the base.
Work process for constructing a furnace
Foundation structure
The total weight of the structure will be several tons. Such a mass requires the creation of a solid foundation. The base area should be approximately 10-15% larger than the stove base.
The depth of the pit for filling is determined at the rate of 50 mm for every 1000 kg of weight. In our case, we will need an impressive pit.
Remember! The minimum distance of brickwork from the wall is 15 cm
Having retreated the required distance from the wall, they dig a hole, the bottom of which is covered with sand and rubble. Bulk materials are thoroughly compacted. The main depth of the pit is reinforced with steel and filled with concrete. The top of the foundation should be several centimeters below the floor level.
The foundation is allowed to stand for about a month. Cement-sand mixtures crystallize within 4 weeks. The minimum curing period for concrete is 2 weeks. But it’s better not to rush things.
After the composition has completely set, the base is waterproofed. This builds protection against possible penetration of groundwater into the thickness of the furnace. Now you can start laying.
The procedure for laying a stove with a comfortable bench
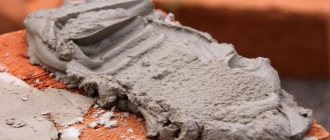
To build a stove structure, heat-resistant fireclay and/or red bricks, clay and metal fittings (doors, valves) are used.
Order of the stove masonry
When laying a stove with a comfortable bench, you must follow the order. It will not be easy for a non-specialist to understand the jungle of the diagram, so each row is illustrated separately.
Recommendation! If you do not have a professional background as a stove-maker or bricklayer, use the level more often. Achieve strict horizontal and vertical masonry.
- Lay out the first row. This is the most critical stage, on which the quality of the rest of the masonry depends.
- It works the same way.
- The blower door is mounted on this row. It must be taken into account that when heated, metal fittings will increase in volume. Therefore, it is necessary to install the door, avoiding touching it end to end. Typically, strips of asbestos are placed between the stove dampers and the masonry to compensate for expansion.
- Here the schematic laying continues in the same vein as in the previous row. The brick turns out to be “flush” with the fittings.
- Here they start laying the firebox. For this reason, the chamber is reinforced with a lining - it can be seen in the illustration by its different shade. The channel arrangement starts. Install 3 doors for cleaning chambers. The blower damper is completely covered with brick.
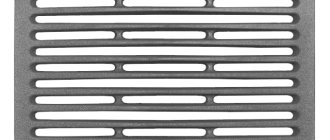
- The row duplicates the previous one. The fittings are completely covered with fire-resistant ceramics. The grate is also placed here. Be sure to monitor the brick dressing.
- Arrange caps (vertical channels). The firebox is reinforced with heat-resistant material. Install the firebox door.
- The installation of caps and linings continues. Lifting and lowering “passages” are formed.
- The row duplicates the previous one.
- The row duplicates the previous ones. The caps are already almost 100% laid out here. The lining layer is still being formed.
- The firebox damper is completely covered with masonry. 4 suction channels are installed. The first is carried out from the firebox - into the lifting one, a pair - between the caps. Since the formation of the boundary between the firebox chamber and the chimney (hail) begins here, the fourth channel is made from it - into the side hood.
- In general, the 11th row is being duplicated. The caps are already completely done. Other elements in the process of formation. The lining at this stage tapers into a dome-shaped structure.
- Fireproof reinforcement of the firebox is completed. The firebox and caps are also completed.
- The formation of the overlap continues. At this stage, it is especially important to control the vertical and horizontal, while not forgetting to correctly tie the masonry.
- The formation of the channel continues, which is clearly visible in the illustration. One of the features of this wood-burning structure is the presence of an original side designed for filling with sand. This is not necessary, but warm sand increases the healing properties of the bed. Installing the side does not require much effort, so it is recommended not to abandon it - it will most likely come in handy during the operation of the stove.
- From this to the twentieth rows form a smoke exhaust channel and a protective wall. Despite the lightness of the “extension”, you should carefully monitor the quality of the dressing.
- The next step is to install the stove damper on the smoke exhaust duct.
- This row ends the laying of the protective wall. The chimney damper is completely closed.
- The chimney is laid out from this row to the end. After this, the stove is ready. Despite the intricacy of the design, such a stove with a stove bench can be made with your own hands even by a person far from the stove business.
Recommendation! However, despite the step-by-step instructions, it is better to consult a professional. An experienced stove maker will be able to take into account the individual characteristics of the house and advise on the optimal layout of the structure.
Another ordering option
We will not dwell on this option in detail. From the previous diagram it is easy to understand what each element in the illustration represents.
Figure 5. Layout diagram of another furnace option
This model is one of the simplest. However, it is effective and efficient. Unlike more complex structures, the execution of this one can also be entrusted to even a relatively unprepared homeowner.
Figure 6. Alternative design with a bed
Damper design
The design of the damper is shown in the figure below, where 1 is a sheet of roofing steel, 2 is a handle made of strip steel, 3 is legs made of strip steel to stabilize the damper, 4 is a frame made of angle steel 25x25x3 mm.
It is recommended to make a frame from strip or angle steel and insert it into the masonry of the mouth and then fasten it. In this case, it will serve as formwork when making the arch.
1 – roofing steel sheet; 2 – handle made of strip steel; 3 – legs made of strip steel for stability of the damper; 4 – frame made of angle steel.
Variety of designs
A classic oven has an oven, and the lower part does not heat up. Polati, also called a couch, are intended for resting people, drying clothes and fruit. If you make them two-tiered, then the whole family can fit on them, for example, children can lie on the upper tier, and adults on the lower tier.
Water procedures are also performed on the beds, and to wash, water is heated in a vat. The heating unit is erected separately or in combination with other devices.
Advantages and disadvantages of the oven
Among the positive qualities of the heating device, the following is noted:
- Cheap design . To build the unit, you will need a minimum of materials: red brick, clay and sand.
- Economical . The efficiency of the simplest device exceeds 60%, and the efficiency of a more complex design is more than 80%.
- equally well on various types of solid fuel .
- Functionality (cooking, heating, warm sleeping place).
- The long operating time of the stove allows it to be heated once a day.
- Has therapeutic properties. Food is cooked in it without coming into direct contact with fire and superheated gases. At the same time, the optimal temperature for cooking is maintained. Thanks to these features, carcinogens and toxins are not formed in food. As for relaxing on a bed, six hours of sleep is enough to feel alert and collected in the morning.
- Safety of use . The flame burns deep in the furnace. Sparks can only appear in severe frost.
- Durability . Service life exceeds 30 years.
- Room interior with a Russian stove it is original, unlike any other.
Modifications of a Russian stove with a stove bench and stove
Currently, stoves are equipped with cooking surfaces made of cast iron, and they are heated in the lower part. If there is a couch, their sizes vary greatly, but most often it is 1.5x1.75 meters or 1.5x2.3 meters. There are stoves with a fireplace, oven or other additional elements.
The most common:
- Ovens with a hob built into the location of the hearth, which in the classic model was made blind.
- Units with a trestle bed. It is placed next to the stove to increase the size of the bed.
- Designs of a Russian stove with a fireplace located in the adjacent room. In this case, there will be no need for a separate foundation and smoke exhaust system, and the parameters of the unit increase, although not by much.
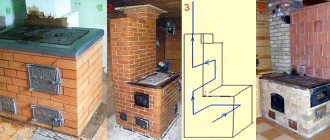
Furnace finishing
In the process of finishing the structure, you can use any materials. The most common options are:
- whitewash;
Stove with whitewash and stucco
Whitewashed stove with stove
- decorative rock;
Stove trimmed with decorative stone
Finishing a stove with large gypsum stone
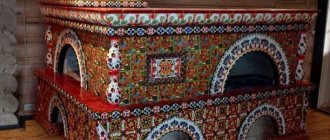
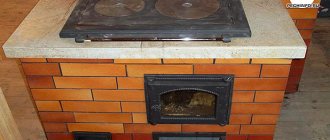
- tile;
Swede tiled
- combination of different materials.
Swede made of combined materials
If you are making a stove from new beautiful brick, then you can leave everything like that.
Swedish brick
Swede with dark brick
Stove with oven
Swede with light brick
Swede in a residential building
Home heating options
The choice of heating method depends on the layout of the building - side or bottom. The first option is the best solution for houses with several rooms, since the adjacent room is heated using a side heating panel. The second method is used to supply heat to one room, but having a larger area.
The walls of the sub-floor space are heated from below. Currently, in order to increase efficiency, designs are equipped with a bell-type combustion, which makes it possible to ensure uniform heating and stable draft. In such units, fuel burns completely and less soot accumulates in them.