Types of installation - snail, snake and combined method
There are several basic layouts for laying the heating element:
- “Snake” - laying is done parallel to a long or short wall, in increments of 20 - 30 cm. When turning a cable or pipe, it is not recommended to make sharp corners. You need to start laying out the product from the collector or thermostat, and return to them. The level of heat transfer from this scheme is not high, so this technique is recommended for small rooms.
- “Snail” is a spiral arrangement of the heater. The scheme is economical and effective. Installation of pipes or cables should begin from the edge, moving to the center.
- Combined option - can combine both schemes. For example: there is a “snake” around the edges, and in .
Basic methods of pipe installation
There are only two methods of laying pipes for arranging a heated floor - flooring and concrete. In the first method, ready-made materials are used for the base: polystyrene insulation and modular or slatted panels. There are no wet jobs that require a long drying time, so installation is quick.
When using the second option, the heating network is walled up with a screed. Depending on the thickness of the concrete, the time it takes for it to dry completely is calculated. It will take 28 days to harden and only after that is it possible to install the selected floor covering. This is the most labor-intensive and financially expensive method.
#1: Laying on profile thermal insulation boards
Arranging a warm floor system using this method is the simplest. Polystyrene insulation mats are used as the basis here.
The standard parameters of such slabs are 30*100*3 cm. They have grooves and low posts on which the finishing material is laid.
In this case, pouring a concrete screed is not necessary. If tiles or linoleum are used for flooring, gypsum fiber sheets will initially be laid on the base. The thickness of such plates should be at least 2 cm.
#2: Device using modular and rack panels
In most cases, such panels are used in houses built from wood. Fastening of pipes for arranging a heated floor is carried out on a rough foundation.
The modular system is equipped with chipboard panels 2.2 cm thick, on which the heating lines are laid. These modules are equipped with channels to accommodate aluminum fixing plates. With this installation method, the insulation layer will be located in the wooden floor.
All strips are placed with a distance of 2 cm. Based on the applied pitch between the pipes, strips of the appropriate length (15–30 cm) and width (13–28 cm) are used.
To reduce heat loss, pipe latches are installed on the plates. If linoleum was chosen for the final floor covering, one layer of gypsum fiber boards is laid on the pipes; if laminate or parquet boards are used, they are dispensed with.
The slatted flooring system is almost identical to the modular one, however, it does not use panels, but strips, the minimum width of which is 2.8 cm.
Laying is done directly on the logs in increments of 40-60 cm, and the distance between the slats is at least 2 cm. For thermal insulation, extruded polystyrene foam or fibrous mineral wool is chosen.
Both methods are more suitable for wooden floors. In other cases, a more complex option with a concrete screed is chosen.
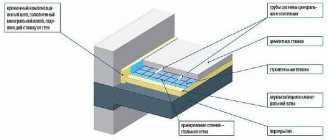
#3: Installation of pipeline with screed
Despite the labor-intensive process, installation of a heating network with a concrete screed is the most popular.
The process consists of the following steps:
- First of all, the base is prepared. Irregularities in the subfloor are eliminated using a hammer drill.
- The first layer is waterproofing material. It is spread in strips so that the edges overlap each other by 20–30 cm. The film should also extend to the base of the walls by 15 cm. The joints are glued with construction tape.
- Thermal insulation is laid over it.
- A damper tape is glued between the future fill and the walls. This action is required to compensate for the expansion of the screed when the floors are heated.
- Laying reinforcing mesh. It helps to increase the strength of the screed.
- Pipes are attached to the fittings according to the chosen pattern using plastic ties.
- A control check of the heated floor system is carried out by filling it with liquid and pressing it.
- Next, the guide beacons are installed.
- The final stage is pouring the cement screed.
For rooms with a large area, the sector division method should be used, with cells no more than 30 m2. For each of them it is necessary to arrange an individual circuit.
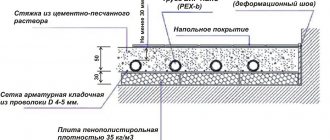
If the lower floor is heated, then polystyrene foam with a thickness of 20–50 mm is used as insulation. When there is an unheated basement floor or basement below, the thickness of the thermal insulation should be 50-100 mm. Pouring heated floors with a concrete-sand mixture can be done with or without a reinforcing mesh.
If polystyrene foam boards with connectors for the contours act as insulation, the use of a mesh is not necessary.
When standard thermal insulation material is used, a thin polymer or metal mesh is used to fix the heat-conducting line.
On our website there is a series of articles devoted to the design, installation and connection of water heated floors.
Which type of styling is better, advantages and disadvantages
Each type of installation has its own positive and negative sides, and is recommended for different models of heated floors.
If we consider the “snake” option, it has many turns, so when used in water heating systems, a difference in the heating level at the inlet and outlet is possible. In addition, as the coolant moves through the pipes, it loses its degree - the further it is from the heat source, the colder the surface will be.
The "Snail" scheme is more productive. Heating is uniform, as hot zones alternate with cool ones.
The process of heat loss is minimized, but it is more difficult to install the heating element using this method. In addition, with this installation there are no sharp turns of the heater, that is, the cable or pipeline does not bend, so the distance between the branches can be made smaller.
The combined scheme is suitable when it is necessary to zoning a room. For example, use a “snake” at the entrance, and a hotter “snail” in the middle of the room.
Pipe laying length
When laying out the pipe, the length of the contour itself is important. If you make a spiral or snake that is too long, the pump simply will not be able to push through the circuit.
Therefore, it is important to follow two rules:
- The length of one circuit should not exceed 80-100 meters. That's right, not tough. That is, if you slightly exceed the length, this does not mean that everything will become bad. It's just better not to do this again.
- It is advisable to make all contours similar in length
To calculate the length, follow the following table:
| Pipe diameter (mm) | Pipe material | Allowable length (meter) |
| 16 | metal-plastic | 80 ÷ 100 |
| 18 | cross-linked polyethylene | 80 ÷ 120 |
| 20 | metal-plastic | 120 ÷ 150 |
eurosantehnik.ru
Installation of heated floors according to the “snail” pattern
Any heated floor must be laid in accordance with the instructions, as well as all installation requirements, otherwise the heating system will not function effectively.
Regardless of the chosen scheme, the heating element can only be laid out on a flat base covered with hydro- and heat-insulating material. This is required so that the heat does not go down, but is directed in the right direction.
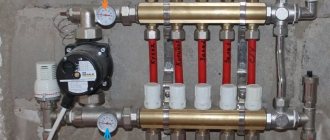
Snail and double snail layout diagram
The photo below shows the methods of laying the heater according to the “snail” and “double snail” schemes.
The first photo shows a diagram of a heated floor with a two-core cable that does not return to the connection point.
This photo shows a common version of the “double snail” layout of pipes for a warm water floor. Here the second end of the heater returns to the original point.
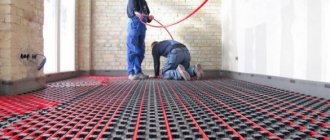
Laying a heated floor with a “snail”
Warm Floor Laying Schemes Lesson 3
After preparing the base, you can proceed to laying the heating element according to the “snail” pattern. It is also called “double snail”, since the supply and return run parallel to each other. In this way you can wind water heated floor pipes or single-core cables
The sequence of actions is as follows:
- We begin to lay the heater (pipeline or cable product) from the heat source. In cable systems, this is a thermostat; when installing hydrofloors, it is a collector; it is connected by pipes to the boiler. The manifold is equipped with valves for connecting hot and cold coolant.
- We lay the line around the entire perimeter of the room; it is recommended to make markings first - this will make the installation process easier.
- With a planned step between loops of 30 cm, the first loop should be made at a distance of 60 cm. The step between pipes or cables throughout the room should be the same.
- In the form of a spiral, we bring the pipeline to the center of the room, and a gradual reduction in the radius occurs.
- We fix the heater to the heat-insulating material or to the reinforced mesh using fasteners. When laying polystyrene foam mats with bosses (used as thermal insulation), the fastening process is simplified, since the heater is placed in grooves with fixation by bosses.
- In the center we turn the heating element 180 degrees, roll it between the laid line, exactly in the center. In this case, the diagram will be saved, since the step will be 30 cm.
- The pipes or single-core cable must return to the place from which they were brought out - the thermostat or manifold.
After testing the system for functionality, you can fill the screed and lay the finishing coating.
If a two-core cable is used when installing an electrical system, then the process of laying it can be done with a simple “snail”. The only difference is that the second end of the wire can be taken out to any place, and the cores can be short-circuited and insulated. There is no need to return the cable to its connection point.
Water heated floor. Water heated floor with snail connection to the comb, visual video.
Water heated floor system
A distinctive feature of heated floors is that they do not have external heating structures, and the system itself accumulates and radiates the resulting heat.
With proper heat distribution over the surface of the flooring, you can save 30% or more on coolant consumption.
To rationally use the floor heating system, let's consider additional ways to help save:
- The length of the liquid circuit does not exceed 70 m. When choosing the optimal pitch for laying pipes, the coolant is transported with virtually no losses.
- Mixing hot and cold flows. The use of return water makes it possible to waste less energy from the boiler.
- Drawing up a detailed layout of the circuit with precise calculation of the step. Preliminary distribution of furniture positions will allow you to save on consumables, and, accordingly, on the circuit itself.
- When the system reaches maximum temperature, reduce the temperature by 20 °C. This action will help save 13% of the coolant.
In order to get the best result, you must strictly adhere to the installation technology. The heating mechanism of such a system consists of several layers, each of them has its own function.
How to calculate the pitch and length of a pipeline
In order for the heating to work efficiently, the pitch and length of the circuit should be calculated before laying the pipes.
The laying step is the distance between the branches of the spread heating element (it is easy to calculate). If a warm water floor is additional heating, then the standard step is 0.2 or 0.3 meters.
When using tiles as a finishing material, the recommended step is 0.2 m, since heating it takes a long time. If linoleum or laminate is laid, then the step is 0.3 m, because this material does not like overheating.
When installing a cable floor, the cable power affects the pitch. For tiles you need a more powerful system, for linoleum less so.
To determine the length of the pipeline, the area of the heated room and the power of the device are taken into account. The average value is 10 W of power required to heat 1 m2 of area. The length of the pipeline can be calculated using the formula:
L = S / N * 1.1+k , where:
S is the area of the room;
N—laying step;
1.1 — pipe reserve for turns (10%);
k is the distance of the pipeline to the collector.
If the length of the pipeline is calculated incorrectly (the permissible size is exceeded), then the circulation of the coolant may be obstructed, which will lead to poor operation of the device.
How not to make a mistake with the length of the heated floor pipe
Typical errors of combined systems
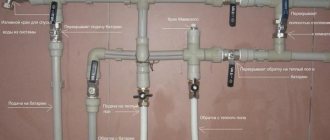
The desire to save money leads to various variations of the proposed schemes. In the process of simplification, sometimes important elements are excluded and the heating system ends up looking like this:
But it’s still wrong to do this because:
- In this scheme there is no decoupling (independence) of the two remaining pumps of boiler 1 and the heated floor circuit 3, because they are connected to the common points of the circuit A and B, between which there is a large hydraulic resistance. In contrast to the circuit with a hydraulic arrow, where there is very little resistance between points A and B (D and C) (that’s why it’s a hydraulic separator).
- In some situations (when all radiators are closed and the heated floor is running), the boiler pump and the underfloor heating pump work sequentially, interfering with each other. This leads to changes in the coolant flow through the boiler heat exchanger.
- In situations where both radiators and underfloor heating are operating, the underfloor heating pump 3, at certain positions of the mixing valve 2, reduces the pressure difference between points A and B and thereby reduces the coolant circulation through the radiator circuit.
- And if boiler 1 stops, underfloor heating pump 3 still drives coolant through the boiler and through the radiator circuit, creating parasitic circulation. And if parasitic circulation through the radiator circuit can be dealt with by installing a check valve (at point A towards the radiators), then parasitic circulation through the boiler cannot be dealt with.
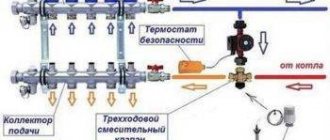
- Because If you did not install the protective thermostat 6, then in emergency situations (for example, a mixing valve is jammed) if too hot coolant (over 55°C) gets into the heated floor pipes, destruction of the floor screed and floor covering may occur. And the pipes won’t say thank you if you apply 80 degrees into them.
- Due to the fact that there is no bypass valve in the heated floor circuit, when all the heated floor loops are closed (automatically or simply with playful hands), the coolant circulation in the circuit stops and pump 3, which, of course, no one turned off (well, they forgot, with whoever it is) works on a closed valve and heats up. Of course, a good circulation pump like Grundfos UPS 25-40(60) can probably work for a year in this mode, but sooner or later it will fail.
A protective (safety) thermostat is always needed.
But you don’t need to install a bypass valve when:
- at least one floor loop will always be open;
- or the circulation pump will be frequency controlled;
- or automatic control of heating circuits can also control the circulation pump, turning it off when all the loops of the heated floor are closed.
Based on the shortcomings of the modified circuit, we urge you not to use it when installing a mixed heating system at home.
Norms, rules, SNIPs
If you follow the rules and regulations when installing a heated floor, you will create heating that will last for many years. In addition, before purchasing components, you need to make calculations in order to know what material and in what quantity you need to purchase.
When drawing up a diagram for the circuit, you need to take into account the norms and rules that are prescribed in the regulatory documentation:
- When constructing a cable floor, the heater must not be placed in areas with heavy furniture. Otherwise, the system will overheat in these places, which will lead to its rapid failure. Laying a heated water floor according to the “snail” pattern is carried out over the entire area of the room.
- To maintain the pressure in the system at the required level, the length of one branch should not be more than 120 meters - with a pipe cross-section of 20 mm. If the diameter is 16 mm - maximum 100 m.
- If there is a large room, it should be divided into several circuits of the same length, in cable floors no more than 15 meters, in hydrofloors no more than 60 meters.
- If a hydrofloor is installed, then the bend radius of the pipes must be equal to at least 5 of its diameters.
- The heater should not overlap - this can lead to uneven heating of the surface.
- The permissible laying step is 10 - 30 cm. It is not recommended to roll out the heater more often, since the heat flow will not change, but the consumption of the heating element will increase.
- Heating pipes must be located at least 15 cm from the walls.
It is quite possible to lay a heated floor in a spiral with your own hands. The main thing is to correctly calculate the laying step and the size of the circuit, and also to follow all the rules for installing underfloor heating.
Preparatory work and calculation of materials
Such a responsible job as installing a heated floor with your own hands should begin with the preparation of materials and planning. Strictly speaking, an accurate calculation can only be made by specialists who have information about the level of heat leakage in a given room. But for individual needs, approximate calculations are often used that satisfy the requirements.
First you need to draw a plan for the placement of pipes. The clearest and most visual diagram will be a diagram drawn on paper in a checkered pattern, the warm floor on which can be calculated based on the square footage of the room. Each cell will correspond to a pitch - the distance between the pipes.
For temperate climate zone:
- If the house and windows are well insulated, the distance between adjacent turns of the pipe can be 15-20 cm;
- If the walls are not insulated, 10-15 cm.
- In spacious rooms, where some of the walls are cold and some are warm, a variable step is taken: near the cold walls the distance between adjacent turns of pipes is small, and as you approach the warm walls, it increases.
What flooring is suitable for heated floors?
A big mistake is made by those who plan to lay parquet or thick wooden flooring on a warm floor. Wood is a poor conductor of heat and will prevent the room from heating up. The efficiency of such heating may be even lower than that of radiator heating, and heating costs may be too high.
The ideal covering for a heated floor is stone, ceramic or porcelain tiles. Once heated, it will keep warm perfectly, and this is the best option for the kitchen or bathroom. Children love to play in rooms where the floor is warm, and walking barefoot there is more pleasant than on wooden parquet.
A slightly worse flooring option, but more suitable for a guest room or bedroom, is linoleum and laminate. These materials transmit heat well and will not reduce the efficiency of water heating. In this case, the laminate should be chosen with a minimum thickness, and linoleum should be chosen without an insulating backing.
Important!
When heated, many synthetic materials can emit harmful fumes. Therefore, floor coverings with chemical components must have a manufacturer’s mark indicating the possibility of their use in residential premises on heated floors.
Base for heated floors
If we are talking about a house with concrete floors, then the most affordable and generally accepted option is a water-heated concrete screed. The same method is used for the first (ground) floors of private cottages, if the base of the floor is on a sand cushion, which is located directly on the ground.
In houses with wooden floors, this option is not applicable. Wooden floor beams simply will not withstand the enormous weight of a concrete screed, no matter how thin it is. In this case, a lightweight version of heated floors is used, which will be discussed in a separate section.
Installing a heated floor with your own hands begins with preparing the base. The base for creating a warm floor must be flat, without protrusions and depressions. The maximum permissible difference is 5 mm. If the depth of surface defects reaches 1-2 cm, then you will have to pour and level a thin layer of granite screenings (fine crushed stone) with a grain size of up to 5 mm. You will have to lay a film over the leveling layer and walk on wooden boards when laying the thermal insulation. Otherwise, the leveling layer itself will become a source of unevenness.
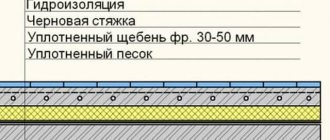
Preparing the soil for the pie
Installing a floor on the ground should begin with cultivating a plot of land. An important point is the presence of groundwater and its depth, because the risk of foundation flooding depends on this. It is better to make drainage, it will remove water from the structure.
Work should begin by removing a layer of earth, 30 - 35 cm below the surface of the future finishing floor. This is done without fail.
Having removed all debris and stones, the soil is compacted and leveled.
Then sand is poured around the entire perimeter, which is also compacted well by adding liquid, and leveled using a level.
In the absence of a large amount of groundwater, bedding material is placed on this layer. Otherwise, it is replaced with geotextiles, which will prevent moisture from penetrating above.
The next layer is crushed stone; it has a low degree of thermal conductivity. Fractions should be small or medium. It should be compacted carefully; it should almost become a monolith.
After this, a layer of cement mixture is poured, it also serves as additional insulation. Its thickness should be 4 - 5 cm, so that the composition does not spread, it must be protected with slats.
We wait until the mixture hardens, moistening it periodically. This screed can be replaced with an alternative option - profiled membranes; this method will significantly reduce the installation time of the floor.