Infrared heated floors under tiles are one of the most functional and fairly highly efficient methods of heating residential premises.
However, this option has not only positive aspects, but also some negative nuances that must be taken into account during the installation process.
Is it possible to lay film flooring under tiles in the bathroom?
The main purpose of infrared heated floors is the so-called “dry” installation of floor coverings based on laminate, linoleum, PVC tiles and carpet, so the use of such a system in a screed or with tile adhesive can cause the following problems:
- the low adhesive characteristics of the films do not allow obtaining a monolithic screed, and any sufficiently strong mechanical impact on the surface provokes cracking;
- cutouts and notches that improve adhesion are difficult to insulate, therefore, during operation, current leakage may occur and frequent tripping of the RCD is observed;
- Even the highest quality IR film is severely destroyed under the influence of an alkaline environment, which is present in adhesive compositions for tiles and solutions for arranging screeds.
For installation under tiled flooring, the optimal solution at present is the use of rod and cable electric floors, but if necessary, you can lay IR film, strictly adhering to all installation rules.
As many years of practice have shown, installing a film “warm floor” system under ceramic tiles is not the best option, so the technology for performing this type of heating must be followed with the utmost precision.
Electric heated floors
They are mainly divided into three groups:
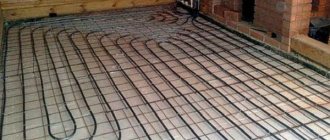
- Cable. The heating element is made in the form of a cable attached to a special tape or metal mesh. When laying, they require careful calculation of the required cable length, as well as a fairly solid tie with a height of 30 to 50 mm.
- Warming mats. Most often this is the same cable, but attached to a fiberglass mesh. Such heated floors are much easier to install and require a smaller screed size - up to 30 mm. Tile adhesive can also play the role of screed: in this case, heating mats are placed in its thickness.
- Film: heating elements are placed in a fairly thin film. Based on the material of the heating elements, carbon and bimetallic (copper and aluminum) types of film heated floors are distinguished. Unlike the first two groups of electric heating systems, heat transfer is carried out mainly due to infrared radiation, which is why they are often called infrared heated floors.
USEFUL INFORMATION: What to choose for the floor in your apartment: linoleum, carpet, cork or laminate?
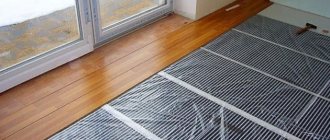
Installing an infrared floor under tiles on the bathroom floor
Features of the IR floor design determine the main advantages of such a modern heating system:
- the insignificant thickness of the heating film does not have a significant effect on the height of the room;
- self-installation is simple and fairly fast, which is explained by the connections being made using conventional terminal clamps and the complete absence of the need to use special fasteners;
- an emergency situation causes the RCD to turn off, but is not accompanied by leaks, as in the case of using a “warm water floor” system;
- safe operation in offline mode using a timer and control system;
- high level of fault tolerance, which is due to the parallel connection of all thermal elements.
However, it must be remembered that IR floors are significantly sensitive to the thermal conductivity of the final floor covering, so mechanical damage cannot be ruled out under conditions of excessive pressure and load.
The use of infrared floors allows you to achieve increased energy efficiency and the highest possible thermal efficiency compared to other electric types of “warm floor” systems.
Types of heated floors
The system of water heated floors is nothing more than a development and continuation of classic water heating. In the most traditional connection method, it is one of the circuits of the general heating system, although it may also have its own autonomous sources of water heating. But due to the complexity of installation and the increased tendency to accidents, it has recently been increasingly replaced by other models.
Electric heated floors
Electric heated floors
- Cable wires are a special high-resistance electrical wire that heats up under the influence of passing electric current. In the simplest case, they are made in the form of a single cable, but most often thermal mats are used, which use a double wire attached to a fiberglass self-adhesive mesh.
- Another option for thermal mats is rod-based heated floors, where special rods made of composite materials are used instead of wire.
- Film is truly a new word in heating systems. Despite the fact that, like all other types of heated floors, they release thermal energy through thermal conductivity, convection and infrared radiation, but having an increased radiating surface, they are designed to a greater extent for the latter method of heat transfer. And that is why they have recently been increasingly called infrared floors
Necessary materials
To independently carry out work on arranging a “warm floor” system based on infrared film for tiles, you need to prepare a standard set of materials and the main working tools, presented:
- heating elements equipped with terminal clamps;
- electrical wires;
- thermostat;
- bitumen insulation;
- heat-insulating materials;
- plastic reinforcing mesh;
- plastic film;
- dry self-leveling mixture;
- adhesive for laying tiles;
- multimeter and indicator screwdriver;
- tape measure, meter and square;
- pliers and a regular screwdriver;
- construction tape;
- insulating tape.
The standard installation kit includes not only thermal film, but also contact clamps, electrical wires and bitumen insulation with a self-adhesive backing.
It is important to remember that installing a thermostatic device involves choosing the correct wire cross-section. For copper wire: 1.5mm2 – 3.5kW; 2.5mm2 – 5.5kW; 4.0mm2 – 7.0kW and 6.0mm2 – 9.0kW. For aluminum wire: 1.5mm2 – 2.0kW; 1.5mm2 – 3.5kW; 1.5mm2 – 5.5kW and 1.5mm2 – 7.0kW.
Preparatory work
Like any other underfloor heating systems, infrared film requires careful preparation of the base:
- It is necessary to eliminate the protrusions and cover up the cracks in the base surface.
- To lay electrical wiring and install the thermostat, grooves are made in the wall. As a rule, the thermostat is placed near the switch. It is more comfortable. If necessary, a groove is hollowed out in the floor to accommodate the temperature sensor.
- A layer of thermal insulation is laid; professionals recommend perforated insulation with a heat-reflecting surface made of foil. Thermal insulation is laid with the foil side up so that the heat goes back into the room, and is attached to the base with metallized tape.
USEFUL INFORMATION: Plastic skirting board for the floor: do-it-yourself installation
No insulation is placed around the perimeter of the room at a distance of 20 cm from the wall. This is done in order to provide a more secure fastening to the edge tiles.
- It is necessary to cover the perimeter of the floor with special electrically conductive tape. It will serve as a kind of grounding. The heating elements must be powered via a separate line with the mandatory use of an RCD.
- A laying diagram is drawn up. Heating is not done under heavy stationary furniture; it is necessary to retreat at least 40 cm from the walls.
To save money, you can lay infrared film under the tiles only in those places where you will walk. The result is a kind of warm path.
Preparation
Film “warm floor” systems are very demanding on the base, so special attention must be paid to its preparation:
- leveling the surface, cleared of old coating and debris, using a “dry screed” using expanded clay sand;
- leveling the surface with cement-sand mortars and using self-leveling floors.
In the first option, a certain advantage is the absence of a “wet” process, but there is a high probability of damage to the heating circuit on the surface of the expanded clay.
Warm floors - installation
Traditional cement screed allows you to eliminate even pronounced unevenness on the base, and self-leveling floors make the surface absolutely smooth.
It should be noted that the presence of a strong and maximally even old base allows, at the surface preparation stage, to limit ourselves to only a self-leveling solution with a thickness of 0.3-2.0 cm.
Have you decided to install an infrared floor under the tiles? You will find an infrared floor under tiles with video instructions in the article.
Read about the pros and cons of electric heated floors under tiles here.
Types and technologies for laying cable heated floors under tiles are described in this material.
Installation stages
The entire process of independently installing a film infrared “warm floor” system includes, in addition to preparing the base, several step-by-step activities:
- arrangement of a heat-insulating layer to minimize the cost of electrical energy for heating the room;
- arrangement of a grounding system based on electrically conductive tape;
- competent calculation and transfer to the drawing of the installation diagram of all equipment;
- direct installation of infrared heating elements;
- connecting the installed system through a thermostat when heating a room with a total area of no more than 23-25 m2;
- testing the completed system for performance;
- finishing of the floor surface with tiles.
Installation diagram of film heated floor
When planning the installation diagram, it is very important to correctly determine the location for installing the thermostatic device, which should be located at a height of approximately 15 cm from the surface.
It is important to remember that installation of a temperature sensor will require the use of a corrugated pipe, which fits into the screed and prevents distortion of the readings of the measuring device.
Step-by-step installation instructions
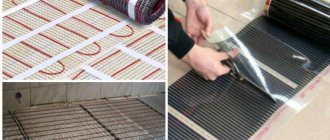
When laying a heated floor, a special thermal film is placed with the reflective side up. To perform installation correctly, you must follow a strict sequence of actions:
- Connect the sheets laid right side together with mylar tape. By this step, you need to already prepare the floor for laying thermal film.
- During operation, the film material is cut into strips. The dimensions of the workpieces should not be more than ten meters. It is better to cut the product along special dotted lines.
- Gradually lay out the film on the covering, moving along the room. Thus, when the material is consumed, more solid sections will remain, and the number of connection points will decrease.
Laying thermal film - During installation, the film is placed with the copper strip down. Then the strips of material are connected using double-sided tape. This fastening will prevent the sheets from moving during tiling.
- Sometimes craftsmen use the fixation method with mounting brackets. At the same time, remember that only the edges of the material are fastened on the sides, in those places where there are no electrically conductive components.
- Thermal film can only be laid in one layer. Layers of material containing heating elements must not be allowed to be covered. The work should be carried out carefully so as not to tear the thermal film and connecting wires.
Connecting the wires of a warm film floor - After this, you need to connect the terminals to the film in the places of the existing cuts. This is necessary to ensure contact.
- A hole is punched in the middle of the copper strip of thermal film with a hole punch. A terminal is inserted into this slot.
- The next step is to connect both holes - terminals and thermal films. It is also necessary to fix the rivet, most of which is located on the side of the copper strip.
- After this, you can install the thermostat. It is attached to the wall next to the wiring. This device can be mounted independently or connected to a nearby outlet using a cord.
External view of the thermostat for film heated floorsIn this case, it is better to plan in advance the installation location of the device, taking into account the furnishing of the room and the placement of household appliances.
- The next step is to connect the wires to the terminals. At the same time, to prevent the wires from crossing, they must be placed on different sides of the insulating material.
- Then you need to connect the film to the wire. To do this, remove the insulation from the areas connected to the terminals.
- After this, we supply the bare wire and press it with pliers at the connection point.
- The next stage is cable insulation. A special rubber material is used for it, which comes complete with the film. You can insulate one terminal using two pieces of material. They are fixed at the top and bottom. Then the insulation is leveled, for which cuts are made in the appropriate areas. You can use ordinary scissors. At the end of the wire they are connected to the thermostat.
- A floor temperature sensor should also be installed.
- We connect the equipment to the electrical network. If you are not sure that you can strictly comply with all safety requirements, it is recommended that you call a qualified electrician to do the work.
Installation of thermal film
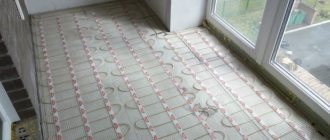
The first layer laid on top of the leveled base is heat-reflecting material. This layer allows you to direct the heat generated by the film heater in the desired direction, and also ensures optimal consumption of electrical energy. The “warm floor” system itself is mounted on top of the heat insulator.
Laying thermal film
Infrared film must be installed very carefully to minimize the risk of damage to the heating elements. Terminal clamps are used to connect sheets of IR film to each other.
At the final stage, a visual inspection of all connections made is carried out, and the entire “warm floor” set is connected to the temperature control device.
Connection
After all the elements of the “warm floor” film system are laid with the copper side of the contacts down and towards the walls, and the copper strips are connected to the contact terminals, the system is connected:
- installation of a temperature control device on the wall, in close proximity to an electrical outlet or switch;
- laying electrical wiring from the heating elements to the temperature control device, in accordance with the established diagram, inside the baseboard or a special plastic box;
- partial cutting of insulation and connecting electrical wires to clamps located on IR heating mats, followed by wrapping with bitumen insulating tape;
- installation of a remote temperature sensor and connecting it to a temperature control device.
Floor connection
At the sensor installation site, a sufficiently sized cutout is made in the thermoreflective layer, which will minimize differences in surface height.
The final stage of connection consists of individual testing of each heating strip at a temperature of 25-30°C, as well as the subsequent laying of a layer of additional protection in the form of polyethylene.
Floor installation
Even a non-professional can install an infrared floor under ceramic tiles. The main thing is to adhere to the rules for performing work.
Preparation
Laying infrared heated floors under tiles begins with preparing the construction base. The work algorithm will be as follows:
- dismantle the previous covering;
- remove dirt and dust;
- degrease the building base;
- treat the surface with a primer;
- Fill the floor with self-leveling mixture until the surface is perfectly smooth.
To level the building base, you can use a simple cement screed. However, in this case you need to have some experience to ensure that the surface is perfectly smooth.
Preparation of the construction base also includes the implementation of the installation scheme for the coating and the placement of thermostat elements. Since film cannot be placed under plumbing fixtures and furniture, you need to determine in advance where they will be located. There is no need to install the material in this place, which should be taken into account when drawing up the diagram.
Decide how you will lay the wires from the film to the thermostat. If the gutters are in the building foundation, it is necessary to groove the wall. You can place the wires in plastic boxes and fix them on the surface.
Next, the entire system is grounded. Contacts should be carefully insulated, as well as areas of material damage, if any.
Installation stages
Laying film heated floors under tiles is carried out in several stages:
- installation of thermal insulation material;
- grounding the system using special tape;
- installation of infrared floor;
- system connection;
- checking the functionality of the infrared floor;
- covering the building base with ceramic tiles.
Infrared heated floor under tiles
Installation of thermal film
Immediately place the heat reflecting product onto the prepared building base. It will help direct heat upward and reduce energy consumption. Next, carefully place the film with built-in heating elements.
Attention! Thermal film sheets must be mounted so that the side with copper contacts is at the bottom and towards the walls. Only in this case will the underfloor heating system function correctly.
Use terminal clamps to connect the material. After this, check the integrity of the system and connect it to a pre-installed thermostat.
Connecting the system
After laying the film on the correct side and connecting the heating elements to the contacts, you can connect the system. To do this, you should adhere to the following scheme of actions:
- Install the thermostat. Fix the device on the wall so that it is close to the outlet. You can also install a thermostat near the switch.
- Route the wires from the heating devices to the thermostat. In this case, it is recommended to adhere to a pre-designed scheme. Install the wires in the gutters using corrugations or in special plastic boxes.
- Partially cut off the insulation on the wires and attach them to the clamps located on the heating elements. Perform this manipulation on all devices. Next, wrap the joints with bitumen tape.
- Install the temperature sensor. After that, connect it to the thermostat.
After all measures have been completed to connect the floor heating system to the electrical network, it is necessary to check the functionality of the heating elements. To do this, you need to set the temperature to about 30 degrees and turn on the system. If the floor is evenly heated, it means the emitters are working correctly. In the event that the heat does not flow or some area is not heated, therefore, the system is installed or connected to the network incorrectly. It is necessary to disassemble the sheets and check the correct connection. After this, you need to test the heating elements again.
If the system is working correctly, plastic film should be placed on top of the infrared floor. This will create additional protection for the IR film.
Connecting infrared heated floor
Tile installation
There are several ways to lay ceramic tiles on polyethylene film:
- On the reinforcing mesh. To do this, the material is fixed on top of a plastic film. This will increase its adhesion to the material. Next, apply a cement screed or fill the building base with a self-leveling mortar.
- On plasterboard sheets. The material is laid on top of the plastic film. After this, finishing material is fixed onto it. Thanks to this, the tiles will lie flat.
To lay tiles, glue or a special mixture is used. Apply the product to the facing material and fix it to the building base.
Infrared heated floors under tiles are a good way to make living in an apartment more comfortable. You can arrange the covering yourself. To do this, you need to adhere to the work algorithm without violating the instructions.
Laying tiles
The finishing of the floor surface of the “warm floor” system using tiles can be done in different ways:
- fixing the plaster mesh over the polyethylene waterproofing layer in order to improve adhesion, as well as subsequent pouring of screed or self-leveling mixture with a height of 0.8-1.0 cm;
- installation on the base of gypsum fiber sheets over a waterproofing layer and between strips of IR heating elements.
The tiles are laid on top of the surface leveled over the infrared film. To fix the tile finish, special mixtures or adhesive solutions are used.
Finishing work should be carried out “square by square”, marking out separate areas of one square meter for laying floor tiles.
Reviews
Film infrared floors serve as a very good alternative to other types of “warm floors”, and due to physiological characteristics, people positively perceive the heat generated by such a heating system.
Many positive reviews are associated with the use of infrared heated floors under tiles in rooms such as the bathroom and kitchen. However, the infrared film heating option is completely unsuitable for installation in homes where there are very frequent interruptions in electrical energy.
A water heated floor is a fairly simple design. Laying a warm water floor under tiles - recommendations and step-by-step instructions, read and do.
You can familiarize yourself with the options for installing water-heated floors under tiles at the link.