Water heated floor under tiles: features and advantages
Water-heated floors are the most widespread option today, which is widely used for furnishing bathrooms, kitchens and corridors.
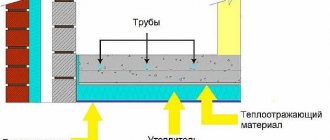
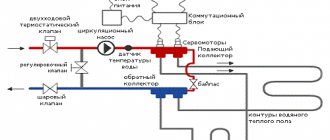
In this case, a special system consisting of water pipes is laid directly into the floor screed. In this case, it is necessary to lay several layers, each of which has its own meaning and role in this design:
- a layer of heat-insulating material is laid on top of the base, which does not allow the system to waste heat in vain, warming up the floors;
- a reinforcing mesh is placed on top, which should give the base strength;
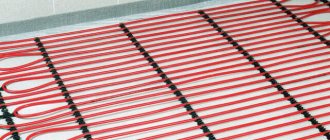
- then there is a pipe system that is directly responsible for the circulation of warm water;
- another layer of screed (cement-sand or concrete) is designed to protect the structure from loads;
- Finally, an adhesive composition is applied to which the ceramic tiles are fixed.
To connect a water heated floor system, you must obtain permission from the responsible authorities
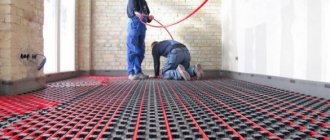
If the owners decide to make such warm floors under the tiles with their own hands, then during the work it is important to observe some nuances. For example, the gap between the metal-plastic pipes of the system should be from 10 to 30 cm
In this case, fixation must be carried out using plastic clamps.
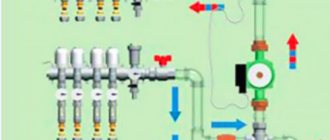
During the installation of the system itself, the appearance of joints should be avoided, so the inlet and outlet parts of the pipe should be located in the manifold. In addition, before you start pouring the top layer of screed, it is worth installing a damper tape around the perimeter of the room. It serves to compensate for those expansions that will occur as a result of expansion processes associated with changes in temperature conditions.
After the installation of the pipe system is completed, it is necessary to carry out a check, and only after that can you proceed to pouring the rough surface
It is important that the thickness of the screed layer is at least 30 mm
Installation of a pipeline network for a warm water floor does not require special knowledge, but for correct connection to central heating it is better to contact a specialist
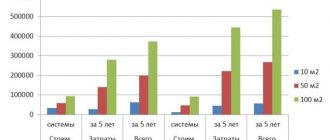
If all the calculations, as well as the procedure for laying a warm water floor under the tiles, were carried out correctly, this solution will save up to 10% of the thermal resources required for monthly heating of the room.
Why is it better to lay heated floors under tiles?
If you learn how to lay warm electric floors under tiles yourself, you will save significant money when carrying out certain repairs in your home, and will also give your room an attractive appearance. Since the tile has the following properties:
- excellent appearance;
- practicality;
- good thermal conductivity;
- the ability to maintain its original appearance even under conditions of elevated temperatures (unlike wood, which becomes deformed under the influence of high temperatures).
You can see clearly what laying tiles on a heated floor looks like in the attached video.
Types of heated floors
The following floor options are available:
- water;
- electric.
In the first case, pipes are used, and hot water acts as the coolant. Provided the installation rules are followed, you can connect the floor communication system to the central heating.
This opportunity is only available in a private home. The result is lower operating costs - no power supply required.
The advantages include the reliability of the heating system, since the pressure exerted when moving across the floor cannot lead to disruption of the functionality of the structure.
This is due to the fact that pipes are characterized by higher strength compared to cables.
This option has a number of disadvantages:
- reduction in ceiling height due to a thick structure, which increases due to the use of large cross-section communications;
- there is a possibility of leakage, the risk of compromising the integrity of the pipes increases if errors are made during installation (tightness at the joints is not ensured), when connecting the pump, the pressure increases significantly, which, against the background of violations of the pipe connection technology, will lead to a leak;
- inability to dismantle a section of the pipeline that requires repair.
The electric heating system is presented in 3 options, which are based on:
- wires;
- cable mats;
- infrared mats (film heaters).
The first one is classic. It is distinguished by higher efficiency and simplified installation methods compared to its water counterpart.
The wire resists deformation loads (compression and tension) worse than polymer pipes.
However, installation of such a system will be cheaper due to the absence of the need to install control equipment.
In addition, the cable cross-section is much smaller than the diameter of the pipe, so the installation of an electric floor heating system will not affect the ceiling height.
Considering that the cable is lightweight, it will not create additional load on the ceiling in the apartment. The main disadvantage of this type of system is high operating costs. If you regularly turn on the floor heating, your electricity bills will increase.
Cable mats are an analogue of the standard design option. They consist of a cable laid at a certain pitch and a fiberglass mesh.
This is a ready-made structure; in terms of properties and efficiency it is not inferior to a standard electric heated floor, which you install yourself.
Installation of a cable system in the form of mats is much faster, because In this case, you do not need to lay the wire yourself or check the position of its turns relative to each other.
It is only necessary to fix the strips of fiberglass mesh.
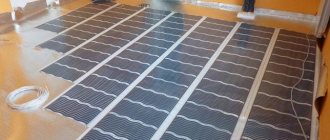
Infrared heated floors are the most economical and efficient option. This is due to the method of heating the coating.
Infrared mats consist of a heat-resistant film, inside of which there is carbon paste in the form of strips. These elements are connected by copper bars.
The thickness of such mats is small, which means that the heating system will not affect the height of the ceilings. The power of the design is minimal, which avoids increasing energy consumption.
Step-by-step installation instructions
How to distribute heating elements and control units?
Scheme of step-by-step installation of electric skirting boards.
The first step is to create a plan for installing a heated floor on paper. Heating elements must not be installed in places where heating pipes or other heat sources pass. This is due to the existing features of such heating systems. All single-circuit heating elements heat up equally. If there is a restriction on heat output (for example, furniture without legs) or additional heat comes from the street, then the elements may overheat and fail. In this case, furniture can also be damaged by overheating.
The result should be an irregularly shaped figure that is inscribed in a rectangle. Heating elements of the heating system must be placed along the contour of the resulting figure and inside it.
This is the disadvantage of such a heating system. If you want to rearrange the furniture, you should be aware that this can significantly affect the operation of the system.
For separate rooms, even if they are formally separated, you will need to create separate circuits with regulators and power supply. During the process of pouring the screed, a damper tape will need to be laid between them along the base of the floor.
Once the layout is drawn on paper, the markings can be transferred to the floor.
In a convenient place on the wall you need to mark the position of the regulator for the heating system. Here you will need to make a hole for the mounting box and lower the grooves for the floor. After the preparatory work and planning have been completed, you can begin to calculate the required amount of material.
How to calculate the amount of materials?
Electric floor installation diagram.
According to the calculation of the heat losses of each room, you will need to select the cable laying step, and then determine what length of wire will be needed.
If you plan to install a film system, then the calculations are even simpler: you need to select the number of elements that can cover the available area.
The calculations need to include a cable for connecting the thermostat to the heated floor, as well as the meter and thermostat to the elements of the heating system.
You should know that connecting the underfloor heating system directly to an outlet is not allowed.
Related article: How to sew curtains with rings: installing eyelets
After the calculations, when the power of all heated floors has been obtained, you need to check the total input of electricity to see if it can withstand such a load. If the existing input is not sufficient, then it must be replaced and suitable fuses installed.
How to prepare the base for the floor?
Layout of heated floors.
If necessary, the old layer of screed must be removed to the surface.
An electric heated floor is installed after all the rough construction work has been completed, that is, this process must be performed after the walls and ceiling have been finished and the screed has been poured. In most cases, upon completion of the rough work, the floor surface will be covered with a layer of dust and debris, and there will be elements of a hardened plaster or cement solution on it. Before installing the heated floor, it is necessary to clean the base. To do this, you need to remove the hardened pieces of the construction mixture with a spatula or use a solvent. The floor surface is moistened with water, after which the remaining building mixture, debris and dust are swept away with a brush.
In order for a warm floor to work efficiently without overheating, the concrete base must be level.
How to lay a thermal insulation layer for a floor?
Table of properties of some thermal insulation materials.
You should know that when operating, an electric floor heating system will necessarily distribute heat in all directions. That is why not only the base of the floor of the room that is heated will heat up, but also the concrete surface to which the heating elements are connected.
To be able to reduce heat loss and eliminate heating of the floor slabs, you will need to install thermal insulation material under the warm electric floor. The thermal insulation layer will screen heat flows, reflect them and direct them to the middle of the heating zone. The type and thickness of the thermal insulation layer will need to be selected based on which room is located below - heated or unheated.
In the process of installing heated floors in multi-apartment buildings, where heated rooms are located below, you will need to use rolled foil thermal insulation material, which has a thickness of 3-5 mm. In this case, it is recommended to use sheet or extruded polystyrene foam. It is necessary to lay out, join and fix the strips of the insulating layer using a construction stapler. In order to be able to prevent the material from shifting relative to the floor surface, it is necessary to fix the thermal insulation layer to the concrete base. Additionally, it is recommended to glue the joints of the strips with mounting tape.
If you plan to install a warm electric floor in a private house, where the heated room will be located above an unheated one, foam plastic or other material that has a thickness of 8-10 cm should be used as a thermal insulation layer. It is recommended to combine this layer with foil.
You should know the following:
- If you plan to install a heated floor on an unheated loggia, you will need to form a solid layer of insulation up to 10 cm thick. You can use polystyrene foam or mineral wool.
- If the heated floor is an addition to the main heating system, then foamed polyethylene, which is covered with foil, can be used as a substrate.
How to connect a temperature controller and sensor?
The process of installing heated floors.
Before you begin installing underfloor heating elements, you will need to mount a temperature regulator and connect a special sensor to it. The temperature controller, with which you can vary the temperature of the floor, will need to be installed on the wall in a suitable place at a height of at least 30 cm from the floor surface. The device that measures the heating temperature must be placed in the middle of the heated floor at a distance of 60-70 cm from the wall on which the thermostat is located.
Related article: How to make a double bed with your own hands from wood at home
The connection diagram for electric heated floors involves connecting a wire to a temperature controller, which comes from the heating elements of a heating system of a similar type, a corrugated pipe with a temperature sensor inside and a cable from the central power supply. If you turn on the heated floor in heating mode, the indicator on the front of the temperature controller will light up, and the heating elements of the heated floor using electricity will begin to give off heat.
How to lay the heating elements of a warm electric floor?
The order of laying the heating elements of a warm electric floor.
The technology for installing electric heated floors involves laying out heating components with distances from the walls of about 5 cm, from heating devices - about 10 cm. Laying of this structure can be done over the entire area of the room or only in that part of it where it is not planned to place furniture, plumbing fixtures and other interior items. Here everything will depend on the chosen method of installing a warm electric floor. It is important to remember that the cable floor cannot be laid under furniture and plumbing fixtures. A film floor can be installed anywhere, and it does not matter where the floor elements of the room are located.
When installing an electric floor, the strips with heating elements are secured to the floor surface using double-sided tape. The mats can be connected to each other using mounting tape. In the process of installing a heated floor with a cable, you will need to secure pieces of mounting tape to the concrete base in increments of 0.8-1 m, using dowels or self-tapping screws. After this, the wire must be laid out at a given pitch and secured to the tape.
You need to lay out the heating cable in the form of a snake, where the pitch between turns should be at least 8 cm. The pitch can be calculated as follows: the number 100 is multiplied by the area of the room and divided by the length of the heated floor cable.
When installing the heating cable, you need to make sure that the wire is not stretched, there are no sharp bends or tension inside.
At the final stage of laying such a structure, it is necessary to fill the screed with a layer of approximately 5 cm. It will have to stand for about 30 days. Only after this period can the floor covering be installed.
The installation of heated floors, which are based on infrared heating elements, is convenient because there is no need to form a screed - the floor covering can be installed directly on the mounted heating system. The technology for laying electric heated floors is simple; you just need to purchase all the necessary tools and materials.
The best posts
- Adhesive for extruded polystyrene foam to concrete
- How to fix a toilet flush tank yourself?
- Branded drywall primer and homemade mixtures
- Adjusting the volume of the flush cistern with your own hands
- Tambour doors to the landing: from selection to installation
- House project: unjustified greed or reasonable savings
- DIY denim crafts for home: master class with photos
- Transformable shawl: diagram with description and video on working with knitting needles
Tips for installing heating mats
Experienced craftsmen know secrets that help increase the durability of equipment and save energy resources:
- it is necessary to use thermostats (they protect against overheating and save electricity);
- During installation, you can walk on heating mats only in shoes with soft soles;
- when unwinding the roll, it is advisable to tuck the end of the cable inside, so it will not twist during installation and will not touch foreign objects;
after each stage of work, you need to check the operation of the mats; you need to choose a special adhesive for tiles that can withstand temperature changes; The quality of installation will be better if you start using heated floors only after the adhesive layer has completely hardened. When purchasing equipment, you need to pay attention to the warranty period - the longer it is, the better the quality of the product.
Fourth step. We install heated floors
Properly laid penofol
First of all, we lay thermal insulation material on the base. Penofol with a self-adhesive layer and foil coating is perfect for use in combination with heated floors. Place the insulation with the foil facing up. We glue the joints between the strips with mounting tape.
We lay a reinforcing mounting mesh on top of the foam foam. It will prevent further deformation of the “layers” of the system after pouring the screed.
Mesh laid on penofol
Let's start laying the heating cable. For fastening we use the mounting tape included in the kit. If it does not provide high-quality adhesion to the base, we install the heated floor cable on the “bugs” of tile adhesive. We remove the upper part of the “bloopers” with a spatula.
Option for attaching cable heated floors
Mounting tape for heated floors
The simplest method for self-arrangement is the “snake” method of laying the heating cable. We maintain a minimum 8-centimeter step between elements. To accurately determine the pitch, multiply the area of the room by 100 and divide the resulting value by the total cable length.
Laying the heating cable
Layed cable
We lay the cable as carefully as possible so as not to damage it and the thermal insulation. Using the groove, we insert the end of the heating element, which will connect to the thermostat, into the socket box, along with a corrugated pipe for the temperature sensor. Before this, power must be supplied to the socket box.
Connecting the thermostat
Experts first recommend placing a temperature sensor in the corrugation and connecting it to the temperature controller. Thanks to this technique, the regulator will be able to turn off the power to the heating cable if it overheats. The corrugation itself is fixed in the groove using tile adhesive.
We connect the cable and regulator in accordance with the diagrams given in the manufacturers' instructions.
Having tested the system in accordance with the previously given recommendations, we pour about a 5-centimeter screed over the cable, give it about 1 month to gain strength, and only after that we proceed to finishing.
Filling the screed
Filling the screed
The diagram shows a cable filled with mortar, on top of which tiles are laid
Cable floor option on base
Example 2. Cable floor diagram on the base.
A variant of this type of heated floor is small in thickness and is a mat with a mesh on which a heating cable with a cross-section of approximately 2.7 mm is fixed. This type of underfloor heating is quite easy to install, because the heating cable is laid and fixed to the base. The installation process will consist only of laying out and securing the mats.
A floor with a cable on the base is the best option for installing a heating system under the tiles, because the thickness of the layer of the adhesive mixture will be enough for the mats to sit in its thickness. If you plan to install this type of heated floor under laminate or linoleum, then you will need to fill the screed, but it does not have to be very thick. Such heated floors are not allowed to be installed in areas of the room where furniture or plumbing fixtures are planned to be placed.
Related article: Bath skirting: selection and installation
Installation technology
Under tiles
A convenient place is selected and a special crown for the socket is cut out. A socket box is installed in it, into which the thermostat is mounted. In this case, you can choose any height from the floor, but not less than 300 mm. In the future, this place should not be covered by stationary furniture or household appliances. A good installation option is next to the light switch.
It is important to make a square groove of 20×20 mm. It is needed for further installation of installation wires into it.
Working technology:
- They clean the floor well from dust and construction debris.
- The dry surface is primed. If necessary, coat several times in a row after the previous layer has dried.
- Foil-based insulation is laid over the entire area for additional thermal insulation. The insulation is placed outside.
- Adjacent strips and sheets of insulation are laid end-to-end to ensure good density. To do this, the top is glued with metallized tape.
- The mounting tape is laid out on the floor and fixed. They fasten it with self-tapping screws or dowels at a distance of approximately 500–1000 mm from each other.
- Following the diagram, lay out the cable.
- The hinges are attached according to the drawing. At the same time, the necessary step is observed.
- Secure the cable in the area of the end coupling.
Under laminate
Electric heated floors under laminate are installed using the following technology:
- The surface is being prepared. The old floor covering is removed, all debris is removed from the base, and the concrete screed is checked for integrity. If there are uneven spots or chips, the subfloor should be filled.
- Thermal insulation is carried out. The base is well insulated with penofol. The joints between the sheets are glued together with foil tape.
- The film is laid. According to the chosen pattern, you need to spread the material over the surface. Laying sheets overlapping is prohibited. Their contacts should be directed towards the wall on which the thermostat is mounted. The copper side is placed at the bottom, i.e. attached to the base.
- The thermostat is installed. This is done in a groove on the wall near the sockets. The strip is connected to the thermostat with wires and clamped with clothespins. All clamping points are insulated with bitumen insulation.
- The temperature sensor is displayed. It is connected to the underside of the covering by creating a groove at the base 30 cm long, but no more. The sensor itself is placed in a protective corrugation and placed under a heating sheet.
Important A layer of thermal insulation is placed under the temperature sensor to avoid large errors. This can worsen the operation of the entire electric floor heating system. It is possible to connect a heated film floor under a laminate without a thermostat
But there remains a risk of increased electricity consumption. In this case, there will be no temperature control at all. In this option, you can lay a protective foam film on top of the heated floor and cover the surface with laminate
It is possible to connect a heated film floor under a laminate without a thermostat. But there remains a risk of increased electricity consumption. In this case, there will be no temperature control at all. In this option, you can lay a protective foam film on top of the heated floor and cover the surface with laminate.
Video about installing heated floors under laminate:
Into the screed
Work technology:
Select a location to install the thermostat. To install it, leave about 40 cm from the level of the floor covering. A hidden installation option is preferable, in which all the wires are recessed into the wall. Remove the sensor from view.
A mounting tape is attached to the reinforcing layer in increments of 50 to 90–100 cm. 10 cm are indented from the wall, and 40–50 cm in the areas of fittings. If there are pipes and heating radiators, a 15 cm indent from them is made, but no less. The heating cable is attached to the power element, and the connection is hidden in a special coupling. Then connect the power cable to the thermostat.
Heating fragments are distributed over the surface. Use the drawn up diagram
It is important to ensure that the bends are correct (they should be even, smoothly transitioning, and not have any creases). The cable is attached to the mounting tape
For a more successful strong fixation, it is installed on the reinforcement and tightened tightly.
The distance between the turns of the elements is more than 80 mm. Temperature sensors are placed in selected locations.
All connections are checked for correct installation and functionality. The operating procedure of temperature sensors and thermostats is assessed using the data sheets supplied by the manufacturer, which reflect the parameters and errors.
Video about installing an electric floor in a screed:
Installation of thermomats
A standard heating mat kit consists of two elements:
- Thermal mat on a roll with power cable.
- Corrugation with a metal probe and a plug - for installing a temperature sensor inside it. It is needed to protect the sensor from alkali and moisture. If a layer of tile adhesive does not allow the installation of corrugation, a special moisture-resistant sensor is purchased.
Standard system equipment
Additionally you will need to purchase:
- Thermostat. Selected based on maximum power consumption.
- Mounting boxes if the thermostat will be installed in the wall.
- Remote temperature sensor (usually included with a thermostat). It is better to take a contact sensor rather than one that will measure air temperature.
- Wires for connecting the thermostat to the network. The cross-section is selected depending on the power of the system and the material of the wire (see table below)
| Wire cross-section, mm2 | 1,5 | 2,5 | 4 | 6 |
| Maximum power (copper wire), kW | 3,5 | 5,5 | 7 | 9 |
| Maximum power (aluminum wire), kW | 2 | 3,5 | 5,5 | 7 |
Basic Rules
The connection must be made through a thermostat to maintain the set temperature.
According to the Electrical Installation Rules (PUE), it is mandatory to install an RCD (residual current device) with an operating current of 30 mA, 100 ms and a circuit breaker of max 10 A (type C). It is recommended to connect systems more powerful than 2 kW through separate wiring with a machine.
If you are installing in a bathroom or other damp room, the thermostat should be located in an adjacent dry room.
The cable must not be shortened or cut! If necessary, you can cut off only the supply wire.
The photo shows possible installation schemes on an existing coating or a regular screed
System installation sequence
Determine where the thermostat will be installed on the wall and the area where the thermomat will be placed. There should be no furniture without high legs, plumbing fixtures or household appliances above the heated floor. If the screed has damping joints, the mat should not pass through them. A separate thermostat and mats are used for each room. If you plan to make several topcoats with different properties in a room, you need to install a separate thermostat for each of them.
A standard temperature sensor is installed inside a corrugated tube. To prevent it from creating additional unevenness, a groove is made for it in the floor and wall. The end of the corrugation is closed with a plug to prevent the solution from getting inside. The end of the sensor should be installed at a distance of 50-100 cm from the wall, slightly below the mat, centered between two turns of the cable. Do not bend the corrugation with a radius of less than 5 cm to allow the sensor to be replaced.
Installing a temperature sensor
The moisture-resistant sensor is simply fixed on the mesh centrally between the two cable cores. The disadvantage of installing without a corrugation is that if it breaks, you cannot easily replace it.
Before laying the heating mat, you need to coat the concrete floor with a primer to remove dust from the surface and increase the adhesion of the tile adhesive.
Place heating mats on the selected heating zone. To get the desired shape, you can cut the mesh and wrap the cable, but you cannot cut it. The mesh is attached to the floor with tape or staples, with the cable facing up.
An example of cutting and laying a thermomat
Retreat at least 5 cm from walls and adjacent mats, and 10 cm from other heating devices.
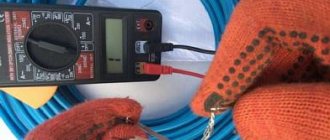
After laying the cable, you need to measure the ohmic resistance using a multimeter. It should be within the limits (plus or minus 10%) that are written in the manufacturer’s instructions or warranty card.
Connecting and installing the thermostat
System connection diagram
Connecting the heated floor and thermostat to the network should only be carried out by a professional electrician with the voltage turned off.
Strip the insulation at the output of the mounting wires from the mat and the power wire from 220V by 5-7 mm.
Connect the wires to the thermostat terminals according to its connection diagram, which is indicated in the instructions.
The cable's braided shield must be connected directly to ground.
Laying tiles
Laying can be done directly with tile adhesive, or the mats can be pre-filled with screed (at least 2 cm thick). It is prohibited to lay tiles on a substrate made of chipboard, plywood or other material.
- Apply tile adhesive directly to the mat. In damp areas (for example, a bathroom), first apply a thin layer of glue to the mats. After it hardens, waterproofing and a second layer of glue are applied.
- It is advisable to use special adhesive mixtures for heated floors, they are more elastic.
- Spread the glue evenly with a notched trowel. For this case, it is recommended to use only plastic combs to avoid damaging the cable.
- Press the tile or porcelain tile onto the glue, leveling it. The thickness of the tile adhesive together with the tiles should be at least 2 cm. Some manufacturers (for example, DEVI) recommend making a covering layer of at least 5 cm. This is due to the fact that with such a layer the heat will be distributed evenly.
Caring for heated floors during operation
There is no need to take special measures during use. The structure is reliably protected under a decorative coating. To ensure that warm tiles please the owner for as long as possible, you should follow a few simple tips:
Voltage surges can cause circuit damage. It is not possible to check it entirely. Thermostats from reputable manufacturers have built-in protection against voltage surges, breaks, and short circuits. If a reliable sensor is not available, it is recommended to purchase one separately
It is not difficult to install; it is important to choose the right operating parameters. Before purchasing, you should check the brand of heating elements
The sales consultant will select the appropriate thermostat. An accurate diagram of the route of the power cable, network wiring, and layout of heating elements will be useful when installing additional structures in the room. It is not recommended to drill the floor or walls in a room where warm tiles are used for heating. In cases of extreme necessity, check the location of the proposed holes with the layout plan for the heating elements. Completely eliminate the possibility of moisture penetration into the system. Warm tiles in bathrooms and toilets are an option that increases comfort, but requires compliance with certain rules. Plumbing fixtures must be in good working order. Constant leaks and excess moisture are unacceptable in a room with heated floors. It is better to think about this problem when designing and include additional waterproofing operations in the work plan. Then using the heated floor will be safe and long.
A satisfactory result and a minimum of care costs are determined by the correct, step-by-step implementation of the recommendations. Tiled floors that warm a room have a beneficial effect on the health of residents. Feet are warm. Uniform convection with slow movement of air masses does not raise small particles of dust and lint. There is no cold layer above the floor, as with traditional heating.
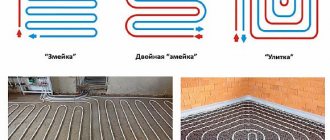
Laying methods
The most common methods of installing heated floors include:
- with screed;
- with logs (when the system pipes are laid on top of wooden logs);
- laying method (using special plates).
Floor installation methods
Each of the options is effective in its own way, but in order to choose the most optimal installation method, you need to become more familiar with the principles of their implementation.
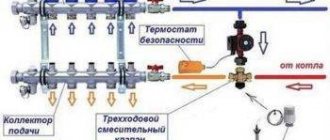
With screed
To install a heated floor using a screed, you need to prepare some materials. These include:
Warm water floor with screed
- pipe made of polymer or plastic;
- fasteners;
- pump to ensure water circulation in the system;
- special fittings and valves;
- manifold for heated floors.
Screed thickness for water heated floors
After assembly, the finished system is filled with a layer of cement mortar. The surface of the screed, like its structure, must be free of any voids or defects. Otherwise, this may lead to deformation of individual parts of the system. After the screed has dried, the tiles are laid.
Laying the mortar
Note! The surface of the laid tiles should be as smooth as possible so that heat transfer into the room is optimal. We are talking about all types of tiles.
With lags
This method is used mainly in houses made of wood. During the work, polystyrene or mineral wool is laid between the lags. The installation process can be carried out in two ways - modular or rack. In the first case, large chipboard modules are used, in which special channels for pipes are made. When choosing the slatted method, the installation of pipes and plates is carried out between slats made of chipboard.
Warm water floor with logs
For fixation, small aluminum plates with special grooves for fixation are used. Once the system is installed, gypsum fiber sheets must be laid on top of it. Only after this can you begin laying tiles.
How to make underfloor heating on a wooden floor
Recommendations for choosing materials
Here is a list of equipment and building materials that will be used to install a water heated floor:
- pipe with a diameter of 16 mm (internal passage - DN10) of estimated length;
- polymer insulation - polystyrene foam with a density of 35 kg/m³ or extruded polystyrene foam 30-40 kg/m³;
- damper tape made of polyethylene foam, you can take “Penofol” without foil with a thickness of 5 mm;
- polyurethane foam;
- film 200 microns thick, tape for sizing;
- plastic brackets or clamps + masonry mesh at the rate of 3 attachment points per 1 meter of pipe (interval 40...50 cm);
- thermal insulation and protective covers for pipes crossing expansion joints;
- a manifold with the required number of leads plus a circulation pump and a mixing valve;
- ready-made construction mixture for screed, plasticizer, sand, gravel.
Why you shouldn’t use mineral wool for thermal insulation of floors. Firstly, you will need expensive high-density slabs of 135 kg/m³, and secondly, porous basalt fiber will have to be protected on top with an additional layer of film. And the last thing: it is inconvenient to attach pipelines to the cotton wool - you will have to put a metal mesh.
Explanation regarding the use of masonry welded mesh made of wire Ø4-5 mm. Remember: the building material does not reinforce the screed, but acts as a substrate for securely fastening pipes with plastic clamps when the “harpoons” do not adhere well to the insulation.
Option for attaching pipelines to a mesh of smooth steel wire
The thickness of the thermal insulation is taken depending on the location of the heated floors and the climate in the place of residence:
- Ceilings above heated rooms are 30...50 mm.
- On the ground or above the basement, southern regions - 50...80 mm.
- The same, in the middle zone - 10 cm, in the north - 15...20 cm.
In heated floors, 3 types of pipes with a diameter of 16 and 20 mm (DN10, DN15) are used:
- made of metal-plastic;
- made of cross-linked polyethylene;
- metal - copper or corrugated stainless steel.
Polypropylene pipelines cannot be used in TP. Thick-walled polymer does not transfer heat well and elongates significantly when heated. Soldered joints, which will definitely end up inside the monolith, will not withstand the stresses that arise, will become deformed and will leak.
Typically, metal-plastic (left) or polyethylene pipes with an oxygen barrier (right) are laid under the screed.
For beginners, we recommend using metal-plastic pipes to install heated floors on their own. Causes:
- The material bends easily with the help of a limiting spring; after bending, the pipe “remembers” the new shape. Cross-linked polyethylene tends to return to the original coil radius, so it is more difficult to install.
- Metal-plastic is cheaper than polyethylene pipelines (with equal quality of products).
- Copper is an expensive material; it is connected by soldering and heating the joint with a torch. High-quality work requires a lot of experience.
- Stainless steel corrugation can be installed without problems, but has increased hydraulic resistance.
To successfully select and assemble a collector block, we suggest that you study a separate manual on this topic. Here's the catch: the price of the comb depends on the method of temperature control and the mixing valve used - three-way or two-way. The cheapest option is RTL thermal heads, which operate without mixing and a separate pump. After reading the publication, you will definitely make the right choice of control unit for heated floors.
Homemade distribution block with RTL thermal heads that regulate flow based on return flow temperature
Floors
79 votes
+
Vote for!
—
Vote against!
The installation of heated floors is especially important for rooms with high humidity, such as a kitchen, bathroom or hallway, where ceramic tiles are used as flooring. Tiled floors can also be installed in a sauna, on balconies and verandas, where installing a heated floor under the tiles would be no less appropriate. Moreover, heated floors under tiles can be an effective addition to the main radiator heating. The advantages of ceramic tiles are obvious: they are characterized by moisture resistance, practicality and durability, as well as an original appearance. It is easy to care for, but at the same time, remains cold to the touch even in the summer, which creates discomfort when walking barefoot on a tiled floor. However, due to the high thermal conductivity of ceramic tiles, a solution to this problem has been found - it involves installing a heated floor under the tiles. Note that ceramic tiles are an ideal floor covering in the case of a “warm floor” system, since the heating elements that are located under the floor covering help warm up the room, due to which the coolness of the tiled floor, valuable in the summer, is replaced by the comfortable warmth needed in the fall . There are several ways to arrange a “warm floor” system, and the choice of the most suitable one depends on many factors, each of which must be considered in more detail.
Content
- Advantages and main types of underfloor heating systems
- What must be taken into account during the installation of electric heated floors?
- Electric heated floor: arrangement options
- Types of electric heated floors: advantages and disadvantages
- Installation of heated floors under tiles: step-by-step instructions
- Creating a heated floor scheme: recommendations from experts
- Calculation of materials for installing a “warm floor” system
- Surface preparation: features of choosing insulation
- Installing a temperature sensor and checking the heater
- Attaching the heating cable or thermomats
- Pouring concrete screed and laying ceramic tiles
Advantages and main types of underfloor heating systems
- Compared to a traditional radiator heating system, heated floors under tiles, the construction technology of which will be discussed below, are characterized by a number of advantages:
- During operation of the “warm floor” system, the natural humidity of the air in the room is maintained;
- A uniform distribution of warm air in the room is created;
- Installing a heated floor is an ideal option if ceramic tiles, which are characterized by high thermal conductivity and are a kind of “accumulator” of heat, are chosen as the floor covering.
The main types of “warm floor” system:
- Electric heated floor, the design of which involves the use of:
- heating mats;
- electrical cable.
- Infrared (film) heated floor, which according to some classifications is a type of electric heated floor;
- Water heated floor.
What must be taken into account during the installation of electric heated floors?
Heating floors made of ceramic tiles can be done in several ways, and therefore, when choosing the best heated floor for tiles, you need to answer several questions, which will allow you to make the most accurate choice. First of all, it is important to find out the following:
- Is the system you are installing the main or additional source of heating?
- What is the maximum thickness of the “warm floor” system, taking into account the height of the ceilings in the room?
- What type of heating system is in the residential property where the heated floor will be installed (central or autonomous)?
- Are you planning to install concrete screed?
Warm floor under tiles photo
Electric heated floor: arrangement options
Laying heated floors under tiles based on electric cables or heating mats is carried out mainly in apartments where it is not possible to install water floors, which are characterized by greater efficiency. In addition, electric heated floors are easy to install and are one of the most economical options for heated floors under tiles.
There may be variations in the installation process of electric heated floors, depending on the conditions in which the installation will be carried out.
- Installation of a heated floor can be carried out in a layer of screed, after which the floor covering will be laid. This option will be most successful in the case of installing heated floors in residential premises, for example, a kitchen and a loggia. It involves installing a system based on an electrical cable, under which a layer of insulation and waterproofing material is placed. After laying the cable, a small layer of concrete screed is installed on top of it;
- Laying a heated floor can be done on top of a layer of concrete screed without additional thermal insulation material. Installation of heated floors directly into the screed is only possible if there is an insulated living space on the floor below. This is due to the fact that ceramic tiles and a layer of tile adhesive can provide adequate protection for the heating elements without the use of additional materials;
- Laying a heated floor can be carried out directly under the floor covering, but this method is considered the most suitable in the case of installing one of the types of electric heated floors - film floors. If you are faced with the need to install a heated floor under the tiles, but you have no desire to carry out major work related to replacing the concrete screed, this method will be the most preferable. However, it is important to remember that it involves the installation of a heat-insulating layer, which uses foamed polyethylene with a foil surface, which is laid on top of an existing concrete screed. The next stage is the installation of electric heating elements and, if necessary, laying waterproofing materials.
Important! Film flooring is a type of heated floor that cannot be laid under tiles and mounted in a layer of concrete screed.
Types of electric heated floors: advantages and disadvantages
Laying an electric floor under tiles can be done using an electric cable or heating mats (thermomats). Each of them is characterized by its own advantages and disadvantages, which will be discussed below.
- Underfloor heating based on an electric cable is a type that appeared earlier than anyone else, but still remains relevant and is a worthy competitor to installation methods based on more modern heating elements.
Advantages of underfloor heating based on heating cable:
- Low cost of materials used;
- After a power outage, it retains heat for a certain period of time, which allows you to save energy.
However, it also has disadvantages:
- If repairs to the system are required, difficulties may arise due to the need to dismantle the concrete screed;
- Difficulties associated with correctly calculating the length of the conductor;
- If the cable does not adhere tightly to the concrete screed or if furniture is placed above its location, there is an increased risk of overheating of the system and its failure;
- Low electrical safety of the system.
- An improved option for arranging a “warm floor” system is the use of thermomats, which can be either convection or infrared. Convection mats are a more modern version of a heating cable mounted on a mesh base.
Advantages of heated floors based on thermomats:
- Easy calculation of the required amount of material;
- Less thickness of required concrete screed;
- Less labor-intensive installation combined with a more affordable price.
- Disadvantages of this type of “warm floor” system:
- Difficulties arising in the process of repairing a damaged area;
- Fire hazard, which is typical for any type of electrical wiring.
- Installation of a heated floor based on a film coating is another option for arranging a heated floor, during which laying a concrete screed is not permissible.
Advantages of the method:
- Low energy costs;
- The process of laying film coating does not require specialized professional skills;
- No need for complex preparatory work;
- Can be used for heating wooden floors.
Disadvantages of the method:
- High cost of materials used;
- The need to install a waterproofing layer due to the low moisture resistance of the film coating;
- Higher fire hazard associated with the lack of fire-resistant concrete screed;
- High risk of damage when exposed to mechanical loads;
- Instant cooling after disconnecting from the network.
Installation of heated floors under tiles: step-by-step instructions
Creating a heated floor scheme: recommendations from experts
The initial stage of work involves creating a heated floor diagram on paper, during which it is necessary to take into account that the installation of heating elements should not be done in places where massive furniture and household appliances are placed. In places where pipes and other heating devices are located, it is necessary to organize a buffer system, which implies the absence of underfloor heating elements. This is due to the peculiarities of electric heating systems, the heating elements of which, unlike hydraulic systems, heat up equally and, if there are obstacles to the release of heat in the form of furniture without legs, overheating of the system elements from the outside will occur with subsequent failure. Furniture can also overheat and fail.
Based on the results of developing a scheme for laying heated floors under tiles, reviews of which can be read on specialized construction forums, the result is an irregular figure inscribed in a rectangle representing the room. The outline of this figure is a guideline for laying electric heated floors. This feature of the system can subsequently become one of its biggest disadvantages, since rearranging furniture can cause breakdowns in the “warm floor” system.
Important! If you plan to install heated floors in several rooms, you need to take care of organizing several heating circuits with separate regulators and a power source (even if the delimitation of rooms is symbolic). During the process of pouring the concrete screed, if any, a damper tape is laid between the heating circuits along the floor surface.
Before starting calculation work, drawing up a diagram of a heated floor, consider the step of laying the electrical cable or heating mats. In this case, try to focus on the following recommendations:
- It is necessary to retreat at least 10 cm from the walls;
- If the configuration of your room does not allow you to lay the heating elements straight, you can trim the mesh, which will allow it to bend in the correct direction. By using this installation option, you can reduce energy consumption and create accents on the necessary heating areas.
Calculation of materials for installing a “warm floor” system
If you decide to install a heated floor under tiles, the price of which can be approximately calculated already at this stage of installation, and use it as the main source of heating, calculate the materials taking into account that 1 sq. m of surface requires a heater with a power of at least 140-180 W. If a heated floor under tiles is used as an auxiliary heating source, the power of the heating devices should be no more than 140 W and on average not exceed 80 W, provided that the building is well insulated.
To calculate the required amount of materials, it is enough to calculate the area of the room (length x width) and from the resulting value subtract the area of the room occupied by furniture without legs and household appliances. As a result of these calculations, the area to be heated should be obtained. Next, determine the total power of the heating element and its length. Remember that the linear power of one meter of heating cable can range from 16 to 21 W/m.
For example! The area of the room is 10 square meters. m., and the power of the heating cable you use is 100 W/kW m. As a result, the calculated power is 1 kW. If the power of the selected cable is 20 W/m, its length should be 50 m (1000/20).
The selection of a heating mat is carried out according to the same principle, taking into account the usable area and the required power. In addition, you need to purchase mounting tape, which will be used to attach the heating elements to the concrete screed.
Surface preparation: features of choosing insulation
First of all, the old layer of concrete screed is dismantled to the base, followed by cleaning the surface. Next, waterproofing materials are laid, which must extend onto the wall by at least 10 cm. A damper tape is attached to the wall along the perimeter of the floor, the use of which will compensate for the thermal expansion of the floor during the heating process. Upon completion of these activities, trim off excess waterproofing and damper tape.
To prevent thermal energy from escaping during the operation of the heated floor, insulate the base of the floor. The choice of thermal insulation material depends on the location of the room in which installation is carried out, the type of flooring and the target orientation of the heating system.
- If the “warm floor” system is used as a secondary heating source, foamed polyethylene, characterized by a reflective foil coating, will successfully cope with the function of thermal insulation material;
- If there is a heated room on the floor below, polystyrene foam or extruded polystyrene foam with a thickness of 20 to 50 mm can be used as a heat insulator;
- If the installation of a heated floor is carried out in a room that has not previously been heated (veranda or loggia), care must be taken to form a more thorough thermal insulation layer, the thickness of which can reach 1000 mm. The material can be polystyrene foam or mineral wool of similar thickness.
A reinforcing mesh is laid on top of the insulation layer. Theoretically, you can do without a reinforcing mesh, but in this case you will have to add microfiber or plasticizer to the solution.
Installing a temperature sensor and checking the heater
In order to control and manage the system during the operation of the heated floor, it is necessary to install a temperature sensor and a special thermostat, which is an electronic or mechanical regulator designed to set the optimal temperature regime and turn the system on/off. It is mounted in the wall, in close proximity to sockets, while the temperature sensor is mounted in the floor. To carry out installation, a special groove is created in the wall from the thermostat, which is brought vertically to the ceiling. The sensor is placed in a corrugated pipe and led under the tile to the temperature control point of the electric heated floor, which is the middle between two turns of the cable. The corrugated pipe will protect the sensor from damage and, at the same time, provide free access to it at any time, for example, in case of need for repairs. The end of the corrugation, located in the screed, is filled with sealant to prevent the solution from getting inside the corrugation.
Immediately before laying the electrical cable or heating mats, its resistance is measured, the final result of which should not differ from the stated passport data by more than 10%. To do this, use a multimeter, which will also allow you to determine the phase if there is no color marking of the wires. If the measured resistance corresponds to the declared values, you can begin installing the heated floor under the tiles.
Attaching the heating cable or thermomats
Having prepared the surface, proceed to fixing the heating element. If you use an electric cable as a heating element, it must be secured with mounting tape, as shown in the photo.
To facilitate the process of attaching the cable, use plastic clamps that simplify the installation process. To ensure uniform heating, it is necessary to ensure that the distance between the turns of the cable is the same over the entire floor area. When laying heating mats, you do not need to monitor the distance between the turns, since it is already maintained along the entire length. When using heating mats, it is enough to spread the material in accordance with the diagram and connect it to the thermostat.
After completing the cable installation, check that the connection is correct by measuring the resistance using a multimeter. The resulting value should match what you measured before installation.
Pouring concrete screed and laying ceramic tiles
To prepare concrete mortar, use materials in accordance with the proportions indicated below:
- 1 part cement;
- 4 parts sand;
- 5 parts crushed stone;
- 0.6 parts water;
- 1% by weight of cement is a plasticizer that imparts elasticity to the concrete mortar.
Important! The amount of water should be small, which will prevent the appearance of cracks in the concrete screed. Expanded clay and perlite are prohibited from being added to concrete mortar, since the use of these materials contributes to disruption of heat transfer, which causes system breakdowns.
The thickness of the concrete screed layer should not exceed 3-5 cm. After pouring the concrete screed, wait until the solution has completely hardened. Despite the fact that the initial hardening will occur within 2 days, it is recommended to turn on the electric heated floor no earlier than after 4 weeks, when the final hardening of the solution occurs.
Important! Installation of a concrete screed is only necessary if an electric cable is used, while heating mats themselves provide a base for tile adhesive.
After the initial setting of the screed, proceed to finishing the floor with ceramic tiles.
Warm floor under tiles video