Design Features
Production technology
Products of this type are among the most popular on the market. In addition, if we accidentally make a mistake and type in a search engine something like “steel shower tray 900×900 mm”, we will still take a fairly wide sample of tens or hundreds of models.
The steel pallet itself has a relatively simple design.
It is produced in a factory using the stamping method with subsequent processing:
- In most cases, a steel sheet with a thickness of 1.5 to 3 mm is taken as the starting material . The sheet is cut into blanks, the size of which allows the manufacture of a container of the appropriate dimensions.
Note! Most of the models on the market have a square shape and sizes from 70x70 to 90x90 cm. Huge products and rectangular pallets whose width exceeds their length (for example, 120x90 cm) are less common.
- Steel blanks are subjected to primary heat treatment, after which they are fed under a press . Along with this, the sides of the pallet are formed in a couple of steps, a hole is made for drainage, and a relief is applied to the bottom.
- Upon completion of stamping, the edges of the sides and holes are cleaned , and after that an anti-corrosion compound is applied to all surfaces. Much more often it is enamel, but from time to time passivating agents based on zinc are also used.
- In addition, in many cases, fasteners for installing legs and upper guides used to fix the shower enclosure are welded to the pallet.
Note! Models without legs are installed on side walls, which are much more often welded to a stamped blank. But such products have a drawback: they can only be mounted on a pre-leveled surface, while pallets with legs allow position adjustment.
The result is a fairly strong, reliable and stable product that is relatively easy to install and can withstand the most intensive use.
Forms and varieties
As we noted, most pallets are in the shape of a square or rectangle. Such products are relatively inexpensive and easy to manufacture and install. But they are not overly practical, because with classic corner installation they take up quite a lot of space.
Corner models with a trapezoidal or rounded front part are a couple more expensive. They are more compact, and therefore they are chosen for installation in small bathrooms.
Another parameter influencing the choice is the depth of the base. If you want to protect your bathroom floor from drops and splashes as much as possible, then a deep tray (up to 150 mm from the top edge of the side to the bottom at the drain hole) is ideal for you. But in an outdoor shower it is possible to use small (up to 80 mm) models.
In addition, it is worth paying attention to the material from which the structure is made. There are two options, and the most ergonomic way to compare them is in the table below:
| Product type | Highlights |
| Stainless steel |
|
| Dark metal with enamel |
|
But, whatever the anti-corrosion protection of the metal from which the pallet is made, its effectiveness depends on the thickness of the base.
This is explained simply:
- In most cases, these products have a fairly large area (80x80 cm or more), and are installed on a frame laid along the edges.
- Under the influence of enormous loads, the narrow (less than 2 mm) metal in the middle part begins to bend, and the elastic anti-corrosion composition that is not enough becomes covered with microcracks.
- Over time, these cracks increase in size, leading to peeling of the enamel.
This is why experts strongly advise against saving on purchasing narrow pallets. It goes without saying that their price will be lower, but the service life will also be reduced by an order of magnitude.
Pallet installation method
Tools needed
Installing a steel shower tray with your own hands is not only completely possible, but also quite simple.
We will need the following tools and consumables:
- For a model without legs - a screed to level the floor.
- A pipe with a diameter of 50 mm for connecting the siphon to the sewer...
- A special siphon that is installed under the shower stall.
- FUM tape for sealing pipe threads.
- Sealant (it is best to use moisture-resistant, silicone-based).
- Roulette and level.
Advice! The tray, purchased separately, must be measured in advance so that all other elements that we will make for the shower stall fit in size.
Installation algorithm
Instructions for installing similar products with your own hands suggest the following sequence of actions:
- First, we check the floor level. The structure on legs can be fixed to virtually any surface, but models with a massive base require leveling by pouring screed.
Note! Because it takes at least 7 days for the screed to gain sufficient strength, it must be filled in advance.
- Then head to collect the pallet. In most cases, before installing it, we need to attach the legs to it by inserting them into the intentionally made grooves and securing them with fixing screws.
- We install the product in the chosen location, after which we attach a siphon to it to drain the water, sealing all connections with rubber gaskets. It is most ergonomic to do this before final fixation, while the tray can still be tilted.
- We connect the siphon outlet to the sewer pipe. In most cases, a rubber cuff is used for this purpose, which allows you to quickly disassemble the system to clear the sewer blockage.
- Smooth the tray by turning the screws on the legs. At the same time, we make sure that the drain level does not fall below the level of the siphon entrance to the sewer.
- We do a test drain, letting water into the pan under low pressure. If there are no leaks anywhere, we completely fix the legs and install the side panels or cover the edges with tiles.
Types and shapes of pallets
Models of trays for different shower stalls may differ in both shape and material. The most common are acrylic, ceramic and steel - it is not difficult to install such a shower tray with your own hands, while products made of cast iron and marble are quite heavy, so it is better to entrust their installation to specialists.
The shape of the pallets can be with or without a rounded edge, square, rectangular, etc. Regardless of the material and shape, the installation principle for all models is similar. Let us consider in detail the process of equipping acrylic and ceramic pallets, what are their fundamental differences and the subtleties of installation, in order to simplify the independent work and avoid possible mistakes. You will need the following set of tools and consumables:
builder's level, hammer, jigsaw, screwdrivers, screwdriver, pliers, adjustable wrench, marker/pencil, drill, hammer drill, electric, copper cable, sewer pipes, trowel, concrete mortar and silicone sealant
Advantages and disadvantages
Steel products have many advantages:
- Firstly, they are significantly stronger than acrylic and plastic models. So if in your family there are people weighing well over 100 kg, then you will not find an alternative. A shower cabin 800x800x1975 mm with a steel tray is the minimum you need!
- Secondly, most of the models are installed in almost an hour and a half. It goes without saying that from time to time difficulties arise at the stage of leveling the base, but if you purchase a structure with legs, you can adjust its position by rotating several screws.
- Thirdly, the trays can be used both as an independent plumbing fixture and as part of a shower stall. The second option, of course, is preferable from the point of view of comfort, but if you need to equip a shower with minimal money, then just a tray with plastic curtains around the perimeter will be enough.
As for the disadvantages, they are as follows:
- Tendency to corrosion when the enamel or passivation layer of dark steel is damaged.
- Limited number of design solutions.
- High volume of sound when a jet of water falls.
But we can compensate for the last minus by applying a layer of polyurethane foam to the underside of the pallet before installation. The remaining shortcomings can be fully tolerated by properly using the structure and avoiding damage to the anti-corrosion layer.
Steel shower trays
Characteristics and Features
If we look at shower bowls and divide them into groups according to the materials from which they are made, we will notice that steel products will be the most budget-friendly:
| Material | Price, rubles |
| Acrylic | 6000 – 20 000 |
| Cast stone | 20 000 – 50 000 |
| Ceramics | 10 000 – 40 000 |
| Enameled steel | 2000 – 10 000 |
Cheapness is one of the indisputable advantages of steel models, but it can also have the opposite effect: most buyers believe that low cost is a sign of low quality.
This is not entirely true, and often the low price is caused by the peculiarities of product production, the cost of materials, as well as (and this is especially important) existing market trends and the related marketing policies of product manufacturers.
In the case of steel pallets, it cannot be said that they are definitely worse than their analogues, but in some positions, metal models do lose. Their lineup is not that diverse, especially in terms of design. It is quite difficult to find a bowl of an unusual shape; square and rectangular shapes predominate on sale; corner models are much less common.
There is also a limitation on the depth of the vessel, and it is almost impossible to find really deep steel shower trays, since this parameter is limited to 160 mm. At the same time, models with a maximum depth of 130 mm are more common, and any pallet with a depth of more than 40 mm is called deep. However, this feature is not unique to this class.
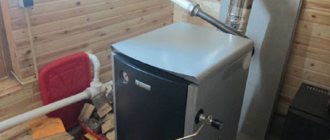
On the other hand, steel is an excellent structural material, which is characterized by high strength and durability, which is not afraid of high temperatures, shocks, falls of heavy objects, fungal infections and other similar influences. Low cost makes steel models especially in demand for installation in country and country showers.
The products are made from carbon steel coated with anti-corrosion wear-resistant enamel. If you think of a cast iron bathtub, you can imagine what we are talking about. The bowl can be equipped with a frame for installation, special legs or supplied without them.
Important! By the way, bathtubs can last for decades and still look good, so stereotypes about the quality of steel bowls are largely far-fetched.
Advantages and disadvantages
Installation
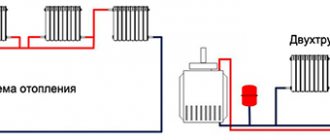
Installation of steel pallets is done in two ways: on a podium made of brick or concrete, as well as on a special steel frame with legs. It is advisable to choose a model with a frame and adjustable legs.
If there is no frame at the installation site, a brick podium is first laid out. To do this, the floor is stripped of finishing down to a clean screed, on which a ceramic brick structure is laid (silicate brick is not suitable due to its low moisture resistance).
The design is a parapet 0.5 - 1.5 bricks high around the perimeter of the bowl:
Inside the structure, a sewer pipe with a water seal is laid to the riser (a neck is brought outside into which the drain pipe will fit) and filled with cement mortar. The height of the pouring should be such that the bowl rests on it with its bottom and the sides rest on the curb.
To fix the bowl to the brickwork, you can use silicone sealant, cement adhesive, epoxy resin or polyurethane foam. Connections to the wall must be treated with silicone.
Important! Before final fixation, it is necessary to test the structure for leaks. Only after this can the pallet be fixed with glue and the joints sealed with silicone.
At the end, the podium is covered with tiles or other material, and the joints with the walls are decorated with ceramic or plastic skirting boards.
Installation procedure
Stages of installing a metal pallet.
There are many ways to quickly and efficiently install a metal tray in a shower room (chamber). Let's look at one of the simplest and most common options for installing a waste tray.
Before you begin the process of installing this structure with your own hands, you must thoroughly study the technical instructions that are usually included with it upon sale. It is worth noting that experts recommend doing this regardless of what material the shower tray is made of.
First of all, the shower stall must have dimensions that generally correspond to the dimensions of the metal base. In this case, the dimensions and finish should be adjusted in such a way that the facing ceramic tiles, if not the entire wall of the room is lined with them, have their lower edge descending slightly below the level of the tray placed against the wall. If there is a gap between the wall and the base of the cabin, it must be sealed with a waterproofing compound (sealant).
When starting to align the pallet according to all the rules, it is recommended to immediately use a building level to monitor the clear horizontalness of its upper plane.
This situation should not interfere with the effective removal of water in the future, since modern drainage products are manufactured with ready-made cone-shaped funnels.
To fix the structure in a certain position and to ensure its horizontalness, the legs supplied with the pallet are used. They are usually adjustable, so they can be used to quickly and easily position the base. Once the adjustment is complete, the legs are firmly fixed with locking mounting bolts.
In some cases, instead of legs, special plastic supports are used, which are supplied with the pallet. At the same time, very often builders install these products, resting them not on legs, but on specially constructed stands made of bricks or mounting cinder blocks.
Installation diagram of a shower tray with a wall-mounted mixer.
The specified stand (or, as it is also called, a well) is built in accordance with such dimensions that the future bottom of the shower stall can be freely laid on it, resting its sides on the edge of the brick (cinder block) masonry. To fix the pallet, its sides are either glued to the masonry with a special adhesive mixture or placed on cement mortar.
When installing the base of the shower chamber on a stone well-support, one cannot ignore the fact that a siphon must be connected from below to the drain neck of the pan. To ensure that the height of the well is sufficient for it (the sewer outlet should be above the floor level at a height of 12-15 cm), care must be taken in advance when designing the bathroom. By the time the entire structure is finally secured to the brick support, the mixer must be assembled, and its components must be tightly screwed to each other according to the diagram.
For better stability of the pallet, the space between it and the floor can be filled with ordinary sand. This will create additional support for him. If you don’t have sand at hand, polyurethane foam can partially replace it.
It should be borne in mind that the shower stall is a place where, by definition, there should be a lot of water. Therefore, all the slightest seams, cracks and joints - between the sides and the brick on which they rest, between the edges of the tray and the tiles on the walls, between the tightly screwed elements of the mixer and the tray - should be carefully coated with silicone sealant and laid with FUM tape.
Every time you complete one or another stage of the installation procedure, it is recommended to immediately check the quality of what was done. In particular, after installing the bathtub on the support well (but without its final fixation), it is proposed to ensure its stability. To do this, all you have to do is stand on the pallet with the utmost care, and, most likely, balancing deficiencies will immediately manifest themselves.
It is also necessary to make sure that the junction of the pipe with the neck of the pan and the siphon with the sewer pipe is well sealed. For this purpose, water is supplied to the tray with low pressure. If there is no leakage of liquid, the shower can be used for its intended purpose. If water leakage is detected, additional sealing of the connected components will have to be done.
Conclusion
A shower tray made of enameled steel is a budget-friendly and quite acceptable quality option that is perfect for both a suburban area and a city apartment. The video in this article will help you install the product in the shower yourself.
The main stage of work when installing a cabin in a bathroom is installing a shower tray. You can do this yourself if you comply with the technological requirements.
Installation of a shower tray
The easiest way to install acrylic, ceramic or steel products is that you don’t need unique knowledge or complex tools. But with certain skills in construction and renovation, it is possible to equip a bathroom with a concrete tray decorated with ceramic tiles. The installation of a shower tray made of marble or cast iron must be carried out by specialists due to the large weight of the products.
Advantages of acrylic pallets from RGW
You can purchase high-quality and durable acrylic pallets in the RGW online store.
- A large selection of models allows you to find the best option for your bathroom.
- The pallets are made from high-quality sanitary acrylic or composite.
- Products are manufactured at well-known enterprises. The products come with a manufacturer's warranty.
- The service life of acrylic pallets is up to 25 years.
To place an order, fill out a request on the store's website. Contact the company's managers for advice by phone or use the feedback form.
Choosing the right model
Shower trays come in various shapes - square, rectangular, with rounded edges. The choice here depends on the wishes of the owner. It is much more important to take into account the depth of the structure when installing:
- Deep trays resemble small bathtubs. They have high sides (from 20 cm) and rest on a powerful frame with six height-adjustable legs
Prices for deep shower trays
Products with medium depth have side heights from 10 to 20 cm. Their support system can be the same as deep ones or like shallow ones.
- The sides of small or low structures are small; they are also sometimes equipped with legs. But in most cases they have no support. And under them it is necessary to lay a special foundation.
- mechanical deformations from the feet of people washing;
- surface cracking due to temperature changes;
- need for a solid foundation.
In some cases, a waterproofed floor with drains for draining water acts as the bottom of the shower stall.
Pallets are also built-in and removable. This point must be taken into account during installation.
The thickness of the walls of the selected plumbing element is no less important.
Pallets with thin walls are made of acrylic and plastic. The advantages of such models include ease of transportation and installation, as well as a budget price. But thin-walled models have a number of disadvantages:
The coating on steel pallets may peel off and rust stains may appear in damaged areas. Acrylic analogues are easy to scratch if, for example, you decide to wash your beloved dog.
Ceramic trays or those made from brick and concrete are more durable. The most durable are cast iron models.
How to choose a shower tray, video:
Instructions for installing a shower tray with your own hands: video tutorial
For readers who prefer a visual demonstration to detailed descriptions, we have prepared a short and understandable video tutorial. Despite the short duration, it shows all the stages of building a retaining wall, installing a shower tray with your own hands, and also provides recommendations on the necessary materials and tools.
Share your experience in self-assembly with users in the comments to the article, because a lively discussion is the best way to birth the truth. If you have not yet chosen a shower tray, be sure to take a look at this publication, where all possible sizes, shapes and materials of these plumbing products are analyzed.
Which base for a pallet is better?
Installation of a shower tray can be done in various ways:
- on a brick foundation;
- on plastic support parts;
- on a metal frame.
The base is selected depending on the model’s configuration and its technological characteristics. The need for a foundation is due to the fact that the drain hole must be located above the level of the sewer line so that the water drains well. Experts believe that the angle of inclination from the bottom to the entrance to the sewer line should be at least 3 degrees. If it is impossible to make a pedestal or lower the sewer inlet, you will need a special pump to pump out the water.
Most deep models are equipped with a special metal profile frame. But if the tray is thin-walled, the feet of bathers will quickly push the bottom between the guides, especially if the owners of the bathtub are not of fragile constitution. In these places, acrylic options may even develop through cracks. Therefore, deep, thin-walled pallets also require a stable foundation.
Installation of a ceramic shower tray is possible without a foundation, directly on a flat floor without an installation gap.
Here it is necessary to monitor the quality of laying the sewer lines so that the drain hole is higher than the outlet and the water quickly leaves the container. The element itself is attached to the floor using glue or cement tile mixture.
Cast iron elements are usually simply placed on the floor. Their height is sufficient for reliable drainage into the sewer. The same applies to stone products. But there may be a problem with the siphon. It will have to be installed directly on the floor surface or connected to a flexible unit and hidden in a specially equipped niche in the wall.
Let's look at how to install different types of foundations when installing shower trays.
Metal or plastic frame
If you choose this type of base, it won’t take much time for installation. The main actions here will be:
- Leveling the legs using a building level.
- The installation of the shower tray itself.
- Connecting to the sewer and fixing the drain hole.
An extruded polystyrene board can be placed under the bottom to insulate the area. Polyurethane foam is used in the same way. This is especially important when installing steel pallets. It will also help reduce the sound of falling water.
Once the installation of the shower tray is complete, you need to check its stability. If the pallet wobbles or creaks, additional supports from steel angles or brick columns will be required.
To secure the thin bottom and give the structure stability, you can make removable formwork and pour concrete. The installation of the shower tray will be carried out on the resulting pedestal. This method has disadvantages: it is impossible to check and eliminate the leak. Replacing a sewerage unit and installing a siphon is also quite difficult. Alternatively, you will have to use flexible connections and hide the siphon in a niche in the wall.
Installing a shower tray on a brick foundation
This is an excellent solution for most pallets, allowing you to eliminate any deformation and extend the life of your plumbing fixtures. The main thing is to choose the place where the siphon will be installed.
In this case, the bricks are laid not only around the perimeter of the product. Otherwise, the bottom will bend over time. In structures with legs, to eliminate this drawback, additional support is provided in the center. Since there is a convexity there, such a model cannot be installed on a flat brick foundation. It is necessary to provide a recess for this tubercle.
The correct technique for creating a brick foundation is as follows:
- Draw the foundation lines according to the required dimensions.
- Mix the cement mortar for masonry.
- Apply several strokes of the composition to the floor using a spatula.
- Lay the first row of bricks, starting from the corner, and tap them with a mallet for a better fit to the floor. The thickness of the seam should be 5–7 mm.
Installation of the shower tray is carried out after 3 days, when the masonry is completely standing.
If the pallet is semicircular, at the bend the bricks are laid out in a fan with the butted edges facing outwards.
A welded frame made of metal corners 20 by 20 mm can act as a support in the center of the bottom. It is installed between rows of bricks and secured to the floor with dowel nails. Acrylic should be protected from friction on metal surfaces with a layer of insulating rubber glued to the metal.
A deep tray on a high foundation will require the creation of a ladder to the entrance to the shower stall. Steps can be made of concrete or bricks and covered with tiles. The walls behind the pallet are finished with tiles or other waterproof material. The tile adhesive must also have excellent moisture resistance.
Installation of a shower tray - price
If you don't want to bother with the question of how to assemble a shower tray
, then you can invite specialists for this. For example, “Spectrum of Household Services” (Moscow) charges 1,500 rubles for installing an acrylic shower tray with a sewer connection. But, as a rule, this service is provided in conjunction with the assembly of the entire shower cabin, and in itself is not very popular among Muscovites. After all, anyone can screw four legs onto an acrylic vessel.
Another question is if you need to install a shower tray
of an original design, according to an individual project, and even from some unusual material.
Then the lower threshold of the price
is determined by your ability to bargain, but the upper does not exist!
Do you want to save space in your bathroom by installing a shower? The bathroom is a place of relaxation that should be practical and aesthetically pleasing, right? Are you planning to do all the installation work yourself, but are you confused about installing a shower tray and connecting plumbing?
We will show you how to cope with this task - the article discusses the important points that you will encounter during installation. We also paid attention to the features of pallets made of various materials, describing in detail the installation process of each option.
To help the novice plumber, we have selected photographic materials demonstrating important nuances, and a video describing in detail the assembly and installation of a compact shower cabin.
Manufacturers are ready to surprise the most sophisticated owner, offering many shapes, sizes and design options.
One of the first classifications is the division of models by shape. These can be square, oval, round, triangular, rectangular products.
It is worth choosing the shape and size of the tray that will distribute the space in the bathroom as ergonomically as possible with the appropriate level of convenience.
Image gallery
No. 4 - installation of ceramic and marble models
Ceramic and marble sanitary ware are trending today. Shower trays are no exception. Such products are durable and massive, so they do not require the use of legs or reinforcing elements.
The installation method is selected depending on the design of the pallet.
There are two options:
- Design with a niche
. Many ceramic models have a niche in the tray cavity for installing a siphon and draining the sewer system. Such a tray simply needs to be connected to the sewer and installed directly on the bathroom floor without any additional steps. All that remains is to attach the walls of the shower stall. - Monolithic option
. In this case, in order to connect the drain hole to the siphon, you will need to build a pedestal. Inside it there will be space for connecting to the sewer.
The construction of the pedestal occurs as follows. We apply a layer of waterproofing to the area where the pedestal will be built.
To do this, you can use liquid rubber, roofing felt, polyurea or other composition. You must wait for complete polymerization if you used a liquid product.
Any modern version of liquid compounds can be used as waterproofing, which, after application, polymerize and create a waterproof layer
Inside the contour of the pallet we make brickwork with a height that would be enough for the normal location of the siphon. It is necessary to provide a cavity for the drainage system.
We connect the drain hole, the reverse end of which is connected to the outlet pipe. Apply a layer of cement mortar on top of the masonry.
DIY installation of different types of pallets
Each shower cabin comes with instructions for assembling it. Additional tools and materials are also indicated there. But if you decide to choose your technology, then you should take care of selecting suitable tools and consumables. In most cases you will need:
- building level;
- screwdriver;
- marker;
- drill and hammer drill;
- pliers;
- adjustable wrench;
- sealant.
If you need to do brickwork, you will additionally need a mortar mixture and a trowel.
Preparatory work
Regardless of the type of tray, it is necessary to prepare the bathroom for its installation. To do this you should:
- waterproof the floor and walls;
- check the possibility of connecting to the water supply system and sewer lines (pipes should have convenient outlet openings for easy connection of hoses);
- Close all pipe openings with plugs during installation work.
An important point is the electrical wiring. It must be hidden and moisture-resistant, with a minimum number of twists. For the connection, you should choose a three-core copper wire with a cross-section of 2.5 mm and double insulation. It is laid directly from the electrical panel with the installation of a residual current device.
Installing an acrylic shower tray (step by step instructions)
Most modern shower cabins are equipped with acrylic trays. They are easy to assemble:
- Turn the element upside down and install the legs. They can be fixed to the pallet itself. But more often - on a steel or metal frame.
Rules for installing an acrylic pallet
Experts recommend installing acrylic pallets following the instructions. If you complete all the points and have the skills, you can do it yourself.
- First, choose the installation location - along one of the walls of the bathroom or in a corner. Pallets in the form of a circle sector can only be placed in the corner, rectangular ones - both in the corner and near the wall.
- The next step is to check if the floor in the room is level. This is done using a laser or other level. The surface must be perfectly horizontal.
- Next, it is mounted and checked where the sewer drain hole will be located. The best option is under the bottom of the tray. If this doesn’t work out, you can run the pipes and hide them in the wall.
- After this, the pallet is placed in the chosen place and its contours are traced on the floor with a pencil.
- Experts recommend installing supports at all four corners - legs that come with the product, or foam concrete blocks. The pallet is attached to foam concrete blocks using ceramic tile adhesive. In addition, foam concrete blocks should be placed around the entire perimeter of the pallet.
- The connection to the drain is made: the transition corner and corrugation are installed. The connections are sealed and secured using sealant. The drain is fixed to the pallet.
- The pallet is put in place. If the package includes legs, adjust their height using the mounting level.
- After this, the pan is connected to the sewer drain.
An important point: it is recommended to lay ceramic tiles on the floor after the acrylic tray has been installed.