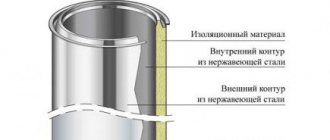
Purpose and design features
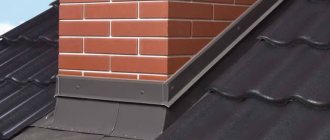
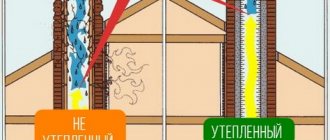
The chimney pipe box provides thermal and waterproofing of the chimney section on the roof. The presence of a protective and decorative casing helps to level out the risk of destruction of a brick or asbestos flue under the influence of atmospheric loads. This eliminates the possibility of roof elements catching fire due to high surface temperatures of the chimney. The functionality is also designed to provide an aesthetic appearance of the chimney section protruding on the roof to support the façade and architectural style of the house.
Structurally, the box follows the shape of the chimney, can be square, rectangular or round in configuration, and is made of various materials. The finished casing is placed on the chimney and securely fixed to the base.
The chimney box is an additional thermal protection for the pipe
Chimney box: types and design drawings for a pipe on the roof, DIY production
Hello, dear readers! A good chimney made of stainless steel or other reliable material is an important part of the heating system of a home. But an equally important role is played by a device such as a chimney duct. Our article will discuss its meaning, what it represents, what types there are, whether it can be made with your own hands.
What is it and why is it needed?
Any chimney is designed to discharge combustion products to the street. Naturally, they pass through it in a hot state, so in areas of ceilings (ceilings, attics, roofs) a hot stove or fireplace pipe will be a fire hazard.
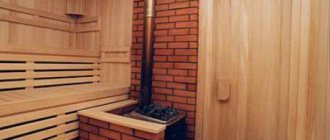
For fire protection, thermal insulation of the chimney is provided, in particular through the so-called cutting. This is where the construction of a box around the chimney plays an invaluable role. The cutting material is placed in a casing, which is made of non-flammable material and can be of different heights.
Its second important function is the decorative decoration of the pipe protruding on the roof, especially if the pipe does not fit into the overall design.
When is box installation necessary?
The casing for chimneys is installed in the following cases:
- passage of floors;
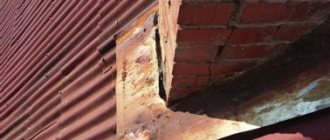
- to protect the brick chimney on the roof from destruction;
- in order to maintain the integrity of the house design and roofing structure.
Principle of operation
The casing is put on the chimney and acts as an additional thermal protection for buildings as it passes through the ceilings.
On the roof, it not only protects the brick chimney from destruction, but also serves as a design element.
Advantages and disadvantages
The construction of the duct creates the following advantages for chimney owners:
- the chimney will be protected from the destructive effects of natural forces - wind, rain, snow;
- protects brick chimneys from the formation of condensation and its destructive effects;
- by insulating the pipe, it ensures normal traction;
- pipes with a beautiful finish look aesthetically pleasing on the roof;
- a correctly constructed element reliably protects the building from fire.
The disadvantages include:
Types and designs of boxes
The boxes are:
- stoves;
- for roofing;
- for ventilation;
- decorative.
Usually the boxes are made of metal. They are painted in a suitable color and last a long time.
Stainless steel products are used for decorative elements on the roof and indoors.
Galvanized devices complete with plastic elements are cheaper, so they are used more often.
Boxes in the form of a wooden frame are installed only for lining brick chimneys. In addition, they must be additionally covered with a metal casing.
Boxes made of fireproof plasterboard are installed indoors for decorative purposes, in attics; they cover channels embedded in the wall.
The smoke exhaust area on the roof is protected by a metal decorative casing with an umbrella.
Make it yourself or buy it
The structure of the box is quite simple and it is quite possible to build it yourself. However, this requires skills in working with metal and the appropriate tools. In addition, the bulk of the installation work will have to be carried out on the roof. Therefore, it will not be superfluous to use the services of professionals.
Tips and tricks for choosing
The choice of duct is determined by the type and size of the chimney. The main selection criterion is the diameter for the passage of the pipe.
For the passage unit in the ceiling, a product is selected that consists of a stainless steel plate and a neck, the diameter of which is slightly larger than the chimney.
The design of the stainless steel platform is quite suitable for mounting on the ceiling of the house.
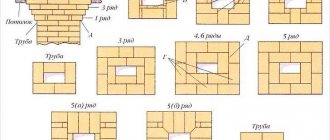
The photo shows the main configurations of manufactured boxes:
The roof box shown in the bottom photo can be purchased according to predetermined dimensions or ordered to be manufactured.
The cost of finished products varies from 550 to 1900 rubles and more.
Making and installing a box with your own hands
If you want to save money, you can make the casing yourself. At the preparatory stage, the location of its installation is determined, the required dimensions are taken, the material is purchased, and the tool is prepared.
Required tools and materials
You will need:
- metal scissors;
- riveter;
- hammer;
- pliers.
Materials you will need:
- galvanized sheets
- rivets.
The approximate price of materials will be about 500 rubles.
Size calculation
The size of the box is determined by SNiP standards based on the cutting dimensions of 500 mm for wooden floors. When the floors are protected with a reinforced layer of plaster of 25 mm, or iron with an asbestos lining underneath of at least 8 mm thickness, the size is reduced to 380 mm.
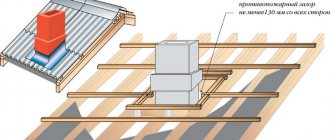
On the roof, there must be at least 130 mm (13 cm) from the outer surface of the pipe to the border of combustible structures.
The thickness of the cut should overlap the thickness of the ceiling (ceiling) by at least 7 cm.
The diameter of the hole in the box should be made approximately 0.5 mm larger than the outer diameter of the pipe, so that the pipe can freely fit into the hole.
The perimeter sides of the casing base must be cut 5 cm larger than the cutting size so that they can be attached to the ceiling.
Work progress
A homemade box is made from galvanized sheets, cut to size:
- the center is found in the bottom through the drawn diagonals;
- punch a hole with a nail, draw a circle;
- Through the hole, use scissors to cut a hole to fit the diameter of the pipe.
The sidewalls are made of 4 sheets, fastened with a riveter, no less than 4 rivets per seam.
First, the lower parts are bent to a width of 5 cm and the resulting structure is riveted to the base through them.
Installation stages
The box is installed in a pre-drilled hole in the ceiling.
At rafter connections, supports are made of a wooden frame or metal profiles.
The finished casing is installed on these supports.
A segment of the chimney pipe is inserted into it through the hole and secured with the previous element.
The free space in the box is filled with mineral wool and expanded clay.
The roof cutout for “sandwiches” is made in the form of an iron cone located at a certain angle on the plate. The pipe structure is inserted into the cone. Sealing is done using a sealant. Part of the apron is inserted under the overlying sheet of roofing.
Roof trims can also be of a different type, for example, made of polymer materials on a metal base.
Decorative finishing of chimneys is carried out by cladding a material suitable for the style of the roof over a frame made of metal profiles.
for installation
How to line a chimney:
Making a homemade box:
Penetration through the ceiling:
Frequent errors and problems during installation
Violation of the standard dimensions for the placement of the duct and smoke ducts in the ceiling opening, which leads to conflict situations with the fire service.
An umbrella that is too large and installed on the top can cause brown streaks on the roof. Condensation formed on its cold surfaces all winter. The area of the umbrella must be reduced.
The same situation can arise with a metal box on the roof that immediately covers the smoke and exhaust ducts. Expanded clay poured to the edges of the channels in this casing will help.
A wide gap between the pipe and the penetration - as a result, the laid fine expanded clay falls down.
Using penetration without backfilling with thermal insulation material. There is practically no protection.
Types of boxes
There are several types of protective devices for smoke exhaust:
- metal - structures in this category are used most often, made of galvanized steel or stainless steel;
- wooden - found in the installation of brick chimney systems; when installed according to the regulations, they are equipped with a metal or polymer lining;
- plasterboard - protective elements made of fire-resistant plasterboard are installed on both brick and asbestos-cement or steel flues exclusively in internal areas - in the attic, indoors;
- plaster – protective plastering is suitable for installing brick chimneys in horizontal sections of the attic. The outer part of the brick shaft on the roof is decorated with a decorative metal casing.
Manufacturers of metal profiles offer ready-made solutions made of galvanized steel with a plastic protective coating in variable colors. This allows you to select the optimal product option in accordance with the stylistic features of the roof and facade being installed. In addition, galvanized devices complete with plastic elements are sold in a relatively affordable segment.
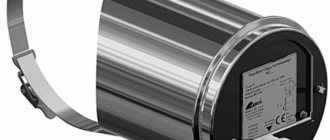
To make the casing, corrugated stainless steel material with a thickness of 0.45-1 mm is also used, which is considered a convenient basis for work. Galvanized and corrugated models of chimney protection devices are relevant in the design of gas outlets of any configuration. Complete with basalt insulation, boxes made of metal profiles are positioned as a universal option for thermal protection of chimney pipes of all categories.
Metal casing for chimney pipe
Vanes for large ventilation shafts
A chimney or weather vane on a frame is required if the exit of the ventilation shaft or ventilation duct, which needs to be equipped with a protective umbrella, is large. In this case, the frame gives the structure the necessary rigidity; it can be securely fixed to the roof.
In addition, it is often difficult to lift a regular weather vane for installation on the roof without damaging it - the metal can bend, and the polymer coating at the bend can deteriorate. It happens that wind loads, which are especially strong on high-rise buildings, can even lead to the weather vane flapping loudly, bending and gradually failing.
In some cases, it is necessary to organize the exit of several ventilation ducts and chimneys into one large pipe. It is most appropriate to use a chimney on a frame, which can be sheathed with metal to match the roofing to give a holistic look to the entire roof.
Advantages and disadvantages
The use of a chimney pipe box helps improve the operational and decorative characteristics of the device:
- the formation of condensate on the walls of the gas outlet is leveled out;
- the intensity of soot and soot deposits is reduced;
- the possibility of large thermal differences between the temperature of the flow of combustion products and the internal surfaces of the flue is neutralized, since the heat capacity coefficient of the smoke channel material is improved;
- deterioration of traction is eliminated;
- provides reliable protection from aggressive atmospheric influences;
- the fire hazard level of the chimney structure is reduced.
A big plus is the presentable appearance of the chimney on the roof, which is equipped with a protective and decorative box in the same style of the facade.
The disadvantages of the device include the need for drawing work when making the box with your own hands and serious safety requirements for installation on the roof.
Types of chimneys
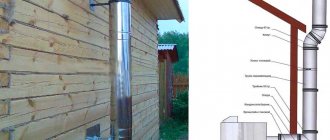
In a frame house, it is possible to install two types of chimneys - external and internal. The internal one is mounted directly in the building. Its installation is not always convenient. The main disadvantage of this chimney is that it reduces the area of the room. Also, a pipe passing through all floors of the cottage can spoil the interior. It will have to be decorated somehow so that it fits into the design of the premises.
The external chimney runs along the façade. It is brought outside through the wall of the building. Advantages of this type of chimney:
- safety for people, there is no risk of smoke entering the room;
- low price for installations;
- ease of decoration, you can use inexpensive materials to cover the chimney. If desired, you can leave the pipes open.
The only disadvantage of an external chimney is that it cannot be made perfectly straight; you will have to provide for bypassing the roof overhangs. But chimney manufacturers produce not only straight pipes, but also those with bends. Therefore, the structure is made up of pipes of different shapes, which makes it easy to bypass the overhangs.
DIY materials
Resources for homemade protective installations for smoke ducts are selected depending on the characteristics of the planned work. Most often, galvanized steel sheets or corrugated stainless steel are used. If the process of arranging a gas duct indoors or on the attic floor is to be done, fire-resistant plasterboard is used. For brick chimneys, wooden protection is sometimes made in combination with basalt insulation and steel cladding. At the same time, do-it-yourself galvanized and corrugated chimney casing models are positioned as durable and effective options.
Manufacturing and installation technology for a metal chimney box
Despite the fact that ready-made offers are presented in a relatively affordable segment and a wide variety of modifications both in Moscow and in the regions, craftsmen often prefer to make a box for a chimney pipe with their own hands.
Tools and materials
To build a homemade protective device for a metal gas exhaust pipe, you need to prepare the following set of tools, devices and materials:
- metal scissors;
- pliers;
- hammer;
- riveter
You will also need galvanized sheets in consumable quantities and rivets.
Installation of a ceiling-passage unit
Drawings and diagrams
In the preparation process, it is necessary to make drawing sketches, on the basis of which a full-size diagram is made. For independent work you need to prepare:
- diagram of the device for ceiling cutting;
- model of ceiling passage box;
- ceiling mounting diagram;
- smoke exhaust outlet through the ceiling-passage device;
- passage to the roof.
The calculation of dimensions is carried out according to regulatory rules, taking into account that in order to attach to the ceiling, the sides of the casing must be 5 cm larger than the size of the groove.
Stages of box manufacturing
Blanks are cut from galvanized steel:
- the side sections of the protective device are made of four sheets;
- structural elements are fastened using a riveter, using at least 4 rivets for each connecting seam;
- to fix the metal casing to the base, first bend the lower perimeter to a width of 5 cm;
- diagonals are drawn at the bottom, the central point is marked;
- make a hole - use a nail to punch a hole, draw a circle of the required size.
Metal box ready for installation
Next, a hole for the pipe is cut through the hole with scissors along the marked line.
The metal casing is installed in a designated place:
- a support structure made of metal profiles or a wooden frame is constructed on the rafter connections;
- install the finished body of the protective device on the supports;
- The upper segment of the chimney pipe is inserted into the hole in the bottom and joined to the previous chimney element.
The internal cavity of the housing is filled with a non-flammable insulating composition with a low thermal conductivity coefficient. The most commonly used mineral insulation is basalt wool or expanded clay. The final stage of work involves covering the box with a coating that matches the style of the roof and facade.
Installation of the duct on the chimney tube
Pipe installation features
In order to correctly install a protective box on a chimney, you should understand how the system works, what are the features of installing different types of pipes, and in what section of the chimney can you do without additional protection.
There are the following rules for installing a pipe and its insulation:
- The brick pipe is installed with support on a separate foundation and is not tied to the ceiling or roof.
- Additional fixation of the high (above 1.5 m) chimney structure is carried out with guy wires, which are attached separately from the building.
- The distance from the pipe body to the ceiling materials should not be less than 15 cm. For metal chimneys, the minimum distance is 25 cm.
- The butt joints of the pipe structure should not be located in the area where the floors pass. If the joint of the chimney coincides, then the pipe is shortened from below and extended from above, shifting the entire section to the overlap area.
- Brick chimneys are effective only for classic stoves using natural solid fuel. For slow-burning gas stoves, such pipes are quickly destroyed by aggressive chemical compounds that form in them during the combustion process. For such ovens, the best choice is a metal sandwich.
We recommend reading: How to repair a crack in a cast iron sewer pipe yourself
Rules for bringing the pipe to the roof:
- The outlet is no further than 1.5 m from the ridge - the pipe height is sufficient 0.5 m.
- The outlet is at a distance of 1.5 m to 3 m from the ridge - the top of the chimney can be at the same level as the roof ridge.
- The pipe outlet is at a distance of more than 3 m from the ridge - here the height of the pipe is calculated based on the ratio: the angle between the horizontal line from the ridge and the straight line connecting the top of the pipe with the ridge of the roof is 10 degrees.
Note! Stove draft is highly dependent on the height of the pipe and its location relative to the roof ridge. A white flame indicates excessive draft, while a warm orange flame indicates insufficient draft.
Features of installation of various casings
Installation of the chimney box begins with cutting 2 holes: in the ceiling and in the roof. The cut in the ceiling is made square, based on the size of the required minimum distance between the pipe wall and the ceiling material. The cut in the roof will be rectangular, with an equal projection onto the lower hole.
To insulate the pipe, a metal box is made for the cut. It is cut out with metal scissors, with an overlap (5 cm) in the shape of the letter “P” onto the outer part of the ceiling and the floor of the attic.
Cut out two lids to fit the box with a hole for the pipe.
The internal cavity of the box is filled with non-flammable insulating material. Mineral (basalt) wool is most often used.
Next, along the length of the attic section of the chimney, a protective casing made of plasterboard (non-flammable), iron or wooden is mounted.
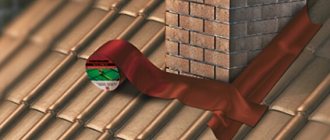
The exit to the roof (roof cut) is equipped with a system of protective aprons and ties (for a brick pipe) or a special casing for a metal chimney.
Roof cutting for brick pipe
Installation of insulation and waterproofing on a brick pipe is carried out as follows:
- A metal profile frame is installed on the pipe. The profile is secured with dowels.
- The pipe is covered with thermal insulation to the thickness of the profile.
- A mesh for plaster is attached over the heat-insulating layer.
- The structure is plastered and covered with decorative tiles or a finished metal casing.
- A waterproofing structure is installed in the lower part of the pipe section above the roof.
We recommend that you read: Repair of steel and brick chimneys
For this:
- At the bottom of the pipe, a groove is cut around the perimeter using a grinder.
- Adjacent strips are secured around the pipe, securing the top bend directly into the grooves. During installation, the overlap of the upper planks on the lower ones is maintained.
- The parts of the planks lying on the roof are attached to the sheathing with self-tapping screws.
- All joints are coated with sealant.
- The roof is being laid.
- Install the upper aprons, observing the principle of “upper apron on the lower.”
- The upper apron of the pipe is placed under the tiles or under the ridge itself.
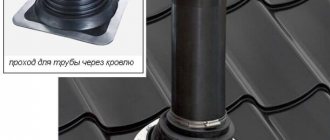
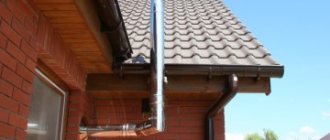
Roof cutting for metal pipe
Insulation and waterproofing of metal pipes is simplified by the fact that many ready-to-install structures are sold. There are special sandwich pipes that initially come with a double wall and a layer of thermal insulation.
To protect against moisture, special polymer nozzles are produced on round metal chimneys, which simply need to be cut to the diameter, put on the pipe and the base secured to the roof. For corrugated roofing, the nozzle should be selected with a flexible base.
You can make your own roof groove for a metal pipe from galvanized sheets. To do this, cut out a cone, the upper hole of which is slightly larger than the diameter of the pipe. The cone is riveted at the joint and put on the pipe. A flexible apron-base is installed under it, maintaining the “bottom sheet under the top” principle.