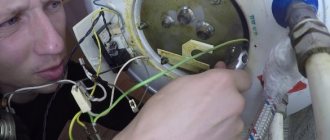
Connecting power to the water heater
A storage boiler belongs to high-power household electrical appliances. The device must be powered from a separate cable line coming from the common distribution panel. How to properly connect a water heater to the electrical network of an apartment or private house:
The table shows the maximum power, so the cable must be taken with a reserve. For most heaters, 2.5 mm sq. wire is suitable.
- To supply voltage from the panel to the boiler, use a three-core copper cable type VVG. Select the cross-section of the wires according to the power of the unit, using the table above.
- To protect the supply line, install a differential two-pole circuit breaker with a trip current of 30 mA, as shown in the diagram below.
- Connecting a grounding conductor is a mandatory requirement of safety regulations.
- To connect the wires to the contacts of the heating element, remove the protective plastic cover (usually held on by 2-3 screws).
- It is not necessary to install an outlet for the water heater. But if the device is equipped with a factory plug, then the socket can be carefully placed on the side of the tank.
Do not mount the outlet directly under the water heater, where it could become flooded in the event of an accident.
Installation
Installing an Ariston water heater with your own hands is not difficult if you carefully read the instructions and follow its instructions. Of course, you can invite specialists who will do everything quickly and efficiently. The only “but” is the price of this service. For example, in Moscow it ranges from $100. Meanwhile, having minimal skills in working with plumbing, you can cope with this task in just 2-3 hours. Considering that you will spend some money on supplies, the net savings will be approximately $60.
Water heater connection diagram.
When assessing the pros and cons of installing a water heater with your own hands, take into account the risk of flooding your neighbors below; if something goes wrong, balance your strengths. The advantages of solving this problem yourself include:
- saving time and money;
- acquiring the skills you will need while operating the water heater.
Access to the storage water heater (boiler) must be absolutely free, and the wall for mounting must be strong, capable of supporting double weight (for a unit capacity of 50 liters, calculate the load of 100 kg). Determine the condition of your electrical wiring: is it capable of handling the significant additional load? For example, for a 2000 W water heater the copper wire cross-section should be 2.5 mm². Keep in mind that if there are old water pipes in the apartment, sometimes you have to first replace them and only then connect the boiler. Find out what amperage your electric meter is designed for. If it is less than 40 A, you will have to replace it too.
Required tools and materials
The type of tool used to fasten the water heater is selected depending on the characteristics of the walls. At the same time, a construction pistol is necessary in each case.
Hammer
A hammer drill will be required if the heater is hung on concrete walls to form holes into which dowels are inserted.
Electric drill
An electric drill is used in cases where holes are drilled in walls made of a softer material than concrete (plasterboard, brick, etc.).
Brackets are required to mount the water heater to the wall. The length of such hooks depends on the volume of the boiler.
Dowels
Dowels hold the brackets in the wall. That is, these fasteners take part of the load that the boiler creates.
High quality hoses
To connect the boiler, you will need at least two copper (not metal) hoses, one of which supplies cold water, and the second returns hot water.
Instructions and connection diagram for the device
Without instructions and a diagram, it is impossible to connect the boiler to the general network, since the device installation algorithm directly depends on the design of the heater.
Filter
A coarse filter will be required if the heating device is installed in places where contaminated water (with large particles) is supplied.
Briefly about the main thing
Before hanging the boiler, you need to determine its installation location. It would be ideal if the wall were load-bearing, but it would also be suitable if it had a large load-bearing capacity.
The dimensions of the canopies on the water heating device itself play an important role in the installation process. Therefore, it is important to accurately measure the distance between the eyes. And also the distance from them to the upper plane of the boiler, adding 5 cm to it.
Depending on the material from which the wall is constructed, fasteners are selected. Brick, concrete - anchors for a water heater or self-tapping screws with plastic dowels. Wood – anchor with screw thread. Foam concrete is a better adhesive option.
Connection to the water supply system, as well as to the mixer, is made with flexible hoses.
To connect to the power supply, a separate loop is formed to the distribution board. In the latter, a separate machine and RCD must be installed.
Ratings 0
Installation work
Choose a place to install the storage heater as close as possible to the water taps and electrical panel. The water heater should not take up useful space. After checking the strength, markings are drawn on the wall, holes are drilled, plastic dowels are driven in, or a homemade shield is mounted.
At the back of the boiler there is a mounting plate with eyes. An anchor is inserted into the holes and screwed into a plastic dowel. If hooks were used, then the boiler is simply hung with eyes. When using studs, the mounting plate is pressed with nuts.
Upon completion of the installation work, connect the outlet pipes to the water supply, try to fill the tank with water and check how securely it is fastened.
Water heater “Ariston”
It is very important to prepare in advance all the tools and consumables for the work. Before starting installation, make sure you have the following tools:
Tools for installing a storage water heater.
- roulette;
- hammer drill with drill;
- adjustable wrench;
- spanners;
- wire cutters;
- pliers;
- two types of screwdrivers.
- Unipack type paste or FUM tape;
- tow;
- 3 shut-off valves;
- 3 tees;
- 2 connecting flexible hoses (if not included);
- metal-plastic pipe of the required length.
- if it is necessary to replace the wiring - a three-wire wire, a socket or a circuit breaker.
To install a storage electric heater, you will need a 32-40 A circuit breaker and a PVS 3X6 -3X8 cable.
Connection to communications
Connection to the general water supply network is carried out according to the following algorithm:
- Tow is wound onto the blue pipe of the boiler (designed to connect a hose with cold water), which is lubricated with Unipak.
- A tee is screwed onto the pipe, from the side of which a drain valve is then installed.
- The relief valve is screwed onto the bottom of the tee with the arrow pointing down.
- A shut-off valve and a threaded adapter are installed at the bottom.
- The second part of the hose is connected to a cold water pipe.
After this, a shut-off valve and an adapter to which the hose is connected are screwed onto the red pipe. The latter is then connected to the water supply.
Connecting the water heater to the water supply network.
Storage water heater: which company is better?
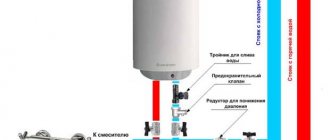
Conventionally, connection diagrams can be divided into two types:
- If the boiler will be used as the only (main) source of hot water, the connection is made according to the following diagram. The main mandatory elements are: shut-off valves, which are installed at the connection point to the riser and directly at the connected tank on the cold and hot lines. The latter will make it possible to carry out repair work on the heater without turning off other water consumers. It is mandatory to use a check valve that prevents water from draining from the device if there is no water in the supply system. It is also necessary to provide for the installation of a drain valve; it is necessary to free the water heater from liquid during dismantling.
- If the storage water heater will be used as a reserve (if there is a centralized hot water supply system), the connection is distinguished by the presence of a shut-off valve installed on the hot water main. This valve will help switch the water supply depending on its availability in the main system, and will prevent other users from collecting water from your storage tank.
Rules for operating water heating equipment
It is worth noting that the key to successful operation of water heating equipment for a long time is compliance with the rules for using water heaters. Here are the main ones:
- experts advise removing the heating element at least once a year and checking it for scale deposits, and this is due to the fact that at the maximum heating temperature of hard tap water, scale forms in the heating element, as a result of which heat transfer decreases, the system overheats and stops functioning; in this case, you have to change the heating element;
- It is forbidden to hang the heating element if there is no grounding in the room, since drops of water falling on the body can damage the device, as a result of which the possibility of electric shock to a person cannot be excluded,
- It is prohibited to connect an empty storage boiler to the electrical network;
- if there is an excess pressure of more than 6 atm in the city water supply network, then it is necessary to install a pressure reducer;
- It is not allowed to connect the heater to the water supply network without installing the safety valve that comes with the water heater;
- Water must not be discharged from a storage heater connected to the network;
- The consumption of water from the water heater as drinking water is excluded.
How to connect to water
Connection diagram of the water heater to the water supply. (Click to enlarge) It is necessary that the water meets at least the minimum requirements set by the water heater manufacturer.
If you have doubts about the quality of the water, it is best to install a purification filter. In this case, the service life of the water heater will increase slightly.
It is advisable to use a braided annealed copper pipe for water supply. Such a pipe can be easily shaped and is not afraid of temperature changes. And the strength of such connections is very high, so the taps for shutting off the water can be mounted on the tank itself.
After installing the water heater on the wall, cold water is connected to it. The combination valve, which is included with the water heater, is mounted on the pipe leading to the water heater (blue).
If the valve is installed by hand, it should be noted that there is no need to tighten it on the thread too much, four turns is enough. This is necessary to prevent stripping of the thread on the pipe.
A prerequisite is sealing the connection point. The valve may also be needed to drain water from the heater in case of repairs. Although, draining water through the valve is a long process. It would be better, of course, if space allows, to install a tee between the valve and the pipe. Then it will be much more convenient to drain the water.
Next, the pipe intended for hot water is connected either to the mixer or to the pipe that leads to the hot water tap. There are models of water heaters into which a third pipe is embedded. But according to the connection diagram it is not used. In this case, you just need to plug it securely.
Read an article on how to properly disassemble a Thermex water heater here.
Design Features
To figure out how to hang a water heater on the wall, you first need to find out the design features of the storage device. According to the type of heating, boilers are:
- Gas water heaters are connected to a mains line or a cylinder. They require the chimney to be vented outside the premises.
- Electric boilers operate by connecting to the home electrical network. The absence of combustion products does not require a chimney outlet, since there is no chimney at all.
- Indirect heating water heaters are equipped with a heat exchanger connected to the heating system.
What all these boilers have in common is a storage tank. The larger the tank, the heavier it will be when filled with water. This design feature determines how to hang the boiler on a wall made of different materials and where to choose a place for it.
Any water heater model is sold with mounting elements. Floor-standing units are easier to install, but wall-hung boilers require a solid wall. As standard, each boiler body is equipped with mounting lugs on the rear. Steel hooks included. If you don't have them, you'll have to buy them separately. The thickness of the hook should correspond to the diameter of the hole in the eyes.
Even an inexperienced person can figure out how to use a wall mount for a water heater:
- The first option is to drive the dowels to fix the device with a construction gun. However, not every owner has a tool at home.
- It’s easier to drill holes in the wall for plastic dowels and screw in steel hooks.
Standard mounting options are suitable for solid concrete or stone foundations. How to mount a boiler on weak walls will depend on the looseness of the material.
How to connect to water
Connection diagram of the water heater to the water supply. (Click to enlarge) It is necessary that the water meets at least the minimum requirements set by the water heater manufacturer.
If you have doubts about the quality of the water, it is best to install a purification filter. In this case, the service life of the water heater will increase slightly.
It is advisable to use a braided annealed copper pipe for water supply. Such a pipe can be easily shaped and is not afraid of temperature changes. And the strength of such connections is very high, so the taps for shutting off the water can be mounted on the tank itself.
After installing the water heater on the wall, cold water is connected to it. The combination valve, which is included with the water heater, is mounted on the pipe leading to the water heater (blue).
If the valve is installed by hand, it should be noted that there is no need to tighten it on the thread too much, four turns is enough. This is necessary to prevent stripping of the thread on the pipe.
A prerequisite is sealing the connection point. The valve may also be needed to drain water from the heater in case of repairs. Although, draining water through the valve is a long process. It would be better, of course, if space allows, to install a tee between the valve and the pipe. Then it will be much more convenient to drain the water.
Next, the pipe intended for hot water is connected either to the mixer or to the pipe that leads to the hot water tap. There are models of water heaters into which a third pipe is embedded. But according to the connection diagram it is not used. In this case, you just need to plug it securely.
Read an article on how to properly disassemble a Thermex water heater here.
How to mount a boiler on walls made of different materials
Attaching the boiler to the wall is carried out practically according to the same scheme, regardless of the design and dimensions, but there are differences.
- A metal anchor for a boiler is driven into vertical fences using a special gun - this is a reliable, but labor-intensive method. Not every owner has the necessary tool and needs to rent, borrow or purchase a new one for a one-time installation.
- Metal dowels are used, which are fixed in plastic tips. Reliability is somewhat reduced, but this method is easier. Holes are drilled in the wall monolith, plastic casings are inserted and L-shaped dowels are screwed in to hang the unit.
Foam concrete
For foam concrete it is necessary to select special wall mounts
Spiral-shaped nylon dowels are used to attach lightweight water heaters with a capacity of up to 50 liters to a wall made of aerated concrete foam blocks. Heavy units of 80 - 100 l are fixed using a boiler mount with a metal tip.
A steel plate is used, which is fixed with steel studs threaded through the thickness of the wall. On the back side of the partition, the nuts are tightened, and the dowels for the boiler are attached to the plate. There is an installation option using chemical or adhesive anchors that are securely held in the wall.
Adobe
It is not enough to drive steel anchors into partitions made of this material. For hanging, a special metal shield is used, which transfers the load from the water heater evenly to the entire wall. Hooks for mounting the unit are welded to the support.
The supporting element is attached to the partition in several places. Through threaded pins are used through the wall, and nuts and washers are screwed on the reverse side. The studs are welded to the shield or fixed with a bolted connection.
Ceramic tile
If the wall is finished with ceramics, you can hang the heater if there is a fence made of durable material under the cladding. The layer on which the tile lies must be a solid mass without voids and be no thicker than 3-4 cm. Metal anchors of the correct length are used so as to capture the ceramics, mortar and wall body by 10-12 cm. The boiler will break if it is only secured into the tiles with mortar, the layer will separate from the wall.
Plasterboard partitions
Fasteners for plasterboard walls
You can attach the boiler to drywall if you make a frame support when erecting the partition. The embedded element corresponds in area to the dimensions of the heater. A narrow pad will hold the anchors, but a heavy unit will push the plasterboard wall around the perimeter of the frame element.
Wood
The method of installation into the wall of a wooden house depends on the design of the fence. Solid walls made of logs or beams are strong and support the boiler on anchors. Over time, the dowel in the wood becomes loose, so an additional metal plate is installed. It will serve as a support and non-flammable spacer for the dimensions of the heater.
In panel wooden buildings, the frame is made of timber; between the supports there is a shingle filling with insulation. The support shield must be installed and attached to the frame to which the water heater is mounted.
Lining
The material is used for decorative finishing and is not considered as a base for fixation. A non-flammable gasket must be installed. An asbestos sheet is placed between the boiler and the lining if the finishing is on a solid foundation. Otherwise, you need a durable metal shield that will provide additional support and fire protection. The shield can be replaced with a frame made of a square pipe or another profile.
Plaster of Paris
A strong support is installed under the plaster or adobe in the wall, to which the boiler is attached
In this material, dowels and anchors are pulled out, so the plane of the ceiling and floor is used if the ceiling has a solid structure. Vertical posts are fixed on the upper and lower supports, sometimes longitudinal niches are cut out for them in the plaster. For fastening, steel anchors and dowels are used. Hooks for hanging the heater are welded to the support posts.
Brick and cinder block
The water heater is attached using an anchor screw to a wall made of sand-lime or red brick, if the thickness of the partition is more than 250 cm. Metal support pads are used if the stones in the wall have a hollow structure, with round or rectangular holes. In cinder block partitions, such gaskets are always used, since the strength of the material is inferior to brick.
Attaching the boiler to a wall made of aerated concrete
I recently had problems with my storage water heater. It began to leak. After several attempts to get it working, the leak did not stop. In the end, the decision was made to buy a new device.
There was a desire to purchase a larger boiler. The old water heater was used constantly, and the volume of 65 liters was not enough for us. I chose one with a 120 liter tank. But then I had doubts that the partition would withstand such weight. It is made of aerated concrete 100 millimeters thick. It is plastered on the hallway side, and tiles are laid on it in the bathroom. The total thickness of the partition is 130 millimeters.
I put off the purchase for a while and started looking for information on the Internet about the load-bearing capacity of aerated concrete walls. Having read horror stories about water heaters falling on citizens’ heads, the desired tank volume was reduced to 100 liters. As a result, the total weight of the boiler filled with water was 134 kilograms. In order not to further fall into thoughts about the advisability of purchasing the desired volume, the boiler was purchased urgently! I decided to think about how to mount the water heater to the wall after purchasing the device!
Of all the existing options for mounting the boiler to a wall made of aerated concrete, I chose mounting it on a metal frame. I immediately ruled out the option of mounting on through studs with plates, imagining studs with nuts protruding from the wall in the hallway. I didn't need such beauty. I also didn’t want to fasten it through wooden blocks, it wasn’t pretty, and the room was damp. And I thought that a metal frame was the best option.
Types of water heaters
In a system with a single-circuit boiler, a boiler is used to heat water
Boilers are classified based on the type of energy they use and their operating principle. The storage unit contains inside a tank with a heating element, in which a specified volume of water is heated. The advantages are durability and economical operation, while the disadvantages are large weight, dimensions and the need to wait for the liquid to heat up.
Water heaters are:
- electrical;
- gas;
- indirect heating.
Flow-through models heat the water before entering the mixer. This model is mounted on a water pipe and works as a heat exchanger that passes liquid in an arbitrary flow. Cold water heats up to boiling water in a few seconds and hot water flows into the tap.
Gas
Gas boilers are almost always made in a flow-through version and contain inside a heat exchanger made of copper flat elements that transfer energy to the water tube. The burners are located under the heater and transfer heat to the plates. The collector of used gases is located above the heat exchanger, collects them and directs them to the chimney through natural draft or forced ventilation.
Electric
The heat source in the form of a heating element is placed inside or under the built-in water container. The water heating tank is protected by a thermal insulating layer of foam rubber or polyurethane and a casing. There is a control panel on the front for adjusting the temperature.
The heated water in the tank is replaced by cold water when dispensed from the tap. If the supply of warm liquid runs out, you need to wait until the device warms up. The sensor coordinates the temperature and turns on the heating element when the indicator drops below the established norm.
Indirectly heated
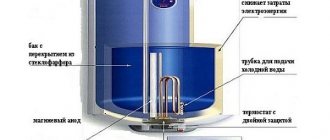
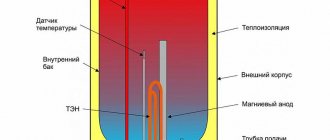
The water is heated using the energy produced by the boiler
The equipment operates in winter using energy generated by a heating boiler using gas, electricity or coal. The unit supplies hot water to several water points thanks to its high performance. It is a cylindrical metal tank protected by thermal insulation.
Inside the container there is:
- a heat exchanger in the form of a coil (tube) through which antifreeze or water from the heating system flows;
- magnesium anode to protect the internals from corrosion;
- thermostat to coordinate temperature and start;
- valve to protect against dangerous pressure.
The presence of a check valve in Termex water heaters
In the store, the check valve is marked with a water flow arrow and is connected to a bypass valve (ribbed fitting in the photo). It is necessary:
- When water enters the tank from the riser (for the first time you will have to open the mixer slightly and let the air flow). The system works without this, the pillow just accumulates on top and comes off when using the shower. We'll have to bide our time.
- As soon as the pressure inside the tank is equal to the riser, the check valve slams shut. The heating element begins to heat the water. The coefficient of thermal expansion of steel is less than that of water. The tank begins to bend under pressure. The valve does not allow water back into the riser. Deformation causes damage to the tank, leading to cracks in the protective enamel coating and corrosion (see above). The bypass valve releases excess fluid under pressure.
The check valve prevents the heated water from leaving the riser. It is permissible to use a water heater with an empty tap. When the tap is turned off, the upper part of the tank is drained, but 80 percent will remain inside. To use it, a tee is placed on the inlet pipe at the entrance to the water heater, water is drawn through the valve if necessary. It is important to make the correct wiring diagram. The tee is located between the water heater and the bypass valve.
Let us mention the rule for cutting in a tee. Usually sediment accumulates in the tank. If you cut a check valve into the lower outlet of the tee, when you turn off the water and try to empty the tank through the side outlet, dirt will settle on the valve, which is unfavorable for the operation of the latter. The scheme looks advantageous when the water heater is powered from the side, and the emergency drain goes vertically down. In this case, we partially clean the tank without disassembling the tank and removing the heating element, which is very convenient. Take note.
Place a coarse filter near the riser - the check valve does not like dirt. The internal channel resembles a Latin V placed on its side. There is a mesh at the top, and according to the rules, the entrance wall has a negative slope (directed downward), dirt accumulates inside. Deviate from the rules; during a planned or emergency shutdown of water, the rust will be washed into the riser. But deviation is not allowed. A good owner can clean the filter himself. Signs: the tank does not fill well, but the water drains through the outlet well. If cleaning does not help, the problem is with the check valve; the fittings should be removed and washed.
Before installing the Thermex water heater, make sure there is a convenient approach to the device. Quickly see: removing the heating element is not an easy task. If you do not want to reinstall the Termex water heater yourself, worry about scheduled maintenance in advance. The instruction manual clearly states how many times a year to clean the product by completely emptying the tank.
What is not recommended to do
How to install a boiler correctly was discussed above. But there are recommendations on what to do during installation and use of the unit:
- turn on the installed unit, not filled with water;
- connect a pipe from the water main to the water heater if the pressure in it is more than 6 atmospheres;
- remove the protective cover of the unit and drain the liquid from it without disconnecting it from the power supply;
- engage in installation if you do not know how to install a boiler with your own hands;
- the use of “left” components different from those recommended by the manufacturer;
- When installing the unit, ignore the installation of the safety valve;
- do not follow installation and safety rules.
Termex water heater - installation and connection
Thermex water heater is an integral part of household appliances during planned shutdowns of hot water in homes. A storage water heater powered by an electrical network is most often placed in a toilet or bathroom. It allows you to heat water to a certain temperature. At the same time, the water does not cool down for a long time thanks to the heat-insulating walls of the heater tank. The volume of the water heater usually ranges from 30 to 150 liters.
Let's consider the most common method of placing a Termex water heater. This installation can be carried out by anyone who knows a little how to handle a drill and an adjustable wrench.
Termex water heater - materials and tools
To install the electric heater, you will need an impact drill or hammer drill. This tool will be used to drill mounting holes in the wall. You will also need the following tools: an adjustable wrench, pliers and a Phillips screwdriver. To make the correct markings, you will have to use a water level, a tape measure and a pencil (or a marker if installation is carried out over a glossy surface).
From materials it will be necessary to purchase a sufficient length of metal-plastic pipes (preferably with a reserve), a pair of tees and a valve to relieve back pressure. If you want to further isolate the heater from the water supply system, then purchase another pair of valves. If the pipes in the water supply system and the heater have different diameters, then you still need to purchase adapters.
How a Termex water heater is mounted using wall mounts
The heater must be placed vertically in such a way that pipes for the water supply system can be installed underneath it. Usually 50 - 70 cm is enough for this. Before installation on the wall, it is necessary to determine the distance to which the mounting points on the heater itself are removed. Markings should be made on the wall in accordance with the measured distance. Using a level, it is necessary to ensure that these points are located strictly horizontally, and not parallel to the floor or perpendicular to the wall. Then holes are drilled in the wall for anchor bolts. After this, you can hang the water heater on the anchors.
How a Termex water heater is connected to the water supply
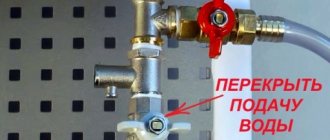
Before connecting to the water supply system, you must first turn off the water supply valves. Then open the tap to release excess pressure. After this, you can proceed directly to the connection.
First, tees are installed, immediately after the taps that turn off the water. An overpressure valve is mounted on the inlet pipe of the water heater. As a rule, it operates at a pressure of 6 - 7 bar. If necessary, you can adjust it towards a lower level of excess pressure. Then the lengths of the metal-plastic pipes that will connect the heater to the water valves are measured. The pipes are cut according to the marks and fixed to the heater and tees that were previously installed.
To check the tightness of the connections, water is supplied to the water heater. Gradually, water will fill the heater tank; this will take a certain time, which depends on its capacity and the water pressure in the water supply system. After some time, water will come out of the tap - this means that the heater is completely filled. After this, the tap must be closed.
Design Features
The design of any water heater necessarily includes fastenings. They vary depending on where the boiler is installed - on the wall or on the floor.
With a floor-standing device, everything is relatively simple. But installation to the wall is carried out using steel fasteners on the back side of the tank body for heating water. In this case, you will need dowels, the dimensions of which must correspond to the fastenings on the boiler. By the way, there are devices that require removing the back panel. The dowels are attached with a construction gun. If there is none, then you need to drill holes for screws for fastening using a hammer drill or drill.
Typically, fasteners - steel hooks - are included with the water heater. Parts should only be used if they are of high quality. Their diameter should exceed one centimeter.
The water equipment market is represented by three main types of boilers. The method of installation work will depend on their type:
- Indirect heating. The peculiarity is the absence of heating elements; heating of the liquid is possible from external sources. The design can be both wall and floor.
- Gas storage. The liquid is in a special container and is heated by the combustion of gas. It is recommended to entrust installation to specialists.
- Electric storage. Heating of the liquid is provided by heating elements at the bottom of the tank; the water temperature is regulated by a thermostat. Most popular due to ease of installation, connection and operation.
Features of installing a boiler in the country
Boilers are widely used in private homes. If we are talking about a dacha where people live mainly on weekends, then there is probably no heating boiler there. Therefore, with each visit, certain difficulties arise related to hot water supply. To avoid them, install a boiler.
Water heaters for cottages
The operational specificity of water heaters in the country is that the water pressure is almost always inconsistent. This is no longer a city apartment, in which the pressure is always the same, since it is supplied from a centralized water supply network.
In view of this, in dachas, water heating equipment is installed 2 m above the nearest water intake point. Thanks to this, the water will circulate naturally even in the absence of pressure.
Classic scheme for connecting a storage boiler to a pipeline
Regarding the installation technology, in this case it is the same.
Where to hang a water heater: recommendations from experts
As a rule, water heaters are installed in places protected from water freezing, close to water distribution points. If these points are located at a certain distance from each other, then several water heaters are installed. When choosing a location, you should consider the possibility of access to hot and cold water to the plumbing fixtures. It is also necessary to provide free space for subsequent maintenance of the boiler. When choosing a wall where to hang the boiler, you should take into account its strength. Often the water heater is installed in bathrooms on the back wall of the toilet. Before making a final decision, it is recommended to “tap” the wall. If it turns out that it is thin and there is a ventilation shaft behind it, you can hang a boiler up to 100 liters in volume on it; it is recommended to hang a water heater up to 200 liters only on load-bearing walls.
Before installing the boiler, it is worth finding out a number of important points, namely:
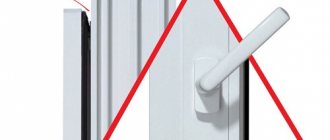
Scheme of a storage water heater.
decide by analyzing its technical characteristics and design; find out whether it is possible to shut off the water during the installation period and access to communications; where and at what height can the water heater be hung: vertically or horizontally, in the kitchen, in the toilet or in the bathroom. Before hanging the device in the bathroom, you should know that the water heater, like other household appliances, must be installed in certain areas. According to safety regulations, there are four danger zones in the bathroom
Therefore, it is important to correctly plan the location of each household appliance and choose the safest one for the boiler;
- plan the location of the cable, taking into account the characteristics of the room;
- consider how many mixers will operate from the boiler: several or one;
- will additional work be required: chiselling of main walls, installation of boxes, gating, etc.;
- where to drain water if it is necessary to constantly drain excess pressure from the system;
- consider which option is suitable for your apartment: flexible water supply to maintain aesthetics or reliable pipes;
- where to install the socket.
Preparatory work before installation
Connecting an electric heater yourself is quite feasible, and you do not need to have any special skills. The procedure will give you the opportunity to save your family budget by doing it yourself.
In this case, you must comply with all safety requirements. They are applicable for all activities related to work on electrical devices.
You should take into account the operating conditions of the electrical equipment and follow all the manufacturer’s instructions, which are set out in the technical documentation supplied with the device.
When starting to install a storage water heater with your own hands, you should:
- choose a place for installation so that the device does not interfere and at the same time you can easily approach it, that is, decide at what height
to hang the storage water heater; - choose the optimal wall to fix the boiler. It is necessary to take into account the fact that the storage water heater itself is heavy, even without taking into account the water that will be heated in it, and therefore, for the correct installation and connection of the water heating device, it is necessary to calculate the load on the wall used.
To do this, they resort to the formula: the tank capacity is doubled; - check the wiring to make sure that there are no faults and that it is suitable for use. If necessary, it can be replaced (maybe even partially);
- inspect the condition and identify faults in the water supply system. You should also connect all necessary communication systems to the heater installation site. In the case when the pipes are too worn out, the most correct solution would be to replace them partially or completely before connecting the storage water heater. The place to install the water heater can be a toilet
, kitchen or bathroom; - check the integrity and completeness of the purchased device before connecting it to the system.
We also advise you to prepare all the necessary tools that may be needed for the work, and consumables:
- a hammer drill and a set of drills with attachments for it, most home craftsmen have a similar tool;
- wrenches of the required sizes and in the required quantity;
- wrenches: pipe, adjustable;
- yardstick;
- screwdrivers for the used fittings;
- fum tape, fittings;
- pliers;
- a metal-plastic pipe of the diameter and length you require; you should decide on these parameters in advance;
- shut-off valves for correct and safe connection of the water heater;
- tees - several pieces.
DIY tools and installation
The boiler is tied after installation on the wall.
The position of the heater is marked on the fence. The distance from the holes on the bracket to the ceiling and the adjacent wall is measured.
Installation is carried out in 3 stages:
- Unit mounting.
- Connection in the water main.
- Electrical connection.
The boiler is connected to the water supply by blue and red pipes, through which cold liquid enters and hot liquid is discharged. Connecting fittings are used for fastening.
Tools used:
- hammer drill, construction gun, drill;
- roulette, level;
- welding machine;
- grinder with a circle for metal;
- set of wrenches;
- plumbing welding device.
Tools required for work
To install a water heater you will need:
- instructions describing the connection;
- pencil;
- metal hooks;
- dowels and screws;
- roulette;
- construction gun;
- hammer drill or drill;
- hoses;
- network cable;
- water purification filter;
- pipes
Clarification regarding hoses for supplying water to the unit: better, more expensive, but more reliable. Flexible products may fail prematurely. It is desirable if the elements for supplying pipes are copper.
How to mount the device?
Walls made of bricks or blocks are considered ideal for installing a water heater, but it is highly undesirable to mount them on a thin wall. However, fastening to other types of materials is also acceptable. The most common:
- drywall,
- tile,
- tree,
- lining,
- foam blocks,
- plaster.
Let's look at the installation features for each type of wall.
Drywall
Experts consider drywall a capricious material and question its load resistance. However, there are two effective ways in which you can install a boiler in a room lined with sheets of plasterboard:
- installation on reinforcement, which is laid under the wall cladding material;
- installation on holes made in the wall.
Tile
Sometimes during repairs the question arises: when is it better to install a heating tank - before or after laying the tiles. It's good to have options. What if the tiles are already laid? Qualified experts believe that in this case three conditions must be met:
- glue evenly applied to the tiles;
- the tiles must be laid without voids;
- the wall must be made of solid materials that do not allow the tiles to sag or wobble.
If all requirements are met, then any water heater can be mounted on top of the tiles.
Tree
Information about attaching a tank to a wooden surface is full of contradictions. According to some sources, installation on wood is extremely undesirable, since the wall will not be able to withstand the colossal load, which will become even greater after the boiler is filled with water.
According to other sources, the installation is acceptable. True, with a caveat
Before fixing the water heater, it is important to select a non-combustible base for the unit in accordance with fire safety rules
Lining
This material in this case is considered capricious. Therefore, you cannot do without special conditions for the installation process. You will need two vertical beams, which need to be carefully processed and painted to match the color of the lining or tank. They are permanently attached, and the water heater is already hung on them. The lining itself is not capable of supporting the weight of the boiler.
Foam concrete
Special fastenings such as nylon spiral dowels will be required. If the volume of the device exceeds 100 liters, it makes sense to use metal fasteners. Two fastening options are acceptable - using metal dowels or using special or chemical anchors for foam concrete. The option using a chemical (or adhesive) anchor is considered the most reliable and modern, as well as environmentally friendly.
Key points when installing Termex water heaters
Let's look at how to install a Termex water heater yourself. Let us pay attention to the points mentioned in passing. By the way, don’t forget - the entire plumbing is put on at least three and a half turns. Otherwise, cut the thread. Self-installation of a Termex water heater is carried out according to the standard scheme. We will only highlight the silent places.
You cannot operate a Thermex water heater without a magnesium anode. In heating technology, a magnesium anode protects aluminum and steel against galvanic corrosion in circuits containing copper elements. This is stated in SNiPs. It is prohibited to operate iron and aluminum structures downstream from copper ones.
The same applies to water heaters. Copper heating elements are often used. Copper conducts heat well, and the efficiency of the device increases. There are steel heating elements. This is due to electrochemical corrosion: the difference in electrical potential between the steel tank and the heating element is zero. Consequently, destruction is blocked. We would like to note that the process of electrochemical corrosion is not associated with 220 V from the outlet. Metals in nature have a natural potential. Copper is on the right edge in the series of charge values, magnesium is on the left.
When a conductive medium is formed between two metals, charge transfer begins. As a result, one material becomes a donor and breaks down. Water heater tanks, not counting instantaneous models, are made of steel. In some cases, the alloy is alloyed, obtaining the properties of stainless steel, in others it is covered with enamel. There is no third. When the protective layer is broken, the steel comes into contact with water. As a result, if copper is lurking upstream, the process of electrochemical corrosion starts. All the more so because the full force of the impact falls on a small scratched area of steel. Due to this, the process of electrochemical corrosion occurs quickly. The tank begins to leak, the damage cannot be replaced under warranty or repaired. Draw conclusions.