Main or additional heat sources for a country house
Electric floor heating can be performed specifically on a dilapidated floor: on ceramic tiles or parquet.
In this case, it is most ergonomic to use heating mats. They make it possible to easily improve thermal comfort in a room that is already in use, without raising the floor level significantly and creating additional load on the ceiling.
When planning the installation of electric underfloor heating in a dilapidated building, you should not forget that as the main source of heat it can only be justified in buildings with good thermal insulation. If the total heat loss through the outer walls, floor and roof is enormous, in other words, exceeds thermal standards, underfloor heating alone will not be enough to heat the room to the required temperature.
In this case, electric underfloor heating can only serve as an addition to a second type of heating, for example a system with radiators. Here we are not talking about reducing electricity consumption but about floor temperature. It cannot be larger than the defined values. Otherwise, the floor must provide no more than pleasant warmth, neutral from a physiological point of view.
It is generally accepted that in rooms such as the living room or kitchen, the floor temperature should be a maximum of 29°C, and in the bathroom - 34°C. In areas under the windows, along the outer walls, the floor temperature can be as high as 35°C. But this is often not enough to compensate for heat losses at home and ensure a comfortable temperature in the room during frosts reaching -15-20°C (calculated temperature taken depending on the region of the state).
Warm floors using technology
Those who have wondered how to insulate a floor in a country house have probably heard more than once about “warm floors.” This is the installation of a heating system under the surface of your floor. For these purposes, a cable or flexible tubes through which water is driven can be used. The heat source can be any heating boiler - gas or electric. Such a system is laid on top of a layer of insulation, distributed under the entire floor, in the form of circular or parallel fastening of wires or tubes. Such heating will help you feel comfortable and maintain the air temperature in the room. In this case, experts will be able to advise you on how to make a floor in your dacha.
The floor in the dacha creates the atmosphere. It’s one thing when you can calmly walk on it in socks, or even barefoot, sit on the carpet in the evenings, allow children to play with toys on the floor, and quite another thing when it’s icy and any contact with it only threatens to catch a cold. For a dacha floor you don’t need a lot of materials, and working with them is simple and straightforward. When you move into a new house, or decide to spend the winter outside the city, be sure to think about the structure of the house, because its most vulnerable places are the floor and roof. An insulated floor in your dacha will save money on heating and subsequent repairs, so be sure to carry out all the necessary work. They can be done year-round, as long as your subfloor is not damp.
Methods for insulating a wooden floor
SNiP 02.23.2003 clearly defines the standard values of heat transfer resistance and requirements for thermal engineering calculations, which should be used to guide the choice of insulation thickness. Many inexperienced self-taught builders mistakenly believe that the thicker the insulation, the better. If the insulation is too thin, the house will be cold; if it is too thick, you will be wasting your money.
That is why it is important to choose the right layer thickness depending on the thermal insulation material and the material from which the walls are made. The climatic conditions of the area in which the house is located also play an important role.
All these nuances are described in detail and taken into account in SNiP.
Without going into the intricacies of thermal engineering laws, experts advise building floors over a cold basement with insulation 12 cm thick for the middle zone, 20 cm for the northern regions, and insulating the interfloor floors with an 8-centimeter layer.
It is much more convenient to insulate wooden floors in a house than walls or ceilings, if only because their design involves the use of joists and a subfloor. You can pour expanded clay, shavings into the space between the joists, lay the slabs neatly and tightly, or blow everything out with foam. Thus, insulation with any material occurs according to the general principle - it is placed between the joists and covered with a finished floor (in some cases, additional hydro- or vapor barrier is required).
Insulation of floors with low underground
In houses with a limited subfloor size, it is impossible to place thermal insulation material as usual - between the joists. To do this, you will have to dismantle the entire flooring, so if this is your case, get ready for labor-intensive work.
Sequentially perform the work:
This method describes how to insulate a floor in a country house if construction has already been completed, but it is best to take care of thermal insulation at the time of designing the house.
Insulation of floors above a high cellar
The nature of the actions in this case is no different from the previous one, except that you do not need to increase the height of the logs, dismantle the finished floor covering and the stages of work should be performed in the opposite order. The only caveat is that for insulation in this way you cannot use bulk materials - expanded clay or sawdust.
Progress:
Everyone decides for themselves how to insulate the floor, but it must be done in any case. A warm floor in a dacha will keep you warm in the winter and give you coolness in the summer, reduce heating and electricity costs, and become the key to the health and comfort of the residents.
How to prepare the house?
Regardless of whether the dacha will have heating or not, it is recommended to insulate the building. Thermal insulation material is laid on the walls, floor and roof. The insulation will keep you warm in the cold season and cool in the summer.
- It is necessary to prepare the base for laying the underfloor heating system. If the floor is not insulated, then it is opened and backfilled with expanded clay and crushed stone; layer 30 cm.
- Lay membrane waterproofing and insulation; layer 20 cm.
- A concrete screed 5 cm thick is made.
- A moisture-repellent impregnation is applied to the screed and the base is covered with insulation; thickness 5 cm.
- A damper tape is installed along the lower perimeter.
- A reflective screen is placed on the floor surface.
- The “warm floor” system is being installed.
- Perform a screed. For a liquid main, the depth is 8 cm. For a cable section or mats, it is 5 cm. Thermal film does not need a screed.
If the floor is wooden, then backfilling is done between the joists on the sheathing. Repeat all stages of preparatory work. Instead of a screed, a surface is formed from plasterboard or cement-fiber boards.
We recommend: How to install heated floors under PVC?
Lay the highway on a foil backing and cover it with a wooden sheathing. The thermal film heating system is mounted directly on the wooden floor, on the lathing.
General principles for arranging wooden floors
If you are planning to install floors made of natural materials in your country house, plan the work for the end of spring
This is important because during this period the tree will absorb less moisture. If the assembly of floors in a cottage or house cannot be postponed until the recommended time and the work needs to be done in the summer, choose a dry, hot period, without heavy rains and dew.
Regardless of the method used to install floors, it is extremely important to pay maximum attention to the quality of the lumber. Wood must be treated with special agents against rotting, moisture, insects, as well as a fire retardant composition
Installation of heated floors
The easiest way to install a heated floor yourself is thermal film, the installation of which does not require much time and effort. During the work you will need the following:
- heat reflecting material;
- thermostat;
- electrical power cable;
- electrical tape (mounting tape);
- rivets and pliers;
- mounting grid (if you plan to make a screed).
Scheme of a warm water floor.
Thermal film is placed at a distance of 50-70 cm from the walls around the perimeter. A very important point: you cannot place furniture on it and do not install a plinth on top of it. The thermal film strips are fixed with clamps parallel to each other and insulated with tape. It is not necessary to make a screed; you can immediately lay the covering. However, if you plan to lay a soft covering, for example, carpet or linoleum, then it is worth giving the base additional rigidity by laying sheets of plywood or MDF.
Cable heating systems require additional dexterity and certain skills when installing. For installation you will need the following materials:
- thermal insulation, which can be solid foam with a density of at least 20 kg/m, polyurethane or hard mineral wool;
- polyethylene film;
- metal mesh for fastening the heating cable, it ensures insulation of the cable from the surface of the thermal insulation;
- cable ties or soft binding wire to secure the cable to the metal mesh;
- mounting tape (used instead of metal mesh);
- heating cables;
- thermostat.
Before you begin installing a heated floor, you need to develop a project and prepare the base; it must be level and clean. A layer of thermal insulation, plastic film and metal mesh must be laid out on the prepared surface. Be sure to follow this sequence.
According to the heated floor design, the heating cable is attached to a metal mesh. You can secure it using cable ties or soft binding wire. you can also use a special mounting tape if the thermal insulation will be filled with a special solution (for fastening the heating cable).
Once you have completed installing the cable, you can move on to the next step - installing the temperature sensor. Then the entire surface is filled with sand-concrete mortar, the thickness of which must be at least 50 mm. You can also use a self-leveling (self-leveling) solution. In any case, the cable must be completely “sunk” in the solution from start to finish. After the screed has completely dried, you can begin laying the final coating.
Installing water heating is technically more complex. In the process of installing a water heated floor, the following stages can be distinguished:
- Development of a project, which involves dividing the area of the premises into sections whose area does not exceed 40 sq.m.
- Laying insulating material on the prepared surface (necessary to avoid heat loss).
- Installation of reinforcing mesh and laying of pipe contours.
- Pressure testing of the heating system.
- Pouring concrete.
- Final finishing.
If you doubt your own abilities, it is better to seek help from professionals. This way you will save money and avoid disappointment.
Step-by-step instructions for installing a heated floor system
Let's look at the installation process using the example of laying a Caleo Line heated film floor. The example also uses a 3mm reflective substrate and regular plastic film. In our example, there was nowhere to take the furniture out, so the author had to drag it around the room. Well, let's get straight to the workflow.
Step 1. The author began, as mentioned above, with manipulations with pieces of furniture.
You should start with furniture
Step 2. Then all debris and dust had to be removed from the floor (otherwise they could push through the film heating elements in the future). You definitely can’t do without a vacuum cleaner here.
The floor needs to be cleared of debris
Step 3. All things were moved to one half of the room, while work was carried out in the other.
All things are moved to one half of the room
Step 4. Next, the tapes of the film floor itself were rolled out. It is recommended to start from the connection side.
Laying film heated floors
Step 5. The film was attached to the substrate using adhesive tape (regular reinforced tape was used). Also in the photo you can see the already installed thermal sensor.
The film is secured with tape
Step 6. The author had to cover the floor with film in parts, as can be seen in the photo.
Laying process
Step 7. Another fragment is glued. Care must be taken not to damage the infrared film while working.
Avoid damaging the heating elements
Step 8. After completing the installation of the film, the functionality of the system was checked - the latter was connected for a while.
System health check
Step 8. After this, plastic film was laid, which was also secured with tape.
The floor is covered with film
Step 9. Next, the finishing floor covering was laid (in our example, laminate). Here are the first 4 rows of lamellas laid.
Laying of laminate flooring has begun
Step 10. The installation process continued and now we have smoothly come to the end.
Laminate installation process
Step 11. Last row left. As is usually the case, it had to be cut up.
Last row laid
Step 12. This row was the most difficult, it took a lot of time and effort.
The last row is the hardest
Step 13. As a result, a small insert came out, but it would not have existed if the area of the room had been at least 50 mm larger.
Perhaps this insertion would not have been necessary
The advantage of the system is that the floor warms up evenly and quickly (in an hour the temperature rose by about 15 degrees, but it was warm outside). Also, heat goes from bottom to top, that is, the entire volume of the room is heated.
Calculator for calculating the number of laminate boards per room
Go to calculations
Prices for Tarkett laminate
Tarquette laminate
Installation of underfloor heating system cable
The cable is laid on a layer of thermal insulation (expanded polystyrene or mineral wool), covered with moisture-proof insulation (film) and a narrow layer of cement paste. The film protects the thermal insulation from the penetration of liquid from the solution. If the cable is laid in wet areas (in the bathroom or kitchen), moisture-proof insulation must be placed under the top layer of the floor.
The thickness of the thermal insulation layer depends on the base and the type of premises underneath:
- a narrow layer (3-5 cm) is laid in floors above heated rooms;
- a thicker layer (7-10 cm) - in floors above basements or unheated rooms;
- The thickest layer of insulation (more than 10 cm) is needed for floors on the ground, floors with open space under the floor, floors above a bay window or loggia.
In addition, the design of the floor is important: the higher the thermal insulation properties of the flooring material, the thicker the layer of thermal insulation needs to be laid. Heating cables are fixed to a tape or mounting grid at the required intervals, and then covered with a layer of cement mortar with the addition of a plasticizer or a layer of gypsum or cement screed.
Attention! In underfloor heating systems installed in wooden floors on joists, heating cables are laid brightly on thermal insulation and mortar
are not covered. An air gap of 3-5 cm is left between the heating wooden covering and the body elements.
Optimal insulation for wooden floors
There is no point in discussing the best material for thermal insulation of a wooden floor. Almost everything is applicable, from grandfather’s dry leaves to expensive vermiculite. Floors in wooden houses are insulated using loose thermal insulation options, mats and slabs.
Since the list of requirements for any insulation consistently includes lightness, minimal water permeability, durability, and operational safety, all these qualities are quite satisfactory for builders and owners of wooden houses.
The choice mainly depends on the financial capabilities of the owner, the type of base and the method of installation. Owners who are not limited in funds will be able to purchase progressive, easy-to-install materials with detailed instructions on how to insulate the floor in a private house without the involvement of builders and with an accurate indication of the thermal properties of the factory product on the packaging. If you want to save money, you will have to tinker a lot with traditional insulation schemes.
Insulation for thrifty owners
Independent home craftsmen who do not want or do not have the opportunity to invest significant sums in insulation can use the following as a heat insulator:
- dry sawdust, which pleases with a minimal price, but requires reliable waterproofing on both sides of the insulating layer due to the tendency of the material to actively absorb moisture;
- sawdust granules, which are a more practical option, treated with an antiseptic and fire retardant;
- slag, which attracts cost, but is used primarily in floor insulation schemes on the ground;
- expanded clay, used to create a heat-insulating layer of considerable thickness, since its optimal thickness for our latitudes is considered to be 30 cm;
- simple mineral wool without foil and corrugated shells that increase thermal performance;
- roll insulation, created on the basis of glass fibers, slag wool;
- polystyrene foam, which requires measures to protect it from the encroachment of rodents and from fires.
If you follow the rules for installing thermal insulation using the listed materials, heat leakage through the lower ceiling will be eliminated. However, laying them will require impressive labor efforts.
Modernized, expensive insulation materials
If the owner of a country property does not have the main task of how to insulate the floor in a wooden house at low cost, then he has at his disposal:
- Vermiculite is a product of processing hydrated mica, which has excellent insulating qualities and long service life;
- Penoplex is extruded polystyrene foam produced in slab format with increased strength and excellent waterproofing properties;
- Various modifications of insulation with the brands Ursa, Thermolife, Isovent, Penofol, Izolyte, etc., which are mats and slabs with bases made of foamed polystyrene, glass wool and a basalt analogue, optimized by increasing wear resistance, minimizing water permeability, applying foil shells to reflect back heat rays and other methods.
In case of minor heat leaks, you can insulate a wooden floor with ecowool or polyurethane foam, but without special equipment it is impossible to blow in these materials.
This is a significant disadvantage, but the advantage is the creation of a dense water-repellent insulation layer that does not require a device to protect the insulation from steam.
Warm floor on a concrete base
For the liquid floor line and for the cable sections, it is necessary to provide a fastening system. The best option is reinforced mesh. It is necessary if the system is subsequently covered with screed or tile adhesive.
The floor line to the mesh is reinforced with tapes with reverse teeth. Staples, a stapler, and mounting tapes with locks are used as fastening elements.
- The ends of the liquid line are connected to the distribution comb. Pipes lead from it to the heat exchanger, which is located in the firebox. The cable is connected to the thermostat.
- No fastenings are needed for cable and carbon mats. They are produced in rolls. The rolls are rolled out over a heated area. If it is necessary to rotate the cable mat, then the mesh is cut. The conductor remains intact. The system can be rotated at any angle. To rotate the carbon mats, the connecting wire is cut. The integrity of the rods is not violated.
- The thermal film is cut along the dotted lines, forming sheets of a certain length. The distance between the sheets should be 1 cm. Secure the tape to the base with tape.
- Mats and sheets of thermal film are connected in a parallel way.
- A temperature sensor is placed on the surface of the electric floor. A niche is being created for him.
- Connect the electrical wires from the “warm floor” and the temperature sensor to the regulator.
System selection
There is electricity at the summer cottage. Water is often supplied only on certain days of the week; houses are usually not connected to the gas mains. Liquid heating is installed only if the room has a stove that runs on solid fuel.
It is advisable to install water heating in a two-story house or in a cottage with a large heating area.
If the summer house does not require heating units, then electric heating elements are used as heating:
- cable section; a conductor is laid on the floor; It is recommended to cover it with a 5 cm screed or tile adhesive; for normal heating it is enough to cover 70% of the active area; Cables are not laid under furniture and household appliances; the circuit is mounted with a double “snail” or double “snake”; in this case, the cold circuit is located between the hot turns of the cable; heating is effective over the entire floor surface;
- cable mats; the system is easier to install than sections; the conductor is secured to the mesh with a snake; heating may be uneven; the further away from the power source, the cooler the cable will be;
- carbon rods; the rods are assembled into mats; installation is not difficult; cover the mats with screed or tile adhesive;
- carbon thermal film; the system is installed on any surface; laminate is immediately laid on it; for linoleum you will need to form a covering from plasterboard; the film can be covered with fiberboard or clapboard, but to cover it it is necessary to install logs and make lathing; It is not recommended to violate the integrity of carbon elements;
- electric liquid heating; a pipeline is laid on the base; it contains a heating cable; pipes are filled with propylene glycol; the coolant does not circulate through the main line; it heats up due to the cable, transfers heat to the floor; the conductor is connected to the network.
We recommend: What kind of substrate is needed under a laminate for a warm water floor?
For a country house that does not have a liquid or solid fuel stove, it is recommended to install electric heating systems. They consume less energy than air heaters.
Heating can be turned off if the country house is not in use. It will take 48 hours to achieve normal thermal conditions in the premises, so it is recommended to turn on the system long before arriving at the site.
If there are frequent power outages in the area, then the optimal heating system will be a liquid circuit from the furnace. A “warm floor” in a country house is installed without a circulation pump. Pipes are brought to the floor main at an angle.
For the return pipe, the slope is made towards the boiler. The coolant circulates due to gravity. The stove is chosen to burn for a long time so that the coolant does not heat up to a high temperature.
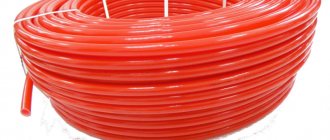
Water-type warm floor
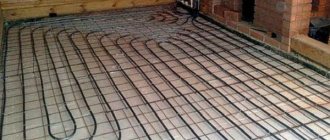
The design of this system is simple: heat comes from water, which passes through pipes located in the screed. This system includes:
- pipes;
- thermal insulation;
- fastening materials,
- components for making expansion joints,
- manifold with fittings for connecting pipes to the heating system.
This system uses metal-plastic and polyethylene pipes. They should be laid in the same way as an electrical cable - with a snake. The distance between the turns should be no more than 30 centimeters. Installation of water heated floors is much more difficult than electric ones. The step-by-step instructions are as follows:
- The beginning of the installation of this system will be the installation of a manifold and a unit in the form of a block, which will combine a pump and a mixer. It is the unit that will ensure that the temperature you select is maintained. The block is responsible for distributing water among the turns. This entire structure is attached to the manifold cabinet.
- The next step is to prepare the floor, it is worth clearing it of debris and checking the evenness of the surface.
- Thermal insulation tape is laid around the perimeter.
- Then it is worth laying a vapor barrier to protect the system from moisture from below.
- Next, for quick installation of pipes, the floors are lined with polystyrene foam boards. The slabs are laid overlapping; for this they have special grooves.
- When laying pipes according to the diagram, be sure to maintain the distance between turns. A spring conductor is used to fix the bend.
- When the design of the circuits is completed, the ends of the pipes must be connected to the distribution manifolds, and servos are installed. They make it possible to regulate the operation of the entire structure using a room thermostat.
- Before starting the system, it will need to be checked for leaks, only after that you can make a concrete screed. The floor can be put into operation no earlier than after 28 days.
To summarize, I would like to note that electric-type underfloor heating is better suited for summer cottages. If you want to make a water-type structure, you must be prepared for the fact that at the end of the summer season you will have to drain the water from the pipes. Another advantage of an electric floor is that it is more economical compared to others. Now you know what a heated floor is and which option is best for your suburban area. You can safely begin installing it, and let your home be warm.
Why choose “warm floor”?
The main advantage of using underfloor heating systems in country houses is the ability to move across the floor barefoot, without fear of hypothermia and without fear that the “child” will catch a cold. Indeed, when heating a house with warm floors, drafts disappear and the air warms up more evenly.
Compared to classic methods of heating a country house, the “warm floor” system has the following advantages:
- Safe
- Provides the most comfortable microclimate for humans
- Doesn't take up space
Don't forget about efficiency and cost-effectiveness. Since underfloor heating systems do not heat the external walls, and the heat from the heating elements warms the entire area of the heated room, this work requires less energy resources.
Important! It should be understood that the use of heated floors as the main heating system of a country house only makes sense if it is well insulated. Otherwise, all the heat will escape through the ceilings and window openings.
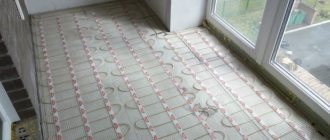
Heating mat
Fiberglass heating mats, which are equipped with a heating cable system, are also popular among consumers. The advantage of such products is their ease of installation, because their installation does not require such a labor-intensive procedure as additional pouring of concrete. The system is fixed in a layer of adhesive composition designed to fix the tiles. Thanks to this, the final layer of screed does not exceed three centimeters.
Heating mat
The devices are sold in rolls, which makes installation of the system easier. The technical characteristics of such products are exactly the same as in the case of prefabricated heating cable systems.
Types of heated floors and their features
There are several heating options:
- water;
- electric;
- infrared.
Water heated floors are a simple and effective solution. To install it, heating elements are placed in the concrete screed. As a rule, polyethylene and metal-plastic pipes (less often copper) are used. Hot water flows through them.
Unfortunately, this type of underfloor heating cannot be used in apartment buildings, as this disrupts the overall heat supply system. Of course, if you wish, you can try to get permission and coordinate the project with utility services. Water heated floors are an excellent solution for a private home; they do not require approvals, are safe, durable and economically attractive. However, it requires maintenance (filter replacement, etc.)
Electric heated floors are installed in a similar way, only the main element is a shielded heating cable with temperature sensors. There are different options here: heating cable, film material and special heating rods, depending on whether you are ready to raise the floor level. The heating cable is laid under a screed 5 cm high. When using a thin heated floor, namely mats, a screed is not required.
Diagram of a riser for a heated floor system.
You can use single-core or double-core heating sections, which are suitable for heating a wide variety of premises (residential, office and industrial). Using a thermostat, you can control the climate by setting the optimal temperature. In addition, you can monitor your energy consumption. Electric heated floors are more expensive than water ones.
Infrared heated floors (ITP) are very popular. A significant difference of this type is the use of infrared radiation with a length of 5-20 microns. This option is economical in terms of energy consumption.
Electric heated floor
Electrically heated underfloor heating is a very popular heating system for a country house. Its main components are a heating cable and a thermostat, which controls the entire system.
There are two options for installing the heating cable - either laid in a cement-sand screed or directly under the floor covering. Most often, tiles are used as flooring in this case, but other materials are also possible.
An important advantage of electric heated floors is the simplicity of its implementation. Any experienced home craftsman can design and assemble it.
Features of installing products with your own hands
If you are undertaking the installation of an electric floor system in a country house or country house with your own hands, then first you must carefully study the installation instructions, which are attached to the products and contain all the necessary information regarding installation, features of operational use and general safety.
Film placement diagram
A list of several rules will help avoid such problems:
- Be sure to calculate the area that needs heating and choose the system rationally.
- You cannot lay the cable under pieces of furniture that do not have high legs, and the infrared film must be placed only in an open space free of furniture.
- The base must be thoroughly leveled and dried.
- Under no circumstances should you shorten or lengthen the cable, cut it or perform other manipulations.
- Turning on the system is allowed only after the screed layer has completely hardened and dried. This usually takes from 28 days to a month, at least.
If you plan to use tile products as flooring, then it is best to choose a cable-based device, since this option is the most budget-friendly and suitable for this case.
Range of film products
First of all, you should prepare a place to place the temperature regulator, form a groove where the electrical wiring and temperature sensor tubes will be hidden. The output of the mounting ends will also be located in this area.
After this, the base is leveled, cleaned of dust and debris and covered with a layer of primer. Then the heat-insulating material is laid, and the corresponding sections of the mounting tape are glued according to the laying diagram.
Material cutting
Key points that should not be forgotten:
It is necessary to check the electrical resistance in the network. The cable should be taut during installation, but without much effort. It is necessary to take into account the minimum permissible bend. On straight sections you need to use special couplings. Do not allow the cable turns to intersect or touch.
Next, the temperature regulator is installed and connected to the electrical network. When installing a temperature sensor, a corrugated tube is used, which, for ease of repair work, should be placed between the turns of the cable.
After all connections are made, the system is checked for damage, resistance measurements are taken on the sections and the sensor and checked against the numbers in the documents. When the screed is completely dry, the device can be turned on.
Installation of mats
Making a system from heating mats is a less labor-intensive process than laying cables.
First, the mats must be laid out on the floor for estimation. They are laid with the wires down. After this, carefully cut the mesh fibers in the right place, taking care not to damage the cable.
Then you need to lay out the pieces of the mat so that they cover the entire free surface in the room. Mats with one-sided power supply are more ergonomic to install. Recently they have become cheap on the domestic market.
Mats with power connections on both sides are more difficult to lay so that the ends of the cables reach the junction box together.
Once fastening and installation are complete, the mats are covered with a thin layer of plastic mortar and a new floor covering is laid on it. In bathrooms and all other wet areas, under the floor covering, for example, under tiles, it is necessary to additionally install moisture-proof insulation.
If the coating is thin, the floor level will rise by only 1-2 cm.
Attention! Heating cables should not be laid above expansion gaps because they are easily damaged in such places. As a result, this may lead to a heating system failure
If the heating element is damaged, safety will be ensured by a differential involuntary switch, which will turn off the electricity supply, preventing electrical breakdown.
Advantages and disadvantages
Before installing a heated floor, it is necessary to evaluate all the pros and cons of this design. The benefits include:
comfort and safety; efficiency (compared to other methods of heating a room, power consumption is lower); aesthetics; hygiene (especially important for the bathroom); easy to install and requires no maintenance (electric heating); Suitable for all types of floors (i.e. can be installed under carpet, marble, wood, etc.). Heated floor temperature control diagram
Scheme for adjusting the temperature of a warm floor.
First of all, the materials used for final finishing must be safe so that during the heating process no harmful substances are released that can harm people.
If you decide to install a heated floor, then you should not use a coating that will interfere with heating. For example, a coating with double insulation will not work.
Operating conditions are directly related to the materials used. If you have chosen parquet, then you must take into account that the temperature should not exceed 24 degrees, and the power should not exceed 130 W/sq.m. Many experts do not advise laying parquet and cork on a heated floor. Parquet is too capricious a material, and cork has low thermal conductivity.
Flaws:
- financial costs associated with installation;
- the floor heating system emits an electromagnetic field, but it is minimal and safe for the inhabitants of the house (electric heating);
- maintenance required (water heating).
Infrared heated floor
The operation of this type of heated floor is based on infrared radiation, which heats not only the floor itself, but also objects located above it.
The system has several very important advantages:
- the use of radiation, which by its nature resembles solar radiation and is perceived more naturally by humans;
- It is not the air that warms up, but the objects in the room, which then themselves begin to give off heat;
- versatility and ease of installation - thin radiant film can be mounted on walls, ceilings, under floor coverings without cement screed and special labor;
- reliability and safety;
- efficiency;
- versatility;
- quick heating of the room;
- ease of use;
- possibility of automation of control;
- long service life.
Important! As practice shows, infrared heated floors are economical and completely safe. The thin film does not require space under the floor covering and is not felt at all even under thin and soft linoleum.
The infrared heating system also has disadvantages:
- heating of furniture, leading to overheating of the film. It can be avoided by not installing film in places where furniture will be located or using furnishings on legs;
- significant energy costs when heating large rooms;
- dependence on electricity supply - relevant if the heated floor is the main or only source of heat.
Two structures could serve as support for the lag
- Special support beams that were placed in nests arranged in the stone foundation of the house or rested on the lower crown (if the house was wooden).
- Brick columns, which were installed in the underground space and could serve as both a base for support beams and a support directly for the logs.
Nowadays, when there is a wide choice of building materials, including concrete, a concrete slab or pad is often used as the base of the ground floor.
And, if the slab is mounted directly on the foundation, then the cushion is poured inside it and distributes the load directly onto the soil located inside the foundation contour.
Let's talk about the finishing coat
Before laying down the finishing coating, you should decide what kind of material you need. After all, each room has its own load and humidity level. In addition, when planning the installation of floors in a dacha, you need to take into account that in winter the room will not be heated.
Concrete covering
A concrete floor for a summer house can theoretically also be installed independently. If you make it perfectly smooth and paint it, it will have a fairly good appearance. This coating is strong and durable; you will need to refresh the paint every few years and the floor will be like new.
But no matter how hard you try, concrete is concrete, it will be cold, if you cover it with a carpet or bedding, the cold will still be felt. Even in the summer, doctors do not recommend walking barefoot on concrete.
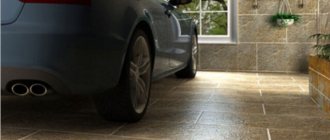
This option may be suitable for a summer kitchen, garage or outbuildings. In residential premises, a concrete screed is used as the basis for the final coating.
We use natural wood
The installation of natural wood floors in a dacha is a classic. People have been laying them for hundreds of years. The price of such a coating will be average, but wood is a natural material and requires careful processing and care. In particular, good waterproofing of the wooden floor in the country house must be provided. Otherwise, the tree can quickly deteriorate.
This coating is also convenient because with a good base and well-equipped waterproofing, you will not need powerful insulation. The covering is covered with a tongue-and-groove board with a thickness of at least 40 mm, which itself is quite warm.
When deciding how to paint wooden floors in a country house, experts advise paying attention to acrylic varnishes and paints. In the old days, the floor was traditionally painted with oil paint, of course it is practical and durable, but with such a coating the wood does not breathe and the whole meaning of naturalness is lost
A classic wooden floor is installed exclusively on joists, because it requires constant ventilation from below. DIY installation instructions are quite simple. Initially, waterproofing is laid, wooden logs are mounted on it, onto which a tongue-and-groove floorboard is already nailed. Insulation is laid between the joists.
Laminate
Laminate coating appeared about 20 - 30 years ago, and currently it is one of the most popular. The appearance of the laminate can be anything, the range of colors here is one of the widest. As a rule, it emits natural wood.
The advantages include a low degree of abrasion, ease of installation and durability. If we talk about the disadvantages, then this coating requires a perfectly flat, waterproofed base. The price of expensive types is steep, but budget options are afraid of moisture and cannot withstand heavy loads.
Linoleum
This material can deservedly be called the king of floors not only in the country, but also in most other residential or office premises. It can be thin or dense. Smooth and corrugated surfaces with varying degrees of stability are available. Linoleum behaves well in a humid environment and is not afraid of temperature changes, plus laying linoleum does not require high professionalism.
Linoleum has few disadvantages. In fact, experts consider the most sensitive area to be the ability to push through the material. Linoleum is afraid of sharp heels and heavy furniture. Plus, its installation requires a perfectly flat surface.
Wood is a material valued for its environmental friendliness, aesthetics and durability, and therefore it is not surprising that dacha owners choose wood as a construction resource for constructing floors. Coverings made of natural materials are laid not only in the country - in small summer houses, a wooden floor can be laid in a brick cottage or a foam concrete structure. How to lay a wooden floor in a country house and whether it can be done with your own hands - we’ll figure it out together.
Heating on a wooden floor
When working with wood flooring, you should always remember that the heating elements are located below the floor surface. There are several installation methods:
- the pipeline or cable sections are routed between the lags on the surface of the gypsum plasterboard; to pass the elements through the logs, holes are made; they install corrugated tubes or insulation for pipes;
- if the floor is made of boards, then a contour is drawn on the surface; For this purpose, a wall chaser is used; foil material is placed in the grooves;
- make the contour from plywood or lining; distance between workpieces 50 mm; metal thermal distribution plates are installed in the resulting niches; reflective material is placed in them;
- Thermal film is installed on a wooden floor without preliminary preparation;
- instead of concrete screed, wooden sheathing or sheets of plasterboard are used; the cladding is laid on a clean dry screed; laminate, linoleum; I'll have to give up the tiles.
When installing underfloor heating in a country house, it is necessary to provide an optimal source of energy. If possible, use a liquid line. The pipeline is filled with antifreeze. It doesn't freeze. Additionally, a circuit for DHW is output. Electric heating is provided if there are no power outages.
Autonomous heating with your own hands.
Economical battery boiler for heated floors Heading Do-it-yourself autonomous heating. Economical battery boiler for heated floors Heading Warm floors under laminate in 1 hour EASY and SIMPLE Heading Warm floors. 10 mistakes you should NOT MAKE
What to use in the garden?
There are two main types of underfloor heating: water and electric. Each of them has its own advantages and disadvantages, so you should choose depending on the operating conditions.
- If a country house has weak electrical networks, then it is better to opt for a water system.
- If the house is not intended for year-round use, then it is better to use electric heated floors.
Warm floor with water coolant
In water systems, the “vehicle” for delivering thermal energy to the consumer is a coolant (water, brine, antifreeze), which circulates through a pipeline laid in the floor structure. The heating source is an autonomous heat generator operating on gaseous, liquid or solid fuel. In order for the coolant to move along the coil in the desired direction, it is necessary to provide a circulation pump and control valves.
Water heating systems work great with all types of flooring. The best material with maximum heat transfer is ceramic or stone tiles. The second most popular option is underfloor heating under laminate. Before installing the screed, waterproofing, the required layer of insulation material and a reinforcing mesh should be laid on the concrete floor, on which the coil is directly installed.
The main advantages of this CO for a country house are:
- Possibility of uniform heating of large areas.
- Economical. The operating cost of CO, which receives thermal energy through the combustion of hydrocarbons, is significantly lower than the use of electricity.
- Long service life.
Warm floor heating in a private house is a rather expensive option and requires design and competent calculations at the stage of building the house.
Tip: Electric water heaters can also be used for a water system. The problem is that this method of heating the coolant is less efficient than heating the floor directly with electricity.