Original do-it-yourself balcony railings
Next, let's see how you can assemble the fences yourself from scratch.
Assembling wooden railings
The wooden fence is assembled as follows:
Support posts made of 70x70 mm timber are attached to the embedded parts or flanges at the corners of the slab. First, grooves for the handrail should be cut into them on top.
The fencing beam can be attached to concrete using an embedded piece. Tip: Oak or ash are best suited for railings. This wood is durable and not afraid of moisture.
- From below, along the edge of the slab on three sides, a beam is secured to the anchor.
- Balusters are installed on it using metal pins.
- A handrail is mounted on top of the balusters and corner posts using secret bolts.
Wooden balcony railings. Assembly diagram Tip: The bolt heads recessed into the wood can be covered with putty made from fine sawdust and PVA glue.
All metal parts are covered with wooden plates and covers.
Major or emergency repairs?
More serious baseplate failures should be inspected by a certified technician who will make a determination regarding the extent of the damage, the possibility of repair, and the type of repair required.
Emergency repairs consist of dismantling the remains of the old balcony and creating a new one in the same place. Not every city, even regional ones, has organizations that have permission and sufficiently qualified personnel to carry out major repairs of balconies. What can we say about emergency repairs, which will require special equipment and industrial climbers. It is very difficult to prepare a package of documents for such repairs. Therefore, the logical advice would be not to let the balcony slabs of your apartments fall into disrepair and to promptly respond to any initial deviations leading to further destruction.
Overhauling a stove is also not an easy task for DIYers. From the outside, the list of repair work does not seem very complicated: stripping the slab to a solid base; cleaning, leveling, adding missing reinforcement by welding; welding new railings to reinforced reinforcement; processing of a durable slab frame with concrete contact; production of formwork; concreting; waterproofing of the restored slab; installation of ebb tides to prevent repeated destruction; restoration of the surface of the slab (bottom) from the neighboring side.
But theoretical knowledge must be confirmed by sufficient experience to know:
- How long does it take to knock down the old crumbling layer?
- which part of the reinforcement and parapet can be left and which needs to be changed;
- what kind of concrete and how to restore the slab so that the remainder merges with the new concrete into a single whole.
To work, you need concrete in strength not lower than class B10, in frost resistance not lower than F32. Its preparation must be carried out on industrial equipment. And concreting must be done by a highly qualified specialist who understands all the intricacies of the process.
The general conclusion for both repair options is that it is an expensive undertaking that is performed by specialists.
Thermal protection of concrete floor
To properly insulate a concrete floor, you can use joist installation. At the beginning of the process, waterproofing is installed, and the logs are placed directly on it. An insulator is laid between the frame elements, and a vapor barrier is placed on top of it. At the very end, cladding is performed.
So, the instructions for insulating a loggia include the following processes: installation of a window unit, preparation, installation of thermal insulators and finishing. The last step is to introduce a heating source and lighting fixtures.
The simplest insulation of balconies and loggias converted into living rooms is the installation of a heating device powered by electricity. But it is not economical. It is much more expedient to use, for example, a heated floor system.
The only case where it is not recommended to install an additional thermal insulation system on the floor is heating mats.
If there is insulation, the solution covering the products has every chance of cracking.
Main stages
We will write out detailed instructions for insulating a loggia with your own hands. Firstly, glazing. Designs made of plastic are best suited for this.
This stage also includes the installation of additional expansion-type profiles. Before installing double-glazed windows, the parapet is laid, as well as the construction of side walls - foam blocks or light brick (silicate, ceramics).
Before insulating the loggia, you must carefully check the installation seams located around the perimeter of the window block. Inside they should be treated with special foam. Outside - cover with plastic “flashings” or “facade sealant”. All this is necessary to prevent the destruction of the foam surface and the negative influence of moisture from the street. Secondly – direct thermal insulation.
Laying the insulator
Installation of insulating materials is carried out after complete glazing with all preparatory measures. The insulation installation process itself is not too complicated. Plates made of foam plastic or penoplex are glued to the wall, covered with various protective compounds, and doweled. Then it’s time to finish the walls of the loggia.
For finishing in the case of penoplex, materials such as aquapanels, VGKL and GVL are suitable. After installing them, you can cover the wall with wallpaper or perform other work aimed at comfortable and aesthetic living.
How to insulate a loggia with your own hands
Upon completion of the preparatory work, it would seem that you can proceed directly to insulation. However, it is not yet clear where and how much insulation will be needed? Meanwhile, the design of the frame sheathing for thermal insulation also depends on this.
How to calculate the thickness of the insulation layer
Before moving on to insulating the loggia, it is necessary to decide which layer of thermal insulation will be sufficient to ensure comfortable living conditions in this room at any time of the year. Calculating the required thickness of insulation is not so difficult if you know the technique.
The current SNiP establishes standard values of heat transfer resistance for building structures of residential buildings. These parameters were calculated by specialists for all regions of Russia, depending on local climatic conditions. The normalized values of thermal resistance are different for walls, coverings (roofing) and ceilings (floor, ceiling).
If there is a desire to turn a loggia into an “all-season” room, then it is necessary to ensure that the thermal insulation parameters of its enclosing structures are brought to normal levels. You can find out the tabular parameter for your region from the SNiP tables, or even easier - from the proposed schematic map. Please note that the meanings are different, highlighted in different colors.
Schematic map of the territory of the Russian Federation to determine the normalized value of thermal resistance for your region
Knowing this parameter and the design features of his loggia, the reader can easily determine the required thermal insulation layer if he uses the calculator proposed below.
But before moving on to the calculations, pay attention to several important nuances:
- The design of the loggia itself is quite heterogeneous. This means that the outer parapet always needs insulation, and the rear wall, on the contrary, as a rule, is not insulated at all, only finished in the general style. In addition, the proximity of the loggia is very important. Thus, the end wall may border on an open street, a warm room, or a neighboring loggia, which in turn can also be insulated or even open to all winds. Similar situations can arise with the floor and ceiling. Naturally, the thickness of the insulation in each case will be different.
We tried to take this into account in the proposed calculator.
- To enhance the insulation effect and to create a reliable vapor barrier, foiled polyethylene foam (for example, penofol) is often used in combination with other materials. Its reflective layer, creating the effect of a thermos, dramatically increases the insulating qualities of the created thermal insulation system, and this often makes it possible to save both money and space by using thinner layers of insulation without increasing heat loss. This should be kept in mind.
Foil roll insulation dramatically increases the efficiency of the thermal insulation system as a whole.
The proposed calculator makes it possible to observe how the required thickness of insulation changes with and without penofol.
Now you can move on to calculations: for each surface of the loggia, of course, an individual calculation must be carried out.
Calculator for calculating the required insulation thickness for loggia surfaces
Go to calculations
The found value is usually reduced to the available standard thicknesses of insulation materials, rounded up.
Prices for popular types of insulation
Insulation
Stage 1. Ceiling insulation
Step 1. First, the suspensions necessary for further fixation of the guides are attached to the ceiling.
Suspensions
Step 2. Slots are made in the foam boards for hangers.
Step 3. The plates are secured using mounting foam or dowels made of plastic.
Balcony insulation with foam plastic
Note! The diameter of the dowel core is selected depending on the total mass of the insulation.
Step 4. All holes are filled with foam.
Stage 2. Thermal insulation of the floor
Step 1. First of all, spacers made of timber, pre-treated with an antiseptic, are laid on the floor - they will serve as support for the structure.
Lags
Note! When installing gaskets, they should be periodically checked with a building level to ensure they are level.
You also need to ensure that the sheathing does not protrude above the thermal insulation layer by a maximum of 5 mm.
Step 2. The logs are attached to the supports using self-tapping screws. Thermal insulation boards are placed between the latter.
Step 3. A layer of vapor barrier is laid (with foil on top).
Vapor barrier
At the same time, there should be no joints in the outer corners of the material, otherwise cold bridges, as they are called, will inevitably form. By the way, the reason for the appearance of such bridges can also be:
- metal frame fixed in the slabs themselves;
- wooden logs installed in the same way.
Step 4. All connections are glued with mounting tape to achieve the “thermos effect”.
The floor is over, you can move on.
Insulation of the balcony floor
Insulation of the balcony floor
Stage 3. Thermal insulation of walls
The need for insulation of the walls of the structure is determined. The front wall, as well as the corners adjacent to it, need careful thermal insulation. Next, the height of the additional expanders is indicated.
Thermal insulation of walls
It is advisable to use foam plastic boards with a selected quarter as insulation, which will prevent the formation of through holes at the joints. If similar slabs cannot be found, then ordinary ones are taken and laid in two layers. In this case, the seams should be shifted to avoid the appearance of through holes. The first layer is fixed to the covering slab using plastic dowels. The next one can be secured to the first one using polyurethane foam.
Guides for insulation boards
So, you will need insulation:
- side walls bordering the street;
- corners of walls that adjoin other rooms;
- walls in contact with other loggias.
A vertical strip of insulation is fixed under the glass unit and along it along the side and front walls. The height of the strip should be equal to the side walls, and the width:
- in a brick house - at least 50 cm;
- in a panel house - at least 30 cm.
For fixation, you can use the same mounting foam. In the corners, thermal insulation is laid in a layer of 2-3 cm, after which it is covered with foil vapor barrier in the same way as when insulating the floor.
Note! To enhance the effect, the vapor barrier is attached to the “warm” side of the insulation.
Do-it-yourself insulation of the internal wall of the loggia
Using hangers pre-installed on the walls, guides are attached. This is necessary so that an air “cushion” forms between the finishing material and the insulation. It is typical that if you plan to install dryers, curtains or lamps, then guides for them should be installed at this stage of work.
Insulation of a balcony without sheathing using mineral wool blocks
As guides, you can use either a galvanized metal profile or an ordinary wooden beam (coated with an antiseptic, of course).
Stage 4. Interior decoration
After installing the insulation, all that remains is to give the loggia a finished look, that is, to finish the walls.
Interior decoration
Step 1. First, all surfaces are covered with a sheathing of 2x4 cm timber. The timber is fastened directly to the base using dowels or self-tapping screws. Horizontality is controlled by the building level.
Step 2. Finishing material is attached to the sheathing. In most cases, plasterboard or plastic panels are used, since they are characterized by increased resistance to moisture. In this case, it is better to choose the second option, because drywall requires labor-intensive subsequent work - applying a primer, puttying and finishing with a topcoat.
Step 3. Plastic window sills are installed under the windows that overlook the loggia from the adjacent room. A threshold made of polyvinyl chloride is fixed under the door. It is typical that a separate log treated with an antiseptic should be installed under the threshold in advance.
Interior decoration
Prices for popular finishing wall panels
Wall panels
Stage 5. Heat conduction
It is worth remembering that it is impossible to insulate a loggia with thermal insulation material alone. No matter how sealed the structure is, heat will not appear there if it is not supplied there. Due to the fact that state standards prohibit water heating from being installed on the loggia, a thermal convector would be an excellent option. If the area of the loggia exceeds 6 m², then you can install two convectors at once at opposite ends. You can also install an electric fireplace or a portable oil heater.
Electric convector on the balcony
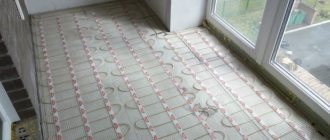
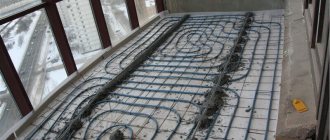
A more effective, but at the same time more labor-intensive option is the installation of an electric heated floor. To do this, even at the stage of insulation, a cable for a warm floor should be laid on top of the foam, bent in such a way that the maximum area of the loggia is covered. Next, all this is covered with a concrete screed about 45-50 mm thick.
Warm floor on the balcony (infrared)
Warm floor on the balcony (cable)
To prepare the solution you will need:
- “four hundred” grade cement;
- water;
- sand (mixed with cement in a ratio of 5:1).
When the screed is dry, ceramic tiles are laid on top of it.
When the screed is dry, ceramic tiles are laid on top of it.
Prices for infrared heated floors
Infrared heated floor
Laying out the floor on a concrete slab
A repaired or restored slab becomes a reliable base for a balcony floor. It’s just not advisable to level the outer slope of the slab using a concrete screed - excess weight load on the slab is undesirable. The slope is concealed by the use of wedge-shaped logs. They are laid with the high side facing the parapet. The result is a horizontal base for the subfloor. Now, in the case of the provided insulation of the slab, it’s time to lay foam plastic or aluminized padding polyester between the lags. After this, you can put a rough pillow and lay a laminate floor or other decorative finish over it.
Important! Mineral wool should be excluded from the possible options for selecting insulation for the floor and walls under glazing along the perimeter of the parapet. It quickly becomes saturated with moisture, as it shifts the dew point towards itself
The result is that it creates additional load on the slab, loses its geometric shape and falls off, and ceases to serve as insulation.
This material will help in performing simple cosmetic and restoration work. When contacting specialists to determine the scope of work ahead and select methods for solving existing problems, it will be useful to communicate with them in the same “language.”
Insulation of balconies and loggias
Insulation is carried out during finishing, after glazing work. Glazing, insulation, internal and external finishing of loggias and balconies have been the core activities of our Company for more than eight years.
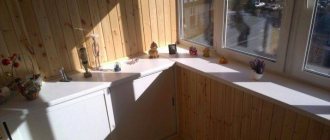
Our organization installed warm Veka double-glazed windows on the loggia. The picture shows the process of installing thermal insulation
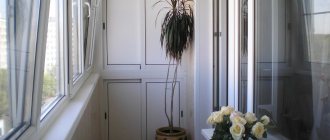
There, after the work is completed. The floor and railing under the windows are insulated with a wide layer of thermal insulation, and the transition between the windows and the parapet is decorated with a plastic window sill
The main mistake when repairing a balcony slab yourself
Installing a conventional sand-cement screed (using reinforcing mesh) on top of a concrete balcony base that has significant damage is a major mistake. Such “restoration” only adds excess weight, increases the load on the foundation (which already has defects) and in no way strengthens the reinforced concrete structure. Experts consider this measure purely cosmetic.
What can be done in this situation to make the slab more durable:
- We install a temporary support structure that will support the outer edge of your concrete slab. Naturally, this can only be done with the permission of the owners of the balcony located below, and only if it is in good condition and can withstand the additional load during the repair work.
- Using a hammer and chisel, remove loose parts of concrete from the surface of the slab.
- Along the entire length of the junction of the base of the balcony with the load-bearing wall, we hollow out a narrow recess.
- We attach the formwork around the perimeter of the slab.
- We install a reinforcement frame over the entire surface, which fits into the equipped gap.
- We clean the surface of the stove from dirt and dust.
- We apply a special composition (concrete contact) to it, which increases adhesion.
- We construct the screed from a mortar prepared from a special frost-resistant repair composition.
- After it has completely dried and gained the necessary strength (the time is indicated by the manufacturer on the packaging), we dismantle the formwork and temporary supporting structure.
- We apply a layer of waterproofing to the surface.
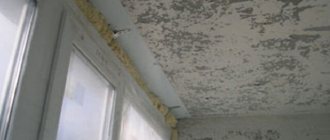
How to insulate the parapet (outer wall) of a balcony
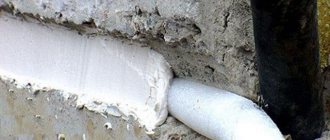
A parapet is one of the components of a balcony - an outer wall in contact with the street on which a double-glazed window is installed. In winter, this long concrete slab will definitely cool down the balcony:
Here, the ideal option for installing insulation would be gluing Isoplat sheets to a concrete parapet using polyurethane foam. In my case I used this:
It is necessary to prepare supports in advance so that the sheets are firmly pressed to the parapet, and leave the foam to dry for a day.
It was most convenient for me to use car tires, which perfectly served as spacers on the balcony and securely pressed the Isoplat sheets to the concrete:
After the wall on the balcony is insulated, it is advisable to immediately protect it from accidental denting, since Isoplat is a fairly soft material. For example, you can cover it with wood-effect panels like these (fiberboard “decorative beech”), which are sold in a hardware store:
The easiest way to attach these sheets to the insulation is with liquid nails. Apply glue around the perimeter of the sheet and in the center:
We begin gluing the fiberboard sheets to the insulation on the wall:
As a result, we get this finished version:
So, we insulated the floor and parapet (outer wall). Now the most difficult part remains - the ceiling.
Installation of balcony railings
Of course, the old fence may still be quite strong. But a major overhaul of the balcony slab already implies the installation of a new enclosing structure. In addition, if in the future you plan to glaze the balcony and insulate it, then it won’t hurt to think through a high-quality base in advance.
When installing fences, welding is indispensable. Even a beginner can work on a compact inventory welding machine that runs on mains power. But there are two more options:
- invite a qualified welder;
- secure the balcony railing using anchors; in this case, welding is not required.
The frame of the new fence is made of a rectangular profile pipe. This fence is easy to install and will have an attractive appearance. Next, a galvanized steel ebb is attached around the entire perimeter of the balcony slab. This will protect the edge of the slab from precipitation. screed on the balcony and what you will need for this.
Order Information
Call us at tel., or come to the office at 59 Baltiyskaya Street, room 23A. Placing an order involves a number of the following facts:
- RSU Aleksandrovskoye is open on weekends
- Our website shows full prices including delivery, lifting, all materials and labor. No surcharges are provided; you can completely rely on the offered prices when planning
- We have been making balconies for eight years, and we are ready to give a fairly accurate cost of the work over the phone. It will coincide with the prices offered on this website. Phone calls are answered by the same engineers who will come to you the next day to measure and sign the Contract.
- The prepayment at the time of signing the Agreement is 2,000 rubles. to order finishing, or 8,000 rubles. if the order contains windows. Regardless of the complexity and volume of work, final payment to the Customer is always on the day the work is completed
- We are confident in the proper quality of our Company's work. For many years we have been engaged exclusively in finishing, insulation and glazing of loggias and balconies; this is the only and main profile of our organization’s work
- All employees are domestic craftsmen, do not drink, have no criminal record; We do not have “southern” employees
- The installation team leaders have two or more years of experience working only on balconies and loggias, so they have experience
- We are proficient in winter installation technology, ensuring proper quality of work at temperatures down to -24 degrees. Celsius, regardless of precipitation
Related article: Freezer on the balcony in winter to what temperature
Reinforcing the parapet with foam blocks
Foam block, thanks to its undeniable advantages, is in great demand in the building materials market. It does a good job of strengthening the balcony parapet, while the material has increased strength and sound insulation, and the composition of the building foam block allows high-quality heat retention in the room. It is often used not only for strengthening, but also for additional thermal insulation of loggias in multi-story buildings. Another distinctive feature of the material is reasonable prices.
- Long service life.
- Low thermal conductivity.
- Increased resistance to high temperature.
- Installation using the material can be successfully performed by non-professionals.
- Safe for health.
Construction foam blocks also have disadvantages, for example, poor resistance to high humidity and natural precipitation (therefore, when installing the material, steam and waterproofing material are used).
The nature of work with foam blocks is as follows:
- We measure and calculate the dimensions of the parapet taking into account future glazing.
- We install the waterproofing layer on the supporting slab of the balcony.
- We lay the outer perimeter of foam blocks using a building level.
- We make the main plane of the structure “in a running start”, fixing it with special construction glue.
- We drill the necessary holes in the external wall and drive in reinforced rods at the junction with the foam block brickwork.
- We reinforce the masonry with galvanized mesh.
- Apply primer.
- We cover the structure with high-adhesive plaster.
Upon completion of work on the balcony parapet, we finish it with galvanized sheets.
How to insulate the floor on the balcony
First, let's talk about insulation. Especially for this article, I prepared 2 different materials, each of which has the right to exist. The first is mineral wool; the second is the heat and sound insulation board ISOPPLAAT (hereinafter referred to as Izoplat).
I think most builders, both beginners and experienced, know how to insulate a floor with mineral wool. We unwind the roll and cut it into pieces so that they fit evenly between the joists:
The recommendations here are as follows: work with gloves, safety glasses and a respirator, since direct contact of cotton wool with the human body will not do anything good (see my article: What are the means of protection against construction dust).
Even a novice builder can insulate a floor on his own. But if you want to insulate the ceiling, then laying mineral wool above your head is a much more difficult and unhealthy task, since, willy-nilly, the wool will hang on you throughout the entire work and fall off in small particles. Plus, you need to make a frame, otherwise you can’t just put cotton wool on it.
Therefore, if you are wondering how to insulate the floor on a balcony with your own hands, then mineral wool is a quick and cheap solution.
However, in my case, I set out to insulate the entire balcony from the inside, that is, in addition to the floor, lay insulation on the parapet (the wall in direct contact with the street) and on the ceiling.
The search for materials led to a rather interesting, but quite expensive solution called Isoplat.
What I liked about it is that it is an environmentally friendly natural sheet material. Isoplat is made from coniferous wood fibers, and there are no admixtures of glue or other chemical binders - everything is natural!
Isoplat is sold in the form of sheets with dimensions: 2700 x 1200 mm, thickness 10 and 25 mm. To cover the entire insulation area, I needed several of them. The main problem was not the delivery, but the lifting of such sheets up the back stairs to the top floor (due to the lack of a freight elevator). One sheet for an adult man is quite a liftable weight, i.e., we can say that it is not heavy. However, due to the fact that the sheet has such unfortunate dimensions in length and width, it is impossible to grasp it normally with your hands. Therefore, I will say right away that only two people need to lift it. It should be borne in mind that Isoplat is a fairly fragile material, and when lifting it, it is undesirable to hit it against the walls, since the edges of the sheet will be damaged. And you cannot take only one edge of the sheet, transferring all the weight to it, because the sheet can simply break in your hands. But, as they say, what can’t you do to keep your balcony warm in winter?
Sawing Isoplat is quite simple - using a hacksaw. However, this can be inconvenient in an apartment due to the huge size of the sheet, so I sawed in the hallway. But you must remember to clean up the trash after yourself!
When it blows from the balcony, you need to insulate everything: the floor, the walls, and the ceiling, so I immediately cut the sheets to size to lay them everywhere. In order not to forget where and what will go, each cut sheet must be numbered:
Isoplat insulation is installed on the floor in the same way as mineral wool: between wooden joists. But you need to lay it in several layers for maximum thermal insulation. I got 3 layers:
When the insulation is laid between the joists, it is necessary to lay sheets of plywood on the floor, seal all the seams on the floor (see the previous article in this section) and then begin installing thermal insulation along the concrete parapet.
Metal reinforcement
Metal reinforcement looks like this:
- If the technical condition of the parapet is acceptable (does not require radical measures), then it can be strengthened by welding metal corners to the areas of old reinforcement necessary for this.
- In case of severe wear and tear, the old metal parapet is carefully separated and then replaced with a new one.
Options for strengthening the balcony parapet before glazing Also, a good option for strengthening the parapet is the use of building foam blocks, the qualities of which perfectly strengthen the balcony parapet.
Strengthening the balcony structure
Analysis of the condition of the balcony
Before carrying out work on installing double-glazed windows, you should carefully inspect the balcony and determine its technical condition. In older houses, quite often the concrete slab is in poor condition. It is a common property of the house, so you cannot decide on your own whether it will withstand the weight of the reinforced parapet. This requires an expert diagnostic examination conducted by the Housing Office commission.
The fence on which the double-glazed window will be installed must have the following characteristics:
- Strength. The approximate weight of a single-chamber double-glazed window is 23-25 kg/m2, and a double-chamber one – 35-37 kg/m2. With a known glazing quadrature, it is very easy to calculate the load per linear meter of fencing.
- Sufficiently wide width. In addition to the plastic double-glazed window, an external ebb and possibly a window sill will be installed on it.
If the technical condition of the balcony allows, then you can strengthen the balcony parapet.
Sequence of work when insulating a loggia
It is necessary to clean the walls, floor and ceiling of the loggia from old facing materials. Large gaps in concrete loggias should be covered with concrete mixture.
Preparing the loggia
If required, the old balcony door and window are dismantled if the loggia is combined with a room. For a wider opening, part of the wall is knocked out. We must remember that combining the loggia is a redevelopment, so all actions must be coordinated with the BTI.
- Check the walls and floor again. All holes must be filled with foam. After the foam has dried, lubricating waterproofing must be applied to the lower part of the walls.
- Leveling the floor. Cement-sand mixtures are used.
- Waterproofing to protect against moisture.
The floors, walls and ceiling are covered with waterproofing material, such as roofing felt or expanded polyethylene film. This is necessary to ensure that condensation does not accumulate on the thermal insulation material. The roofing material is laid overlapping, glued to the base, gluing the joints using a gas torch. Instead of roofing felt and film, penetrating waterproofing is used, which is a thick mixture. It is applied with a roller or brush. You can also use polyurethane painting mastics.
Floor insulation
The floor should be warm, durable and light. There are several insulation options:
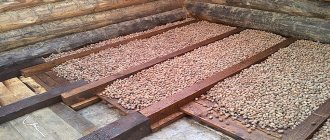
- the floor surface can be covered with expanded clay and a screed can be made;
- instead of expanded clay, you can glue a thermal insulation material (pressed foam plastic, extruded polystyrene foam) to the floor, and glue a gypsum fiber sheet on top;
- place wooden logs, place the selected insulation in the empty space, then nail tongue-and-groove boards onto the logs;
Insulation of walls and ceilings
plastering and painting, drywall or lining, lay in staggered order,
Covering with finishing material. For cladding, you can use moisture-resistant plasterboard, slatted or wooden lining, and wall panels. An air layer of 1.5 cm is left between the facing material and the insulation using an attached wooden sheathing, which is attached to the concrete wall with self-tapping screws. The selected cladding is fixed to this frame: plasterboard, lining. When facing with plasterboard, the joints between the slabs are sealed with putty. Painting fiberglass mesh with small cells is also used. The ceiling can be made suspended, under which the wiring can be hidden.
Flooring is laid on the floor. This can be a Euroboard up to 4 mm thick. Many people prefer to lay linoleum or carpet after laying wood flooring. When the option of floor insulation using a concrete screed is used, an electric floor heating system is installed. Turning off central heating is prohibited by building regulations. Or they use air heaters and electric fireplaces for heating. For individual heating in the room, you can install a radiator under the window sill on the loggia.
Installation of baseboards, sockets and switches.
Thus, the insulation of the loggia will depend on the goal being pursued and on the available budget.
Internal insulation
When carrying out work from inside the room, all elements of the balcony or loggia are protected from heat loss, with special attention paid to external enclosing structures and walls adjacent to the street or technical premises.
To protect the loggia premises from heat loss, it is necessary to perform the following blocks of work:
- if necessary, replace old glazing with new double-glazed windows or wooden structures;
- seal all defects and cracks in external enclosing structures;
- waterproof the walls, parapet, floor and ceiling, as well as the frame external wall for the balcony;
- lay insulation on all walls, floor and ceiling surfaces;
- attach an additional layer of vapor barrier;
- complete the final finishing of the room.
Related article: Balcony racks with doors
All types of work do not require special professional training, so anyone can insulate their balcony or loggia on their own.
It is important to follow the recommendations of the manufacturers of the materials used and basic building codes.
Preparing for insulation
A high level of thermal insulation of a balcony can be achieved if basic preparatory measures are completed. Such work is considered the most important.
- Strengthening the parapet.
The fencing of the balcony slab, which performs the function of ensuring safety and creates an aesthetic appearance of the structure, is called a balcony parapet.
As a rule, insulating a balcony involves glazing it. Modern double-glazed windows are heavy, so you can’t do without strengthening the enclosing parapet.
The parapet is strengthened with your own hands using various materials. The choice of material depends on the design of the balcony and the preferences of the owner. To strengthen the parapet the following are used:
welded metal structures. If the old fence is completely changed, then the structural elements are cut off at the balcony slab, and then a new, more durable structure is welded. Completely new metal structure with expansion along the base of the slab. When strengthening is carried out while preserving the old structure, supports from angles or pipes are additionally welded;
brickwork
An important condition is that the bricks lie strictly vertically. Before laying, the old fence is removed and markings are made
The bricks are laid on the mortar along the edges of the balcony slab using beacons;
IMPORTANT!
Brick has a lot of weight. In addition, in wet weather it absorbs moisture, which means additional weight increases. Brickwork is not suitable for light balcony bases.
masonry with foam blocks. The method is considered an alternative to brickwork. It is distinguished by its large masonry dimensions, which means it occupies useful space on the balcony slab. The laying is done from the walls along a stretched cord. Due to the low weight of the blocks, there is no increased load on the balcony slab.
- Glazing.
The most well-known and proven following glazing options:
wooden windows. The classic version of cold glazing. Best suited for DIY installation. The installed structure is inexpensive, but has a short service life. Without constant maintenance, windows quickly lose their performance;
metal-plastic windows. Provide a high degree of isolation from the street. Metal-plastic structures create reliable thermal insulation. Window installation requires skill, so it is best to trust it to professionals. Such windows have a well-matched price and quality;
frameless windows. The frames of such windows are almost invisible, since they are made of a very narrow metal profile. Such structures create a panoramic view. Installation of frameless windows can only be done by professionals with special equipment.
- Surface preparation.
The quality of insulation largely depends on the condition of the surfaces under the insulation. Any irregularities reduce the effectiveness of the insulation several times. Heat is not retained if the insulation does not fit tightly, there are large gaps in the joints, or an unstable base.
There are rules for preparing surfaces:
the base for installation is cleaned of dirt, dust, and paint residues;
brickwork is treated with cement mortar or primer. The cracks are sealed with polyurethane sealants or mastic. All potholes are leveled with cement mortar and primed
Particular attention is paid to the places where the parapet adjoins the balcony slab;
metal parapet gratings are sheathed with boards, plastic or moisture-resistant plasterboard. Before installation, the material is treated with an antiseptic. The sheathing should fit very tightly to the gratings, and the seams should be sealed with sealant. All defects on the surfaces are smoothed out with foam, and then the excess is cut off.
The main stages when installing thermal insulation from the inside
Work on insulating walls, floors and ceilings is carried out after installing new glazing. If the balcony or loggia is already covered with metal-plastic or other modern double-glazed windows, then the integrity of the layer of polyurethane foam and sealants applied during installation is checked once again.
Surface preparation
The loggia parapet is carefully inspected to identify cracks and defects. To achieve minimal heat loss, as well as protect the structure from waterlogging, it is necessary to carefully seal all cracks with polyurethane sealant or polyurethane foam.
Additionally, all seams between the parapet, walls and floor are processed. The surface of the walls bordering the street is also inspected. It is necessary to protect all structures as much as possible from moisture penetration and heat loss through cracks and defects.
Waterproofing device
After eliminating identified cracks and defects, it is necessary to protect the surfaces of the room from external moisture. To do this, the inside of the balcony or loggia is completely covered with waterproofing films. The membranes are attached with an overlap, overlapping adjacent sheets by 5 - 10 cm and gluing all seams with protective tape.
When using polyurethane foam or extruded polystyrene foam, the waterproofing layer does not need to be laid. The low permeability of the materials will not allow moisture to penetrate the body of the insulation.
Laying insulation
After preparation is completed, the walls, ceiling and floor of the loggia or balcony are covered with thermal insulation materials. Rigid slabs are attached to concrete or brickwork using disc-shaped polymer dowels. The distance between individual fasteners should not exceed 40 cm. Most often, five dowels are used for one standard plate.
The joints between the sheets are additionally insulated with toluene-free polyurethane foam. All winter versions of such materials may contain toluene, but its use is unacceptable due to the negative effect on polystyrene.
Vapor barrier device
After laying the insulation, all structures are covered with a vapor barrier. For these purposes, it is best to use special polymer membranes or foamed polyethylene. The presence of a thin layer of foil on the inner surface of the material will help create the effect of a thermos and additionally protect the room from heat loss.
The vapor barrier can be fixed using polyurethane glue. All joints are also made with an overlap of 5–10 cm and taped with waterproofing tape.
Frame installation and sheathing
After the main protective layers have been assembled, a frame is installed from wooden blocks of 40x20 mm or 50x25 mm for attaching the finishing material. Sometimes a metal profile 60x27 mm is used instead of wood.
The sheathing guides are fastened only after the elements have been leveled. For fixation, self-tapping screws are used, the length of which allows you to attach a beam or profile directly to a concrete or brick base. The location of the frame is determined based on the selected material.
So, for drywall it is better to set vertical guides, and for plastic panels - horizontal. The distance between the guides should not exceed 40 cm. After installing the frame, the walls, ceiling and floor are sheathed with the selected finishing material.
Insulating a balcony or loggia will allow you to expand the useful space of the apartment and get an excellent office or relaxation room.
Strengthening the balcony slab
Depending on the load that the slab will bear, the reinforcement material is selected. There are two main options - metal reinforcement and foam block reinforcement. The first method is universal and suitable for a balcony of any condition. The second method, due to the material used, is distinguished by its heat-saving function, durability and environmental friendliness. However, the foam blocks themselves take up a lot of space and reduce the area of the balcony.
Strengthening the balcony slab with metal supports
Rice. 6. Reinforcement with metal structures.
A metal frame is attached around the perimeter of the slab, onto which reinforcement with a cell side of 100 mm and a cross-section of 8-10 mm is welded. If part of the slab is lost, it is necessary to frame it with metal and fill the entire surface with concrete. The reinforcement should be buried 50 mm in concrete
Please note that for pouring it is necessary to use frost-resistant concrete, class not lower than B10
Strengthening the balcony slab on the upper floors
Rice. 7. Balcony on the top floor.
This type of work requires the installation of upper or lower mansols. The reinforcement at the top is a strand of metal cable with a diameter of 20-24 mm, which is attached to the sides of the balcony using long anchors. In this case, one part is attached to the outside of the slab, and the second at a height of 900-1200 mm from the floor on the wall. The metal corner additionally tightens the joint between the wall and the slab. Moreover, the larger the hypotenuse of the angle, the stronger the fastening will be. Lower reinforcement is more effective, but requires permission from neighbors - mensols enter their territory. The installation procedure involves securing rectangular metal corners to the wall with anchors. In addition, lower reinforcement can be done by drilling holes under the balcony into which strong, large-sized reinforcing bars will fit. This option is suitable if there is no other covered balcony below you.
Lined parapet
Step 1 - preparing and strengthening the slab
For some reason, many people believe that it is possible to strengthen the parapet of the loggia in front of the glazing, and this will be enough to install the window. However, this is far from the case, and strengthening a metal parapet with your own hands is associated with many other nuances, and in particular, strengthening the slab and leveling the fence.
Strengthening the reinforced concrete slab with a metal corner around the perimeter - arrows indicate welding with embedded parts
Related article: Foam thickness for insulating a loggia
First of all, you should not confuse the parapet on the loggia with a similar fence on the balcony. If in the first case it is made of a reinforced concrete slab or foam blocks, then in the second case it is a structure in the form of a railing.
Consequently, the installation and fastening methods here are completely different. And now we are interested in balconies:
- in the statistics of Google and Yandex search queries you can find the following phrase “how to strengthen a metal parapet with your own hands,” but I want to disappoint those who enter it - often there is nothing to strengthen;
- the fact is that the metal fence is supported by embedded reinforced concrete slabs, but due to the period of limitation and under the influence of moisture and oxygen, the steel has rusted;
- Some balconies are already more than 50 years old and the cross-section of the reinforcement in them has decreased four (!) times due to corrosion. While the design load for a solid flat slab (the most common model) was originally 100kg/mline, it is now only 50kg/mline;
This slab cannot be restored
- but even if the mortgages are “live” (this is possible if the balcony was closed), you should cut off the old fence and weld a 50x50 mm corner around the perimeter - this will protect the edges of the reinforced concrete products;
- but if the mortgages have rotted, you should knock down the screed, screw a steel strip to the wall of the house with anchor dowels and weld the same strips across the slab to it in increments of no more than 40 cm;
- these transverse strips are also screwed to the slab - two dowels per strip will be enough, and the 50th corner is already welded to them;
- Be sure to set the corner level - this will make it easier for you to install the fence.
Homemade metal profile design
If the slab is badly broken, then it cannot be restored and you have two options. You can contact an organization that charges you for home repairs - they can replace the balcony slab, although they will unlock it in any way. But you can do this yourself by assembling a lightweight structure from a metal profile, as in the photo above, but that’s a different story.
Step 2 - installation of the fence
It is more convenient to weld the fence directly on the balcony
Now let's figure out what to make this very parapet from . Some even build it on the balcony from sand-lime bricks or foam blocks, which I do not recommend doing, as you increase the load on the slab .
For these purposes, it is best to use a hollow profile with a section of 20×20 mm or 20×40 mm according to the thickness of the fence. Set it to 20mm, so you can then achieve a total thickness of 60mm.
Please note that we are not talking about forged railings - our goal is to make a strong and even fence on which we can subsequently install a window and veneer it on both sides.
When you make a parapet from a metal profile with your own hands on a regular or extended balcony, then it is best for you to assemble it not on the perimeter, but separately. That is, you need to weld balusters of the same length to the handrail, and then install and weld the assembled structure onto the corner.
However, this method is acceptable only when the corner has an even horizontal line. Vertical profiles (balusters) must be installed flush with the front edge of the perimeter so that it is possible to conveniently install the wooden frame under the cladding .
To install the window on the fence, a subframe is welded (indicated by arrow)
Now let's figure out what height of the parapet on the balcony is needed. It depends on the floor and/or additional slab extension (expansion). If you are not expanding the balcony, and it is not on the top floor, then the height of the fence can be 100-120 cm.
On the top floor, in some cases it makes sense to go down to 90 cm, that is, the higher the railing, the smaller the window will be . If there is a brick edging above the upper floor balcony, then you can only install the roof below it.
If this is an extended balcony, then along the front edge with a 90-centimeter parapet the window will be about 125 cm. And here it makes sense to reduce the height of the fence to 85 cm - this is normal.
Action 3 - wooden frame
The parapet is sheathed with slats for cladding, and a board is placed below (indicated by the arrow)
After installing the metal fence, you need to cover it with 20 mm thick slats, which will serve as a lath for installing the external and internal cladding. At the front bottom, instead of a slatt, a 20 mm wide board is placed, which covers the slab.
And the finishing, be it siding or corrugated sheeting, will have a good foundation, which means it will not be blown off by the wind. And if insulation of the loggia parapet can be done by attaching slats of the required thickness to the fence (insulation between them), then here you will have 60 mm free - 2 slats of 20 mm each and a profile of 20 mm. Here you can lay 50 mm polystyrene foam or mineral wool.
Wooden frame is ready
The upper part above the parapet is made from a 50x60 mm block - it will be cut for you at any sawmill from a 50 mm board. And you will install it in width so that the entire frame has a thickness of 60 mm, as in the top photo.
Some people prefer to make the frame out of metal all the way to the top, and then cover it with slats, they say, it’s stronger. This is wrong!
Pay attention to what the rafters are made of and how many years they last: the longer they are aged, the stronger the wood becomes if it does not get wet. In addition, a metal frame will add unnecessary load to the slab, and the price of a metal profile is several orders of magnitude higher than that of wood.
Step 4 - installation of corrugated sheets
Profiled sheets are fastened with self-tapping screws with a press washer
Now everything is simple: sheets of galvanized or painted corrugated sheeting are cut to the required length and screwed to the wooden sheathing with self-tapping screws and a press washer. This can easily be done from the balcony.
Install the sheet not according to the width, but according to the height of the parapet - this way it will be washed by rain, and dirt will easily flow off along with the water, without lingering on the ledges.
Another question - how to seal the cracks? The answer here is very simple - silicone sealant or polyurethane foam, depending on the width of the gap.
I specifically published this photo so that you can appreciate the benefits of a board installed at the bottom of the perimeter and covering the slab. Agree, with an open slab, the tiled balcony looks unfinished.
Covering the parapet with siding from the outside
Vinyl siding has proven itself to be an excellent material for exterior finishing of balconies. Simplicity of installation, low weight, a variety of colors, durability and affordable price are the main advantages of siding panels.
If the parapet is a metal lattice, then it is advisable to combine the insulation with the exterior finishing. Sequence of work:
- Place a level on the metal railing and secure a horizontal support bar, which will serve as the basis for the glazing.
- On the outside, make a sheathing of wooden beams in increments of about 60 cm. If the siding is laid out horizontally, install vertical posts; if it is vertical, then a horizontal sheathing is needed. Pre-treat the timber with an antiseptic. Carry out the work using a level.
- Attach guides and a starting strip to the sheathing for installing panels in the chosen direction.
- Install the first 2-3 siding panels, inserting them into the profile and securing them with self-tapping screws to the sheathing beams.
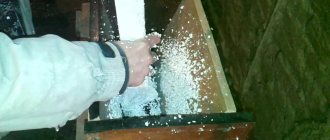
- At the same time as the siding is fastened, the insulation is fixed. Penoplex sheets cut to size must be inserted between the finishing panels and the metal parapet so that they fit into the cells of the sheathing.
- Complete the installation of siding on the outside of the balcony.
- From the inside, apply mounting foam to the joints between the insulation sheets and the wooden sheathing. The seams between the penoplex and the floor and walls are also sealed.
- Place a second layer of insulation on the outside of the balcony. The sheets are attached to the first layer with plastic mushrooms. The gaps between the parts are also filled with foam. A double layer of penoplex reliably protects the balcony from moisture and provides a good degree of thermal insulation. The parapet is now ready for glazing and interior finishing.
Standard insulation
Insulation of loggias and balconies is always included in the cost of cladding: Therm-20 slabs are used for walls, Therm-50 for floors, and high-density Therm-30 for roofs over balconies. Roofs over balconies, balconies during external cladding and loggias during internal finishing, extensions and extensions necessarily include polystyrene foam insulation in their cost.
Insulation with Knauf Therm plates. This is what Knauf expanded polystyrene slabs look like in the store, which are used to insulate loggias and balconies. They are similar to Soviet foam, but differ significantly in properties for the better
The photo shows aspects of thermal insulation with polystyrene foam: 20 or 30 mm - wall insulation, 30 mm - roof insulation, 50 mm - floor insulation.
Knauf polystyrene foam is most similar to polystyrene foam, but differs significantly from it for the better in terms of environmental friendliness, heat and sound insulation. Note that standard insulation - slabs 20 mm thick for the parapet, 30 mm for the roofs and 50 mm for the floor - is absolutely sufficient to ensure comfort, warmth and silence on your balcony or loggia.
Related article: How to properly cover a balcony with plastic panels
If the fence requires external cladding, then the cladding is done first, and then the thermal insulation. In the photo: the exterior of the balcony fence was sheathed and windows were installed. The next stage is insulation
Thermal insulation is inserted tightly under the frame of the sheathing, the joints are sealed with polyurethane foam. This is what an insulated balcony parapet looks like from the inside before finishing work begins.
To avoid drafts, balcony floors are always made with a raised level. The floor is the coldest place on the balcony, so Knauf Therm slabs 50mm thick are used between the joists. As a result, the floors will never creak and will always be warm.
When installing the floor, 50x50 logs are laid (lying lengthwise in the photo). The logs raise and level the floor level. Thermal insulation is laid between the joists, the joints are sealed with polyurethane foam
15 mm plywood is laid on top of the joists and thermal insulation, then linoleum and plinths are installed. On a balcony measuring 3x1 meters, such a floor costs 5,900 rubles, including linoleum, labor and materials
Insulation of roofs over balconies is carried out with Knauf Therm 30 mm slabs. High density slabs are used for roofs. With the help of thermal insulation, two important points are ensured: firstly, the formation of condensation under the roof ceiling is not allowed; secondly, excellent sound insulation is provided. The sound insulation is so good that even in heavy rain you can’t hear drops falling on a metal roof made of corrugated sheets.
The photo shows a balcony roof made of corrugated sheets in progress. Insulation of the roof of a balcony performs three tasks at once: noiselessness of the roof in the rain, actual thermal insulation, absence of condensation
The joints of heat-insulating boards between the rafters and among themselves are sealed with polyurethane foam. As a result of thermal insulation, roofs made of corrugated sheets and ondulin become equally silent
With vapor barrier
Knowing the laws of physics, it is not difficult to understand how to insulate a balcony with your own hands - the insulation must be done from the outside. After all, only then does the structure find itself in the positive temperature zone. This approach allows moisture vapor escaping from the rooms to freely seep through the insulation and then out. No condensation appears.
Peculiarities
The main advantage of the technology is that, due to insulation, the “box” turns into a multi-layer one and does not lose its heat-insulating qualities. This method involves the use of a special vapor barrier, which is installed in front of the insulator. This method is suitable for insulation with any vapor permeability - be it mineral wool or other popular material, you can forget about condensation.
The vapor barrier is especially effective in dry construction (option: “wall cladding”). Here, broad prospects open up in terms of building materials - instead of metal profiles or gypsum cardboard, you can take PVC, MDF or even wood beams (a natural material with high decorative characteristics).
Ordinary foil or polyethylene film, as well as special types of membranes, are used as a vapor barrier. However, the presence of a barrier does not guarantee the absence of condensation - an important condition is the correct sequence of layers.
An obvious advantage of the described method of insulating a standard balcony is the complete absence, as builders say, of “wet processes.” The exception is when filling seams, and only when using plasterboard sheets. There is also a significant disadvantage - the “balcony box” loses its ability to “breathe”.
In what cases is a balcony or loggia insulated from the outside of the house?
A reasonable owner will not do a major overhaul of the same object twice. If you are already taking on the renovation of a balcony, then change it completely and radically - insulate it on the outside and finish it on the inside. An example of such a change option is the installation of a French balcony with an integrated thermal insulation layer and finished finishing of all surfaces.
However, when we are talking about loggias and balconies with an integrated concrete slab, then there can be no question of any ready-made metal-plastic version. The maximum that can be done from plastic in this case is to install window frames around the perimeter. In addition, a radical replacement costs a lot of money, and finishing and insulation using the existing frame can save more than a third of this amount.
If we approach the issue of insulation from a technical point of view, then, definitely, it should be carried out only from the outside of the balcony box. Several factors speak in favor of this:
- External insulation of the facade is a more effective measure than internal insulation, since the cold is contained from the outside in relation to all materials and surfaces, including load-bearing ones. A concrete slab, protected from the street, cools the interior space of the loggia to a much lesser extent;
- With internal insulation, water condensate at the border of the temperature change enters the living area (internal walls “sweat”), it is better to shift this undesirable phenomenon outside the loggia;
- Also, the advantages of external insulation include the fact that thermal insulation, even the most modern, is quite massive, extensive and can take up useful space from a small balcony. This phenomenon is not desirable for most apartment owners. This issue should be approached with maximum rationality;
- It is also important that external insulation helps to significantly improve the overall design of the balcony.
The practical side of the issue suggests that performing work outside is associated with some disadvantages:
- If we are not talking about the first two floors, then this work is difficult to do with your own hands due to the danger of falling from a height. You will need specialized climbing equipment and an experienced craftsman who is accustomed to performing such types of work;
- The facades of some houses are valuable architectural monuments and any actions to transform them will be suppressed by the city authorities. If the reconstruction cannot be carried out in a common architectural style with the house, then such work is prohibited and will be immediately suspended by the architectural department;
- With a small budget, resorting to the help of specialists is problematic, as is erecting new parapets, strengthening the foundation slab, etc.
In these three cases, the best option is to create internal thermal insulation. You can find out more about this in a separate article: how to insulate a balcony or loggia from the inside.
Strengthening the parapet on the balcony
Rice. 8. Strengthening the parapet.
Having assessed the condition of the slab, it is necessary to attach a metal structure to it using self-tapping screws. Metal stakes and channels are used for this.
Please note that welding cannot be used in this case, as it removes the galvanized layer and the metal becomes susceptible to corrosion. If you want to insulate the parapet, you can use mineral wool covered with OSB, chipboard or plywood
The second option is to use a welded metal structure, which is rigidly tied to the slab and attached to the house. In this case, all the weight is transferred to the frame. If it is necessary to make an open balcony, then a metal grille is purchased, which is welded to the embedded parts mounted into the wall. The grille is treated with an anti-corrosion compound.
Foam blocks are often used. Before installing them, it is necessary to demolish the side walls of the balcony, lay foam blocks, and then install a reinforced frame. The resulting masonry is plastered. Externally, the resulting structure can be sheathed with siding or galvanized iron
Please note that this material has low moisture resistance, which is why it should be carefully sheathed on both sides
Your goals in strengthening the balcony may be different; the materials and methods of work will depend on the initial condition of the balcony and the desired result. However, you need to know that SNiP 2.01.07-85 specifies the standard for structural strength - it must withstand 1800 kg
In order not to add weight to the balcony, use lightweight materials, making sure that they are non-flammable and moisture-proof
Reinforcement of foam blocks
Now you need to make reinforcement for rigidity and strength. A parapet made of foam blocks requires mandatory reinforcement. This reinforcement can be done in different ways, but it is necessary:
- make a hollow inside the blocks and put reinforcement there
- lay a so-called masonry metal mesh between the foam blocks, and apply the solution for the next row on it
- or, as in our case, perforated metal mounting tape was used, laid and screwed with screws on top of the foam blocks
Plus, in the side walls for structural rigidity, reinforcement is fixed between the rows or you can use long anchors or something else. In our particular case, the parapet made of foam blocks does not bear any heavy load. Since the window frame stands on a metal parapet, we limited ourselves to fixing the punched tape into the foam blocks and walls. And also connected with the original metal parapet. It is smooth and strong, but it was possible not to tie them together.
Alternatively, you can screw the tape from the inside onto each row of blocks, thereby also tying them together. But since it was planned to decorate it with decorative brick tiles, this option was abandoned. The tiles were glued onto blocks and they would simply get in the way, so they removed them inside.
In our case, the loggia itself is small, only 2.80, there is no strong and excessive detonation when closing the doors, as for example on 6-meter loggias. There, of course, it is not worth connecting a parapet made of foam blocks with the original one, and also if the original parapet is wobbly and generally not reliable. This can have a detrimental effect on the newly laid block parapet.
Related article: Combining a loggia with a room, coordination
For those interested, here are articles on the topic of finishing with decorative gypsum and flexible tiles:
What to make a parapet on the balcony from?
As we said earlier, fences can be made of different materials: wood, metal, brick, aerated concrete block, etc. Let's consider each of the possible options.
Tree
For those who are interested in wooden fences for balconies, they are much easier to buy and install (of course, if you do not have experience in welding), but you should know that wood is unreliable. When exposed to the atmosphere, the material loses strength. Therefore, wooden parapets cannot be used for subsequent glazing.
Metal
Metal structures for fencing balconies are the most reliable material.
If you are planning to install a balcony fence without subsequent glazing, then you can choose a forged metal structure as a parapet. This option will give the balcony individuality. Can be sold in any size for different designs.
It is worth noting that the forged parapet is mounted to the wall of the house and the external slab using anchors.
If you plan to glaze the balcony, you should choose a welded metal fence. The structure is assembled from several elements and secured with anchors. From the outside, such a parapet can be covered with siding, corrugated sheets or other material for external work.