0
4094
06.05.2014
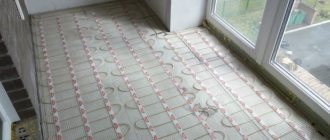
Balconies in modern apartments are often a direct extension of the living space. In order to ensure a comfortable microclimate on the balcony, it is advisable to create a heated water floor on it. It compares favorably with a conventional heating system and creates heat mainly in the lower part of the room, thereby ensuring ideal comfort.
DIY water heated floor on the balcony
Choosing a suitable floor heating system for the balcony
As soon as it comes to repairing the balcony, the owner has a question about which underfloor heating system to use. Today there are 3 main types of this heating:
- The first most popular is “Warm water floor on the balcony.” This system has an affordable price and is easy to install, which attracts customers. The essence of the work is to lay pipes in the screed through which hot water circulates from the central heating system.
- The second most popular is “Electric heated floor”, its price is slightly higher than water heating, but they are identical in efficiency. The cable acts as a coolant, which heats up and detects internal resistance.
- The latest and newest system is the “Film infrared heated floor”, although it operates using electricity, its operating principle is different. The polyester film is filled with carbon paste, which in turn emits infrared rays. They warm up everything that comes their way. The action occurs like the sun's rays.
Attention! In the case where the balcony stands on a reinforced concrete slab and has a concrete base, the heating pipes must be laid directly in the screed.
We insulate ourselves correctly
The first step for insulating a balcony is covering it with vinyl siding, provided that you have a parapet - an ordinary lattice. Sealing all cracks with foam is the next step. Well, then the glazing. It is preferable to use metal-plastic windows with double-glazed windows for this purpose. Single-chamber ones are not suitable for these purposes, since in severe frost they can become covered with ice on the inside.
After completing these works, you can begin to work on the walls and ceiling. They need to be insulated. Mineral wool is quite suitable for these purposes. Although some use polystyrene foam or polystyrene foam.
Scheme of work on installing a water floor on the balcony
Now we insulate the floor
Floor insulation is the next stage of work after completing similar operations with the walls and ceiling. To do this, it is advisable to use one of the following materials:
- mineral wool;
- expanded clay;
- polystyrene foam;
- penoplex;
- penofol.
Do-it-yourself insulation of the floor on the balcony with Penoplex
The order of work should be as follows:
- The concrete base of the room is covered with existing waterproofing material.
- Then wooden logs are laid on top of the waterproofing.
- After this, the purchased insulation is pressed between the laid joists.
- Everything is covered with a vapor barrier film on top.
- The final stage is laying the subfloor.
How does a balcony differ from a loggia?
There is no clear idea why this or that heating system is better; each of them is good and has its own specifics. You need to know that there are serious differences between a balcony and a loggia, and that the type of heated floor is selected for specific conditions.
On the left is a balcony, on the right is a loggia. The difference is obvious
The difference between a loggia and a balcony:
- The balcony is a reinforced concrete slab that is extended beyond the façade of the building. It has no additional fastenings and is held in place only due to its strength. In accordance with GOST standards, the load-bearing capacity of the balcony should be about 200 kg/m².
The average balcony area in Khrushchev-era buildings ranges from 2.5 to 3 m²; using simple mathematical calculations, you can see that the maximum that can be loaded onto a balcony is 600 kg. If we take into account the natural wear and tear of the balcony, the result will be even lower.
Calculations show that it is not reasonable to install a water heated floor on a balcony in a Khrushchev-era building. This heating system requires 50 mm of concrete screed, which will weigh more than 300 kg, and if you take into account the weight of other finishing materials, then staying on the balcony will no longer be safe. Regarding such apartments, the choice must be made between electric and film heating systems.
- Unlike a balcony, a loggia has two reliable supports that ensure the strength of the floor slab. Consequently, the load-bearing capacity increases several times. Having such a significant margin of safety, a water heated floor on a loggia will be the best option.
Preliminary work
It makes sense to install a warm water floor only on a loggia with sealed glazing and insulated walls and ceiling. If you have not done this yet, we advise you to refer to our materials “Insulation of floors on balconies and loggias”, “Glazing of loggias”.
Checking the balcony slab
Concrete screed and water-heated floors make the balcony heavier. The load will increase approximately as much as if you placed a large motorcycle on the balcony. Therefore, you first need to assess whether the balcony slab can cope with the increased load.
We also check for any collapsed corners. In this case, it is necessary to weld the missing pieces of reinforcement to the frame. If there are holes in the slab, you need to fill them with cement mortar.
Leveling the floor
Screed device on the balcony
If your loggia is not separated from the room, then it is important that ultimately all the floors are on the same level. To do this, you need to estimate how much the entire structure (concrete screed, thermal insulation pads, flooring) will increase the floor (by about 10 - 15 cm). There should be at least 110 cm between the floor and the window on the loggia - this is required by GOST, so that children do not fall out of the window.
If after all these calculations you need to further raise the level, then you need to make a preliminary screed on the balcony. This is also worth doing if you have a very uneven balcony slab. You can read how to make a screed on our website in the material “Making a floor on a balcony or loggia - what to choose, how to do it?”
Heat supply mechanism
Installing a heated floor on a balcony with your own hands is a rather labor-intensive process that requires certain knowledge and skills. If the structure is installed incorrectly, there is a high probability of disrupting the hydraulic pressure of the entire system, which will lead to serious problems. The heat source for such a heated floor system is central heating.
Photo of a manifold made by the apartment owner himself
Therefore, without having construction skills, you should turn to a specialist for help, who will tell you whether this structure can be installed in an apartment or whether it is worth considering another option.
Advantages of insulation
In a comparative analysis, a properly installed independently heated water floor on a loggia has the following advantages:
- the ability to independently regulate heat exchange in the room;
- creating a normal level of humidity in the room with protection from the formation of dangerous mold, which often occurs on the balcony due to temperature differences between the apartment and the street;
- simultaneously maintaining a uniform temperature throughout the entire area of the loggia;
- safety of this heating device;
- saving up to 20% of electricity, since heated floors, unlike radiators, consume much less energy;
- long period of operation;
- ease of maintenance of heated floors in contrast to maintenance of heating radiators;
- the ability to plan any interior on the balcony due to the lack of visual contact with the heating device;
- The absence of an external heating device to heat the room makes the balcony look much more aesthetically pleasing and comfortable.
READ MORE: How to insulate a balcony with penofol
Laying heated floors
All of the above makes the installation of a warm water floor on a loggia (balcony) much more attractive and economical when compared with other types of such coating.
Difficulties of installing a water heated floor
A water heated floor works mutually with the main heating system; initially it may seem that you only need to connect the heating system, enjoy the warmth and pay like for a regular battery, but in reality everything is different.
- A minor drawback is the autonomy of the system; it only works when the heating is on. The floor on the balcony will not warm up in late spring and early autumn.
- According to the requirements, the temperature of the water in the pipes should not exceed 40ºС; if overheating is allowed, the owners themselves will not be comfortable. Thus, in the case of a direct connection to the main heating system, the floors in the loggia will be too hot and not regulated. The floor temperature will correspond to the temperature of the radiators.
- An unpleasant disadvantage is the ban on unauthorized connection of a warm floor system to central heating.
It is important to know! The law does not apply to houses built recently.
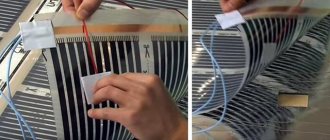
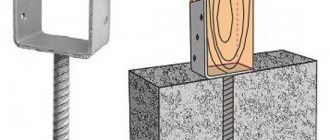
Methods for fixing pipes for heated floors
Pipes can be fixed to the insulation using rigid plastic clamps or inserted directly into the thermal insulation material. You can also lay a metal reinforcing mesh under the screed, the wire cross-section of which does not exceed 5 mm. In this case, the pipes can be tied to the mesh using plastic clamps.
Water floor systems, comparable in popularity to electric ones, are actually a heating radiator mounted in a floor screed. The most preferable option for connecting such a system is your own boiler. In this case, the connection diagram provides for the presence of a pump responsible for circulating the heated liquid over the floor surface.
Installation of water heated floor
The heated floor structure is installed in two ways. In the case where the base of the balcony is a concrete slab, the pipes are mounted in a concrete screed. If the floor of the loggia is made of wood, then between the wooden beams. Compared to concrete, the heating efficiency will be significantly higher, since it has excellent thermal conductivity properties. The work is of course more labor-intensive, but the end result makes up for everything.
Options for connecting the collector to central heating risers
Attention! You should start installing a floor heating system only when plastic windows have already been installed and the walls have been insulated.
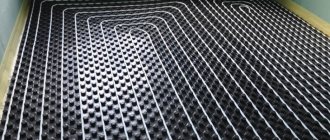
Laying options
The pipe laying scheme for this design has two types, the shape of a snake and a snail. Regarding the first form, it is used on balconies with a small area. The pipes are laid parallel to each other, during which a snake is formed.
Scheme of fastening water pipes on the loggia
The shape of the snail has a double helix, the supply and return parts of the pipes run parallel to each other. During such a composition, the supply pipe cools the adjacent parts of the pipes. The snail pattern is designed for large balconies and loggias.
Ring piping option
What kind of pipes are used?
Installation of water heated floor structures involves the use of 4 types of pipes:
- Metal-plastic. The tubes have an aluminum inner core which makes them more durable. They cope well with the properties assigned to them, have excellent flexibility, and can withstand high temperatures.
- Copper. The most common and expensive material. The average service life of copper pipes is more than 100 years.
- Polyethylene. Quite flexible, but not at all durable pipes. The cost is much lower than its predecessors.
- Polypropylene. Pipes are famous for their durability, practically do not become clogged and are not subject to corrosion. The disadvantage of the material is poor flexibility.
Video: recommendations for choosing pipes for heating a loggia
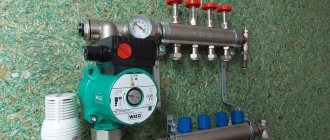
Properties of the collector system
The collector is necessary to supply water through pipes and regulate temperature. The mechanism consists of a thermostat and a flow meter. There are two types of devices:
- mechanical;
- electronic;
The equipment is placed in a specially designated cabinet, and if the balcony allows you to hollow out a niche of the required size, then the collector is placed in it.
Collector diagram
Preparing the room for installation
Preparing a balcony to install a heated floor begins, of course, with preparatory work. The first step is to remove the old flooring in the apartment. Dismantle the concrete screed. You should end up with a completely bare base of concrete slabs.
A more budget-friendly option is to knock out grooves under the pipes in the old screed. Thus, you will save on dismantling and on material for filling the floor. This method is suitable when the old screed is of very good quality and perfectly smooth.
In order not to unnecessarily damage the surface of the screed, you should accurately outline the location of future heating pipes. Do this process very carefully, since it will not be possible to lay the pipe in uneven grooves.
Screed diagram
Having drawn it, it is necessary to cut out the edges of our markings with a grinder, so that when removing the concrete layer, the excess parts will not break off. When cutting, it is best to use a hammer drill with a feather or spade-shaped impact bit. With its help, the work will be done accurately and quickly.
Take care of your safety, wear safety glasses and a respirator. They will protect you from dust, which will be a lot, and will prevent splinters from getting into your eyes.
After making grooves or completely dismantling the old screed, it is necessary to clean the surface from dust and dirt as efficiently and thoroughly as possible. If there are too large holes or gaps between the slabs, they should be sealed with concrete mixture.
Then, it is necessary to seal all joints with bitumen mastic to ensure the required level of waterproofing in the event of a system breakthrough. Then you won't flood your neighbors, which is quite unpleasant. To improve the effectiveness of waterproofing, you can lay a dense polyethylene film with an overlap of ten to fifteen centimeters on the walls.
Manifold and cabinet for assembly
A collector is a mechanism that distributes water through different pipes evenly or in a set ratio. Consists of stainless steel, equipped with flow meters and thermal valves.
The installation cabinet is designed to allow the entire system to be installed compactly in the desired location. Makes it accessible and installation is very easy and quick. It is advisable to install it in such a way that it diverges in the center of the heated room, and as close as possible to the central boiler.
Pumping system: The pump is designed to deliver water to areas where the stake pump cannot reach. They are often equipped with a filter or mixer to catch all impurities and dirt. It should be installed in a location where you can easily reach the filter and quickly replace it.
Thermostat: a device for regulating and setting the temperature in a heating system is called a thermostat. There are several types of temperature control devices, or rather, types of setting the required temperature.
- Mode for maintaining the required water temperature.
- Maintaining the temperature in the room at the set level.
When the above indicator passes, the thermostat turns off the boiler. If the temperature drops below the mark, the boiler turns on again and begins to increase the temperature. The regulator reacts when the temperature increases or decreases by 1-5 degrees, depending on the adjustment mode.
Preparatory stage for installation
Laying a water floor with your own hands should only be done on balconies and loggias, which are well insulated and insulated. If windows or walls let in heat, then you will waste your money on heating the street.
The preparatory stage also includes the following points:
- Checking the load-bearing slab - you should check whether the slab can withstand the additional load. Since pipes and concrete screed will be laid.
- Initial leveling of the surface with your own hands - it is necessary to level out small pits and holes so that the surface is uniform and without sudden changes.
Installation method
You need to decide how to install the heating installation circuit yourself.
There are only three installation methods:
- Under a concrete screed.
- Using polystyrene boards.
- When laying a heating circuit under a wooden floor.
Stages of laying a heating circuit on a balcony
To make a high-quality water heated floor on your balcony with your own hands, follow the instructions that we will provide you with. Then the work will be done easily, quickly and with due efficiency.
- We install a layer of waterproofing to prevent the possibility of leakage beyond the balcony. This way, you will protect yourself from the risk of flooding your neighbors in the event of a pipe breakdown or burst.
- We lay thermal insulation to remove heat from it towards the room. The thickness of the thermal insulation layer should be about ten centimeters. The thickness and density of the insulation should be selected based on the specifics of the balcony; the colder it is, the higher the performance should be. Often, a thickness of no more than twenty centimeters is used; in most cases, ten centimeters is the norm.
- To prevent cracks in the screed and twisting of pipes, it is necessary to lay the reinforcing mesh yourself. It is enough to use a grid with a cell of 100x100 millimeters.
- Laying pipes according to our heating scheme. The step between them should be about ten centimeters; to save materials, you can use a step of about fifteen centimeters. This way you will save on pipes and on the amount of gas for heating.