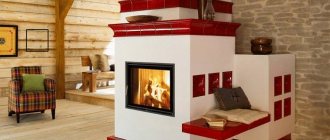
Types of fireplaces
All fireplaces, depending on the method of their construction, can be divided into two large categories:
- Homemade fireplaces that require construction . Capital brick structures that are built from scratch. Installing a fireplace of this type requires a lot of effort and time.
- Ready-made fireplaces that are quite easy to install . This version of fireplaces is much simpler in terms of the effort spent on installation - but it is also quite expensive.
However, there is also a kind of middle, combined option - a ready-made combustion chamber is purchased, and a platform is laid out around it with your own hands and finishing work is carried out. Installation and installation of fireplaces in this case require a minimum of knowledge, but assembly will still take a lot of time. When choosing a firebox, it is better to give preference to cast iron models - they are more durable and have higher heat transfer.
In any case, before installing a fireplace in the house, it is worth considering a couple of design options in more detail in order to have an idea of the work ahead and its intricacies.
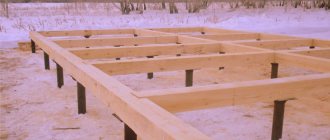
Formation of the pedestal
A pedestal is a durable structure on which our finished firebox will rest. There are no special requirements for the design, but the main thing to remember is that any fireplace needs air supply. In classic versions, air enters the firebox through the ash pan.
The pedestal is laid out from 3-4 rows of bricks and has a U-shape with an open space outside. The back wall of the pedestal must be tied to the wall of the house using metal rods. They are driven into the wall at one end and lined with brick. A mixture of clay and sand is prepared as a solution, since cast iron heats up quite strongly during the operation of the fireplace and will transfer heat to the body.
Good to know: How a fireplace works, we consider all known options for such devices
Certain rules will help you calculate the area of the base and pedestal, which establish the dependence of the dimensions of the fireplace on the area of the combustion opening. The cast iron firebox is installed so that it does not reach the wall a few centimeters. Having made the necessary measurements, it is easy to calculate the width of the pedestal.
Pedestal for corner fireplace
Preparation of tools and materials
To make your own fireplace, you need the following set of tools:
- Master OK;
- Mason's hammer or rubber mallet;
- Notched and regular spatula;
- Buckets for mixing the solution;
- Hammer;
- Screwdriver;
- Construction mixer or drill with an appropriate attachment;
- Building level;
- Water level;
- Plumb;
- Roulette;
- Pencil or marker;
- Bulgarian;
- Device for cutting tiles.
The list of required materials is as follows:
- Red stove brick brand M-200;
- Facing brick;
- Steel corners with a section of 50x50 mm;
- Steel strips measuring 50x5 mm;
- Self-tapping screws with wide washers;
- Plastic dowels for self-tapping screws;
- Heat-resistant masonry mixture;
- Heat-resistant mastic;
- M500 grade cement and sand;
- Thermal insulating foil material in the form of plates;
- Minirite slab (required for installing a fireplace in a wooden building);
- Ceramic tiles or porcelain stoneware;
- UD and CD profiles for drywall;
- Drywall sheets;
- Set of decorative grilles for ventilation windows;
- Heat-resistant sealant.
Fireplace installation
Of course, installing a fireplace in a home can have a lot of parameters, each of which has to be dealt with on the spot. For example, a lot depends on the size of the firebox, and the installation site has a serious impact on the features of the future design, and therefore the technology for its installation.
Simplified installation of a fireplace includes the following steps:
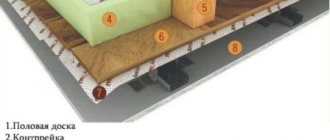
- Preparation of the foundation in a permanent building . Considering the fact that a modest-sized fireplace weighs much less than a traditional stove, there is no need for a reinforced concrete foundation. The base for the fireplace can be a regular screed or a powerful ceiling. Installing a fireplace with your own hands begins with laying porcelain stoneware or tiles in the area where the fireplace will be located.
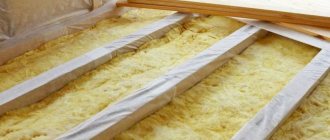
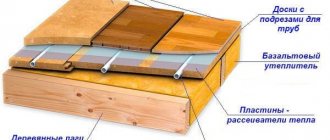
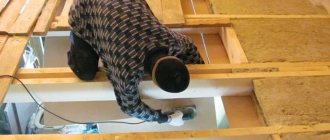
- Preparation of the foundation in a wooden house . If the building is made of wood, then before installing the fireplace you need to take care of high-quality protection of the base from heat. Under the tiles or porcelain stoneware, you need to lay a layer of heat-resistant material - for example, a 15 mm minirite sheet. Sometimes asbestos cement sheets are used for these purposes, but they are less resistant to heat, so the risk of fire will be higher. The heat-resistant plate is attached to the floor with self-tapping screws in the desired area, which is usually located directly under the chimney. To make it easier to navigate, you can use a plumb line.
- Tile installation . It is recommended to lay the tiles under the fireplace in a seamless manner. In addition, for installation you need to use heat-resistant mastic. The tiled base must be made so that it protrudes at least 15 cm beyond the perimeter of the fireplace. In the front sector (where the firebox door will be located), you need to equip a platform with a length of at least 50 cm. When installing a fireplace on the second floor or higher, you need to be aware of the weight restrictions for different types of floors - wooden structures can withstand no more than 120 kg, and concrete slabs – up to 750 kg.
- First row . When the base is assembled, you can begin laying the first row. The fireplace is made of red brick (facing brick is also good for the body, but its cost is much higher). The platform is laid out using cement-sand mortar, and the bricks around the combustion chamber are laid using a clay-fireclay mixture. The first row is laid out in a continuous layer.
- Second row . Next, installing a fireplace with your own hands involves laying bricks so that the platform is U-shaped. Inside the brick platform, the base of a square column is laid.
- Third and fourth rows. Assembling the fireplace at this stage is no different from the previous one. After laying, you will have a base 4 bricks high. This is enough - according to the standards, the metal combustion chamber can be located at a height of at least 20 cm from the floor.
- Laying the slab near the firebox . The stove located at the bottom of the firebox is an important and most visible structural element. For its masonry, facing bricks are used, but if you have a budget, you can purchase stone products. In any case, the slab is supported on the back side by an angle, and two steel strips are laid underneath it. The assembled slab should protrude beyond the base by a quarter of a brick.
- Installation of side elements . The dimensions of the side overhangs must be selected depending on the specific conditions. The easiest way would be to think through the design in advance so that the bricks can be laid out without cutting - in this case, the corners of the outer bricks are simply cut off at 45 degrees. If this condition is not met, then the cutting angles will have to be calculated individually. On the inside of the structure, the bricks are laid so that the combustion chamber can be placed on top of them.
- Installation of the firebox . The firebox is installed so that part of it extends onto the facade slab. Step-by-step instructions for installing a fireplace insert with your own hands will help you understand the details. The back of the firebox is placed on a brick column, and on both sides of the column there are gaps intended for air intake from the lower part of the structure.
- Arrangement of gaps . The brickwork should not be very large - this makes no sense. As a rule, there is about 20 cm of space between the firebox and the inside of the brick body.
- Thermal insulation of the fireplace at the back . In principle, brickwork can cover the firebox from the back, but such a design is only possible if the walls are made of blocks and covered with plaster. You can replace the brickwork with a 50 mm layer of thermal insulation, which is attached to the wall using self-tapping screws.
- Thermal insulation of the wall of a wooden house . The wooden wall located behind the fireplace must be treated several times with a fire retardant. When the wood dries, a layer of thermal insulation is attached to the wall in the same way as described above.
- Formation of a brick box . Around the installed metal firebox, 7 more brick rows are laid, the last one being made with a 25 mm overhang. The eighth row can be made with the same protrusion, but this is a purely decorative aspect, so if you don’t want to, you can safely ignore it.
- Arrangement of the pediment on top of the firebox . This structure is laid out in the same way as the bottom slab - first a corner with a strip is laid, and the top is covered with brick. If the bricks rest against the combustion chamber, they need to be carefully trimmed.
- Installation of the top plate . If facing bricks are laid on edge, then the masonry will be below the level of the upper cut of the pediment. In this case, the free space can simply be filled with mortar, having previously placed the formwork around the entire perimeter of the structure. A regular solution is suitable for pouring the slab - the ratio of cement and sand is 1:3. It would not be superfluous to reinforce the slab with metal mesh. When setting up the formwork, you need to use a level, and carefully remove the poured but still liquid mortar with a spatula to get a flat surface.
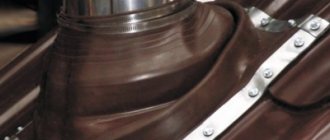
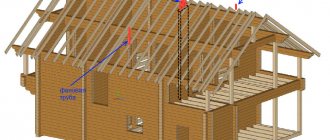
- Chimney installation . In the room itself, the chimney consists of two elements - the chimney pipe itself and the insulated frame around it. To assemble the frame, metal profiles for plasterboard are used. The profiles are connected using self-tapping screws. The lower part of the chimney is represented by a regular metal pipe, and on top it would be advisable to install a sandwich pipe covered with a layer of thermal insulation.
- Installation of thermal insulation . Next, you need to mount a box, the outer part of which is made of plasterboard sheets. Thermal insulating sheet material is glued to the inner surface of the drywall using heat-resistant mastic. The seams between the sheets must be covered with foil tape. On each side of the box you need to cut out hatches for ventilation, which will subsequently be covered with grilles.
- Chimney separation . The upper part of the chimney box must be separated from the lower part so that they do not communicate with each other. An excellent dividing material is foil insulation. Gaps and seams remaining after installation must be sealed with heat-resistant sealant and sealed with foil tape.
- Installation of a chimney duct . First you need to cover the bottom of the box with thermal insulation and install drywall on top of it. A ventilation window is created in the center of the box located at the top, and the rest of the surface is insulated. The top plasterboard panel is installed in its place and equipped with ventilation grilles.
- Functionality check . After installing the fireplace, you need to wait a few days for the solution to harden. After this period, you can light the fireplace and make sure that all its elements are functioning normally. If everything is in order, then all that remains is to decorate the structure. The finishing of cast iron fireplaces is as follows: the chimney box is plastered, the concrete fill is sanded and painted, and the brickwork is exposed with heat-resistant varnish.
At this point, the installation of the fireplace is complete and it can be put into operation. The installation technology cannot be called too simple, but if you know how to install a fireplace correctly, then there will not be any particular difficulties in the process.
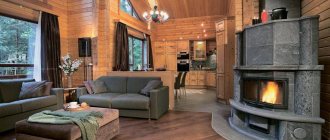
Operating a fireplace in a wooden house
A fireplace is, first of all, a source of fire, so when using it it is important to minimize all possible fire risks.
Before use, make sure that there are no flammable objects such as curtains, books, etc. nearby.
Important! Houses equipped with fireplaces must have fire extinguishing equipment and fire extinguishers.
In addition, all residents of the house must have basic knowledge of the rules of behavior in case of fire and fire safety rules.
Required materials and tools
The set of tools in this case looks much more modest:
- Building level;
- Water level;
- Plumb line, tape measure and pencil;
- Two different spatulas;
- Hammer;
- Rubber hammer;
- Screwdriver.
Additional materials are not included in the finished fireplace kit, so you will have to go to the hardware store with the following list:
- Self-tapping screws with a set of wide washers;
- Plastic dowels for self-tapping screws;
- Heat-resistant mastic and sealant;
- Foil-coated 50 mm thermal insulation boards;
- Profiles for drywall;
- Several sheets of drywall;
- Two grilles for ventilation windows.