How to install a stove in a bathhouse
Correct installation of the stove affects comfort and, as well as safety. To heat the steam room more efficiently, it is necessary to correctly install the stove, position it correctly, make a base, prepare the walls and remove the chimney. Proper purchase and installation of a stove will give you many years of enjoying pleasant steam in the bathhouse without worrying about the safety of yourself and your loved ones. How to install a stove in a bathhouse with your own hands?
There are two types of sauna stoves - brick stoves (heaters) and metal ones.
Brick stove (heater)
If you build a bathhouse yourself, a stone stove will be a very long and expensive option. It is necessary to have professional knowledge, namely, to be able to make high-quality bricklaying, pour a foundation, and understand how a stone oven works. The reliability and durability of a stone stove is several orders of magnitude superior to stoves made of metal.
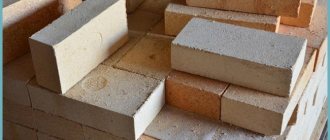
To produce a heater, a special refractory brick is used, which is also called fireclay. Ceramic bricks are used for cladding.
The advantages of a stone stove include:
- fire safety;
- longer heat retention;
- the ability to heat a large area of the bath room;
- ease of use;
- more even heating of the room;
- soft steam;
- Contact between stones and open flames is kept to a minimum.
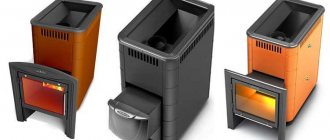
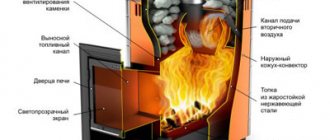
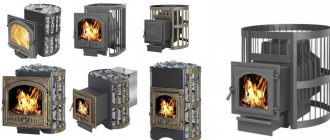
Metal oven
For the production of metal furnaces, alloys of different types of metal are used. The most widespread is the iron stove, because... iron heats up faster, less fuel is required for the furnace. The weight of such stoves ranges from 100 to 400 kg. How to properly install an iron stove in a bathhouse - the answer to this question will be revealed further.
Advantages of metal stoves:
- quick installation in a bathhouse;
- small size of the stove and its weight;
- closed sealed housing reduces carbon monoxide leaks.
The disadvantages of such ovens include:
- faster cooling of metal, unlike brick;
- uneven heating of the steam room;
- strong heating of the furnace body, which can lead to accidental burns;
Furnaces are divided into types depending on the place through which the fuel is loaded.
Video:
Stoves with a firebox located in the steam room. When installing such a stove in a steam room, it is necessary to provide additional ventilation, because With this arrangement of the stove in the steam room, oxygen burns out faster. The advantage of this arrangement of the firebox is constant control of the combustion of the stove and the ability to quickly regulate temperatures in the bath.
Firebox in the waiting rooms. With this arrangement of the firebox, it is necessary to install a frame wall between the dressing room and the steam room. Such a stove is usually heated with wood; this is optimal for maintaining a good temperature in the stove and keeping the room clean.
A stove with a firebox placed outside. This stove is well suited for small baths, as well as baths heated with coal. With this type of firebox arrangement, fuel is poured into the stove from the street. The disadvantage of this stove is that it is very inconvenient to control the loading of the stove and maintain the desired temperature in the bath.
The note! Before purchasing or building a heater, immediately pay attention to which direction the firebox door should open, so as not to create inconvenience when loading fuel into the stove.
Advantages of models with external firebox
Of course, installing a conventional heater is a much simpler procedure than installing a stove with an external firebox. However, all the difficulties of assembling such a model in a bathhouse with your own hands are more than offset by the ease of use . The advantages of stoves with external fireboxes include:
- Possibility of simultaneous heating of the steam room and dressing room. Structures of this type are usually installed near a partition separating these two rooms. In particular, such an arrangement of the stove can be convenient in a bathhouse, which is also used in the cold season.
- There is no special need for ventilation in the steam room. Since the firebox of such a stove is moved to the dressing room, the air in this room burns out much less. In any case, the steam in the steam room will remain “light”.
- Keeping the steam room clean. In this case, firewood is stored in the dressing room. They are also placed in the firebox there. Therefore, there will be no debris left on the floor in the steam room. Sweeping away ash and wood chips in a dry dressing room during cleaning will not be difficult.
How to choose the right place to install a stove in a bathhouse
In order for the installation of a metal stove in a bathhouse to be successful, you need to know how the rooms are heated. When the stove heats up, heat moves along with the air throughout the room, uniformly heating the entire space of the room. In this regard, for normal heating, you should not put obstacles in the way of warm masses, be they walls, decorations or other piles.
How to place a stove in a bathhouse with a water tank? The stove is installed so that at least two rooms in the bathhouse are warm. This is the steam room itself and the dressing room. This is achieved by placing the stove in the wall between the steam room and the dressing room.
How to install a boiler in a bathhouse? In general, choosing the correct installation point for the boiler is the main step in planning a bathhouse. The selection of this point is influenced by the following criteria:
- oven power. This affects the size of the firebox and the number of stones laid. A simple rule for calculation is that for each square meter of steam room you need 1 kW/hour;
- firebox design and smoke pipe outlet. According to the rules, the horizontal part of the pipe for removing smoke and gas from the furnace should not be more than 1 meter long;
- walls, ceilings and floors. The minimum distance for installing the stove from surfaces subject to rapid heating and ignition will depend on the material from which the walls, floors and ceilings in the bathhouse are made;
The note! Installing a metal stove in a bathhouse in a deep niche is not recommended. This arrangement greatly affects the service life of the heating unit.
Firebox in a separate boiler room
Often, a remote stove for a steam room is not located in the room where people constantly relax while visiting the bathhouse, but in a separate small room that serves as a boiler room. In addition to the firebox, this room may contain only a small amount of firewood or other fuel for servicing the stove, as well as special tools for lighting the firebox.
You can use both a sauna vestibule and a separate extension, which is often called a “furnace room,” as a boiler room. This placement of the firebox also has its undeniable advantages:
- The most important advantage of a boiler room is that you eliminate the possibility of the specific smell of burnt wood appearing in the bathhouse, which may not always be pleasant.
- In addition, a separate room eliminates the possibility of debris appearing in the “clean” area of the bathhouse.
- A specially equipped room allows you to avoid bringing firewood and other equipment that may be needed to service the stove directly into the bathhouse.
- The percentage of carbon monoxide poisoning is reduced to zero.
However, it should be taken into account that if, for example, the bathhouse is located in the courtyard of a private house and you use it yourself, you will have to go to the boiler room from time to time during your vacation in order to maintain the temperature regime.
How to make a foundation for a stove
The choice of the required foundation must be made at the planning stage. You can’t just put the stove on the wooden floor of the steam room. The stove is a very heavy thing and over time it will simply push through the floor. This will affect the horizontal position of the furnace, which can lead to the metal splitting when heated.
If the mass of the stove is less than 700 kg, then there is no need to make a separate foundation for the stove. A sufficient condition would be to lay the brick in several rows and connect the structure with load-bearing joists. This applies more to metal stoves, because... they are relatively light in weight. It must be remembered that if you cash the stove with bricks, plus the weight of the water in the tank, the number of stones laid - all this will increase the total weight of the stove. And if the total weight is more than 700 kg, then you definitely cannot do without a separate concrete foundation for the stove.
Is it necessary to connect the foundations of a bathhouse and a stove? In accordance with the recommendations of SNiP, the following types of foundation are used when constructing baths:
- the foundation is reinforced, monolithic, poured below the soil freezing level and is not connected to the foundation of the bathhouse;
- when arranging a bathhouse on highly heaving lands, a foundation on a pile foundation, not connected to the bathhouse, is used for the stove;
- a shallow foundation for the stove is erected in conjunction with the foundation of the bathhouse.
Pouring a monolithic furnace foundation
A pit 120-150 cm deep is prepared for a monolithic foundation. Sand is placed at the bottom of the pit, leveled, and compacted. A layer of waterproofing is laid. The formwork is installed and a reinforcement frame is constructed inside the box. Pour the concrete mixture to the top. After the solution has completely dried, the formwork is removed and the entire space between the foundation and the ground is covered with sand, carefully compacting each layer.
Pile-grillage foundation
A pile-grillage foundation takes less time than a monolithic foundation and costs less.
To make a foundation on piles, you need to remove the top layer of soil and use a rope to mark the dimensions of the future foundation for the stove. At the corners of the resulting square, holes are dug, 15 cm deep, and piles with a diameter of 108 mm are screwed into them. The piles should be as long as the depth of the main foundation of the bathhouse. The piles must be installed to such a depth that they are 10 cm below the level of the future clean floor of the bathhouse.
Next, the heads are welded to the piles. All parts of the metal that are above the soil must be painted with metal paint to protect against rust. The next step is to install 10 channels at the heads. A sheet of steel is welded to the channel, which must be laid inside the resulting square base for the furnace. Cement is poured into the prepared metal pit.
Shallow base
This foundation can only be done on solid, stable ground. The installation of such a foundation is similar to a monolithic foundation, the only difference is that the layer of finely buried foundation is 30-40 cm. This foundation is made without reinforcement.
Stove base
Before correctly installing the stove in the bathhouse, you need to decide which base to mount under the heating device, taking into account the features of a particular model and the type of soil at the construction site. You cannot build shallow foundations if the soil is prone to swelling in winter; it can simply be squeezed out in cold weather.
Foundation - standard size of the structure
Everything will depend on the specific gravity of the heater and the type of soil on which the bathhouse is built. There are several varieties:
- monolithic, deep;
- pile-grillage;
- shallow slab.
Each type has its own positive characteristics and different arrangement methods.
Pouring a monolithic slab base
The algorithm of actions is as follows:
- dig a pit with a height of vertical walls of 50 cm. Compact the bottom, leveling the horizon;
- arrange a cushion of crushed stone and sand, in a layer of 25-30 cm. Sprinkle with water, level and compact well;
- to make a concrete base, for this purpose a liquid solution is mixed. Pour over crushed stone and allow to harden;
- lay a layer of waterproofing - roofing felt glued with bitumen or mastic;
- install formwork from old boards or panels so that the walls are strictly vertical and the angles are 90 degrees. Secure a plastic film on the inside of it so that the plywood does not deform from moisture;
- make reinforcement - the frame should be 10 cm smaller than the formwork on each edge, install a reinforced frame;
- distribution of the solution - you can prepare it yourself or order ready-made. All layers of the mixture are well compacted by piercing them with a sharp iron rod.
After pouring the concrete mixture to the level of the finished floor and allow it to harden for 3 weeks. After this time, the formwork is dismantled and backfilling is carried out - the distance between the base and the walls of the pit is filled.
If you plan to install a brick sauna stove with a firebox from a dressing room, then the installation of the base occurs by deepening it to the freezing line of the soil.
Pile-grillage
This method of arranging the foundation is much simpler and not as labor-intensive compared to the one described above. But it is ideal for unstable, water-logged soil. The execution technology consists of the following stages:
- make markings on the surface, first removing the turf layer;
- in the corners of the future foundation for installing a metal stove in the bathhouse, dig pits 10-15 cm deep;
- screw in piles with a diameter of 10 cm. Be sure to check the vertical;
- cut the posts with a grinder along the bottom line of the subfloor;
- weld a corner channel of the optimal size, arranging a place for pouring the solution;
- place a steel sheet on the beam and secure it with a weld;
- dilute the concrete mixture and pour it into the prepared frame.
Once the concrete has gained the required strength, installation can begin.
Shallow base
This is a simple foundation option for installing an iron stove in a wooden bathhouse.
The algorithm of actions is as follows:
- mark boundaries;
- dig a ditch 50 cm deep;
- fill the pillow with 20-25 cm;
- make a footing;
- arrange waterproofing;
- install formwork;
- pour 30 cm of concrete mixture and compact.
As soon as the concrete sets and dries, you can remove the formwork and lay a layer of insulation - the foundation is ready.
Note: if the base is below the planned level, you can lay 2 rows of brickwork on top of the roofing material. Such a podium will serve as additional thermal protection for the floor covering.
Preparation of the base and walls
Preparing the base
To install the stove, it is necessary to prepare the base. The passport of your stove must indicate the minimum dimensions of the base. If you do not have exact dimensions, then use the following rules: the protrusion of the steel sheet on the side of the firebox must be at least 50 cm, on the other sides - 10 cm.
To prepare the base, a marking is applied to the desired location. If the stove faces the street with its firebox, the base is made close to the wall. When the firebox is located in the dressing room, the base for the stove is made in the opening between the wall of the dressing room and the steam room.
Installation of the base with photo. What will you need?
- fireproof plate;
- refractory brick;
- fire-resistant mixture for laying stoves;
- steel sheet of the required size or heat-resistant tiles;
- heat-resistant glue for ovens;
The fireproof board is cut to the required size and laid on the floor. The brick must be soaked in water before laying. Dilute the mixture according to instructions. Lay the bricks in one row on top of the laid sheet widthwise on the mortar. The second row of outer bricks is laid with their end facing the first row, the remaining bricks are laid with the long side facing the first row.
In the next row, the outermost brick on the left side lies with its end facing the second brick on top, and with its side facing the protrusion of the first brick on top. This type of masonry will reduce the seams and will avoid breaking the bricks into halves. For the same reason, the second layer of brick is laid out.
After the brickwork has dried, apply heat-resistant adhesive to the steel sheet and glue it to the brickwork
Preparing the walls
The main task in preparing the walls next to the stove is to protect them from heat. There are several options for such protection:
- plastering the walls with a layer of 2-3 cm;
- installation of a heat-resistant screen;
- brick protection.
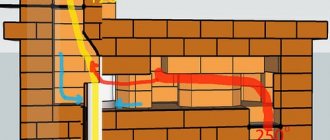
The note! The brick protection is installed at a distance of several centimeters from the main wall of the bathhouse. To ensure ventilation, special holes are left in the brickwork for air convection. This can be seen in the diagram.
If the stove is mounted at a distance of more than 50 cm from the walls or the walls of your bathhouse are made of non-combustible material, then wall protection will not be required.
Before installing the stove in a bathhouse with an external firebox, you will need to make a hole in the wall.
The note! Despite all the precautions, if your bathhouse is made of timber, then the wood must be treated with a fire-retardant layer.
Installation
When equipping a bathhouse with a unit with a remote firebox, there is an option when the firebox is not installed in an adjacent room, but is taken outside. However, it is not difficult to see how pointless this idea is. To constantly lay firewood, you need to have an assistant. How to heat the dressing room? Nevertheless, this option is acceptable when coal is used instead of firewood.
The process of firing the stove from the street prevents the settling of coal dust and the formation of an unpleasant odor in the bathhouse.
Regardless of the conditions in which a stove with a remote firebox is supposed to be installed, it is necessary to provide for the possibility of fully opening the firebox door so that no obstacles are created for loading fuel. Ensuring fire safety for the entire structure, especially for wooden baths, begins with compliance with the standards when working with flammable building materials. The requirements refer to maintaining a distance of at least 1 m between the flammable wall and the heating device. If it is necessary to reduce this distance, it is necessary to create protection for the side structure from non-combustible insulating materials.
Foundation construction
If there is a concrete floor in the bathhouse, installation of the stove is slightly simplified. In this case, there is no need to make a concrete base, since it is already there initially. You can, of course, cover such a floor with ceramic tiles or porcelain stoneware: it will be easier to clean. In the case of wooden flooring, it is necessary to ensure thermal insulation of the base. In addition, in front of the stove itself, you need to lay a metal shield protruding 40 cm in front of the firebox. This prevents the occurrence of a fire hazard when burning coals fall out of the firebox.
It is not necessary to specially build a foundation for a unit weighing no more than 700 kg (including stones). As a rule, even the heaviest structure made of metal weighs less than the specified figure. Of course, this statement does not apply to cast iron units. However, if you want to line a metal stove with brick or install a brick chimney, you need to take care of constructing the foundation.
A foundation built in accordance with all the rules becomes a guarantee of the full functioning, safety and durability of the furnace. Let's look at the construction process in more detail:
- At the location where the heating device is installed, you need to dig a pit that is approximately 15 cm larger than the dimensions of the unit. The depth of the pit should be 0.5 m.
- The compacted bottom of the recess is covered with sand mixed with crushed stone.
- High-quality waterproofing is constructed by laying a polyethylene film over a sand-crushed stone layer.
- To reinforce the foundation, a road mesh is used, from which you need to cut a frame 5 cm smaller than the perimeter of the pit and secure it to reinforcing bars previously buried in the bottom of the pit. This can be done using wire or welding.
- The pit is filled with concrete mortar made from sand and cement in a ratio of 3:1, followed by leveling the surface with a vibrating screed and checking the horizontal level of the pour.
- After hardening, the concrete is covered with a double layer of roofing felt. The base for installing the furnace is constructed from fireclay bricks.
- To improve the practical and aesthetic properties of the heating device, the foundation can be raised 10 cm above the floor level.
Stage-by-stage implementation of preparatory work
Stage 1. First of all, you need to mark the hole for the firebox exit and cut it out. In this case, it is necessary to provide allowances on all sides, the width of which is 25 cm greater than the size of the firebox itself.
Stage 2. In accordance with the chosen method of exhausting the chimney, you need to make a hole that is wider than the pipe itself. There are a number of reasons why it is recommended to vent the chimney not through the roof, but through the wall. Among them the following are noted:
- no need to perform complex work to ensure fire safety on the ceiling and upper part of the building;
- preventing the possible formation of leaks;
- no need to purchase additional elements required for additional roof covering.
Pre-firing of the furnace
Before installing the stove in the bathhouse, it must be heated in the open air. This is done in order to remove any remaining grease from the oven, and also to allow the heat-resistant paint to completely dry and harden. Otherwise, if this is not done, at the first fire in the steam room, the new stove will produce a lot of acrid smoke.
Before the first heating, it is necessary to conduct a thorough inspection of the stove to identify minor defects, chips, etc. Carefully inspect the stove body, firebox door, glass, if any, and heat exchanger. Pay attention to how tightly or loosely the door closes
To fire the stove, place it on a flat surface, away from flammable objects. If the stove has a heat exchanger, then provide a temporary container to heat the water. Install a chimney with a height of at least 2 meters. Place the wood in the firebox, half the volume of the stove, and light the fire. The fire in the oven must be kept for about an hour.
You must wait until the fire goes out completely. Don't put it out. Wait until the oven cools down completely. This is necessary for the heat-resistant coating to completely cure.
Design Features
A similar metal sauna stove can be purchased at a retail outlet or online store. Purchased units do not require brick finishing , since they were provided with reliable protection at the factory to prevent burns. This creates certain convenience in using the unit, but still some problems arise with comfort in the room. The reason for this is the rapid cooling of the stove and the need to constantly add firewood. When the fuel burns completely, the steam room becomes very hot; as the fire gradually dies out, the air in the room cools down.
A homemade stove made of metal is quite suitable for use in a bathhouse. The implementation of such a project will require very little time and money. And if such a device is also covered with brick, then it will become safe for use and will evenly release heat.
According to some experts, to implement this idea you will need fireclay bricks. However, it would be more correct to use heavy fireclay, which can withstand high temperatures and, unlike its light counterpart, allows heat to pass through. The peculiarity of lightweight brick is that it is used for the manufacture of melting furnaces that do not require high heat transfer.
At home, this type of material can be used to equip stoves with chimneys. In this case, there is no need to create additional thermal insulation: ordinary red brick will be enough. Its price is significantly lower than the above materials, and to comply with generally accepted standards, the operational and fire safety characteristics of such bricks are absolutely suitable.
Care should be taken when selecting filler for the heater. As a result of heating some stones, carbon monoxide may be released into the steam room. To prevent this, avoid purchasing those cobblestones that have white veins or inclusions.
Installation of stove, tank and chimney
Furnace installation
The stove in the bathhouse is installed on a pre-prepared base, observing all indentations and minimum permissible distances from the walls. Detailed installation drawings. The distance from the stove to the ceiling, which is not protected by heat-resistant materials, must be at least 120 cm. The distance between the stove and the walls of the steam room must be at least 32 cm.
Tank installation
Bath stove with water tank. When choosing a tank, you can use a simple rule - 10 liters of hot water are needed per person. Based on this rule, everyone can calculate for themselves how large a tank they need.
The tank is installed on a special nozzle of the furnace air duct. This installation will allow you to heat the water to a temperature of 95 degrees Celsius, while heating the air in the steam room to 100 degrees Celsius. To securely mount the tank and reduce pressure on the foundation, it is advisable to mount the tank on the ceiling of the steam room or dressing room.
Chimney installation
Installing a chimney is a very important job, because... Many fires in bathhouses are associated precisely with improper or poor-quality installation of chimneys.
When installing a chimney, you need to remember that you will need approximately 90 cm of empty space along the line of the pipe. Therefore, if the bathhouse was not designed from scratch, according to a specific project, then there may be a ceiling beam above the stove, which will need to be cut out under the chimney, and connecting jumpers with the adjacent beam must be installed.
The material for the chimney can be brick, metal or ceramics. But ceramics require skillful handling, and it is unlikely that you will be able to install it yourself. You will have to look for a highly qualified specialist in this profile.
The simplest option for organizing a chimney is sandwich pipes. Almost anyone who knows how to use a tool can install such pipes.
Chimney installation, step-by-step instructions:
- a hole is made for the pipe in the ceiling, wall or ceiling;
- the wood is coated with a bio-fire retardant compound;
- a piece of pipe with thick walls is mounted on the furnace pipe, welded or installed with a heat-resistant sealant-adhesive;
- a smoke valve is installed on the pipe;
- sandwich chimney pipes are assembled;
- A spark catcher and rain protection are placed on top of the chimney.
Third stage: installation of the furnace
The unit is installed on a prepared surface so that the requirements for clearances from the walls and ceiling .
The distance from the ceiling, which does not have special thermal insulation, should be at least 120 cm. The distance from bath walls or partitions to stove surfaces should not be less than 32 cm.
Reducing this gap is allowed only if the structure is protected in the form of the mentioned steel sheet laid on asbestos. If this condition is met, the distance can be reduced to 26 cm.
When installing the unit, it is important to consider its position relative to the direction of the heating chamber . For example, installing a Vesuvius stove in a bathhouse may imply the possibility of adding fuel from an adjacent room. This design solution is more difficult to implement, but when used it will provide significant benefits. In particular, convenience during the operation of the steam room will be ensured and maintenance of the stove as a whole will be simplified.
Safety rules for the construction of a bathhouse
It has already been written above how important it is when planning and constructing a bathhouse to strictly adhere to all standards and recommendations to ensure fire safety.
Brick is the best material for fire protection, but despite this, it is necessary to maintain a minimum distance from the stove to the walls - no closer than 25 cm. A special base for the stove is laid on wooden floors to avoid fire. The ash compartment is located at a height of at least 14 cm from the floor. When installing any metal stove, you must strictly comply with all the standards and regulations of the manufacturer. When installing a potbelly stove, you must follow the rules of SNiP. When building a stone stove, you first need to calculate the final weight of the entire stove and arrange an appropriate foundation for it.
Following the simple rules described in the article will help you install the stove in the bathhouse correctly and protect yourself from unforeseen situations.
Installing a stove in a bathhouse and possible errors
Finally, I would like to draw your attention to the most common mistakes when installing stoves. These include:
- incorrect installation of the stove, failure to follow the manufacturer’s rules, failure to comply with the minimum distances from the stove to flammable surfaces;
- non-installation or incorrect installation of heat-resistant screens;
- neglect of fire protection measures, lack of a fire extinguisher in the bathhouse;
- savings when buying stones for the stove, low-quality cheap stones - risk of fire, use of low-quality essential oils when vaping;
- installation of a casing for the chimney without gaps for ventilation;
- failure to install or incorrectly install the base for a metal stove on a wooden floor;
- saving on materials, buying cheap equipment.
Following simple rules and recommendations will help you understand how to install a stove in a bathhouse with your own hands.