Firing a stove is a complex process consisting of several steps - from a preliminary inspection of the stove and adding fuel, to cleaning the ash pan and chimney after it burns out. In order to heat your home efficiently and safely, you need to know how to properly heat the stove with wood or other types of fuel. Plumber Portal has prepared step-by-step instructions for lighting the stove.
Basic principles of efficient and safe combustion
The question of how to properly heat stoves in order to bask in soft warmth in a country house, in a country house or in a bathhouse worries many. At the same time, I want this process to be as simple as possible, but with maximum heat transfer.
Effective heating depends on three basic principles: the serviceability of the heating structure itself, the use of high-quality fuel and proper kindling.
If you heat the stove incorrectly, you won’t have to wait long for negative consequences:
- fuel consumption will increase by 20%;
- structural elements become clogged;
- the house will be poorly heated even if a large volume of fuel is consumed;
- the chimney will become clogged and it will become impossible to use the stove.
To avoid such problems, it is necessary to follow the basic principles of efficient and safe combustion of a household stove:
- Always check the suitability of the structure and all its components before each use.
- To increase the flow of air masses for better fuel combustion, regularly clean the grate and ash pan.
- After the stove has been idle for a long time, first warm up the chimney (to do this, light a mini-fire in the firebox), and only then proceed to light the stove itself in the usual way.
- Place firewood, coal or briquettes strictly in the middle of the firebox, not allowing them to move to the rear; it is better to place the fuel closer to the door.
- Regulate the air flow by opening/closing the ashlar and combustion chamber doors.
- To improve draft, push in/out the chimney damper and viewer.
- Do not “gut” the fuel until most of it has burned.
Compliance with these simple principles will allow you to organize maximum heat transfer from the device and its safe use.
What fuel is suitable for a home stove?
In order to heat the stove, you can use firewood, coal, and peat. Modern manufacturers also offer new types of fuel - European firewood, various types of pressed briquettes.
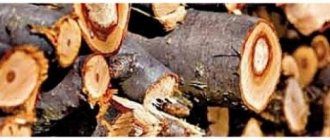
Firewood
- Birch has always been considered the best in this regard. Such logs do not shoot, do not spark, burn completely, and have high heat transfer. But if you overdo it and build too much fire, a fire may occur.
Birch firewood is the best for a home stove.
- Oak wood burns for a long time and produces a lot of heat. Heat transfer is higher than that of birch trees by about 20%. But they are very expensive. With constant use, the brick quickly burns out and the walls become thinner.
- Pine and spruce firewood are inferior in heat transfer to birch and oak. Due to the presence of resin, they crack and shoot a lot. Not only sparks, but also hot coals can fly onto the floor. Therefore, a wooden floor must be covered with a sheet of metal, floor tiles or other non-combustible materials. Pine and spruce firewood produces a lot of ash and burns out for a long time. If you close the chimney opening before all the coals go out, you may get burned.
- Aspen firewood burns slowly. Heat transfer is 50% lower than that of birch. But aspen helps clean the chimney of soot and soot, so it is recommended to place them in a small amount in a hot stove at the end of the firebox.
Aspen firewood is often used not for the purpose of generating heat, but as a means to clean soot from the chimney
- Alder firewood flares up quickly, produces virtually no smoke, like aspen, and cleans the chimney of soot. It has long been considered “royal” firewood.
Pine, birch and spruce, although they have good heat transfer, produce a lot of soot when burning. This means that the chimney will have to be cleaned more often.
Table: required amount of fuel depending on the type of firewood
| Wood species | Birch | Aspen | Pine | Spruce | Alder | Oak |
| Fuel volume (m³) | 1,0 | 1,5 | 1,2 | 1,3 | 1,2 | 0,75 |
Video: how to properly lay firewood and quickly light the stove in a bathhouse or at the dacha
New type of fuel - Eurowood
Euro firewood is made from sawdust and wood dust, compressing them in special presses under high pressure and at high temperature. The density of fuel briquettes is 3 times greater than that of firewood, which means the heat transfer is higher. They burn with a high, even flame, with virtually no smoke. They burn completely and leave very little ash. The thermal conductivity of Euro-firewood is approximately the same as that of coal, but their cost is much higher.
Eurofirewood is an environmentally friendly alternative to conventional fuel
Video: features of peat combustion in a metal furnace
How to make a briquette from sawdust with your own hands
As an alternative to expensive European firewood - handmade briquettes. If you have the opportunity to purchase sawdust, then if you have free time and desire, you can make them yourself. Seed husks, finely torn paper, dry leaves, straw, and cardboard will be used. To bind, you can take clay or any wallpaper glue. The manufacturing process consists of several stages:
- Soak the sawdust in water.
- Mix thoroughly with either clay or glue in a ratio of 1:10. There shouldn't be too much water. The main thing is to moisten the sawdust.
- Place the resulting mixture in a special form and squeeze it with your hands, compress it.
- Place the briquette to dry outside, preferably under a canopy.
To speed up the process, you can make a special press.
Of course, such briquettes, due to their low degree of compression, cannot compete with European firewood. Their heat transfer will be lower, and manufacturing will take quite a lot of time.
Photo gallery: devices for making fuel briquettes
Homemade briquettes from sawdust - cheap fuel with good heat transfer. A sawdust press gives the briquettes a specific shape.
You can make a double sawdust press yourself
Instead of sawdust, you can use paper or seed husks to make fuel briquettes.
Video: how to heat a stove with coal
Types of fuel for stoves
The most commonly used fuel for home stoves is:
- firewood;
- coal;
- peat.
The choice of a particular type of fuel resource depends on its three main characteristics - energy efficiency, availability and cost. Let's take a closer look at how each of the listed fuel types corresponds to these indicators.
Firewood
Advantages:
- They burn for a long time, giving an efficiency of up to 85%.
- Almost complete combustion with the release of only 1% ash.
- The combustion of one kilogram of wood produces 4500 kcal.
- Environmental Safety.
- Low cost.
Flaws:
- The wood must be cut down, sawn into logs or split into small fragments.
- Firewood absorbs harmful substances, so logs from forest belts that are located close to large cities are harmful.
- Chopped firewood needs special storage conditions - they need to be placed over a large area in an area with the least humidity.
Coal
Advantages:
- There is no danger of spontaneous combustion.
- The percentage of ash formation is relatively low - from 25% to 40%.
- High calorific value - approximately 6,000 kilocalories per 1 kg.
- Easy to store.
Flaws:
- Difficulty igniting. Without firewood it is almost impossible to light coal.
- Not every stove can be heated with this type of fuel. To fire coal, the stove must have an additional channel for supplying secondary air.
Peat
Advantages:
- Has a high degree of thermal conductivity.
- It burns for a long time.
- Ease of use.
- Does not create a spark.
- After combustion, it leaves peat ash - a useful fertilizer.
At the same time, peat has one, but very serious drawback - easy flammability. Therefore, you need to be careful when using the cake for heating, and do not store it close to a heating device or open fire. In addition, peat produces a lot of surface moisture.
In addition to the listed fuel resources, briquettes, which are a wood processing product, are often used for stove heating. They are environmentally friendly, retain flammable properties for a long time, and do not require special storage conditions.
General information
The designs of most types of furnaces have a centuries-old history; they are created in such a way that minor mistakes of inexperienced stokers cannot cause significant harm. The main threats remain:
- excessive fuel consumption and financial losses;
- danger of carbon monoxide poisoning.
The energy efficiency and safety of liquid and gaseous fuel stoves are directly determined by the design features of the models and do not depend on the skill of the owner.
The design of gas-fired furnaces does not allow increasing their efficiency by adjusting the stroke Source bestpechi.ru
The combustion process of solid fuel proceeds differently, so a competent firebox can significantly reduce the cost of heating rooms (up to 40%). It consists of several phases:
- at the first stage, thermal decomposition of organic matter occurs with the release of flammable gases;
- pyrolysis gases ignite, releasing energy that heats the carbon base of the fuel;
- the carbon base heated to the ignition temperature produces the remainder of the total heat inherent in a particular type of fuel.
The correct course of the gasification process is most important for firewood, since the pyrolysis gases released during their combustion form a significant proportion of the heat given off by the material as a whole. They are able to easily activate its carbon base, but quickly burn out, and the stove does not have time to absorb all the energy produced by the fuel. As a result, heat evaporates into the pipe, and the structure is subjected to deformations, contributing to its premature wear.
A stove that could not withstand regular violation of operating rules and the destructive effects of time Source pyromasse.ca
Which firewood is better?
Heating a stove to heat a home or bathhouse with wood is the most economically efficient way. However, different types of wood produce different efficiency indicators. The duration of burning of logs depends on the density of the tree, therefore, the denser its structure, the longer the logs will burn and the more thermal energy they will release into the room. This is important to consider when choosing firewood.
Which tree species is the hottest?
Of course, oak is an ideal fuel in terms of efficiency, but this type of wood is very expensive and heating a stove with oak wood is an unforgivable luxury. That's why
In the middle zone and northern regions of the Russian Federation, it is most acceptable to use birch. Wood of this type optimally combines price and quality. In the southern regions, it is better to use white acacia to fire stoves.
At the same time, in order to heat buildings as efficiently as possible, you need to carefully prepare for the heating process.
What types of woodpiles are there?
There are various forms of stacking logs. You can choose the one that is suitable in this particular case.
Woodpiles can look like this:
- In the form of “sheaves”. It is very convenient to store in this form, since you do not need to build a shed or shed for this. In order to lay out a woodpile in a “stack”, you need to find wood of suitable quality that can be stored for a long time and learn how to stack the logs correctly. Such “sheaves” will last for several years and the firewood will retain its properties. Trellis are placed at the base of such a woodpile. You can lay flat stones or bricks as the base. The main thing is to raise the logs above the ground so that they do not get damp. The base is laid out in a circle, the logs inside are placed in random order. This idea is to ensure that the firewood is well ventilated. A pole is installed in the middle, which will hold the entire structure, from bottom to top.
- This styling looks very aesthetically pleasing. If you put wood of different species in such a “sheaf”, the multi-colored structure will decorate any landscape.
- The second way is in the form of a “fungus”. The stacking method is similar to a “stack”; the logs are split in a special way - not in logs, but in short planks. With the help of such a flat shape, the installation of such a “fungus” is easier. If you want to make the “mushroom” symmetrical in shape, you need experience and time. But this option will be a wonderful decoration for your garden plot.
- The woodshed is compact in size with an original roof. Most often, woodpile designs are made simple, without thinking about the aesthetic appearance. And completely in vain. Woodsheds can not only diversify the landscape, but also divide the area into zones. Compact structures are installed in cases where firewood is used from time to time, not as the main fuel.
- Large woodsheds are storage facilities in which you can store a large number of logs, stocking up for several winters ahead. Externally, such warehouses resemble gazebos, there are cracks in the walls for ventilation of the wood, the roof is reliable and should cover the entire woodpile.
- You can put a woodpile right next to the house. A roof of this design protects the path between the building and the woodpile, that is, snow will not get there. Therefore, getting to the firewood in winter will be easy. The firewood is well ventilated and protected from the sun and precipitation. If you stack the logs in this way, you don’t have to worry about them getting damp or rotting. The construction of such a structure is not difficult. You will need to stock up on wooden blocks or metal corners, a chain-link mesh with large cells, and any roofing material. Floors should be laid with simple tiles, such as those used for sidewalks.
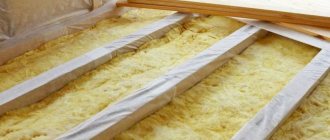
Preparation and storage of firewood
When preparing firewood, use trees growing in dry places; they contain less moisture, therefore, they will burn with greater heat transfer. If there are no dry stands, then the fallen logs must be thoroughly dried. The best period of time for harvesting wood for fuel is November-December.
You should not leave cut trees for a long time; if possible, cut them into several parts. The logs that are intended for heating the stove should be of medium size - 8-10 cm in diameter, the length depends on the dimensions of the combustion chamber.
After cutting the logs, it is better to split them and stack them in a special well-ventilated room, without excess moisture, protected from rain or snow. Therefore, you cannot store firewood in the cellar; it is better to store it in a shed or under a shed with good ventilation.
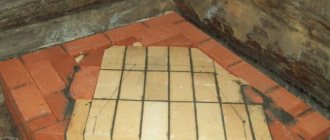
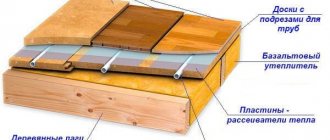
One of the effective ways of laying logs is in criss-cross cells:
The editors of the site santehnikportal.ru recommend drying firewood before using it for 2-3 years. During this period, most of the moisture will evaporate from them, leaving only about 10-15%. Well-dried and split logs are easy to ignite; they burn with great heat transfer, without forming condensation on the constituent units of the stove structure and chimney.
Main characteristics of firewood for kindling
Firewood for kindling should have the following parameters:
- Be well dried. Wet wood is very difficult to kindle, burns poorly and smokes a lot, creating a lot of condensation and soot, which subsequently pollute the chimney. Thermal efficiency from wet fuel tends to zero.
- Optimally dried wood is one that dries for a year
- The humidity of firewood ready for use should be up to 20%
- It is recommended to store firewood already split, outdoors under a covered shed or in a special utility room
- The thickness of the logs should not exceed 10 cm
- The classic length of firewood in a fireplace format is 35-40 cm
- It is recommended to store a small amount of kindling fuel next to the fireplace so that it dries a little more and warms up.
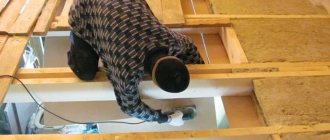
Preparing the stove for lighting
Full serviceability of the stove, namely the absence of cracks, chips and burns, is the key to the long and impeccable service of this heating device. Therefore, regularly inspect the structure and, if you find flaws, correct them in a timely manner. Before lighting, ensure good draft using a damper, clean the chimney of soot deposits, and make sure that the building is sufficiently ventilated.
Using a stove structure to heat a house or bathhouse requires strict adherence to basic fire safety rules:
- Repair and clean all components of the furnace structure in a timely manner.
- To quickly detect cracks and chips, whitewash the exterior regularly.
- Do not leave a burning stove unattended for a long time, especially if there are small children in the house.
- To prevent ignition of surrounding objects from flying sparks, nail a sheet of metal to the floor in front of the combustion chamber.
- Do not heat the stove for more than two hours at a time; you should heat it no more than three times a day to prevent the device from overheating.
- Do not light a fire just before going to bed. The fuel should burn completely 2-3 hours before going to bed.
- Do not place wooden objects, utensils or furniture near the stove.
- Use firewood that matches the dimensions of the combustion chamber opening.
- Close the chimney valves only after the fuel has completely burned out.
- Do not use flammable or explosive materials (alcohol, kerosene, gasoline, etc.) for ignition.
If the stove has just been built, then do not rush with the kindling. Let the masonry dry well for several days. When igniting for the first time, check if there is any smoke and if the surface is heating and cooling evenly.
Attention! Inhaling carbon monoxide can cause death!
Carbon monoxide is colorless and odorless; its presence in a room is difficult to determine. Therefore, you can close the valve only after complete combustion of the wood. But even with the damper open, carbon monoxide can enter the room if you burn with damp wood.
If you feel slightly unwell, close the fuel door and open the viewer completely for 10-15 minutes. In this case, it is better to ventilate the room for 5-10 minutes.
How to light a stove correctly is a very pressing question.
This question is asked not only by those who are going to do this for the first time, but also by those who want to achieve the best possible use. How to light a brick stove? A brick oven requires a responsible attitude. If you have a new oven, you need to dry it out before using it.
When the house is warm and the weather is good, all doors and valves are opened in the oven and left to dry. If the stove is built in cold weather and natural drying is not possible, it must be heated 1-2 times daily with three dry logs chopped into splinters. After heating, open all valves and doors for ventilation.
Do this until the clay dries throughout the entire masonry, and drops of water appear on the closed valve the next day after firing. Especially large ovens take about a month to dry.
The stove should be heated with the valve fully open only with dry wood. During the fire, 5-6 logs are laid 1-2 times. Firewood needs to be added if coals from the first fire have already formed. How to light a stove without smoke? To avoid the release of thick acrid smoke when you put in firewood, close the vent before opening the firebox door. After stowing, you need to open the blower door back.
The principle of how to light a stove is clear, but there is one rule! Stir the coals. When they form, close the blower door, but not all the way. Close the oven valve three-quarters of the way. Close the ash door when ash forms on the coals and the flickering lights are no longer visible. Leave the oven valve open for a while longer.
If the coals are not burned and you close the valve, there is a risk of carbon monoxide poisoning. Therefore, either mix the coals well or leave the valve slightly open. Do not expose yourself and your loved ones to mortal risk.
Brick stoves are not designed for you to heat from morning to evening. This should be done 1-2 times a day in cold weather. If the stove is heated all day, it will overheat, bricks may burst and seams may come apart. The longer you heat the stove, the less useful heat gets into your home, the more it goes outside. And after only three to four hours of heating, you warm not the house, but the street.
How to light a stove safely? According to fire safety rules, a brick oven can be heated to 70 degrees, and if it is more, a fire may occur. Better drown more often. The brick stove will begin to release the accumulated heat approximately an hour after the start of combustion. You won’t be able to get a lot of heat right away.
If you haven’t used the stove for a long time, then you can heat it for the first time with only one load of firewood, then let it warm up for 2 hours, then heat it further. This way you will avoid bursting bricks and cracking of the stove mass. It is better to entrust repairs in case of cracking to a stove-maker. This way you can heat any stove, including a Russian one.
New articles:
- Garden sprayer - how to choose
- Garden shredder - features of choice
- Snow shovel - how to choose
- Cultivator for a summer residence - features of choice
- Which fireplace is better to use for a summer house?
Previous articles:
- How to choose the right generator for a private home
- How to choose the right verticutter for the garden
- How to choose a snow blower for your dacha
- How to choose a garden vacuum cleaner - leaf blower
- Induction boilers - alternative heating for a country house
Correct furnace combustion
The operation of the heating structure largely depends on the correct placement of firewood. Most often, three methods are used for laying logs in the flow chamber of the stove:
- horizontal, when firewood is laid in rows one after another with an even distance;
- conical, when pegs are used to form something like a wigwam;
- diagonal, when the first log is placed diagonally, and the rest - at an angle to it.
At the same time, do not fill the firebox to capacity; about 1/5 of it should remain free.
When using coal, ignition is done with wood, and after it burns, a small amount of coal is poured in - a layer of about 5-6 cm. Subsequent fillings can reach a height of up to 15 cm, but the layers must allow air to pass through well. It is recommended to stir the fuel periodically with a poker.
The instructions for firing the stove require the following steps:
- Place crumpled pieces of paper and thin wood chips in the grate area. You can put 1-2 small pegs.
- Open the ash pan door by ¼ and the chimney valve by ½.
- Set the paper on fire.
- After the fire ignites, open the vent halfway to increase the volume of air supplied.
- After the paper-wood structure burns, gradually add logs as they burn out.
- Re-lay firewood when large coals form (about 30 minutes after the first laying).
- Regulate the combustion process with a valve and a blower.
During the combustion process, pay attention to the color of the flame. The straw color is an indicator of the normal combustion process. If the flame is white and a strong hum is heard, then this means that the draft is too strong, cover the ash pan. A red flame is a sign of insufficient draft; open the blower slightly.
During the cold season, a long-burning stove needs to be lit most often. At the same time, you should not light the fire too much and more than three times, so as not to overheat the structure, causing its premature destruction. It is quite enough to heat the stove twice a day in winter: in the morning and in the evening with an interval of at least 6 hours.
Basic options for placing a stove in modern baths
Traditionally, there are two main types of implementation of the stove layout in the bathhouse:
- Placement of the entire heating system in the internal volume of a steam room.
- Installing a stove in a bathhouse with an external firebox.
What are the advantages and disadvantages of both options?
Let's start with the advantages that installing a sauna stove with a remote firebox provides:
- There is at least a theoretical possibility of simultaneous heating of two separated functional areas: steam room and dressing room or, in some cases, a relaxation room;
- Fuel can be added directly during the vaping process, which is very important when operating lightweight metal stoves with a small combustion chamber and low heat capacity. In addition, this function turns out to be extremely useful for commercial operation of a bathhouse, when maintaining the required temperature should not disturb resting clients;
- The absence of a combustion door will allow the sauna stove to be equipped with a full-fledged brick casing, which is very important for reducing the degree of thermal radiation when operating thick-walled metal stoves. In addition to improving the quality of the microclimate inside the steam room, such a solution will radically increase the level of its safety, negating possible burns for visitors;
- It is possible to improve the operating standards of the steam room by an order of magnitude, where wood debris and combustion products and ash will not fall;
- In humid climates, near the firebox opening, you can equip a niche for drying the current supply of firewood;
- A fire door designed in the form of a transparent insert made of heat-resistant glass can perfectly enliven the interior of a dressing room or relaxation room, introducing into it an indescribable atmosphere of the play of live fire.
Attention! In almost 100% of cases, a bathhouse with a firebox from the street is sold in cases where the stove is heated with coal. Loading it and cleaning it from ash involves the release of a large amount of dust and mineral debris.
Negative aspects of operating systems with a remote firebox
A stove for a sauna with an external firebox, in addition to positive aspects, also has a number of negative qualities that we must know and remember:
- The generated power that a sauna stove with an external firebox can provide is in most cases insufficient to fully heat two separated functional areas: a steam room and a relaxation room;
- Sauna stoves with a remote firebox, which are loaded with fuel from the street, are not always convenient for use for purely personal purposes. If the stove has a small combustion space, its efficiency is low, which requires constant tossing of a portion of logs, then its maintenance in operating mode requires periodic exit of one of those present into the street cold and slush, only in order to “feed” the stove;
- Installing a stove for a bathhouse with a remote firebox requires more installation work than a stove with a traditional layout. Among other things, the installation work itself requires a set of fire safety measures.
How to light the stove after a long break?
In early spring, when you arrive at your dacha, you will have to light the stove to warm up. But after a long period of inactivity, it is worth lighting a fire in it so as not to damage either the heating structure itself or the residential building.
First of all, check the stove outside and inside for the presence of:
- chips;
- cracks;
- foreign objects;
- small animals and birds;
- soot deposits.
The presence of these inclusions can become a serious obstacle to the normal operation of the device.
Fill cracks and chips with mortar and get rid of foreign objects. To clear the chimney duct of soot accumulation, use a special metal ball on a long rope. The ball can be equipped with a wire brush, then lower it down the chimney and lift it up, repeating these manipulations several times, shaking off the soot after each rise.
Be sure to check for draft if the stove has not been fired for a long time. Light the wood by fully opening all the doors, then close them, adjusting the degree of exhaust. Lay two logs parallel to each other at a short distance, then place the other two on top of them, placing them perpendicular to the first row. Place paper inside and set it on fire.
After a long period of inactivity, do not heat the oven at full power at once. The first combustion should not exceed half an hour; after 4 hours, the kindling can be repeated, increasing the combustion time.
Before kindling
Before you light a fire, you should prepare the fireplace for use. This rule applies even to those fireplaces that are used daily, since preparatory work is responsible for the safe use of the heater. The start of kindling should be accompanied by a check of the chimney. Condensation, creosote and soot that accumulate over time on the inside walls of chimneys can ignite when exposed to high flue gas temperatures. Therefore, it is necessary to service the smoke route several times a year and clean it of carbon deposits. Of course, it is impossible to clean the chimney before every kindling, but there are ways to check its condition. For example, before lighting a fireplace, you need to check the draft level. If there is draft, it means that everything is in order with the chimney and the smoke exhaust channel is free and not clogged with debris or condensation.
Traction check:
- Using a newspaper or a sheet of paper: when set on fire, they are placed in the middle of the firebox and the behavior of the flame is observed. If the flame deviates towards the chimney, it means there is draft.
- Using a newspaper or a sheet of paper: setting it on fire, they are placed suspended in the inspection hole in the pipe. If the flame moves and tends upward, it means there is a draft.
Features of the furnace fire in the black sauna
Lighting a stove the black way is sometimes practiced today when heating a bathhouse, since this method produces more efficiency than the “white” method, and less fuel is consumed.
Combustion products in such devices do not exit through the chimney, but through the windows and door. A large amount of soot settles on the walls, acting as an adsorbent.
The procedure for firing a black stove in a bathhouse:
- Open the windows and door to bring in fresh air and support the combustion process.
- Fold the firewood into a “house” by placing paper under it and set it on fire.
- Before adding wood for the second time, generously spray the walls and shelves with water.
- Gradually add firewood, finishing the fire when crimson light appears above the stones.
- Wait until the last portion of wood burns out and remove the coals.
- Ventilate the room by opening the windows and door.
- Rinse doors and shelves with cold water.
- Splash a tub of water on the heater and close the doors.
Now you can enjoy all the delights of a steam room, melted in black!
Heat the stove with coal
There are significant differences when heating a stove with coal. Correct laying gives such an effect that even metal cannot withstand such temperatures. This door used to have an internal reflector, but when it melted, the door quickly began to crack.
We will burn with graded DPK coal, as it is the most convenient to use.
We lay paper and wood chips in the same way as when burning wood, but the grate needs to be lined with firewood so that unburnt coals do not quickly fall into the ash pan. This board is good for this.
If there are no such planks, we simply lay the grate with small firewood. After which it is convenient to put paper and wood chips.
Next we lay a layer of small firewood and one layer of medium firewood on top.
Please note that there is no need to add more firewood. Only a small layer of small and one layer of medium wood
Large firewood is not needed here at all, it will simply be excessive fuel consumption. The picture above shows a little more wood than needed. I just took what was at hand.
Take a bucket of coal. Coal is placed in a bucket as follows. The lower third part of the bucket is occupied by the smallest coal, in the middle there is a larger one, and at the top there is a large one, which will be used to lay the row at the firebox door.
The coarse coal should be about this size.
A smaller one will be inconvenient to lay, and a larger one may not burn completely. Now we build a barricade out of coarse coal so that when we fill in the coal, nothing will spill out. The photo wasn't very clear, but overall it's clear.
Now add coal on top.
We open the door. After filling a bucket of coal, nothing spills out. Everything is clean and tidy. When igniting, as well as burning with wood, the ash door is completely closed.
We lit it and also closed the firebox door not completely for 10 seconds.
Then we fully open the ash pan door and close the firebox door. After 15 seconds my oven was burning like this.
Unlike lighting the stove with wood, here you need to close the ash pan door when you feel good warmth from the stove about 30 centimeters away. If you cover it earlier, the coal will not flare up well and will smolder more than burn, which means the efficiency of the firebox will sharply decrease.
If the door is not closed at all, the coal will quickly burn out and this will also be ineffective. On the demonstrated stove, the door is closed after about 15-20 minutes like this.
This bookmark burns for 1.5-2 hours. If it’s frosty outside, it’s better to immediately add 1.5 buckets of coal. With a house area of 60 sq. m. and 40 degree frost, one bookmark in 1.5 buckets was enough. The house is made of logs and is quite warm.
A good indicator of stove draft can be the circles that are located on top of the stove. With good traction, their interior is light and free of soot. Here it is.
If traction is bad, these circles are black on the inside.
Now let's see how to check the draft in the stove so that the stove valve (viewer) is not closed more than normal, otherwise carbon monoxide from the coals will go into the room. Carbon monoxide from coal is especially dangerous.
We cover the view and place a burning match over the hole where the coal was poured. The flame should go down.
As soon as the flame stops going down, there is no longer any thrust and it is unacceptable to close the view.
It is convenient to whiten the part of the valve that should not be closed. You can clearly see the limit up to which you can close the view and never make a mistake.
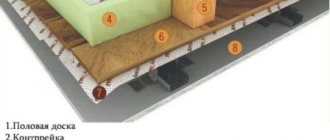
A few tips to make your firebox even more efficient
Figure 6. Stove firebox in progress
The firebox will be even more effective if you pay attention to the following points:
- wet wood can cause the flame to go out after a while; the reason is the formation of a large amount of carbon monoxide inside the chamber; It’s better to forget about undried fuel altogether, but if an unpleasant situation arises, you need to close the combustion damper and open the chimney and damper for 10-20 minutes; after this, you can open the outer door (of the chamber) for a while;
- It is not recommended to move logs that are not at least 50% burned;
- It is advisable to shovel the coals that formed earlier than others into the center of the furnace bottom and cover them with burning fuel and hot coals;
- It is better that the temperature in the firebox exceeds 200 degrees; in this case, soot almost does not settle on the chimney walls.
Stacking and lighting firewood
Method of laying firewood in the stove
The traditional approach to stacking firewood and lighting the stove involves preparing a pyramid of logs with a crumpled piece of dry paper placed in the center. Finely planed wood chips are added there, and then the whole thing is set on fire.
When the paper is lit, the wood chips ignite first, after which the fire spreads first to small and then to large logs. The disadvantage of this kindling method is the inability to control the combustion process. The firewood “seizes” all at once and burns entirely, and the process itself proceeds unevenly and quickly. After some of the logs have burned, new portions of firewood are thrown into the stove, which also quickly catch fire and immediately burn out.
The burning time can be artificially increased by changing the method of placing firewood in the firebox. One way to light your stove involves the following procedure:
- The bottom row of logs is placed in the firebox.
- A second row is placed on top, offset to one side by 5-10 cm, forming a small protrusion in relation to the first.
- Next, the third and all subsequent rows are laid.
- A piece of paper is placed at the edge in the ledge area along with birch chips, after which the whole thing is set on fire.