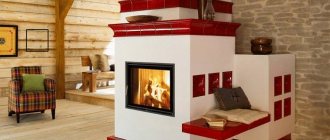
In rural areas, wooden houses are in most cases built without a design. The owners independently decide how many floors there will be in the new building and their area. There is only one problem: how to heat. No one has canceled winter. Russian stoves have gone into oblivion - there is no suitable brick, the craftsmen have disappeared, and it is not prestigious. The only thing that can be installed is a fireplace. But they won’t heat the house.
What remains is a water boiler running on solid or liquid fuel, natural gas or electricity - heating is carried out by converting electrical energy into heat. At the same time, the water boiler can be used for traditional heating, using batteries, and progressive, using pipes with a liquid coolant running through the floor pie. Everyone knows about heating homes with batteries. Few owners talk about a “warm floor” in a wooden house.
The editors of the StroyGuru portal decided to fill the knowledge gap and prepared an article on how to make a heated floor in a wooden house.
What kind of heated floor is better to make in a private house
There are several floor heating systems:
- water;
- electric;
- film infrared.
A comparative analysis shows that water heated floors are inferior to their competitors in two ways: any leak turns into a huge problem; serious financial investments are needed at the construction and repair stages.
However, there are nuances.
- On a heated area of more than 100 m2, in 30-35 years there will be a full return on investment (at current prices, and they can change greatly, all this will happen faster). The reason is low heat costs. Naturally, the larger the area of the house, the faster the family budget feels the impact.
- Modern floor heating systems with liquid coolants rarely fail before 50 years. This is the first thing. Secondly, wooden houses have a different heating installation technology. Repairs here are complicated only if ceramic tiles are laid - you will have to break them, not dismantle them.
The comparative analysis is presented in more detail in the articles:
- “Which underfloor heating is better - water or electric?”;
- “Do-it-yourself warm floor on a balcony or loggia.”
From these same articles we can draw a general conclusion: an electric heated floor in a wooden house can be used either as an additional type of heating, which, in the opinion of the editors, is ineffective, or for constant heating of a small building or part of it. For example, a balcony on the second floor. As a result, the option of water floor heating remains.
Many experts may object: water-based “warm floors” and a wooden house are incompatible. The joists and rough wooden flooring simply will not withstand the weight of the cement-sand mortar used to fill the coolant circuit. Refusal of the screed removes the heat accumulator from the floor pie, as a result of which the house quickly cools down when heating stops.
In principle, they are right. Filling the screed can only be done in the following cases:
- rough wooden floor laid on the ground;
- for logs, a powerful beam measuring 20 x 22 cm or more was taken;
- Instead of wood, a concrete floor slab was used.
In all other cases, you need to look for other ways to install a water-heated floor in a private home. And they exist - floor heating systems made using the “dry” method. They are based on metal plates made of galvanized steel or aluminum. Their wings act as screeds: they accumulate and dissipate heat. The pipes are laid in special grooves in the form of an inverted Greek letter omega Ω (end view).
Important: plates are available for any pipe laying step, which must be taken into account when purchasing them.
The heating circuit can be laid using this technology:
- on the joists in the gaps between the floorboards;
- in a polystyrene plate with bosses;
- in special sets of slats - sold in construction stores.
In addition, the base for the entire structure can be made independently: grooves for pipes are burned into the foam using a special apparatus. By the way, this is the only option for arranging a water-heated floor when the contour can be laid in a “snail”.
Each method has its own strengths and weaknesses. General:
- light weight;
- absence of “wet” processes;
- high efficiency;
- versatility - can be installed in any room (bedroom, living room, kitchen, bathroom), under any floor covering (porcelain tiles, laminate tiles, linoleum, etc.).
In this case, the floor pie looks like this:
- rough floor;
- thermal insulation material;
- scattering plates;
- circuit with circulating fluid;
- finishing floor covering.
Let's study in more detail the instructions for the dry method of installing a water-heated floor. For those who decide to use a screed, we refer you to the work “Warm water flooring under laminate”, where you can get answers to all your questions - the technologies are completely the same.
Rules for further care
When electric heating or water heated flooring has already been installed on a wooden floor, a logical question arises: how to care for it so that it can be used without problems?
For a long service life, follow these tips:
- make sure that the floor covering is not heated by direct sunlight (draw the curtains);
- It is best to clean with a vacuum cleaner - get rid of dust on the floor, and even in the cracks between the boards;
- be sure to take off your shoes when returning from the street, because they may contain dirt and abrasives that can scratch the floor;
- in the area where there is a heavy object, it is better to place a floor mat;
- Moisture negatively affects wood flooring, so rubber mats should be used in suspected areas.
- A wooden heated floor, correctly calculated and laid, serves its owners. This is all done by builders, or the owners install heated floors in a wooden house with their own hands.
Materials and tools
Installing a heated water floor in a private house using the dry method requires the purchase of the following materials:
- solid or liquid fuel boiler, gas (an electric boiler is inferior in economics to cable heated floors and infrared film);
- circulation electric pumps - due to the internal resistance of the pipes, the movement of the coolant due to the pressure difference in the system is impossible;
- expansion tank;
- Mayevsky tap for removing air when airing the heating system;
- distribution unit (collector);
- safety valve;
- pipes with special fasteners;
- fittings for polypropylene pipes or coupling-press for metal-plastic;
- antifreeze if no one lives in the house on a permanent basis during the winter;
- roll waterproofing in case of pipe leaks;
- foil vapor-permeable heat-insulating material. When purchasing simple insulation, you need food foil;
- metal diffuser made of galvanized steel or aluminum;
Diffuser.
- polystyrene plate with bosses for laying pipes;
- set of wooden slats.
If you want to save money, a slightly different list of materials is possible. But we will talk about this in the process of reviewing the material.
You can't do installation work with your bare hands. You need tools and equipment (you can buy them, borrow them from friends and acquaintances, or rent them). According to the technology, the set includes:
- level - allows you to carry out work in one plane;
- roulette - nothing without it. You will have to measure a lot;
- wood hacksaw - useful when laying pipes on beams or on a slatted system;
- grinder - will help in cutting pipes. Here she is unrivaled;
- set of wrenches;
- adjustable wrench. Sometimes they indicate that one adjustable wrench is enough. But that's not true. Anyone who installed such a system with their own hands knows about this;
- soldering machine - required for cross-linked polyethylene pipes;
- Screwdriver Set.
Some specialists take a portable gas burner with them, which in some cases significantly speeds up the progress of work.
Calculation of the number of pipes
The number of pipes depends, first of all, on their diameter. And not because a larger amount of coolant liquid is pumped through a larger pipe, which means less is needed. The point is the size of the circuit, which is limited by the internal resistance of the pipe walls. In plain language, this means that a pump of any power cannot pump water through a pipe of infinite length.
There is always a “locked loop” effect. Thus, through a ⌀16 mm pipe, an electric pump can pump liquid over a distance of only 80-100 m (depending on the pipe material). In turn, the size of the pipe affects the laying step: a thinner pipe can be bent 360° with a smaller radius. Here the laying step will be smaller. Naturally, for a thicker pipe this step is greater.
Taking these nuances into account, heating engineers proposed the following formula for calculating the number of pipes:
N = S/L x 1.05 + (M x 2) where:
- N—number of pipes, m;
- S—heated area, m2;
- L — pipe laying pitch, m (optimal distance between pipes is 20 cm);
- M—distance from the circuit to the collector, m;
- 1.05 - safety factor for radii and connections.
The calculation can be carried out using a simplified formula: multiply the heated area by 5 - SNiP requires laying 5 m of pipes per 1 m2 of room area.
The second point taken into account when purchasing pipes is the material from which they are made.
How to choose pipes for a water-heated floor in a wooden house
Heating efficiency depends on the type of pipes. The requirements are as follows:
- must have an appropriate purpose;
- only two connections in each circuit - at the input and output;
- service life more than 50 years;
- optimal diameter;
- high-quality connecting fasteners;
- famous manufacturer.
Material
Pipes can be laid on a “warm floor” without screed:
- from propylene. Affordable, they are joined by welding, which is more reliable than connections using fittings. The downside is the lack of flexibility, which results in a large laying step;
- cross-linked polyethylene (PE-X or XLPE). Among the advantages: resistance to water hammer, high mechanical strength - can withstand freezing of water, durability. Disadvantages include high price and lack of flexibility.
- metal-plastic. Characterized by high strength and flexibility, long service life. However, installation is complex and expensive;
- copper. A huge number of advantages with one disadvantage - prohibitive cost.
Diameter
For “warm floors”, pipes of several diameters are produced: 16*2 mm, 18*2 mm, 20*2 mm and 25*2 mm. Each of them has its own pros and cons. Operating experience in different conditions has shown that, in general, the strengths and weaknesses are balanced.
Therefore, you need to focus on the turning radius: a pipe ⌀20 mm will never fit in increments of 10-15 cm, which is necessary in narrow rooms. Therefore, for wooden houses, experts recommend purchasing 16-mm water pipes. We especially emphasize that all circuits throughout the house must have pipes of the same diameter.
Preparatory work
A warm floor in a wooden house begins with installing a boiler, choosing a scheme for releasing excess pressure, and with it water, and mounting the pump and manifold to the wall.
Further preparation depends on the status of the building. Residential: all preparatory work is discussed in this section. New construction - classified as basic installation operations. Installation of a gas boiler is possible inside a residential building, in one of the rooms. For solid fuel boilers, as well as those operating on diesel fuel, a separate technical room (annex, basement) is required.
It is more difficult for the home master to choose a pressure relief scheme. They come with open and closed circuit. Let us note that over a long period of work in construction, experts cannot cite the advantages of an open system. But here are the cons:
- moving the expansion tank to the top of the building, which is the attic, requires its insulation;
- it is necessary to constantly monitor the coolant level and add it regularly;
- boiler pressure is limited;
- metal corrosion due to contact with oxygen.
Advantages of a closed system:
- contact with air is completely limited - there are no oxidation processes (nothing rusts);
- expansion tanks compensate not only for boiler pressure, but also for expansion of the coolant under the influence of high temperatures;
- you can use antifreeze, which is important when people do not live in the house permanently;
- expanders can be placed anywhere, including next to the boiler;
- The boiling point of the coolant, due to increased pressure, shifts from +100oC to +120oC;
- high pressure makes the pumps easier to operate.
Conclusion: if you don’t want problems during operation, you need to install a closed system for compensating for water expansion.
Closed water heating system.
At the next stage, the pump and manifold are mounted on the wall. The boiler is connected to them. The connection is made with pipes of larger diameter.
Preparatory work in a residential building
Immediately before assembling the heating system in a residential building, you need to:
- remove furniture from the premises;
- remove the baseboards;
- remove old flooring;
- inspect the wood in the subfloor;
- replace rotten elements, additionally attach boards to the skull block, etc.;
- seal the gaps between the boards and holes from fallen knots;
- treat the wood with an antiseptic;
- prime the surface;
- carry out waterproofing work. Detailed instructions can be found in the work “Waterproofing a floor in a wooden house.”
More details about preparing the subfloor for further work can be found here.
Technology for installing water heated floors in a wooden house
There are several technologies for laying pipes. Let's look at each in detail.
Uponor technology
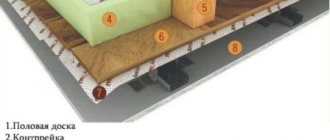
The Uponor installation method is very popular due to its simplicity and affordability. The point is to lay coniferous boards 20 mm thick and 15-20 cm wide (depending on the laying step) on logs with a clearance of 2 cm. The contour is laid into this gap. The technique is clearly visible in the diagram below.
The technology has some differences for the ground floor and the second. Consider the option of laying pipes on the subfloor above the basement:
- skull blocks with a cross-section of 25 x 25 mm are nailed to the joists, flush with the lower edge;
- a subfloor made of boards 20-22 mm thick is attached to the nailed bars with self-tapping screws;
- Waterproofing work is carried out using rolled waterproofing material. The membrane is laid over the lag, overlapping the walls;
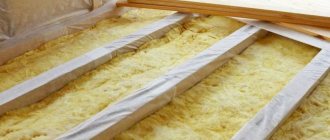
- the seams are taped;
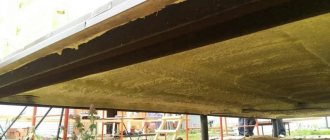
- Basalt fiber insulation is laid between the joists. Its thickness should be 5 cm less than the height of the timber used for the logs - a ventilation gap is needed;
- the insulation is covered with polyethylene film - the access of steam to the insulating layer is blocked;
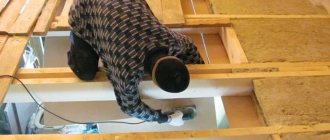
- boards are laid across the joists. Material thickness - 20 mm. The distance between the boards is 2 cm. In places where there will be a pipe loop, the board should be shorter and not reach the wall by 15-20 cm. To avoid confusion, the boards are shortened one by one. At the same time, a short board near one wall should be adjacent to the other almost closely - a 30 mm indentation for a technological gap in case the lumber swells from moisture;
- special metal diffuser plates with a recess for pipes are inserted into the slots;
- the contour is laid;
- the circuit pipes are connected to the manifold;
- the tightness of the system is checked;
- OSB, plywood or chipboard is laid on top of the pipes;
- The final floor covering is being laid.
Work on the second floor is carried out in the same order as on the first. The difference is this:
- The subfloor is nailed to the floor beams from below, without the use of cranial bars. These can be boards, OSB, plywood;
- steam and waterproofing films are swapped. Bottom is polyethylene film, type B, membrane is on top.
Some craftsmen do not install insulation. The editors of the site cannot judge whether this is the right decision. I don’t have my own experience, but I stopped trusting publications on the Internet - there is too much inaccurate information in the articles.
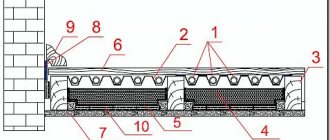
Polystyrene system
In this type of installation of a water-heated floor, the boards are replaced with a special polystyrene foam board, in the upper part of which there are bosses. The step-by-step progress of work looks like this:
- skull blocks are nailed to the joists on the first floor;
- the subfloor is laid;
- the floor is insulated between the joists with simultaneous steam and hydroprotection of the insulation;
- A damper tape is attached along the perimeter of the walls - it is necessary to create a technological gap;
- An even covering is laid over the joists. This can be gypsum fiber board, chipboard, plywood, OSB. You need to screw the flooring with galvanized wood screws;
- polystyrene foam boards are laid on the prepared surface;
- Metal diffusers are placed between the bosses. Many experts refuse to install them and lay pipes directly on the slabs. Of course, there is a difference, but not as significant as supporters of metal plates say and write about it;
- the pipe contour is laid into the plates.
Further operations are the same as in the previous method.
Alternative options
Trying to save money, local craftsmen offered several interesting options for laying water heating pipes.
- In a house without a basement, an insulating soil cushion is made - a layer of expanded clay 40-50 cm thick is poured, and a layer of sand is poured on top. All this is compacted and then leveled. Foam blocks are simply laid on a sand bed. They are held together with glue. A contour layout diagram is drawn based on the resulting surface. Using a grinder or chainsaw, 20 x 20 mm channels are cut for the pipes. The outline is laid. Plywood, gypsum board, gypsum board, fiberboard or OSB are laid on top. The final floor covering is being installed.
- Expanded polystyrene slabs are taken. Channels for pipes are cut out in them using a special device. Metal diffusers are replaced with food foil.
- 3. Buy cheap wooden kits for laying the contour. Here, foil is also used as a diffuser.
Ways to heat a country house
First, it is necessary to solve the problem of preserving the heat that is generated in the house from various electrical appliances, from people, and when cooking food. Then the problem of heat generation is solved. And at the end of thermal engineering problems - warm floors.
To keep your home warm, good thermal insulation is a must. Expanded clay, polystyrene foam, polyurethane foam, penoplex, penofol, glass wool, and ecowool are used as modern thermal insulation materials. In the old days, wood shavings and sawdust were available. The dividing ceiling is assembled from several functional layers, providing hydro- and thermal insulation.
Room in a wooden house
Floor structure between basement and living space or between floors
But such a “pie” is created in a house where there is no real stone Russian stove. In the old days, house construction followed its own technology. The frame of the house was not placed on the foundation, but on corner stones. And around the house there was a pile of earth and sand. There is a Russian stove in the corner of the house, its adobe foundation is on the ground under the house.
A country house can be heated in different ways: you can build one large stove, you can have several stoves in different parts of the house, or you can do it in a modern way - install a boiler and create a heating system with radiators under each window. Each owner chooses what is more convenient, profitable and affordable for him.
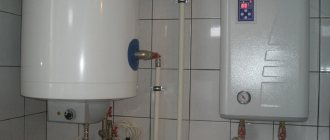
Floors also heat differently. If the house is new, the house has a hot water boiler or boiler room, then you can build a modern water heated floor. Water heating pipes are built into the floor and are included in the overall heating system of the house. This pleasure is very expensive to build, but cheap to operate.
Connection diagram for a water heated floor to a hot water boiler
Another option is to have electric heaters built into the floor. They require certain types of flooring and are quite expensive to operate.
Heating element for electric underfloor heating
There are also electric floors that heat due to the infrared radiation of the carbon filler. The system provides comfortable indoor conditions and raises the temperature to normal in 5-7 minutes.
But in the old days there were no such technical devices. And there were warm floors.
Russian stove in a village house. There, under the house around the entire perimeter, but at a distance of 1 meter from the rubble, there is a fence about half a meter high, coated with clay. The fence is not closed; its open corner faces the foundation of the stove. The space between the wall of the house and the fence is covered with earth, and an air cushion is formed inside the fence.
Since the oven operates almost continuously in cold weather - after all, food is cooked on it - the foundation of the oven warms up. Hot air from the foundation collects inside the fence. The stove warms up due to the fact that fuel and wood burn in it. Combustion requires air. The stove is built in such a way that it takes air from the underground. And it gets into the underground from a warm room. That's why it's warm in the underground. This means that the floor is also warm. This is the kind of convective air circulation that craftsmen came up with in the old days.
With constant use of the stove, the foundation gradually warmed up and gave off heat. Under the floor between the wall and the fence, everything is really covered with earth, and inside the fence there is an air cushion - an empty space between the floor boards and the ground, where the warm air from the foundation “flows”. The floor itself was made of larch boards about 70 mm thick and 70-100 mm wide.
To prevent dampness from the heated ground beneath the house from spoiling the wooden elements of the structure, the surface of the earth inside the fence was covered with flat stones coated with clay.
There is a version that this configuration of the space under the floor of the house was invented to ventilate the space under the house. But some of the heat from the foundation warmed the floor.
Which coating to choose for heated floors
Properly installed heating allows the use of any type of floor covering. Therefore, we can recommend tiles or porcelain tiles for the bathroom and toilet - they can easily be installed by the owner of the house himself. Linoleum or quartz vinyl laminate will look good in the kitchen.
In residential premises, the finishing coating can be made of any material. In a children's room, carpet is a priority, but provided that there are no allergy sufferers in the house. Spending time on such a floor is a pleasure for little residents of the house.
Heated floor installation
A warm floor is a built-in underfloor heating system, which consists of several layers.
Electrical cables or pipes are laid inside the structure, enclosed in a pie of heat, steam and waterproofing. The heated floor is laid on a solid base, a leveling layer is poured on top and a decorative floor covering is installed. As a rule, the system is used for heating in the bathroom, kitchen, toilet, shower rooms, where it is laid under the tiles and serves as an additional heat source. Heating floors are often installed in bathhouses and saunas; they can be installed under laminate and linoleum in living rooms.
As for log and timber houses with wooden floors, concrete foundations are usually not poured, since the wooden frame can deform under heavy load. In houses made of wood, a dry, warm floor is made without screed on plywood or a subfloor made of boards. Some skeptics believe that it is generally impossible to install heated floors in a house made of timber and logs, since this is fraught with fire and deformation of the surface.
There are a lot of nuances when installing a heating system in a wooden house, but if you approach the issue wisely, taking into account the subtleties of operating wooden buildings, installing a heated floor is a possible and reasonable solution. Today, in log houses, heated floors are often used as the main heating system.
Warm floors come in two main types:
- Mermen.
- Electrical.
The former consist of a network of pipelines through which hot water flows continuously. The latter heat the room using a heating cable, rods or film.