Why is vapor barrier so important?
The floors of the basement and first floor are especially affected by moisture. Basement floors are often laid directly above the earthen floor, and therefore, during high water periods, they very often end up under water. Floors located on the first and basement floors of the house are exposed to condensation and water vapor coming from the basement. In addition, they are adversely affected by all household operations that increase the concentration of moisture in the indoor air: wet cleaning, washing, showering, etc.
This problem can be solved by laying a vapor barrier, which is a key layer in arranging and insulating the floor. It ensures optimal air exchange and protects the insulation and the floor itself from high humidity and water vapor. Vapor barrier will extend the life of not only the floor, but also the entire log house, but for this you need to choose the right material and do the correct installation.
Technology for laying wooden floors with vapor barrier
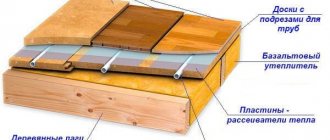
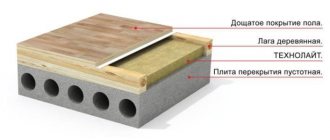
The classic technique of laying floors based on logs has been around for many years, and its principle invariably lies in the construction of a “floor pie”, usually consisting of:
- Beams. Most often, coniferous timber with a cross-section from 110x60mm to 220x180mm (depending on the size of the span). They require careful treatment with antiseptics and protective impregnations, because are the support of the entire future structure.
- Lags. Bars of smaller cross-section. They are attached to the beams and leveled, providing support for laying the subfloor;
- Moisture-proof membrane. Serves as a protective layer against moisture getting on the logs;
- Rough floor. Base for laying insulation. Most often made from sheet materials (OSB or plywood);
- 1st layer of vapor barrier . Saves the heat-insulating material from moisture “from below”;
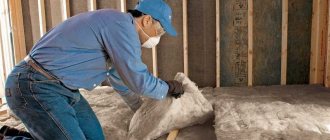
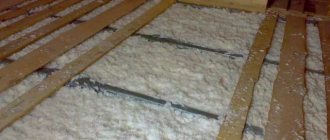
- Thermal insulation . Helps retain heat inside the house. The most commonly used insulation is extruded polystyrene foam, mineral wool or foam mat with a foil layer to curb UV rays;
- Ventilation layer . An air gap approximately 30-50mm thick between the thermal insulation and the finished floor. Necessary when using sealed “non-breathable” vapor barrier films (polyethylene or polypropylene). Provides the necessary air circulation for the floor structure. Not required when using diffusion membranes.
- 2nd layer of vapor barrier . Protection of the finishing layer from steam from the outside and moisture seepage into the thermal insulation from inside the room;
- Finish floor . Finish coating (Parquet, laminate, board, etc.).
Properly selected high-quality materials will significantly improve the life of the floor and create the most comfortable living conditions. This is definitely not worth saving on.
Useful article? Add to your bookmarks!
THIS MAY BE INTERESTING MORE FROM THE AUTHOR
Wooden floors
Sanding parquet
Wooden floors
Practical and environmentally friendly: choosing flooring for an apartment
Wooden floors
Parquet scraping
Wooden floors
Parquet board - how to choose the right one
Wooden floors
OSB board - characteristics, scope
Wooden floors
Do-it-yourself wooden floor on joists
Vapor barrier materials
The market for vapor barrier materials is quite wide. All of them are divided into three main types:
- Vapor-permeable protective films, which, in turn, can be reinforced or not, anti-condensation and regular, with or without perforation.
- Films with a reflective layer are well suited for wet rooms, basement and attic floors.
- Vapor-permeable membranes that provide effective protection of the floor from moisture and condensation, and do not interfere with air exchange taking place in the wood.
It is necessary to choose a vapor barrier for the floor taking into account the design and location of the floor, as well as the characteristics of the log house.
So, the vapor barrier of a wooden floor can be done with the following materials:
- plastic film;
- polypropylene film;
- glassine;
- diffuse membrane.
Polyethylene film
This is the most budget option.
The polyethylene film itself is fragile and breaks very easily. Therefore, to increase its strength characteristics, it is additionally reinforced with fabric or mesh. But even mesh-reinforced polyethylene film can be deformed during operation. One of the main disadvantages of polyethylene film is that it does not allow air to pass through, which creates a greenhouse effect in the room. Another disadvantage of such a vapor barrier is the flow of condensate drops along the film, due to which moisture accumulates on the floor.
Perforated and non-perforated polyethylene film is available. The first type has small holes through which steam passes; most often this type of film is used for waterproofing. Non-perforated film has low vapor permeability and is a good barrier to water vapor.
One type of material is polyethylene film with a foil layer that reflects infrared rays. This film provides good vapor barrier and can be used even in damp rooms.
Polypropylene film
This is a stronger and more durable material, which is easy to install and resistant to atmospheric factors.
Modern polypropylene films have an additional anti-condensation layer of cellulose and viscose, which absorbs and retains large volumes of moisture. Due to the good absorbency of the material, condensation does not form drops, and the absorbed moisture gradually dries out. There are polypropylene films on sale that do not have an anti-condensation layer. When they are used, condensation forms on the surface located on the insulation side, so they are not recommended for use on wooden floors.
Glassine
The material is thick paper impregnated with bitumen. Thanks to this impregnation, glassine retains moisture well. The vapor barrier does not interfere with air exchange processes and tolerates low temperatures well. If you are looking for an inexpensive vapor barrier material, you can take glassine into service.
It should be noted that this material is flammable and short-lived, so experts do not recommend laying it near wooden structures.
Diffusion membrane
Without exaggeration, this material can be called a new word in vapor barrier. It is easy to install, has a long service life, high strength and good vapor barrier properties. The membrane is made of non-woven artificial material.
There are two types of membranes:
- one-way, which discharge steam in one direction;
- double-sided, discharging steam in both directions;
Each type can consist of one or several layers, and the more layers, the greater the volume of moisture the material can retain. One of the disadvantages of a membrane vapor barrier is the high cost of the material, which will cost 3-4 times more than polypropylene film.
There are also smart membranes that independently regulate humidity and temperature, and in addition, are a waterproofing agent.
Liquid rubber
This is a water-based bitumen-polymer cold emulsion.
After hardening, it forms a monolithic coating that is completely impermeable to water and air. It has additional thermal insulation properties and can be used as a soundproofing material.
Foil mats
Rooms exposed to high levels of humidity and temperature, such as baths, deserve special attention. Temperatures sometimes reach 120 degrees, which can lead to melting and release of harmful substances from the above-mentioned materials.
In such cases, it is customary to use special vapor barriers. A layer of foil applied on one side not only prevents the penetration of steam, but also helps preserve heat: infrared radiation from the metallized surface returns inside the steam room. This type of vapor barrier is called “reflective”.
Peculiarities:
- foil-based insulation helps to further retain heat inside the room;
- tolerate high temperatures;
- depending on the base material, they may release chemicals;
- have low strength;
- The combination of foil and fiberglass is quite durable and has good thermal insulation properties, but is expensive.
approximate cost
Prices for various types of vapor barrier are shown in the table.
| Name | View | Price |
| Rapidflex | Liquid rubber | 130 RUR/kg |
| Slav | Liquid rubber | 125 RUR/kg |
| Corotop active control | Active membrane | RUB 2950/roll |
| Tyvek AirGuard | Variable permeability membrane | 4200 RUR/roll |
| P/E film | P/E film | 27 r/m |
| Megaizol | Film | RUR 390/roll |
What material to choose for vapor barrier of a wooden floor
Each vapor barrier material is characterized by a certain set of advantages and disadvantages, thanks to which we can conclude whether this material is suitable for vapor barrier of a wooden floor. The main parameters you should focus on when choosing are breathability and durability of the material. Below we will look at the most popular vapor barrier materials.
Glassine is a dense and thin cardboard impregnated with bitumen, due to which the material has a number of advantages:
- Reliably retains moisture without interfering with air circulation;
- Does not collapse under the influence of low temperatures;
- It has a low cost.
Despite its advantages, glassine also has some disadvantages:
- High flammability;
- Short service life.
When it comes to finding a budget option for a vapor barrier for a wooden floor, some homeowners opt for bitumen glassine, despite its high flammability.
Polyethylene film
Many people are seduced by the low cost of polyethylene film, not taking into account the fact that it does not allow air to pass through and creates a greenhouse effect indoors.
When exposed to negative temperatures, polyethylene is prone to destruction. In addition, it often breaks at the points of attachment to supporting structures, due to which the tightness of the vapor barrier layer is broken.
Polyethylene films are not recommended for vapor barrier use on wooden floors.
Read more about the use of polyethylene films as a vapor barrier in the article: “Vapor barrier with polyethylene film: Is it possible to do it?”
Polypropylene membranes
In comparison with other types of vapor barrier materials, the most rational choice for protecting wooden floors from wet vapors and condensation is polymer diffuse and anti-condensation membranes.
Reliably shielding moisture and allowing air to pass through, these insulating films have high strength, durability and thermal insulation properties.
The following films are best suited for vapor barrier of wooden floors:
- Three-layer polymer membranes B (R70), B (R70) Smart for vapor barrier of the floor on the side of the warm room;
- Superdiffusion membranes SA115 made of non-woven fiber for vapor barrier of the floor on the cold room side;
- Heat-reflecting films with an aluminum layer R Termo for vapor barrier of wooden floors in baths, saunas, bathrooms - in wet rooms, which are characterized by temperature changes.
Characteristics of Izospan
It belongs to the group of construction films designed to protect against moisture. Such a membrane for the floor in a wooden house will serve as waterproofing for the floor, as well as a vapor barrier material. This will stop the processes of rotting and corrosion in the structure of the wood and thus significantly extend the service life of the base of the wooden structure.
Here are some advantages of this material:
- High strength.
- Absolute water repellency, which is not lost over time.
- Possibility of use both at low temperatures (-60ºС) and at high (+80ºС).
- Easy to install.
- Long service life (50 years warranty).
- Environmentally friendly.
- Protection from dampness and fungus.
- Acceptable price.
The disadvantages include:
- Low fire resistance.
- You need to be careful during installation, as due to inaccurate and sudden movements, the membrane may break.
Types of Izospan
There are several types of such material:
- Class A insulator.
- Class B insulator.
- Class C insulator.
- Class Isolator
Izospan A
This material is used as wind protection, as well as protection against condensation on the inside of the roof and walls. It is attached to the outside of the insulation for the roof or under the facing material for the facade. This wind-moisture-proof single-layer membrane improves the properties of insulation and extends the service life of the entire structure.
Izospan A is absolutely harmless. It is easy to use and has good mechanical strength.
The design of the roofing pie, starting from the inside, implies the following sequence:
- interior decoration,
- Izospan B,
- rafters,
- insulation (placed between the rafters),
- Izospan A,
- counter rack,
- roofing covering.
There is also Izospan AM. This three-layer membrane is designed for installation directly on top of the insulation. Which side should I lay Izospan AM on? It spreads with the red porous side inward.
Izospan B
This insulator already belongs to the category of hydro- and vapor barrier films. It is made of polypropylene.
Its outer side has a smooth laminated surface, while the other side has a porous or rough surface. Thanks to this surface, condensation can accumulate and then evaporate without penetrating into the insulation.
It is used to protect walls, partitions, roofs and interfloor and basement floors.
Izospan S
Instructions for use for floors, roofs and other areas show that it has hydro- and vapor barrier properties, but in this aspect it surpasses the performance of Izospan B. One side is smooth, and the other, with the help of a rough surface, retains drops of condensate, which subsequently evaporate.
To provide a vapor barrier for the floor in a wooden house, Izospan S plays an important role. For example, it is necessary when installing parquet or laminate flooring. If a concrete screed is poured onto the floor of a wooden house, hydro- and vapor barrier is provided by Izospan S. This insulator is also used for waterproofing roofs under metal tiles.
Izospan D
This is a universal polypropylene material that has very high strength. This vapor barrier floor membrane is used for concrete or earthen foundations where there is high humidity.
A special feature of the insulator is its resistance to ultraviolet radiation, which allows it to be used for covering temporary structures. Another plus is the ability to withstand snow loads.
When is it needed for polystyrene foam?
Now let’s look at specific moments when you can do without a vapor barrier layer, and when its absence will lead to the negative consequences described above. Professionals know exactly where it is necessary and where it is not necessary to use vapor barrier and expanded polystyrene in one set.
When insulating walls outside
Most often, the house is insulated from the facade. There are a number of reasons for this, and one of them is a shift in the dew point in the environment. Here, vapor barrier is not used at all, both for buildings built from materials with a high vapor permeability rate, and vice versa.
If the main structure is made of concrete, then the risk of moisture appearing on the outer wall is very low, which means glued polystyrene foam will not cause any trouble. If you decide to insulate a house using “breathable” materials, it is better to use a ventilated façade design. Then there will be a small gap where air flows will naturally remove excess moisture.
Thermal insulation of walls from the inside
This option for installing insulation is used extremely rarely, including polystyrene foam. The main reason for choosing this method is the inability to perform external insulation. In this case, high-quality vapor barrier is simply necessary. Otherwise, all the moisture will begin to condense in the thickness of the wall, which will lead to:
- Wetting of finishing materials.
- The appearance of an unpleasant odor.
- The development of mold and mildew, which can cause many complex diseases.
Roof of the house
Expanded polystyrene is a universal material, which is why it is also used for roof insulation. Here, vapor barrier is also not replaced with anything and is not ignored. Moreover, they also use waterproofing. To protect the insulation from moisture, a kind of “pie” is constructed from both precipitation and interior spaces.
The layers are placed as follows, starting from the roofing material:
- waterproofing;
- expanded polystyrene;
- vapor barrier.
This material is also used for thermal insulation of ceilings. And here it is impossible to do without vapor protection. Warm and humid air is always at the top, and therefore polystyrene foam will be exposed to it. At the same time, the vapor barrier must protect the insulation, which means it is mounted on the side of the room.
Floor of the house
When installing thermal insulation on the floor, the presence of a vapor barrier depends on several factors:
- Using a screed - in this case, waterproofing is required. This layer protects against moisture penetration. This means there is no need to use an additional barrier.
- Floor installation using wooden structures. Here you will have to spend money on a vapor barrier to protect the tree. The floor is installed like this: wooden logs, then vapor barriers, and then polystyrene foam.
In private houses, they completely abandon vapor barrier, because warm air does not linger near the floor, and therefore does not affect these structures.
Balconies and loggias
These structures in our homes require the use of vapor barriers. Thanks to the special microclimate and conditions here, warm currents of moist air come into complete contact with cold surfaces, where condensation appears.
Therefore, when insulating a balcony or loggia with polystyrene foam, it is recommended to use difficult films and membranes. You should choose options that have foil on one side, and the base should be foamed. Only in this case will the object be completely protected.
Previous entry Which insulation is preferable for a ventilated facade Next entry Bark beetle plaster - the original appearance and color of the facade of your house
Vapor barrier: necessity or excess
A high-quality vapor barrier for a floor in a wooden house is one of the mandatory tasks. Insulation, finished flooring, substrates and linoleum are laid after this material, since the main task of vapor barrier is to protect wooden structures and other finishing materials from moisture.
It inevitably appears in a private home: during precipitation, evaporation occurs, which settles on the outside in the form of condensation, after taking a shower, during the process of doing housework (cleaning, cooking). An important task of vapor barrier is to prevent the accumulation of moisture in structures and rooms, as it will quickly penetrate the wooden elements of the house, compromising their integrity and reliability.
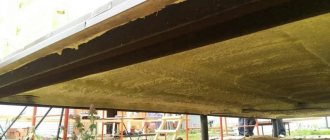
Tree damaged by fungus
Since the pressure of the resulting water vapor is higher than atmospheric pressure, it begins to put pressure on wooden structures, gradually destroying them. Inevitable changes in the temperature background, together with this indicator, lead to the formation of condensation on the mills and in the floor. Accordingly, water gradually penetrates into the insulation and reduces its quality indicators.
If there is no vapor barrier, condensation causes the appearance of:
- decay processes;
- fungus;
- destruction of insulation.
The boards that are used to create a reliable main (finish) floor planned for production in a wooden house do not have special treatment in 80% of cases. It is not customary to use compositions for protection, including against moisture, in this case. That is why it is necessary to lay a layer of vapor barrier material to protect them from the negative effects of water and fumes.
In wooden old buildings and even brick private modern houses, there is one more feature that requires attention from the owner and, accordingly, the use of vapor barrier - the floor of the first floor in 85% of cases is located in close proximity to the ground.
The exception is the presence of a base. In this case, evaporation of moisture and exposure to precipitation are inevitable. The created vapor barrier layer will protect the insulation and wood from exposure to water. At the same time, the material will allow air to pass through, providing high-quality natural ventilation necessary to maintain the performance qualities of all materials used.
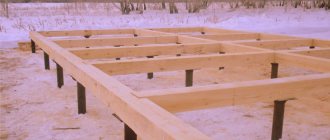
The basis of the wooden floor of the first floor of a private house
Step-by-step instructions for floor vapor barrier
Where does floor vapor barrier begin? Of course, from the dismantling of the old floor covering, careful preparation of the covering or repair work associated with it, if the need arises. After completing all this work, you can proceed directly to installing the vapor barrier material. The process consists of several stages, let's look at each of them.
The scheme by which vapor barrier is usually performed
Stage one. Carrying out dismantling work
First, you must remove all layers of the flooring, down to the sheathing boards or concrete base. If there is concrete underneath, then thoroughly clean it, for which you can use a vacuum cleaner or a regular broom. Next, inspect the surface for visible defects (this may include through cracks, potholes, various types of irregularities, etc.). If they are present in significant quantities, a number of repair measures will be required. First, you will have to straighten the screed in order to prevent direct penetration of moisture (and it may well penetrate from the ground if there are through cracks in the base).
Stage two. Install waterproofing material
This moment is necessary in order to additionally protect the material from moisture.
If you use roll-type waterproofing, then lay it exclusively with an overlap. Glue all joints of the material with mounting tape or ordinary adhesive tape.
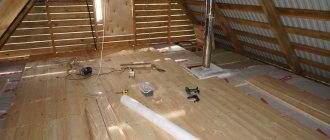
Stage three. Install the logs in the position specified by the project
Before starting this stage, carefully check the level of each of the lags so that the surface is perfectly horizontal. Treat all elements made of wood that will be used with a special antiseptic composition. Thanks to this, the tree will be reliably protected from the formation of mold and mildew, as well as from damage by various types of insects.
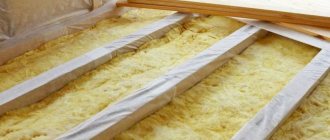
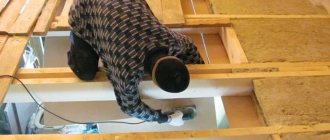
Stage four. Install a thermal insulator
Place the thermal insulation material in the space between the joists. If you use tile-type insulating material, then additionally get rid of the gaps that appear between it and the guides. This way you will prevent the appearance of so-called “cold bridges”.
Stage five. Place a vapor barrier on the floor
If you are using a two-layer polypropylene film (in which layer No. 2 is an antioxidant), then lay it with a smooth surface facing the heat insulator and a rough surface facing the room. And if you use a metallized film, then lay it with the metallized surface facing the heat insulator. Lay polypropylene with one-sided lamination with its smooth surface facing the heat insulator, with the wicker facing outward. Finally, if we are talking about a three-layer film that includes a reinforcing mesh coated on both sides with polyethylene, then try to ensure that the material with maximum density adheres to the insulation, but at the same time there are mandatory gaps of 3-5 centimeters.
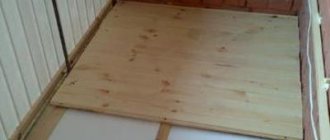
Stage six. Lay the floorboards
When attaching the boards, remember the 2 centimeter gap that should remain between the vapor barrier and the floor.
Note! If the vapor barrier of the floor was carried out taking into account all the requirements, then you will be able to avoid significant heat loss, and the thermal insulation characteristics will be quite high. Thanks to this, the indoor microclimate will be comfortable even in the most severe frosts.
If you are planning to insulate a wooden house, then remember that the procedure for installing a vapor barrier in this case is no different from that carried out in other rooms. In this case, you can lay it on a concrete base, on the ground, and even on joists. In all cases, the algorithm for fastening materials will be the same, although minor deviations may still occur.
Here, for example, is an algorithm for laying vapor barrier material along joists.
- The first layer is laid - plank sheathing.
- Insulating material.
- The logs themselves are installed.
- Vapor barrier layer.
- Covering from boards.
How to insulate a floor in a wooden house
We advise you to read our guide to floor insulation in a wooden house, all the details are here
Painted floor waterproofing
Wooden floors are not always built only inside heated spaces. The floors of verandas and terraces usually also have wooden flooring. Here, the operating conditions of wooden floorboards are much more severe than inside the house (this includes warm rains, exposure to fog, and snow), so you definitely need to take care of waterproofing the wooden floor.
Important! The most reasonable thing is to use larch boards to form floors in open, unheated structures. It is no coincidence that it is called “eternal”, because its wood is absolutely not susceptible to any corrosion.
However, cheaper types of wood can also be protected from the harmful effects of moisture. To do this, you need to apply bitumen or polymer waterproofing compounds to them - saturate them with them. Nowadays there are many such chemical materials on the market: stains, impregnations and varnishes, but their use may not guarantee a high-quality result if certain rules are not followed:
- All wooden floor parts must be dried to furniture moisture content (that is, to a level not exceeding 8%) before waterproofing.
- Before applying the chemical composition, wooden floor parts must be completely ready for installation: they must have all the necessary cutouts, grooves, tenons, and other design features. If you intend to fasten the floorboards with screws, then it is even recommended to drill holes in the boards for them. This is necessary to ensure that the chemical composition completely covers and saturates 100% of the surface of each floorboard.
- To fasten floorboards, only galvanized hardware (nails or screws) should be used. In addition, you need to use rubber seals for the caps.
As a rule, painting floor waterproofing of a wooden floor involves 2 stages: in the first stage, the boards are impregnated by applying chemicals. composition on the entire surface of each floorboard. Then (after the composition has dried), a flooring is formed from the boards, and then they are coated on top with acrylic or polyurethane varnish.
Important! To make the wood more corrosion resistant, the underside of the floor boards can also be coated with an antiseptic compound. This will prevent any type of fungus from forming on them if there is insufficient ventilation under the floor.
Controversy surrounding vapor barriers
There is still some debate about how necessary vapor barriers are, but consensus is getting closer. Most professionals now agree that vapor barriers are important in some conditions, and are not necessary for every home. In environments where the conditions inside a home or office are very different from the conditions outside, water vapor is likely to move through wall cavities and may become trapped inside, in which case a well-installed vapor barrier is recommended. A vapor barrier may also be required for some areas where humidity levels are particularly high.
How a proper vapor barrier should work
Water vapor can pass through building materials in several ways, including direct transfer and heat transfer, but research shows that fully 98 percent of moisture transfer through walls occurs through air gaps, including cracks around electrical fixtures and outlets, and gaps along baseboards. Therefore, installing vapor barriers on wall surfaces must be done in conjunction with sealing these air gaps in walls and ceilings, as well as along the floor surface.
Please note that a poorly installed vapor barrier can be worse than no vapor barrier at all.
The main purpose of a vapor barrier is to prevent moisture from accumulating and deteriorating in building materials. An improperly installed vapor barrier can actually trap moisture within the wall, while a more porous wall may breathe effectively and be less susceptible to long-term moisture damage. This condition is especially problematic where vapor barriers are installed on both the interior and exterior surfaces of the wall.
Do I need a vapor barrier?
Once considered essential throughout a home or business, installing a vapor barrier is now highly recommended only for certain conditions, and vapor barrier installation methods must be tailored to the climate, region, and type of wall construction. For example, the recommended vapor barrier for a home built of brick in a humid southern climate is significantly different from creating a vapor barrier in a cold climate for a home built with wood siding.
Avoid installing internal vapor barriers where the exterior wall structure already contains material with vapor barrier properties.
Most experts recommend vapor barriers in certain situations:
In high humidity areas—such as greenhouses, spa or pool rooms, and bathrooms.
In very cold climates, the use of polyethylene plastic vapor barriers between the insulation and the interior wall can be beneficial if all air gaps in any wall and ceiling cavities are also insulated. The outer surface of the wall or floor cavity must remain permeable to allow the dispersion of moisture entering the wall cavity.
Do not use impermeable vapor barriers.
Construction methods that allow interior wall materials to dry out are considered better than those that seek to prevent moisture from entering
Vapor barriers are usually best installed on the side of the wall that experiences hotter temperatures and more humid conditions: the interior surface in colder climates and the exterior surface in hot, humid climates.
Under existing conditions, oil paints or vapor barrier latex paints provide an effective barrier to moisture.
Avoid completely impenetrable barriers, such as polyethylene or vinyl wall coverings, in air-conditioned areas. This can lead to mold in the home and other air quality problems.
Avoid installing vapor barriers on both sides of the structure. Walls and ceiling cavities should ideally be able to dry in one direction as long as the other side is built to prevent moisture penetration.
Seal all wall cracks and openings in the wall. Use special sealing tape to join the sheets if using polyethylene sheets.
Use caulk or weather stripping tape to seal around electrical boxes at outlets, switches or ceiling fixtures.
Features: pros and cons
The operation of a wooden house requires compliance with certain rules to create optimal conditions for the tree. This way the wood retains its structure longer and does not crack.
Particular attention should be paid to the floor, since it is through it that a lot of moisture penetrates, which settles on the walls. Therefore, installing a vapor barrier is one of the best ways to combat this problem.
The use of an insulating layer is encouraged not only on the floor, under which there is soil, but also on top of concrete bases when finishing them with decorative materials.
Surface insulation is the arrangement of a kind of multi-layer “pie”, the basis of which is a substance that does not allow moisture to pass through.
It should be understood that the concepts of vapor and waterproofing are radically different, although they have several similar properties:
- Waterproofing materials help retain water, but at the same time allow air to pass through. This allows you to organize optimal microclimatic conditions not only inside the room, but also under the floor covering.
- The purpose of vapor barrier substances is to retain water and air. This does not allow even small water molecules to penetrate the structure of the protective layer.
Both of these materials are very often used together to achieve optimal results.
The disadvantage of waterproofing the floor is the increased level of humidity in the premises, which will already negatively affect the wood from the inside.
To achieve optimal results, when forming such foundations, it is important to build high-quality ventilation. It will be able to remove humid air from the house, creating an optimal microclimate in a particular room.
Backfill waterproofing of the floor
One of the most economical and common types of foundation for both brick and wooden houses (made of solid wood) is a strip foundation. Reinforced concrete strip, in this case, is poured directly along the perimeter of the walls, and the floors are often a cement screed, which is formed directly on the surface of the earth.
The screed can be constructed in the classical way, pouring a cushion of layers of sand and crushed stone for it, then laying a waterproofing membrane, and then pouring a reinforced cement screed. Or you can use innovative bulk materials - bentonites. This material is a mixture of sand and polymer additives, which, when interacting with water, turn into a gel and prevent further penetration of liquid.
Concrete can be poured directly onto a plot of land fenced off with a foundation tape up to the zero floor level. At the same time, after filling every 5 cm it is necessary to compact it. There is no need to moisten the bentonite, and logs for a wooden floor can be immediately laid on the compacted top layer.
Important! Concrete also has high thermal insulation characteristics. Therefore, specifically for its use, it makes sense to raise the zero edge of the strip foundation higher above the ground surface so that the bentonite layer is thicker and the house is warmer.
Advice from professionals
To avoid “excruciating pain” for wasted effort and money, professionals advise adhering to the following simple rules:
- when starting to implement a construction project, carefully read its graphic part and explanatory note;
- do not hesitate to ask questions to the designers, foreman and workers at all stages of work, be meticulous until the situation is completely clarified, remembering that they will go to the next projects, and you will live here;
- do not oppress the contractor with petty quibbles, but strictly control each stage of the work, sign acceptance certificates only after all comments have been eliminated.
The given “professional advice” is universal in nature and applies not only to laying vapor barriers on the floor, but also to all types and stages of construction work.
Which side to lay the vapor barrier
Since the vapor barrier has two sides, the question always arises of how to properly lay it on the floor. The answer is very simple: you need to read the label on the roll of material. Everything should be written on it. However, it is good to know some general rules. Thus, polyethylene film can be applied to the insulation on either side, since they are the same. The polypropylene film is laid with the smooth side facing the insulation, respectively, the fleecy side should face outward. Glassine is covered with impregnation - on the outside, cardboard - on the insulation. The most difficult situation is with diffuse membranes. Some of them, according to the manufacturer's instructions, have the reverse order of installation. Izospan B, for example, is laid with the fleecy side facing the insulation!
Vapor barrier layout diagram
Vapor barriers can be laid both across and along the floor joists. When the work is done by two people, it doesn't really matter. If you have to work without a partner, it is more convenient to roll out the roll across the joists. The first layer is laid with an overlap on the wall. Subsequent strips of material should be laid with an overlap of about 150 mm. The last layer to be laid must also extend onto the wall. The joints of the layers are taped with special tape. Typically, film manufacturers also produce their own branded tape. The developer should not skimp on this.
Tools for work
Before starting work on laying a vapor barrier on the floor, you should prepare the necessary tools and consumables. Tools include: tape measure, hammer, scissors, carpenter's knife, stapler. If the amount of work is significant, it is useful to acquire a pneumatic stapler. It is easier and more pleasant for them to work. True, a pneumatic stapler requires compressed air, and, therefore, a compressor. To prepare wooden surfaces, you may need a saw, a carpenter's hatchet, chisels, a hammer, an electric drill, a screwdriver, a plane, and an angle grinder with flap wheels and cutting discs. A jigsaw and a small circular saw will not be superfluous. To impregnate wooden floor structures, you will need brushes and containers for antiseptics. Consumable materials include staples for a stapler and small nails for attaching vapor barriers.