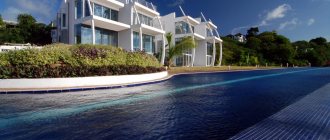
Facade decorative plaster has properties that prevent external influences, and also add decorativeness to the facade along with protecting the walls.
The modern market is rich in high-tech facade plastering products: these include facade plaster from various manufacturers, including Ceresit mixture.
This manufacturer meets all the requirements for façade coating. Ceresit is represented by a company that has been producing products for construction and finishing for decades.
What is Ceresit facade plaster?
Factories where Ceresit plaster is produced are located in various countries. There are several production facilities registered in Russia, which once again confirms the demand for the company’s materials. The manufacturer uses a slightly different technology for the production of decorative coatings, unlike its competitors.
Ceresit façade plaster contains only high-tech components that make it possible to obtain high-quality material. The company offers customers a wide selection of products that have different compositions and texture options depending on what surface will be processed.
The best prices for installing a wet facade!
| Service | Cost, rub. per sq. m |
| Installation of a “wet facade” (plaster) without taking into account materials | 700 — 900 |
| Installation of a “wet facade” (plaster) taking into account materials | 1100 — 1500 |
| Installation of an “insulated wet facade” without taking into account materials | 1100 — 1350 |
| Installation of an “insulated wet facade” taking into account materials | 1900 — 2300 |
Features of the technology
Before you get started, you need to consider a few things. Namely, how the components will be applied in the wet façade. There is no specific standard. But the budget option would be to use 4 main layers .
- The surface of the wall that serves as the basis for fastening other layers.
- Thermal insulator.
- Reinforcing gasket. It includes a special mesh and plaster.
- Decorative.
The point you need to focus your attention on is insulation. Because it greatly affects the comfort and coziness of the home. Depending on what type of heat insulator is used, there are:
- Wet façade based on mineral wool (Ceresit WM)
- Wet facade using expanded polystyrene (Ceresit VWS)
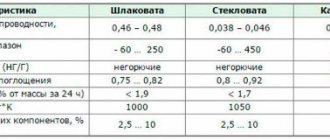
Technical characteristics of popular material
Ceresite is considered to be a certified product that has passed a huge number of tests. Facade plasters from this manufacturer differ from others by unique characteristics.
- The density of the mixture is 1.7 kg per dm³.
- Repair work can be carried out using decorative plaster at temperatures of 5-30 degrees above zero.
- The drying time of the layer for texture treatment does not exceed 15 minutes.
- The material is resistant to moisture.
- It has fairly stable hydrophobic properties and a low moisture absorption rate.
- The mixture is resistant to various types of contamination.
- A large selection of textures, the “bark beetle” Ceresite is especially popular.
Facade plaster from Ceresit has excellent characteristics when compared with some other manufacturers. For the production of products, only modern equipment and quality-tested components are used to obtain a mixture that will make your home or premises visually attractive and protect it from harmful factors.
What makes Ceresit stand out from its competitors?
In order to make a beautiful exterior coating, it is customary to use facade plaster, which has a grooved structure. The mixture is ideal for treating surfaces made of concrete, cement, gypsum or sand. Thanks to this, decorative plaster from the Ceresit company can be used on different surfaces and at the same time, it will retain its original texture.
Manufacturers make a special composition that allows you to obtain a material with a high elasticity index, especially when compared with other companies.
Ceresit plaster does not fade under the influence of sunlight and is quite resistant to mechanical damage. If we talk about competitors’ products, not all of them divide the mixtures they produce into winter and summer. This parameter is especially important to consider in situations where work is performed at low temperatures, at non-traditional times for repairs.
Decorative plaster Ceresit CT 137 Pebble 2.5 mm for painting 25 kg
Moisture-resistant and frost-resistant cement-based plaster. Designed for the production of decorative thin-layer plaster coatings for interior and exterior work, incl. in facade insulation systems. Used on the following substrates: concrete, surfaces of cement, cement-lime, gypsum plasters or putties, plasterboard, gypsum fiber board, chipboard. It has a granular texture in the form of densely packed pebble chips. Used for painting with acrylic, silicate or silicone paints. Applied by hand.
Consumption: 3 kg/m².
Quantity on pallet: 48 pcs.
Manufacturer: Russia.
Gross weight: 25 kg.
Specifications:
| Amount of water | 5.0 – 5.5 l per 25 kg of dry mixture |
| Time to use the finished mortar mixture | at least 60 minutes |
| Adhesion strength to concrete | not less than 0.5 MPa |
| Compressive strength | not less than 7.0 MPa |
| Frost resistance grade | not less than F100 |
| Temperature during operation | from – 50 ºС to +70 ºС |
You may need
- Rollers
- High rise structures
- Hand protection
- Protective nets and films
- Insulation in the “Plaster façade” system
- Bags, packages, boxes, stretch
- Rules
- Demi-season workwear
- Painting tables, platforms
- Stepladders
- Construction containers
- Spatulas, scrapers
According to club card 692
According to club 363 card
According to club card 289
According to club card 533
Details
Reviews
Questions
The base must be solid, clean, dry, free from dust and dirt. Crumbling and weak areas of the base must be removed. Plastered surfaces must be more than 28 days old, concrete - more than three months. It is recommended to prime weakly absorbent substrates (concrete, cement plasters) with Ceresit ST 16 primer; highly absorbent gypsum surfaces, plasterboard, gypsum board, chipboard - with ST 17 primer, and after 4 hours - with ST 16 primer. Decorative plaster can be applied only after the primer has completely dried .
Preparation of the mortar mixture:
Pour 5.0 - 5.5 liters of clean water into a container and add 25 kg (bag) of dry mixture, while the mixture is gradually added to the water, and not vice versa. Recommended water temperature +15 – +20°С. Mixing is done with a powerful drill with an attachment until a homogeneous mass is achieved. To better dissolve the binder, the mixture is allowed to stand for 5 minutes and mixed again. After re-mixing, the mixture is ready for use.
The plaster mixture is applied to the base using a stainless steel float, holding the float at an angle of 60° to the surface. The thickness of the layer must correspond to the grain of the aggregate. The texture of the plaster coating is formed using a plastic trowel after a time when the mortar mixture stops sticking to the tool. The grater should be kept strictly parallel to the surface. The texture is formed with small circular movements directed in one direction (usually counterclockwise), movements should be light, sliding, and pressure on the plaster layer should be avoided. The surface of the instrument should be cleaned as often as possible. Painting should begin: for silicate paints - no earlier than after 3 days, for acrylic and silicone paints - no earlier than after 7 days.
Disadvantages of a Ceresit wet facade
With such advantages of this insulation system, it is difficult to talk about the disadvantages. But basically all these shortcomings are associated with the installation work.
- The temperature range for installation work is from -5˚С to +50˚С. This means that in the cold season, in order to prevent the mixture from hardening, you need to make a special polyethylene cover. If the temperatures are negative, then for work you will need a heat gun, the duration of which depends on the thickness of the layer of the applied mixture, which must dry completely. And this means that the energy costs are so high that there can be no talk of any low cost of this method of external insulation of the facade.
- Strict environmental humidity requirements for this type of work are also a significant disadvantage. If the ambient air humidity exceeds 40%, the mixture will dry unevenly and not completely. This means that the surface will be covered with stains of plaster that dried at different times. The same applies to installation work during precipitation.
- Hot weather also does not contribute to high-quality insulation using the Ceresit “wet facade” system. The installation technology does not allow operation in direct sunlight. Uneven heating of areas of the mixture will lead to hardening of the surface in violation of those conditions, which in turn will provoke cracks and delamination of the layers of plaster.
About the manufacturer of facade systems "CERESIT"
The owner of the world-famous brand “CERESIT” is an equally famous German company, which was founded more than 140 years ago. Since then, the company has occupied a leading position in both the consumer and industrial sectors.
Henkel's headquarters are located in Düsseldorf (Germany). The company is represented in more than 120 countries, and its staff includes more than 47 thousand employees. For this reason, Henkel is considered one of the most multinational organizations in the global market, based in Germany.
Henkel has three main business units:
- “Cosmetics and personal care products”;
- “Cleaning and detergents”;
- "Adhesives and technologies."
The most important part of the development and production of materials for construction and repair is occupied by construction adhesives and mixtures under the CERESIT brand, which include 5 product categories:
- for tile cladding;
- for flooring;
- for making screeds;
- for insulation of facades;
- for waterproofing premises.
What is a wet façade?
Today on the Internet you can find many incorrect definitions of “wet facade”, in which this term refers to insulation, for the installation of which water-based glue is used. In reality, things are somewhat different.
Technically, it is correct to call such facades thermal insulation composite systems for insulation with external plaster layers. Slabs of pressed mineral wool or polystyrene foam are used as insulation, the thickness of which is selected taking into account the climatic conditions of the region and the initial thermal conductivity characteristics of the walls.
The “wet facade” consists of the following layers:
- base - a flat facade wall made of brick, wood, foam blocks, OSB sheets or monolithic concrete (if the wall is not level, air will circulate between the insulation and the wall, which will significantly reduce the effectiveness of insulation);
- thermal insulation layer of non-flammable polystyrene foam of facade grades (fixed with glue and disc dowels);
- fiberglass mesh (it is recommended to purchase alkali-resistant material);
- a layer of ordinary or decorative plaster (finishing with light facing facade slabs is allowed).
Ceresit facade insulation systems
Structure of the Ceresit system Recently, an insulation system called “wet” . Ceresit has made its contribution in this area. Knowing that all its products are of very high quality, ceresit facade systems attract the attention of many specialists. Wet facade Ceresit is an incredibly popular facade insulation material today. It should be noted that all components of the system, namely glue, plaster, primer, insulation and other components , can work effectively in conjunction. Moreover, each such component complements the other. And looking from this side, the Ceresit plaster facade represents a standard of quality . And all because the components of the system are carefully selected, their properties are taken into account, as well as the possibility of their compatibility.
Advice!
All façade system components used must be from the same manufacturer. Otherwise, a kind of conflict may arise and the tasks assigned to such a system cannot be completed.
The possibility of inevitable physical and chemical changes that will occur during operation is taken into account. The Ceresit plaster facade has undergone a number of tests in the harsh Russian climate. And this happened both in severe frost and in hot, humid weather , and as a result it became the market leader in its field. The aesthetic appeal of the Ceresit wet façade is noteworthy. They ideally shape the appearance of a building and are used in a combination of various architectural styles. They are able to preserve the architectural uniqueness that ancient houses have and perfectly reproduce complex decorative elements.
Installation of the Ceresit “wet facade” system
Installation of a ceresit wet facade is carried out in several stages, which include:
- preparatory work;
- installation of insulation;
- securing the reinforcing mesh;
- applying a plaster layer;
- surface painting.
High-quality performance of work at each stage is important for all subsequent ones and affects the final result.
Ceresit plaster insulation system - device sequence
Preparing the wall surface
Work on the installation of a facade system begins with an inspection of the surface of the walls on which the mounted materials will be fixed. At the same time, the outer surface is thoroughly cleaned of any dirt and carefully inspected. Defects in the form of cracks, irregularities, potholes are detected and, if necessary, eliminated.
In some cases, to improve the load-bearing capacity of the walls, they are covered with a rough layer of plaster. After this, the entire bearing surface is primed.
Preparing the wall for the construction of the facade requires special attention - the surface must be smooth
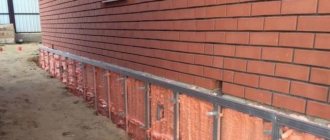
To reliably ensure the stability of the system, a U-shaped metal profile is fixed at the bottom of the wall, which plays the role of a support bar. This element is installed along the entire perimeter of the building, as well as above windows and doors. It protects the lower edge of the structure from moisture and allows the weight of the entire multilayer structure to be properly distributed.
The support profile is installed at a height of 30−40 cm from the ground level or installed on a protruding plinth. A gap of 3-4 mm is left between the individual slats to compensate for possible thermal expansion. For fastening, plastic dowels and screws are used, which are driven in every 15-20 cm.
Installation of insulation
Installing insulation is not a complicated process, but it is responsible
After completing the preparatory work, they begin to install the insulation. First, mineral wool boards or polystyrene are glued to the prepared surface using Ceresit SM-15 or SM-11 wet facade adhesive. The glue is applied with a notched trowel in the form of a wide strip along the entire perimeter of the slab and a dotted area in the center. This allows for reliable fastening of the material while economical use of adhesive. To do it correctly, it is enough to cover 40% of the surface of each slab with glue.
The slabs are installed from the bottom up, starting from the bottom row, which is immediately installed along the entire perimeter. Installation of each row starts from the corner. Wherein:
- vertical joints between slabs in adjacent rows should not coincide;
- adjacent slabs are pressed tightly against each other to minimize the thickness of the seams;
- Excess glue protruding from the seams is immediately removed.
Scheme of fastening the insulation with a disc dowel
Three days later, after the glue has completely dried, fastening plastic dowels are installed, the design of which includes a wide disc-shaped head, a plastic nail and an expanding nail to be driven in.
The length of the dowels used depends on the thickness of the insulation and the wall material. The penetration of a nail into a wall made of porous materials should be at least 9 cm, and for hard materials, at least 5 cm. 6-10 pieces are driven into each slab.
Installation of the reinforcing layer
Reinforcement begins no earlier than one day after installing the insulation. The material used for the reinforcing layer is a façade mesh made of fiberglass with a special alkali-resistant coating. Adjacent mesh strips should overlap each other by 5-8 cm. If it is necessary to strengthen individual sections, the mesh is applied in two layers. A special corner with an edge mesh is installed at corners, doorways, windows and lintels.
The reinforcing layer is applied to the insulation in the plaster layer
The reinforcing material is covered with a layer of adhesive composition 2-3 mm thick, and the total layer thickness can reach up to 5 mm.
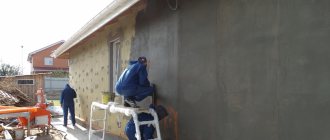
Finishing of the facade
The final stage of installing a “wet” Ceresit façade is finishing. It involves applying a layer of plaster to the surface and then painting it. You can begin this work only after the reinforcing layer has completely dried, which lasts 3-5 days.
Finishing of the facade
The material for the plaster layer must have high vapor permeability, good resistance to adverse weather conditions and high mechanical strength. For this purpose, special dry facade mixtures Ceresit are used. Plastering work can be carried out in dry weather at an outside temperature of +5°C to +30°C, while direct sunlight is not allowed on the fresh plaster layer.
The surface is painted with a roller or through a spray bottle with acrylic, silicate or silicone Ceresit paints.
Ceresit facade system. Description
Ceresit facade thermal insulation system is a professionally developed technology for external insulation of facades (the base is a flat external wall) with polystyrene foam or mineral wool boards (in other words, a layer of thermal insulation is laid) using fiberglass mesh and finishing with thin-layer plasters (both ordinary and decorative).
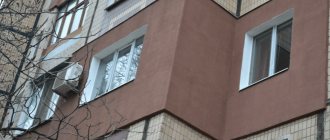
The essence of the system is to fix heat-insulating boards with special glue, protect their surface with universal compounds reinforced with a special fiberglass mesh, and apply a layer of decorative coating. In buildings insulated in this way, a high level of comfort is ensured, heating and air conditioning costs are reduced, heat losses and the amount of harmful emissions from burned fuel into the environment are reduced, and the facades acquire individuality and expressive design. The Ceresit wet facade combines the creation of a warm, attractive and, one of the most important for the client, inexpensive facade.
Such facade systems are used both on large construction projects and in private housing construction.
Ceresit products presented on our website over other building materials:
- reliable protection from environmental factors;
- relatively light weight of the material;
- for quite a long time, gives the building a stunning appearance;
- heat preservation of façade structures;
- muffling sounds from the street;
- vapor permeability (i.e. air conditioning of structures);
- low-cost product;
- while maintaining a low level of heat loss, does not require the use of a very large volume of goods;
- simple and quick installation;
- long service life.
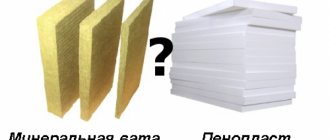
Choice of insulation
One of two options can be used as insulation for facades using the wet method:
- polystyrene foam (plate thickness 5-10 cm);
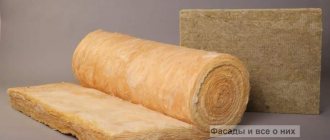
- high-density mineral wool (it is best to use basalt wool).
When choosing a material, you can be guided by four main criteria:
- Price. In this regard, polystyrene foam wins because it is a cheaper material.
- Vapor permeability. This property is inherent in mineral wool, which allows the walls of the house to “breathe”. Polystyrene foam does not have this quality.
- Complexity of work. It is easiest to work with foam plastic, due to the higher rigidity of the material.
- Fire hazard. Foam boards are flammable, so they need to be treated with fire retardants. Basalt wool does not burn and can withstand temperatures up to 1000 degrees.
Decorative plasters
Instead of wallpaper or paintwork, thin-layer decorative plaster can be applied to the leveled base. The cheapest option is to use cement-based dry mineral mixtures, some modifications of which allow you to work in winter conditions. Name of dry mixtures of decorative plasters Ceresit
| Brand name | Volume of mixing water, l | Viability of solution, min | Mixture consumption per sq. m., kg | Approximate price/packaging |
| Decor Plus | 5-5,5 | 60 | Grain 1 – 1.8 Grain 2.5 – 3 | 340 rub. / 25 kg |
| ST 35 and ST 35 “Winter” | Grain 2.5 – 2 Grain 3.5 – 3 | 560-660 rub. / 25 kg | ||
| ST 137 and ST 137 “Winter” | Grain 1 – 1.8 Grain 2.5 – 3 | 700-900 rub. / 25 kg |
Application of decorative plaster
The final stage of arrangement of the Ceresit wet facade is carried out according to the following rules:
- For better adhesion to the reinforcing layer, it must be primed . The façade paint Ceresit ST 16, which is close in color to the future façade plaster, is used as a primer solution. It is applied evenly with a brush in one go.
- If you plan to apply silicone or silicate plaster, then you should use the primer Ceresit ST 15 and ST 15 silicon, respectively.
- Thin-layer plaster should be applied to the base evenly, to the thickness of the grain, using a polisher held at an angle. The façade plaster applied with Ceresit must be additionally smoothed.
- As soon as the plaster solution stops sticking to the tool, it must be given the necessary texture with a plastic float held in a horizontal position.
Grouting textured decorative plaster
Features of creating plaster surfaces with different textures
To create a plaster layer with a “bark beetle” texture, Ceresit plaster mixtures such as ST 35 and ST 75 with a grain diameter of 3.5 mm, and ST 73 with a grain of 2 mm in diameter are used . To achieve the required texture, grouting is done with a plastic polisher using movements in one direction (usually vertical or horizontal) or in a circular motion.
Ceresit “bark beetle” plaster in various color and texture variations
To create “pebble” textures, Ceresit facade plaster ST 73, ST 75 and ST 137 with a grain diameter of 1.5 mm, as well as ST 137 with a grain size of 2.5 mm is used . Grouting is also done using a plastic polisher. In addition to the above, there are textures modeled using various tools and mosaic-type textures. For the former, Ceresit plasters of the ST 36 series are used, for the latter - ST 77 with different grain diameters.
Advice!
To give the plastered surface the required shade, acrylic, silicone or silicate facade paint Ceresit can be used.
So, we have figured out how, using various building mixtures of the Ceresit system, you can create a high-quality, warm and beautiful facade (see also what other finishing materials are available for facades). We hope that our recommendations will be helpful to you for monitoring the correctness of work performed by hired specialists or for professional finishing of the facade with your own hands.
Sanding the insulation planes according to the three-meter rule
Sanding is done using a plywood grater measuring 400 x 600 mm, 500 x 700 mm with sandpaper glued to it with a coarse grain of 100 microns (1 mm). This sanding allows you to smooth out small irregularities that occurred when gluing the insulation due to initial deviations in the geometry of the glued sheets and due to errors during gluing. Small graters should absolutely not be used on large surfaces; small graters create unevenness and depressions when sanding.
Installation of dowels
Dowels additionally secure the insulation sheets to the facade; they are installed either in accordance with the official recommendations of the system holders, two in the middle of the slab and the rest at the joints of the slab with adjacent slabs
or one “star” in the middle and four dowels in the insulation body closer to the edges
If the insulated wall is made of monolithic reinforced concrete, solid brick, expanded clay concrete, then the expansion zone of the dowel should be 50 mm, the total length of the dowel is approximately the thickness of the insulation + 50 mm.
If the insulated wall is made of foam concrete, aerated concrete, slotted brick, multi-slotted blocks, warm ceramics, then the spacer zone is 100 mm, the total length of the dowel is approximately the thickness of the insulation +100 mm.
The top of the dowels must be carefully covered with CeresitST 85 or ST 190 glue; the coating is done after the final sanding of the surfaces to the three-meter rule.
Application of quartz primer Ceresit ST 16
When the base reinforcing layer has completely dried, at least 72 hours after the last re-upholstery, you can begin applying the Ceresit ST 16 quartz primer. The Ceresit ST 16 primer is applied with a paint brush, a wide brush, or a flute. The primer can be white, not a tinted base, or it can be painted to match the color of the future Ceresit decorative plaster.
Installation of abutment elements on blocks of window and door openings
During insulation, the insulation must extend at least 15-20mm onto the window frame to prevent a cold bridge. The abutment element with the mesh is glued to the window frame on three sides, top, right and left.
How to replace "Ceresit" on the facade?
You can find a lot of debate on the Internet about how to replace Ceresite on the facade. Among them there are proposals to use materials from such brands as “Stomix”, “Caparol” and “Bolix”, however, due to its own characteristics, in practice “Ceresit” most often turns out to be the most preferable option.
Installation of facade insulation system
Installation of a façade insulation system consists of five main stages and can be completed within a week. The timing varies and depends both on the area of insulation and on the materials used in the insulation system you have chosen - mineral wool or polystyrene foam
What you should pay attention to during installation:
- non-compliance with application technology or the use of chemically incompatible materials from different manufacturers leads to the appearance of cracks in the protective reinforcing and decorative layers
- If you do not ensure tight joining of the insulation boards when gluing, then cracks and tears may appear in the outer layer
- in addition, the seams between the insulation boards should not be allowed to be filled with an adhesive composition - this leads to the appearance of “cold bridges”, and fungal and mold lesions appear on the inside of the wall
- if you violate the technology and put the reinforcing mesh directly on the insulation boards, “spider web cracks” may appear in the decorative layer
Four stages of installation of the Ceresit facade system.
Let's look at each stage in more detail:
Preparing the walls.
Inspecting the condition of the facade, base and roof of the building is the responsibility of the specialists who will carry out the installation. During the inspection, all irregularities and defects in the walls are identified, after which a general assessment of the condition is made.
Installation of insulating boards.
The corner part of the house is the start of installation. The first layer is installed on a perforated profile. As a result, a certain protective belt appears around the entire building, the height of which is usually 250 mm and thickness from 40 to 80 mm.
Installation of reinforcing gasket.
The waterproofing is installed on the main layer of the slabs and their lower area. The reinforcing mesh is mounted on the waterproofing layer. After which another layer of waterproofing compound is reinstalled on the reinforcing mesh. In order to achieve greater security, a fiberglass mesh is used, which is mounted on all these layers. The profile is firmly installed in the waterproofing mixture, then putty is applied. The fiberglass mesh should overlap the profile by approximately 10-15 cm. The mesh is attached to the profile using special Ceresit adhesives. Another layer of waterproofing, the thickness of which should not exceed 1.5 mm, is laid on top of the fiberglass mesh.
Facade finishing.
After three days after completion of all work, you can move on to the next step - finishing the facade. Using ceresit CT 16, the surface is coated with a primer. After 3-6 hours have passed, the decorative layer is installed. If the insulation material is mineral wool, then all elements used in the work must have vapor-tight properties. In such situations, the use of Ceresite plasters will be just right.
Heavy and light wet facade
Today there are two types of insulated wet facade: • heavy, • wet.
“Heavy” wet facade
A wet façade of this type does not involve gluing insulation to the wall. Dowels are inserted into the wall, and insulation is attached to them using special hooks. It is reinforced with a special mesh and pressure plates. This mesh is then plastered and covered with a finishing layer on top.
This technology allows the structure to absorb thermal and seismic deformations. Some builders call this design “floating insulation.”
For a heavy wet facade, a thick layer of plaster up to 40 mm is used. This is necessary in order to cover the metal mesh. At the same time, the wall must withstand heavy loads. A heavy wet facade is more expensive than a light one. This option is suitable for insulating walls in regions with harsh climates.
"Light" wet facade
This wet façade insulation system is used most often. Its cost is very low. At the same time, there is minimal load on the walls. Any surface can be used for light wet facade technology. The wall must be flat. If the masonry is made by hand, then before applying insulation, you need to plaster the wall.
The insulation is attached to the wall using dowels and glue containing cement. Solid mineral wool slabs are suitable as insulation. This material is non-flammable and allows air to pass through well. This is especially true for masonry.
Lightweight technology involves laying finishing layers on top of insulation. The thickness of the finishing plaster should be no more than 8 mm, ideally 4 mm.
Wet facades Ceresit: which of the two options is right for you?
There are two types of Ceresit wet facade, the installation technology of which differs only slightly - the only difference is in the choice of insulation. Right now we will tell you about each of them!
Attention!
Whatever material you decide to use to create a wet facade, the cost of which will please even the most economical developer, remember about the mandatory preparation of the base - Ceresit CT 17 primer is perfect for these purposes.
Facade insulation system using Ceresit WM mineral wool.
Mineral wool boards are characterized by high vapor permeability, are not afraid of most chemicals and belong to the category of non-combustible materials - these are their main advantages. Basalt wool fibers begin to melt only at temperatures above + 1000 °C! This insulation is created on the basis of natural rocks and does not contain inclusions hazardous to health, and also provides good sound insulation of external walls. A wet facade made of mineral wool can be created on any base.
The layers of the wet facade created on the basis of mineral wool are arranged as follows:
- a layer of adhesive for Ceresit CT 180 mineral wool or a mixture for fastening and reinforcing Ceresit Thermo Universal insulation;
- basalt wool Rockwool Facade Butts or Baswool Facade;
- high-quality dowels with a metal nail for attaching the heat-insulating layer;
- base plaster layer of plaster and repair putty Ceresit CT 29;
- reinforcing fiberglass mesh from a trusted manufacturer;
- primer for decorative plaster Ceresit CT 16;
- finishing coat of decorative plaster Ceresit Dekor Plus, silicate bark beetle plaster Ceresit CT 73, acrylic bark beetle plaster Ceresit CT 64 or silicate-silicone stone plaster Ceresit CT 174.
Among the disadvantages of the wet facade technology using mineral wool, one can note the rather large weight of the insulation and its high cost. The material is afraid of moisture, so it is necessary to take care of a reliable moisture-proof layer.
Facade insulation system based on expanded polystyrene (foam) Ceresit VWS.
This wet facade technology, the price per m2 of which in our company is available to any developer, is created on the basis of foam plastic or expanded polystyrene - materials that have their own advantages. Compared to mineral wool, polystyrene foam boards are at least 5 times lighter. Wet foam facade technology is in great demand due to the fact that this insulation is not afraid of moisture - which means there is no need to spend money on waterproofing. Thermal insulation for wet facades made of polystyrene foam does not contain harmful substances and boasts excellent strength characteristics.
The stages of creating a wet facade from polystyrene foam or expanded polystyrene include:
- a layer of adhesive for Ceresit CT 83 expanded polystyrene boards or a mixture for fastening and reinforcing Ceresit Thermo Universal insulation;
- expanded polystyrene boards Penoplex Facade or polystyrene foam PSB-S-35;
- special serif made of basalt wool;
- certified dowels with a plastic nail for attaching insulation;
- base plaster layer of plaster and repair putty Ceresit CT 29;
- high-quality fiberglass mesh reinforcing;
- primer for decorative plaster Ceresit CT 16;
- finishing coat of decorative plaster Ceresit Dekor Plus, silicone bark beetle plaster Ceresit CT 75, silicate stone plaster Ceresit CT 72 or silicate-silicone plaster bark beetle Ceresit CT 175.
Among the disadvantages of the wet polystyrene foam facade technology are almost zero vapor permeability and poor sound insulation. When installing the material, it is necessary to minimize the risk of contact with organic solvents, which provoke its destruction.