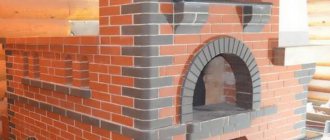
Oven in a brick oven
Geographically only needed in the kitchen. An oven for a small brick stove is often an element of a small structure with a hob.
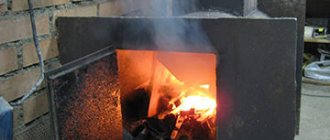
Another mini brick stove is combined with a cast iron oven during the creation process. Increasingly, this is a country option.
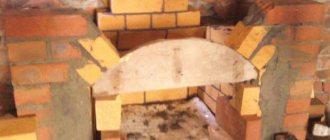
A more complicated option: the oven is not made of iron, but of fireclay brick, which acts as an oven.
This is a modern allusion to the Russian classic oven, where the oven itself was very large, more than one cubic meter.
Methods for installing an oven in brick ovens
It turns out that there are only two options:
- Buy a small cast iron blank.
- Lay it out of refractory bricks, closing it with a flap. The latter is fixed in the brickwork, similar to ash pans or fire doors.
For your information! What is important is not the oven itself, but the installation process, taking into account, first of all, fire safety and technical standards!
It is clear to anyone that the oven in a brick oven system must be sealed and reliably recessed deep into the structure. And closing the sash only means an airtight and tight connection.
How to put an oven in a brick oven
In this process, it is better not to complicate it, because the oven is a regular element of the oven. Therefore we work like this:
- We remember how the fire doors were installed.
- Iron for the oven is designed in exactly the same way.
- It is simply placed in a niche calculated in advance or covered after installation. There will always be openings or gaps.
- The latter must be removed with a non-flammable asbestos cord.
- The oven should be lined with ordinary ceramic bricks, placed on edge. This thickness will be sufficient.
- It is impossible to lay masonry from the very top, so the horizontal upper part is usually coated with clay. A layer of 5-6 centimeters is enough.
Question with the oven door in an iron oven
Oven door frame. If the door of the firebox is a small but supporting part of the structure, then with the oven it is more complicated. There should be no load on the frame itself. How is this rule observed?
- A brick “lock” is made just above the frame, removing further load from the metal part. The old school of masons calls this technique the exit to the arch.
- If nothing works, then they do it very simply: place a steel elastic plate at this level. It is advisable to use cast iron.
- The disadvantage of iron in the design is that expansion cannot be avoided when heated, and the front part that reduces the load on the oven door will become loose over time.
- The solution is as follows: we place the strips of metal and cast iron more freely to give space for minimal movement during expansion.
Installing an oven in a brick oven. Stages
Let's analyze the whole process using a simple example: a country stove with an oven.
The work requires:
- 175 bricks;
- At least six buckets of clay mortar; Grate bars, doors and other cast iron elements;
- The main thing is that the oven is small in size. 450X350X350 mm is enough.
Important processes for installing an oven:
- The first row is drawn and lined with bricks without mortar.
- The second row already comes with ligation of the seam, where it is important to create the beginning of a monolithic structure. Naturally, for stability.
- Third: the beginning of the ash pit, cleaning wells.
- In the fourth row there is the beginning of the outflow of smoke from the stove. In a specific gap we leave the brick as a partition. We follow the rule: the opening width is at least 14 cm.
The provided channel for the outflow of gases will remove smoke from the bottom of the oven to the chimney.
- The fifth row is the beginning of the combustion chamber.
- From the sixth the calculations for the oven are already underway. Moreover, in any drawing it is customary to mark the beginning of the location with a dotted line.
The masonry under the oven is calculated with a margin. So that there is at least 100 mm from the walls of the structure to the bricks. All this is thought out so as not to disturb the design of the furnace when heating and cooling the iron elements.
We start the sixth row by installing the oven. It is not suspended in the air on fasteners, but placed on a clay solution. And the masonry is completed according to plan.
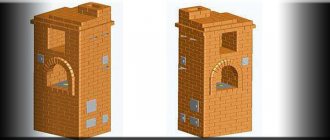
Types of brick structures using an oven
Depending on the size of the room and the purpose of use, different types of stoves are built. They differ in size and shape, and in the location of the main elements.
Stove "Swedish"
Compact and easy to use, suitable for small spaces . Its front side with stove and oven opens into the kitchen, and the back wall goes into the next room. Such a stove can be heated with wood, coal, briquettes - it is very economical and has high efficiency. This model can be built independently, in which the oven acts as an obstacle to the movement of flammable gases coming from the firebox to the chimney. Brickwork has the following sequence:
- A flat base of several rows of bricks is laid on the foundation of the furnace.
- An ash pit and an ash chamber are formed.
- The grate and oven are installed.
- The combustion chamber is laid out and the oven is lined.
- A gas duct wall is laid.
- The furnace door and oven are closed.
- A cast iron slab and a steel corner are laid.
- A cooking space is formed above the stove.
- The cooking chamber is closed.
- A gas duct is formed above the stove,
- The base of the nozzle pipe is removed.
Heating and cooking stove
This stove runs on solid fuel, provides heat to several rooms, has a hob and oven, a water heating unit, a firebox with an ash pan, a samovar, and several inspection windows for cleaning..
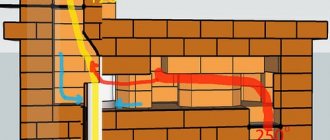
The movement of hot gases passes from the firebox under the stove to the oven and water box, and then into the pipe, everything is regulated by dampers.
A small oven is installed on the sixth row of masonry, then it is lined with brick on the edge on all sides, and on the tenth row its surface is covered with a layer of clay and covered.
What is important to consider when installing an oven in a brick oven
There are the following points:
- The iron cabinet must be blown with hot gas (i.e. smoke). To do this, during the laying process, four bricks are placed flat, the entire height of the oven.
- The fuel chamber cannot produce heat evenly, so the wall of the oven closest to it is protected by brickwork. Yes, iron is unlikely to burn out when it comes into contact with a flame, but cooking in this version will cause a lot of problems.
- Since there is a partition between the firebox and the oven, how will the cabinet be heated? It’s simple: in this very brick partition (lower part) they make a gas channel. This is how the iron element will be heated without the risk of burnout.
- The partition must also be raised 10 cm above the oven in order to successfully cover the upper part of the latter with a layer of clay.
- A cast iron stove is always placed on top of the oven. The dimensions are also maintained here: the distance from the top layer of clay on the oven to the hob should be 7-8 cm. This space should be empty.
pechiexpert.ru
Installation features
The cast iron oven is a large box with a door. It is immersed in a niche that is pre-made in the oven. After installing the cabinet in the opening, the space is filled with refractory bricks, and a heat insulator is placed in the gap area - asbestos cords or plates. The oven is lined with ceramic bricks, having previously placed it on edge. The upper part of the device is coated with clay, a layer of 5-6 cm .
The main feature is that there is no load on the furnace, so a supporting part of the structure is preliminarily provided. For this purpose, there is a brick “castle”, which completely eliminates the load on cast iron parts. Such a system is called vault access. If there is no brick “lock”, then a strong steel plate is installed in the upper part. A cast iron oven for a brick oven has the property of expanding during heating. Because of this, destruction of the brickwork is possible. That is why a small space is left between the side walls and the cabinet, into which a shock absorber - a heat-insulating material - is placed. It smooths out fluctuations in volume.
Mechanism of action
The operating principle of a long-burning stove is based on fuel pyrolysis, during which not only the wood itself burns, but also combustion products.
This process not only significantly increases the efficiency of the unit, but also saves fuel. In addition, with such thorough burning, the stove has to be cleaned much less frequently. The traditional Russian stove has similar characteristics, but it cannot be compared with this stove, which has been improved “in all respects.” It is inferior, at a minimum, in its overly bulky size, as well as the lack of an oven.
Heat transfer depends both on the size of the furnace and its design features, as well as on the type of fuel used. It is worth noting that a long-burning stove can operate on almost anything that burns - wood, sawdust, waste. The masonry of a standard stove in the maximum configuration is made of half a brick; it is equipped with an oven, a hob with several burners, as well as a device for heating water if a water heating circuit is connected to the stove. The firebox is covered with a cast-iron stove in order to increase heat transfer, while the oven is located to the side.
The summer mode looks like this: during the combustion of fuel, hot gases from the firebox pass under the hob, heating it and the oven, and then are discharged through the chimney. In winter mode, the gases, after releasing heat to the stove and oven, do not go into the chimney, but into the upper chamber, where they transfer the remaining energy to the stove body and only then are removed from the unit. You can learn more about the operating mechanism of a long-burning furnace from the video.
Advantages of a cooking oven
Do-it-yourself long-burning stoves have certain advantages that elevate them even above central heating. Why should you start laying a stove with your own hands, and not turn to specialists?
Firstly, this allows you to save a lot , since ready-made stoves have a significant price markup. Secondly, you don’t have to choose an option among standard designs, but come up with your own configuration , which, unlike a ready-made scheme, will take into account all the features of the house and operating conditions. The only thing you need to know additionally is the order. And the video will help you to look at the masonry process in detail in order to assemble everything correctly.
Fuel economy is a very serious plus. Since the stove works both as a heating device and as a cooking surface, fuel is consumed twice as slowly. In addition, fuel, regardless of its type - sawdust, firewood, waste oil or anything else - burns in such a stove for 12 to 20 hours on one stack. This allows you to refuel the firebox no more than once a day, while a conventional stove requires constant addition of fuel.
Do-it-yourself stove laying
Tool
To make a high-quality stove with an oven with your own hands, you need not only to understand the installation process and watch several videos, but also to acquire good tools . In addition, you need the correct sequential laying pattern.
You need to prepare the following tools:
- trowel for applying and removing excess mortar;
- mallet for straightening bricks;
- level – normal or water;
- plumb line;
- rule;
- a special stove-maker's hammer to split bricks;
- flexible tape measure.
Materials
The main material used to assemble the long-burning stove body is a special red stove brick . It is fireproof and, with good quality, evenness and smoothness, will ensure maximum durability of the unit. Stones that have any kind of damage should be excluded from use. It is worth noting that only the main body of the stove must be built from the highest quality red brick. The chimney can also be made of silicate stone, since it is exposed to significantly lower temperatures.
The mortar for fastening bricks cannot be cement, since cement that is too watery tends to crack under the influence of high temperatures, which reach extremely high values in a kiln of this type. To bind masonry elements, it is necessary to use a solution of sand and clay with a fairly thick consistency. The quality of the prepared solution must be carefully checked and, in general, maximum attention must be paid to this part of the structure. The test is carried out in the following way: several samples are taken from a container with the finished mixture from random places, then these samples are rolled into balls. These balls are dried, if no cracks have formed, then the solution is of fairly good quality.
To ensure complete confidence in the acceptable characteristics of the mixture, additional testing is carried out. The balls are dropped onto a hard surface from a height of one meter, but they must not break. This will mean that exposing the mixture to high temperatures will not cause the binder to crumble into powder. If all checks are successful, the prepared solution can be used to assemble a long-burning stove. In this case, there will be no doubt about the quality, reliability and durability
The part of the oven used for cooking does not require large amounts of thermal energy and too high a temperature. Despite its versatility, the design of the stove requires a relatively small amount of building materials.
The finished stove can be finished with many materials. The current building materials market offers such options as ceramics, facing bricks, simple plaster, which can also be finished with a Russian stove. Modern glass wallpaper can be used, which many people are wrong to treat with distrust, as well as expensive and elite materials - marble, granite and even semi-precious stones.
So, the stove laying scheme consists of the following elements:
- approximately 230 red bricks;
- two hundredweight of good clay and the same amount of fine sand;
- steel corner;
- steel strip;
- combustion chamber door;
- ash door;
- cast iron stove with the required number of burners;
- box for heating water;
- box that will become the oven.
The dimensions of the elements are selected taking into account the designed layout of the unit. If you do not have the skills to lay bricks according to a pattern such as ordering, you should find ready-made drawings and watch a video to lay the brick correctly. The main thing is to adhere to the basic principle of installation, namely, carefully checking each row so that the order is strictly observed, because not only the efficiency of the furnace, but also the very possibility of its functioning depends on how the stone is laid correctly.
Masonry technology
Building a stove with your own hands is not so difficult if you have everything you need and find drawings and diagrams . The installation procedure is as follows:
- The first two rows are laid solid. It is worth considering that the edges of the very first row must be laid from solid bricks. In the middle it is allowed to use both crushed brick and broken bricks, if necessary, but it is better, of course, to avoid this. When laying the second row, fighting is not allowed; only whole bricks are required here.
- Rows three through five will represent the outline of the ash chamber. At this level it is necessary to install the door for the ash pan. The fifth row forms the overlap between the ash pan and the firebox, and in this place there is also space for a drying chamber. The size is made based on the parameters of the prepared steel drying chamber.
- The interior of the constructed oven increases, starting from the sixth row. On the seventh row, the grate and combustion chamber door are installed.
- Rows eight through ten represent the firebox. In addition, they line the dryer box. On top of this box, on the eleventh row, steel strips are installed, after which the entire structure is watered with a sand-clay solution. Be sure to leave space to later fold the smoke exhaust pipe.
- In the twelfth row, the brick is laid on a layer of mixture, forming a surface for installing the slab. The dimensions must be such that the prepared parts fit. A cast-iron surface with burners is placed on the thirteenth row next to the oven, then a container for heating water is installed. This container should partially block the chimney. The chimney pipe itself is mounted on the fourteenth row.
As you can see, if you carefully study the process, laying a stove with your own hands is not as complicated a process as it might seem at first glance. The main thing is not to deviate from the scheme tested by the masters and to use only the highest quality materials, and then the stove will last a long time.
poluchi-teplo.ru
Pros and cons of using a Russian stove on the farm
These ovens are very popular due to their compact size and ease of use. But it is worth noting that they have several disadvantages. It is necessary to burn in such a stove with wood of normal quality, which does not emit soot and a large amount of smoke during combustion. It is best to take wood that has a dense structure; they provide the maximum amount of thermal energy after combustion. Other types of fuel are not used in Russian stoves. An exception may be charcoal. In addition, different parts of the furnace have different levels of temperature and intensity of fire. The closer to the outer edge, the more fire there is. Since ancient times, the temperature in a brick kiln was measured using a piece of paper. The sooner it burned, the hotter it got there. The second nuance is that such stoves produce heat best at the top of the room. To be fair, it is worth saying that this problem does not apply only to the Russian stove.
Distinctive features
According to legend, the Swedish heating stove appeared in Russia since the time of Peter I. The Battle of Poltava contributed to this. During the battle, we had specialists on our side who were capable of building such an advanced home structure. Subsequently, the design was improved, new elements were added and advantages were maintained.
In the heating and insulation process, the main positive characteristics of such an installation are the following qualities:
- multifunctionality, since in addition to heating it can be used for cooking (Swedish cooking stove);
- compact dimensions help to place it in almost any room;
- a Swedish stove with a stove has high efficiency compared to analogues;
- a damper can be introduced into the system to help regulate the most comfortable mode;
- the Swedish order has a fairly simple scheme, which allows you to lay fireclay bricks yourself without involving outside specialists;
- The network offers many options, both classic and more modern, occupying about a meter of square space in the room.
The process will require high-quality material, for example, packaging of refractory bricks, which contribute to further long-term operation.
Operating Parameters
According to calculations, even installing a meter-long Swedish stove per 1 m2 is enough to provide a space of 30 m2 with a comfortable temperature. However, in such a situation it is necessary that the masonry spread over two rooms. The part with the hob can go into the kitchen, and the back side can serve as a wall for the bedroom or living room.
High efficiency and low fuel consumption are due to the complexity of the chimney channels, which ensure proper heat distribution with minimal calorie losses. The advantage is the possibility of designing several simultaneous options for fireboxes that can be used depending on seasonality, for example, summer, off-season or winter.
The operating method differs in the smoke paths, which allows, for example, cooking in the summer without increasing the temperature in the room. The location of the chimneys simultaneously prevents smoke and keeps the system in working order. This effect is not always achieved by the owners of a Dutch oven with its design.
Variety of modifications
Fans of this system know that the design has several modifications that can significantly expand the range of use of a home heater. In addition to its exotic appearance, the Swedish stove is functional. This is helped by a cast iron surface and an additional oven.
High-quality ventilation is achieved through the use of a hood. Heated air with the aromas of cooking food is sent into the chimney. Often, the cooking zone is equipped with additional protection in the form of glass doors, which act as an additional barrier from cooking aromas.
During masonry, a small built-in brick niche is provided. It is a convenient area for use as a drying area. The following things are stored in it:
- berries;
- mushrooms;
- fruits;
- herbs;
- things, etc.
Optimal parameters are set at the design stage. It is believed that a Swedish stove lined with a sunbed has a therapeutic effect. All colds go away faster. The heat from it also helps warm up the joints. For those who have lumbar pain, several sessions on a warm area are also recommended.
Swede stove with stove bench
One of the famous developers of this design is G. Reznik. The main zone occupies a space of 3x4.5 bricks, and 2.5x7 bricks are allocated for a warm place to relax. Such a scheme will provide heat for a room of 35 m2, additionally having two modes for the firebox (winter/summer).
For country buildings, a do-it-yourself Swedish stove is a popular option, the arrangement of which is quite simple, with a built-in fireplace. The building is installed at the junction of the kitchen and living room. The aesthetic interior will be decorated in the main room, but the functionality will not suffer. A single chimney will save space. At the resting place you can relax while watching the fire.
If positioned correctly, the structure will not take up much space, but will perform several functions simultaneously - heating, cooking, a place to relax
Some architectural elements serve as decoration for the structures:
- vaults in the form of arches;
- shaped brick;
- external finishing with tiled tiles.
It is worth considering that complications in masonry may force you to turn to more experienced specialists. As a result, the output will be about 5 kW from a medium-sized structure.
Instructions for laying a stove with a fireplace and hob
We recommend making a 70-80 cm foundation laid with stone and poured with concrete. In most cases, this height will be enough to prevent significant shrinkage. The screed is aligned with the reinforcing metal mesh. The entire site hardens in 3-4 weeks.
Next, a solid brick cushion is placed on top of the roofing felt waterproofing layer. The top plane of the masonry should be 1 brick below the expected floor level. A platform of approximately 1.1 x 1.1 m is formed. After it we place it according to the diagram.
The amount of bricks is calculated according to the plan. We recommend pre-soaking it for several hours to minimize the height of the seams. For fireclay material they should be a maximum of 0.3 cm.
In order to understand how the chimney duct works, how smoke moves inside the structure and how heating occurs, you need to familiarize yourself with the diagram of chambers and cavities, where the order is indicated.
Diagram of a Swede with a fireplace - arrows indicate the direction of movement
According to the indicated scheme, you can lay out the entire structure without mortar. This is practiced by both beginners and experienced craftsmen to understand the entire configuration.
IMPORTANT! The heating and cooking “Swedish” has almost the same design as the Russian stove
For convenience and proper fit, each next row is also laid dry, and then placed on the solution.
Order rows 1-6
First, the foundation in the place where the stove will be built is covered with roofing felt, it is laid out for the future foundation and the first row is laid out solid.
Be sure to check the level of straightness - only if the line is perfect will the entire structure be stable.
The first row is laid out on roofing material in a continuous layer
On the second floor the fireplace grate is already being attached
The 2nd one is also laid solid, but with some amendments. Firstly, in the part where the fireplace mantel is planned, silicate - durable - brick is placed. Secondly, after laying, the holders are fixed on the edge, and the grating is welded to them.
From the 3rd row, the design of the blower and cleaning line begins. If an oven is planned, it should be installed here. On the third level there is a channel for removing smoke, and on the other side there is a firebox.
On the 3rd row, working chambers, a smoke exhaust duct and doors are laid
Also, pieces of wire are placed on the solution, to which the doors are attached in the right places.
This is the standard way to fasten cast iron doors.
If an oven is to be installed, a passage will be left on the back side, which will be combined with the cleaning chamber.
4th row
Here everything is similar to the third one, with the only exception that the bricks are placed in a frame.
5th row - the beginning of the firebox and grate
On the fifth, those areas where there will be a direct flame are laid out from silicate. A grate will be installed in these areas. The rest of the masonry is similar to the 3rd and 4th.
The oven is also placed here - it is first washed with asbestos tape so that it does not burst due to high temperature.
Oven installation
The grate is fixed at the edges with masonry mortar. If desired, you can install a door on the 5th, which is treated along the edges with asbestos rope. But you can do this on the 6th - there is no fundamental difference.
6th row
On the 6th, refractory bricks - the wall between the combustion chamber and the oven - are placed on edge. Due to such a “fur coat,” the oven will heat up quickly and retain heat longer.
Order rows 7-12
On the 7th, strips are fixed in the solution to cover the fireplace chamber
On the 8th row, the installation of the oven is completed - pay attention to the cut of the brick
In the 9th row, everything is exactly the same, with the exception that steel strips are fixed above the oven - they are needed to evenly distribute the load of the upper mass, and also at the same time act as a solid base
9th row
From the 10th, a place is prepared for future burners where food will be prepared. To do this, the edge above the firebox and oven is reinforced with a corner, and asbestos threads are lined along the edges
10th row
From the 11th, a niche is laid out under the hob
12th row
Pay attention to how the bricks are cut - this is done to redistribute movement and direct combustion products into the chimney.
The simultaneous tying of refractory and clay bricks that have different linear expansion rates is prohibited. As the temperature rises, they will begin to crack.
Order from rows 13 to 18
Order from 19th to 24th
13th row
From the 14th they begin to assemble the mantelpiece, for which bricks are pushed forward and on the sides by 25-30 mm
On the 15th, the shelf expands due to the fact that the bricks are laid perpendicular to the previous rows and additionally extended along the perimeter by another 2.5 cm
In the 16th row, the arch above the hob is covered with metal strips, and a corner is fixed along the edge
At 17-18, cover the niche above the hob with a solid
On the 19th they make a system of air ducts and cleaning channels
The 20th is laid out in order, on the 21st they make an inspection door
22nd - according to the order diagram and place another door under the cleaning passage
23rd according to the scheme
On the 24th, a valve is attached to the smoke exhaust channel
Order 25-30 rows
On the 25th they install another valve
In the 26th, they put the last inspection door on the cleaning passage and combine both channels
28 and 29 are stacked similarly to each other in order
In 29 and 30 there is only one hole left - for the chimney, everything else is laid in a continuous layer with the obligatory observance of the tightness of all seams
31st - install a common valve
From the 32nd to the ceiling a chimney pipe of at least half a brick is laid
The height of the pipe above the roof is laid out according to the diagram. To increase traction, you need to maintain a distance from the roof ridge.
If something is unclear or you can’t figure out the procedure, the video instructions explain the procedure in more detail.
VIDEO: “Shvedka” stove with fireplace designed by A.I. Ryazankina
This was just one example of a Swedish woman. Its version with a bed is also popular
Ordering a stove with a stove bench
Correct commissioning
It is preferable to carry out work and finish in the summer or during a warm period, when the sun warms up the space well. This promotes excellent natural drying of the masonry. If it was necessary to lay the plant in winter, then it is necessary to ensure the heating of the room using artificial heat sources, which include heat guns or fan heaters.
When everything has dried and fixed, natural tests can be carried out. At the first start, it is necessary to ensure fire drying. Finely chopped wooden blanks are used for it. This is done twice a day, and the portion of the bookmark is selected to be no more than 5 kg.
It is preferable to choose a tree with minimal soot emission; for example, aspen will work well. Drying is carried out when there is no moisture on the valve during combustion.
It is not recommended to use the oven for its intended purpose (cooking food or heating the room) until the structure is completely dry.
VIDEO: An example of the construction of a Swedish stove with three operating modes of the firebox
www.portaltepla.ru