The use of wood stoves for space heating is most often used to heat small spaces. The technology itself is based on the use of traditional cast iron or steel stoves with low efficiency. In addition to high fuel consumption, such stoves also require the constant presence of a person, because if you do not constantly add firewood, it will simply go out. Long-burning stoves are another matter, but alas, today they still have an unreasonably high price, so there is only one option left - to make such a potbelly stove yourself.
What is the difference between a long-burning stove and a wood-burning stove?
Fundamentally, the difference between a long-burning stove and a conventional potbelly stove is how the combustion process occurs. A conventional cast iron or steel stove with a grate and a straight chimney is characterized by rapid combustion of fuel. In fact, the name “potbelly stove” itself comes from the exorbitant appetites of the stove. The combustion process in the firebox occurs on a grate, with a large air flow, which, on the one hand, makes it possible to increase draft, and on the other hand, when burning wood, I burn with a large amount of soot and smoke. This state of affairs cannot indicate fuel economy; they simply have to be constantly added to maintain the temperature.
In a long-burning furnace, the process occurs differently. Depending on the design of the firebox and additional equipment, combustion can take the form of slow combustion (smoldering) or pyrolysis - combustion of gases emitted by the fuel.
When smoldering, it is possible to make the combustion process controlled by reducing or increasing the air flow into the firebox. The result is slow combustion of fuel and the combustion process increases in time. It is difficult to judge how economical such heating is, but it is a fact that the combustion time increases significantly.
During pyrolysis, solid fuel decomposes into simple substances under the influence of high temperature. As a result, it turns out that it is not wood that is burned in the firebox, but the gas emitted by the wood. Such long-burning stoves are much more economical and their installation quickly pays for itself.
But, in fairness, it is worth mentioning intermediate designs that combine the advantages of controlled smoldering furnaces and pyrolysis furnaces. These hybrids are basically the most commonly used DIY projects.
Do-it-yourself long-burning stove: diagram and step-by-step instructions
The most common materials for making long-burning stoves are metal and brick.
Making a “bubafonya” stove from a gas cylinder
For making your own “bubafonya” stove, a used gas cylinder with a volume of 50 liters is best suited. The order of work is as follows:
- Cut off the top part of the cylinder at the place where the body is rounded using a grinder. This fragment will serve as a cover in the future design.
The top part of the cylinder can be conveniently used as a stove lid
- Weld a metal strip to the upper edge (at the cut point of the future lid). This side will prevent the lid from sliding off.
- Next, it is necessary to make a pressure piston, thanks to which the combustion material will be pressed during combustion. Cut a circle from a thick steel sheet with a diameter slightly smaller than the body. The circle should fall freely inside the cylinder. The gap between the housing wall and the circle should be 8–10 mm wide.
- Drill a hole with a diameter of 100 mm in the middle of the circle. It is convenient to do this using a core drill.
- Take a pipe with the same diameter and weld one end to the middle of the circle. The result is a part with a common hole.
- Then weld four sections of channel in a cross pattern to the back side of the circle. They form unique channels through which air will flow into the combustion chamber.
Instead of channels on the piston, you can use angles
- Weld the handles and stands.
- Clean sharp and protruding welding fragments with a file or grinder.
Video: how to make a “bubafonya” stove from a gas cylinder
Making a long-burning stove from brick
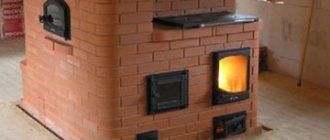
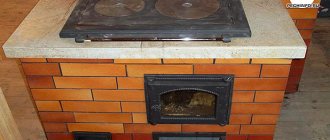
Of course, in comparison with a homemade metal structure, a brick oven looks more advantageous. However, making it yourself is a labor-intensive process that requires certain skills and time.
There is a hob above the combustion chamber for cooking
Foundation preparation
Since the brickwork is quite massive, the stove definitely needs a solid foundation. The depth of the foundation must ensure the stability of the structure. The foundation is prepared as follows:
- First you need to dig a small pit 30 cm deep. Its width and length should be 10 cm larger than the expected dimensions of the stove.
- Level the bottom of the pit and cover it with roofing felt or other insulating material.
- Pour a 10 cm thick layer of sand on top, which must be compacted.
- Place a layer of fine gravel of similar thickness on top of the sand cushion.
- To ensure the reliability of the base, it can be reinforced with a metal grid. To do this, use reinforcing bars connected to each other with wire. The width of the grid cells should be no more than 10 cm. The thickness of the rods is selected in the range from 8 to 12 mm.
- Place the grate in the pit so that it does not touch the bottom. To do this, place broken bricks under the metal frame.
- Pour concrete mixture grade M-200 or M-250. The concrete must completely cover the metal frame.
For reliability, the foundation can be reinforced with a metal grid
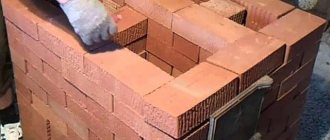
Order of brickwork
After a few days, when the base has hardened, you can begin laying brickwork for a long-burning furnace. Before starting construction work, it is necessary to soak the brick in water for a day. This must be done so that the bricks laid in rows do not draw moisture from the mixture. Bricks should be laid as follows:
- The first and second rows must be laid out in continuous layers.
- An ash pan will be installed on the second row, so you need to provide space for the door.
- On the fifth row, a ceiling is installed above the door. Subsequently, a drying chamber box will be installed in it.
- The sixth and seventh rows are designed to accommodate the grate and install the door into the combustion chamber.
- From the eighth to the tenth row the firebox will be placed. When laying the combustion chamber, it is necessary to use fire-resistant material - fireclay bricks. Use clay-based mixtures as an adhesive for masonry. Ready-made mixtures intended for laying stoves are available for sale.
- The eleventh row serves as the ceiling of the combustion chamber and forms the area for the chimney. On top of this row it is necessary to lay steel reinforcement and fill it with cement mixture.
- On the twelfth row, a place for the hob is formed.
- Starting from the thirteenth - fourteenth row, rows for the chimney are laid. Its height is made according to individual projects, so the number of rows can be increased several times.
The procedure for laying bricks for a long-burning stove with a hob
Video: long-burning brick stove modeled on a children's construction set
What types of fuel can be used
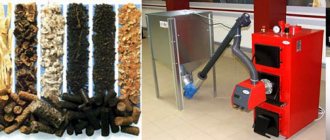
When it comes to the heating system for a temporary premises, such as a workshop or garage, two aspects are usually taken into account - economic feasibility and safety. In terms of economic feasibility, the most affordable type of fuel today is wood. Liquid fuel, such as diesel fuel or used engine oil, is used for heating mainly utility rooms; in residential areas, the use of this fuel is limited because it has a specific odor. Coal is usually not used for long-burning furnaces of handicraft production; it is intended for heating boilers and stationary brick furnaces.
Thus, the most acceptable type of fuel is firewood or pallets - fuel from wood processing waste. And here lies the whole secret of long-burning furnaces. The fact is that to get maximum effect you need to use only dry firewood. In ordinary, freshly cut firewood, the wood contains a large amount of moisture; during combustion, it turns out that two processes occur in parallel - burning of wood fibers and drying, releasing a large amount of water vapor. The result is a large amount of unburned fuel and combustion at a low temperature. These processes do not allow obtaining the maximum amount of heat.
It's a different matter with dry firewood. The moisture content in them is minimal, which means that when the temperature rises to 300 degrees, the process of decomposition of wood into simple substances begins. This allows you to significantly increase heat transfer, as a result of which the firewood burns completely with minimal formation of soot and ash.
Precautions and operating instructions
During heating, the stove becomes very hot.
Safe use of a potbelly stove
It is advisable to make a reflector, in addition, it will improve the distribution of hot air flows. To increase heat transfer, you can line the stove with stones or bricks. I recommend installing it on a foundation. Can be made from bricks and mortar. Flammable materials must be kept at a safe distance. The stove produces almost no ash, so you will have to clean it very rarely, using a scoop with a short handle. Over time, the metal of the case may burn out. It will have to be replaced with a new one.
Pyrolysis ovens can only be heated with wood (chips, sawdust). Liquid fuel will not provide a long burning effect. In addition, toxic substances are released into the air and pollute the atmosphere. Before lighting, remove the lid and remove the piston. Firewood is laid on top, then wood chips and paper are placed. Ignite through a pipe supplying air. Open the damper and throw lit paper or a rag inside (matches go out due to strong draft). When the wood burns well, close the air supply. The combustion process goes from top to bottom.
Designing a long-burning potbelly stove
The starting point in the process of designing a long-burning potbelly stove is the need to ensure a comfortable temperature in the room with minimal expenditure of time and effort. The next stage is the search for the optimal design option. To heat a residential house, you can use a Burelyan or rocket stove circuit. But for a greenhouse, garage or industrial premises where there are no high requirements for cleanliness, you can use bubafonya - a stove with vertical fuel loading.
In practical terms, the following is taken into account:
- Location of heating devices;
- Purpose of the premises;
- Dimensions of the heated room;
- Availability of necessary materials and tools;
- Availability of skills to work with tools.
Each of these points is important in its own way and it is simply irrational to discard it during design. The installation location must ensure complete safety of the premises, both in terms of fire safety and safety during use. In addition, it is important to place the stove in such a way that it does not interfere, the chimneys do not take up much space, and the heat from it is evenly distributed over the entire area of the room.
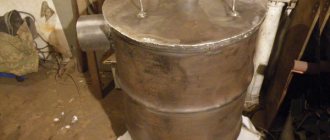
To efficiently heat a room, you need to choose the right dimensions of the structure itself. In a garage or workshop, it is enough to construct a stove of standard sizes, but for a greenhouse you will need a stove from a 200 liter barrel.
The idea of building a long-burning stove with your own hands is often put off until later due to the lack of necessary materials or tools. But on the other hand, if there is no metal sheet 5 mm thick, this does not mean that the idea should be abandoned completely, because there are many successful stove designs created from old cylinders, channels, angles or thick-walled pipes.
Materials and tools
To decide how to make a long-burning stove yourself, you need to prepare all the tools in advance and stock up on materials:
- for the furnace body you will need a metal container of at least 200 liters in volume (sometimes they take an empty, broken gas cylinder for this purpose);
- two pieces of pipe with a diameter of 10 cm;
- metal channel; for body legs;
- approximately 60 pieces of refractory bricks (if it is decided to line the stove with bricks);
- sheet of metal with a thickness of 60 to 80 cm diagonally;
- mixture for masonry (preferably ready-made, but you can make the solution yourself);
- hinges for doors;
- necessary tools that are used when working with metal (for example, a grinder);
- electric welding equipment, electrodes;
- level and plumb lines,
- construction tape and other marking tools.
After all materials and tools have been prepared, you can begin the process of making the stove.
Bubafonya - the most popular long-burning potbelly stove design
The practicality of the Bubafonya stove is proven by its popularity. The fact that this is one of the most popular long-burning stoves is evidenced by the fact that it is used in almost all small greenhouse farms.
The great advantage of this stove is its practicality and ease of use - it is practically omnivorous; dry firewood, sawdust, pellets and briquettes made from straw or sunflower can be burned in the firebox. This stove also shows one of the highest results in terms of fuel combustion duration.
The basic concept of this heating device is that the fuel combustion process combines the process of burning conventional fuel with a controlled supply of oxygen and the process of pyrolysis. The design of the furnace is a metal body with an open top. For the body, a 200 liter thick-walled metal barrel is most often used. It contains a central rod, made of a thick-walled pipe, with a rigidly welded metal disk slightly smaller than the internal diameter of the barrel. The height of the pipe is 10-15 cm higher than the barrel. Ribs are welded on the bottom side of the disk so that there is a small space between the disk and the bottom of the barrel - this is necessary for oxygen access to the firebox. The third element of the design is a structure similar to a guide with a disk. The difference is that the diameter of the pipe is larger than the guide, and the disk itself has holes throughout its entire area. It is put on the internal guide and gradually moves down as the fuel burns. The lid is made of thick metal so that the hole allows the press to lower evenly as the fuel burns. The chimney is sealed in the upper part of the body at a distance of 5-7 cm from the top.
How bubafoni works
Before use, the central guide is inserted into the housing. The entire volume of the body is filled with fuel - firewood, briquettes, flights. The firewood is stacked vertically very tightly. The height of the bookmark should be 5-7 cm below the top cut of the barrel. After this, the upper press is installed on the guide and the cover is put on. Ignition is carried out from above. After the fuel combustion process begins, a process of gradual temperature rise occurs - oxygen enters through the pipes into the combustion chamber. When the temperature rises to 300 degrees, the process of gas formation begins. The gases rise upward and the flame moves into the space between the lid and the upper press. Thus, the process of combustion of gases begins. To regulate the burning speed, an adjustable damper is installed on the pipe of the upper press. When using such a stove, one load of firewood is enough for 48-72 hours of burning.
Structural features of furnaces
A long-burning stove is convenient because it can burn on one stack of wood several times longer than traditional stoves and fireplaces. This is directly related to its design features - it is equipped with a large firebox, and some of them burn wood under certain conditions, with minimal access of oxygen to the combustion chamber and subsequent combustion of pyrolysis gases.
Sealing the seams will prevent combustion products from entering the heated room.
Long-burning stoves have large fireboxes - a large amount of firewood and other types of warm fuel are placed here. Due to this, the frequency of approaches for laying fuel is reduced. Classic stoves and boilers with miniature combustion chambers require new portions every 2-3 hours. In the daytime you can still put up with this, but at night a person wants to sleep, and not bother with adding firewood.
The worst thing is if everyone works during the day - there is simply no one to put logs in the stove. During this time, the temperature in the heated rooms will become quite low, so the evening will have to be spent not on rest, but on kindling in order to create comfortable conditions. However, at night you will have to do the same thing as during the day - throw more and more portions of logs into the insatiable firebox of the wood-burning stove.
The operating principle of a long-burning furnace depends on its design:
- Units with a large firebox - their long operation is explained by the use of large combustion chambers, into which a lot of firewood is loaded;
- Pyrolysis units - here solid fuel is burned with a minimum amount of oxygen and forms pyrolysis gas;
- Units without pyrolysis, but with limited combustion intensity, are “bubafonya” stoves made from a barrel, which have a simple but very original device.
The stoves themselves can be made from a variety of materials - stone, refractory brick or metal.
The key to longer burning of your stove is the use of normal firewood, and not rotten logs with low calorific value. Beech, oak, hornbeam and some varieties of fruit trees burn the longest.
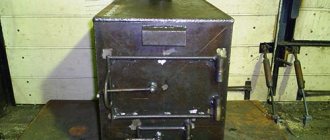
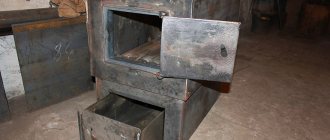
Improved potbelly stove
Like bubafoni, this project has many fans, and do-it-yourself assembly videos can be found in large quantities on the Internet. Unlike other potbelly stoves, its advantage is that, with its compact size, the duration of fuel combustion is 4-5 times longer than that of a simple potbelly stove.
The whole secret lies in the design of the firebox. More precisely, in the absence of a grate in the firebox and the presence of an adjustable damper. The duration of the combustion process is regulated by the supply of air to the combustion chamber.
To independently manufacture such a metal furnace, you must have not only accurate calculations, but also skills in working with a welding machine. The fact is that the moving parts of the housing must be very precisely adjusted to each other, otherwise there will be no controlled air access; it will simply penetrate into the firebox through loosely fitting doors and a gate valve.
The principle of operation of this version of a long-burning potbelly stove is as follows: after the combustion process begins, the gate valve is installed in the desired position so that a slow smoldering mode is maintained in the firebox. Due to the fact that the design does not have a grate or ash pan, air enters through a gate valve.
Practical part
Making a long-burning wood stove with your own hands step by step:
- The container should not have a top. If it is a balloon, cut off the top with a grinder or autogen. If you are using a gas cylinder, before sawing it, you need to unscrew the valve, fill it with water and saw without draining the water. The cut must be precise (we will need the part later).
- If a sheet of steel is used, bend it and weld the bottom at least 5mm thick. In this case, the square shape is preferable due to stability. If the bottom is round, you need to weld 4 legs to it.
- Making a pressure circle. We cut a circle out of steel, the diameter of which will be slightly smaller than the barrel. In the middle of the circle we cut a hole for the pipe (10 cm). We weld the pipe. The circle should easily fit into the barrel, while the pipe should protrude above its top by about 15 cm.
- On the other side of the circle we weld a channel in the shape of a cross. In the future, it will press down the fuel.
- Oven cover. This is either the top that was cut off earlier, or another circle of steel. A hole is made in the lid into which the pipe from the pressure circle will be inserted. It is important that the pipe passes into the hole freely (lowers under its own weight), but without large gaps.
- A small hole is made at the bottom of the barrel, through which it will be convenient to remove ash in the future. A door (purchased or homemade) is welded to it.
- A 150 mm hole is cut in the upper part of the body and a chimney pipe is welded. The length of the segment should be greater than the transverse size of the oven itself.
Induction furnaces are used not only for melting metal, but also for heating the room. Do-it-yourself induction furnace - operating principle and use for heating, operating features. You will find step-by-step instructions for making a sauna stove here.
A fireplace in the house creates coziness and a good mood. But such a stove is most often used for decoration and is not cheap. Here https://microklimat.pro/otopitelnoe-oborudovanie/kaminy/svoimi-rukami-poshagovaya-instrukciya.html is all about how to assemble a fireplace stove yourself.
Rocket stove with a cylinder for combustion of exhaust gases
The conventional lightweight rocket stove is quite easy to recognize from photographs due to its unusual design. Three round or square pipes welded at one point and having a common internal space are perhaps the simplest design for a camp fireplace.
But, like an ordinary cast iron stove, the rocket has a very large appetite. On the other hand, the rocket furnace simply has enormous heat transfer from the fuel; it is not for nothing that this design is recognized as the most efficient compared to other projects.
It is this property of rocket-like emission of flame that is used in the design of long-burning potbelly stoves with a cylinder. The fact is that the flame coming out of the firebox is used ineffectively. The video of the operation of such a furnace shows that the flame comes out with great pressure. But along with the flame, a large amount of unburned gases also comes out. The idea of using this potential is to install a large cylinder after the rocket furnace, with the entrance window located on one side and the exit window on the other.
The flame with unburned combustion products, entering the cylinder, continues to burn until complete splitting. Thus, further combustion of flammable gases occurs in the cylinder itself, and smoke and other combustion products are removed through the outlet window.
What types of garage ovens are there?
Before we talk directly about long-burning stoves and the construction of such structures, we should tell you in general terms what kind of stoves installed in a garage are generally available. In such a building, it is possible to install systems operating on various types of fuel: solid, liquid, gas or electricity. The most important thing is that the efficiency of the stove is high, but the fuel consumption is low.
How to make a long-burning stove with your own hands
Potbelly stove
This is the most common and familiar version of the stove, which probably everyone is familiar with. Such a stove has modest dimensions, it is compact, heats up quickly, does not take up much space and is “omnivorous” - almost anything that burns well can be used as fuel for it. If you wish, this design is quite simple to make even with your own hands.
Attention! Potbelly stoves must be used very carefully. If used incorrectly or carelessly, they can cause a fire. It also uses up any fuel too quickly.
Example of a potbelly stove with dimensions
Previously, potbelly stoves were even used to heat residential premises. But as soon as central heating began to be installed in houses, they lost their relevance. Now they can only be seen in garages or in a number of utility rooms.
Most often, homemade potbelly stoves are made from old propane cylinders or from thick-walled metal pipes. In general, the main requirement for the material is a thickness of at least 2-3 mm, and better yet, 5 mm. The cross-section of the body must be at least 30 cm. The service life of even a simple homemade potbelly stove is several years.
A potbelly stove, if you make it yourself and do not buy it ready-made, must be made from high-quality, durable materials
Table. Types of potbelly stoves.
| View | Description |
| Vertical | This potbelly stove is easier to make than the second option. But it will have a small combustion chamber, and therefore the fuel will have to be greatly crushed. |
| Horizontal | This type of stove is more convenient to use - you can place quite long logs in it, there is no need to chop the fuel into small elements. But it will take up much more space than a vertical one. |
The potbelly stove gets very hot, sometimes even becomes red hot, and it is impossible to be near it. Therefore, craftsmen came up with the idea of making potbelly stoves with double walls. The easiest way is to take two barrels of different diameters, a larger one and a smaller one, insert them one into the other, and pour pebbles and sand between them. Then you will get a thick-walled structure, which will be more convenient to use. And the heat from the stove will last longer. Of course, it will take longer to warm up such a potbelly stove, but it will allow you to warm the room longer.
Homemade stove-stove from a barrel
Brick stove
As you might guess, such a stove can be made from brick. Due to the heat capacity of the material, the stove will give off heat to the room for quite a long time - the main thing is to warm it up well. This is a great option for those who work in the garage for a long time or daily.
A brick oven for a garage will be a good solution if the building is used not only for storing a car, but as a workshop
Such stoves are used less often in garages than potbelly stoves. But in general they are quite convenient and less fire hazardous. They are made almost entirely of brick, with the exception of the door. Also, such a stove must be placed on a good foundation - it is very heavy.
Furnace in production
To heat a garage, you can also use stoves that run on waste oil, that is, machine oil that has already spent its life. They are economical and efficient, allowing you to avoid purchasing additional fuel. If such a furnace is made correctly, it does not smoke and will not pollute the air with heavy metals that may be contained in the waste.
Furnace in production
On a note! Such furnaces can operate on transformer, machine, and transmission oils.
The oven is a unit that has two containers connected by a special perforated pipe. The structure weighs about 30 kg, can hold about 12 liters of waste and consumes approximately 1 liter of liquid per hour of combustion. It is recommended to think over a system for obtaining resources for heating the stove - there is not enough oil from one machine to use it constantly. It’s better to talk to the owners of neighboring garages - maybe they will donate their earnings.
Creating a homemade stove for mining is not a labor-intensive process
The main disadvantages of such a stove are a long chimney with a height of at least 4 m. Moreover, it should not have bends and should only stand vertically. And oil containers will have to be cleaned regularly, and this is not the most pleasant job.
Long burning stoves
And now the most interesting part is the section dedicated directly to long-burning stoves. They can also be made yourself from an old gas cylinder. The operating principle is based on converter combustion. It is important to understand that such stoves are much more complex than potbelly stoves, but if you want to understand their design and install them yourself, you can. They can be heated with wood, coal, pellets, etc. The main thing is to use solid fuel.
Diagram of a long-burning furnace
On a note! A ready-made oven of this type in a store is quite expensive. It's much cheaper to do it yourself.
The features of long-burning furnaces are as follows.
- Increased fuel burn time. In a conventional firebox, firewood burns quickly, but in such a stove it smolders and is able to give off heat for about 6-10 hours, which means it will heat the room for a much longer time.
- The fuel inside such a stove begins to burn from above, while in conventional stoves it burns from below. For this reason, such ovens are usually made vertical.
- You can light such a stove through the top, that is, through the part of the structure that is responsible for the air supply.
- The firewood will have to be pressed so that it does not flare up too much and smolders longer.
Wood-burning garage stove
Table. Types of long-burning stoves.
| View | Description |
| Bubafonya | It was invented by an author with the nickname Bubafonya, and therefore this name stuck to such a stove. Such stoves appeared about 6 years ago. The design is simple, but at the same time has high operating efficiency. Everything burns in it - from sawdust to firewood. The main disadvantage of such a stove is its cleaning. To remove the ash, the stove will have to be turned over. Although, if desired, the design can be modified. The most important thing is to make it very simple. |
| Buleryan | This is also one of the popular types of stoves that burn for a long time. Sometimes such designs are even used for heating residential premises. Simply put, it is a hybrid of a potbelly stove and a bubafoni. It works due to the so-called forced convection of air, which, entering from below, heats up and comes out from above already hot. |
Long-burning gas cylinder stove
Prices for popular models of long-burning stoves
Long burning stove
Pros and cons of homemade long-burning potbelly stoves
Now that the basic designs of furnaces with an extended fuel combustion period are known, it is necessary to analyze the positive qualities and disadvantages of these devices.
The positive aspects include:
- Significant fuel savings;
- High heat transfer;
- Ability to work in “offline” mode for a long time;
- Possibility of use for most types of different fuels.
Alas, these designs also have disadvantages that cannot be called insignificant:
- The need for a hermetically sealed connection of all parts of the housing during assembly;
- High requirements for keeping chimneys clean;
- Despite the fact that the stoves are designed for a long period of operation, they must be looked after periodically;
- To use such devices, certain skills and abilities are required;
- To assemble such a stove yourself, you need to have fairly high skills in metalworking;
- To use, you need well-dried firewood.
Advantages and disadvantages
Why is it beneficial to use this variety?
We list the main reasons for this:
- These designs are compact and relatively small in size.
- They have a fairly high efficiency. It can reach 75% - 85%.
- The maximum burning time can be 10 hours.
- Fuel consumption is much less than in a normal situation.
- Unlike most types of stoves , you can add a new portion of firewood during the combustion process, without waiting for it to finish.
- Here it is possible to effectively regulate the intensity of the combustion process.
- It is allowed to use not only wood for combustion , but also coal and pellets.
- Cast iron stoves have a long service life. It can reach 50 years.
- They are characterized by a high degree of versatility. They can be installed almost anywhere where it is possible to make a chimney.
- They are not too heavy. Two people can move them to a new location without much effort.
- Attractive design. This allows the use of long-burning stoves in a wide variety of cases.
- Relatively low cost.
- Environmentally friendly fuel materials.
Along with the listed positive features, there are also certain disadvantages.
- These devices are not suitable for operation on liquid fuel.
- Special requirements for the chimney due to the low speed of smoke movement (the chimney should not be curved).
- Setting it up to work correctly is quite complex.
- Low outlet temperature, which leads to increased condensation formation.
- Inability to operate in fully automatic mode. Constant supervision is required here.
- The space around the stove must be protected from fire.
Step-by-step instructions for assembling a potbelly stove with your own hands
The first stage is the preparation of the drawing and necessary materials. As for the drawing, it should reveal the design features and subtleties of all elements in as much detail as possible.
For experienced craftsmen, this stage can be skipped, but for those who are just starting the journey of constructing potbelly stoves, it is recommended to assemble a model from cardboard. Modeling, in this case, will cost much less than miscalculations immediately embodied in metal.
The next step is the selection of tools and materials. Here it is recommended to use ready-made components and housings produced industrially as much as possible. This way you can not only reduce the cost of work, but also find new, more effective technical solutions. Another piece of advice regarding this stage is proper organization of the workplace. When working with sheet metal, it is recommended to assemble a jig from wood so that the structures to be welded can be easily installed in the desired position.
During assembly, you need to remember that all connections must be as precise and strong as possible, especially for the body and supports of the potbelly stove. And of course, after assembly, it is necessary to make a test firebox to check the functionality of the assembled structure.
Self-production
Sawdust stove diagram
It is convenient to use the most common type of fuel - firewood. We will tell you in detail how this can be done.
We list the tools and materials needed for this:
- 200 liter barrel;
- 2 small pieces of steel pipe , one of them should be slightly longer than the other;
- piece of metal channel;
- hacksaw , which is used for working on metal; you also need a hammer, an ax and a mallet;
- measuring devices (tape tape, plumb line);
- approximately 50 red bricks;
- reflector;
- sheet steel (small piece);
- welder;
- construction mixture for preparing mortar;
DIY process:
- The main part is the barrel. To use it you need to prepare it. First of all, you need to cut off the top cover. This must be done carefully. This detail will be needed a little later. If it was not possible to prepare the side, you can use a piece of large diameter pipe for the same purpose.
- A circle is cut out of a sheet of steel , with a diameter slightly smaller than the barrel so that it can be moved freely inside. A hole is cut in it for a longer piece of pipe. Horizontally located channels are welded to the disk from below.
- The top lid is made from the cut off top of the barrel. A hole is cut in it for the pipe to exit.
- 2 holes are made in the lower part. One higher and larger for storing fuel. The other is smaller and at the very bottom for removing ash and coals. Both openings must be equipped with doors with handles.
- A hole is made in the upper part for the chimney and the corresponding piece of pipe is connected. It is placed on the foundation. This is due to high heating during operation.
- In some cases, the stove can be lined with brick , and the nearby floor and walls can be lined with a reflector. But this is not mandatory.
Some recommendations:
- For a chimney, it is convenient to take a pipe with a diameter of up to 15 centimeters. It is welded to the upper hole of the furnace being created.
- The use of a reflector can greatly increase efficiency indicators.
- It is not worth covering with bricks if the stove will be used in utility rooms.
- You need to free up space near it and not place objects or materials there that are not fire resistant.
- The chimney must be accessible for regular cleaning.
- Before you start using it, you need to try it in different operating modes and choose the most suitable one.
Drawing of a metal stove on sawdust