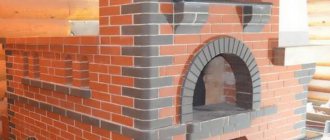
Instructions for building a Russian stove
You can build the unit using an already developed scheme.
The masonry diagrams are presented below: The simplest masonry scheme for a Russian stove must be carried out in compliance with all technological requirements
A detailed diagram of the laying of a Russian stove will help you better understand the essence of the process
Summarizing all the schemes, we get approximately the following sequence of work:
2 layers of brick are laid on the base, reinforced with insulation
The row length corresponds to the selected heater length; between the first and second layers they make a dressing of ¾ brick; It is important that the material is positioned evenly; check the layer using a level; in the second row there is room for baking; layers 3 and 4 are performed with bandaging at the corners, like layers 1 and 2; layer 5 begins the roof of the oven; The 6th and 7th layers are laid out with solid building material; the walls are placed in one row.. Important: stove makers often fill the space under the arch with sand or glass
This is how the Russian stove generates even more heat
Important: stove makers often fill the space under the arch with sand or glass. This is how the Russian stove generates even more heat
- row 11 is a covering for the undercoat;
- in the 12th layer spread under;
- then they make a crucible from the 13th to the 15th row;
- The 16th row is the arch of the crucible.
Important: sand is poured between the walls and the roof - this way the heater retains thermal energy longer
- the pole window is made to look like an arch;
- Next comes the smooth laying, bandaging is done in the corners;
- row 23 must provide space for soot accumulation;
- Row 24 provides for an opening for a view; a door is required here;
- straight laying is completed to the end.
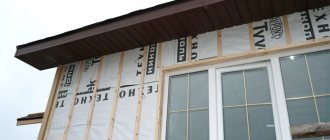
The unit is built using wooden formwork so that the bricks do not “scatter”. It is not on every diagram, but it is important to provide for it so that the masonry is beautiful and even. The formwork is removed a week after completion of construction. The stove must be equipped with a smoke passage
Section – 26 × 26 centimeters. The chimney must be insulated. You can read about it here
The stove must be equipped with a smoke passage. Section – 26 × 26 centimeters. The chimney must be insulated. You can read about it here.
The final stage of construction is lining the heater so that it has an attractive appearance. Finishing can be done in the following ways:
- plastering;
- grouting with clay mortar;
- laying decorative or natural stone;
- facing with ceramic tiles;
- artistic painting with heat-resistant paints.
After completion of construction according to the scheme, the heater must be dried. It is ignited with small chips and shavings. Drying lasts from 1 to 3 days.
Laying 7-10 rows
The seventh row is laid out in the same way as the fifth, squeezing the butts of the side walls under the heel. The eighth row is formed according to the same principle as the sixth. This is where the creation of the foundation for the pole begins, which includes three rows of full-size interlocking bricks. The countdown starts from the frontal plane of the unit.
The ninth row repeats the location and shape of the bricks of the seventh row. The base of the pole continues to be laid out on it. It is formed above the arch of the substructure, forming a continuous lining. When laying out a Russian stove with flooding, the order must be followed exactly, otherwise the design will turn out to be unreliable.
The corners of the tenth row are laid out from 3/4 bricks, the sides from full-size spoons, and the back from full-size bonded bricks. The front part of the structure is laid with three rows of full-size bricks deep. As a result, each row should have 7 bricks laid flat. As a result, a special plane is formed - a sixth. The space created between the back wall and the pole must be filled with gravel, sand and clay.
So, what are the names of the elements of the Russian stove and accessories?
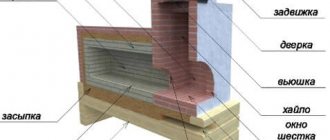
Overpipe, shield - a smoke collector above the pole, for collecting flue gases and discharging them into the pipe.
Shestok is a platform in front of the mouth of the Russian stove. The pole can be open, closed or closed on both sides. Hot dishes were placed on the shelf.
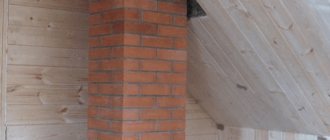
Metal finishing and artistic forging performed by Alexey Kozhin
Cutting - fireproof cutting at ceiling level. Thickening of brickwork at ceiling penetrations.
I suggest you visit my group on VK. Join the ranks, subscribe to news and ask questions on the group wall.
The damper is a sheet of iron that closes the entrance to the furnace; the damper can also be made of wood. The dampers always have a metal or wooden handle. In modern times, the dampers of Russian stoves are made to order. They add additional color and are decorative elements in the oven. Cooking is done in a Russian oven with the damper closed. Modern dampers can also be insulated.
The damper was made by metal artist Alexey Kozhin
Epancha is a casing over the mouth of a Russian stove. The word comes from its resemblance to the outerwear of epanchas. Short fur coat without sleeves.
The valve is a metal plate that closes the chimney. The valve can regulate the draft, unlike the view.
Hog - a horizontal section of pipe, which serves to bring the pipe closer to the ridge, since the stove was not located in the middle of the house.
A view is a device consisting of two and sometimes three parts. This is a steel plate or cast iron frame with a hole that is closed with a blind and a lid.
The pipe is a vertical channel through which smoke is removed from the stove to the street.
Reroof - the topmost layer of brick, located above the massif or backfill; A couch was usually placed on the roof.
A lounger (lounger) is the top of the stove roof, a place to lie down and sleep in the cold season. Basically, two people could fit on a deck chair, but larger stoves had deck chairs that could accommodate up to 6 people.
The crucible is the firebox of a furnace, a cooking chamber in which fuel and firewood are burned, and then food is prepared.
The vault, the palate, is the upper part of the furnace. It comes in different shapes and is often tilted towards the pole.
Stoves are shallow niches in the body of the stove, used to improve heat transfer; clothes, shoes, dishes, mushrooms and herbs for drying are also placed there.
Mirror - the surface of the stove that transfers heat into the house, the wall of the stove. Backfilling - sand and crushed stone were often poured under the floor and above the vault as a heat sink.
Ochyolok is the front part of a Russian stove, from the word jaw.
The forehead is the area of the stove above the arch or the ceiling of the hearth, like a person’s forehead (a person’s forehead is exactly at the level of the forehead of a Russian stove).
Gornushki - a hole for storing coals in a furnace.
Under, bottom - the bottom layer of the furnace roof is the base of the upper roof of the furnace, it is laid to ensure strength from brick hewn into a cone along a cylindrical surface.
The hearth is the reverse side of the hearth, what is inside the oven on top.
Threshold, gas threshold, tooth - the upper part of the mouth to the arch, delays the exit of gases from the firebox, increasing the efficiency of the firebox.
Cheek, cheeks, cheeks - the front wall of the furnace.
The mouth is the opening between the cheeks.
The firebox is a place where coals were placed so that the next fire would not require ignition. The bending was done on the pole on the left. It’s called a pole bend. Sometimes it was built like a stove with an outlet into a chimney. The coals in the fire were slowly burning out.
Zapechek - a Russian stove was placed at a distance from the wall, this distance is called a bake.
The guard is the lower part of the stove, unheated, serving as the base for the stove and in the past it was often made of wood.
The hearth window is a hole often slightly larger than the entrance to the firebox.
A samovar choke is a hole for connecting a samovar with a lid.
A stove is a niche in the wall of a stove. Served for drying things, as well as for better heat transfer from the stove.
Golbets is an arrangement, a fence, a structure made of wood or brick, which was a continuation of the stove; on top it is a continuation of the stove bench, since the stove bench was often shorter than the length of a person; below there is a place to store all kinds of utensils. A curtain was hung on the golbets. Golbets is a word of Swedish origin. This design was also called “cabbage roll” in Russian.
I found more information: Golbets is a wooden extension to the stove, covered with sheets as a continuation of the couch. They enter the golbets through a separate door, and along a ladder they get to the underground.
Carzina, karzhinok, karzhinka - a long box made of boards or wicker built into a wooden guardianship. The lid of the basket rises, revealing the entrance to the underground. The basket usually serves as a bench and chest.
A trap is an unframed hole in the floor of the hut, the entrance to the underground.
Golbets, karzhina are options for framing a trap.
Photo for the elements golbets, karzhinka, karzhinok, basket, underground, trap.
Golbets with entrance to the underground through the door
Polatya was the same name as the extension of the stove, on which one could lie, put things, dry shoes and lay out vegetables for drying, such as onions. Added by Alexander from Samara.
A bed is not only a sunbed built between the stove and the wall, but also a wooden flooring built under the ceiling, above the stove. The tents were also located in the corner between the walls. You can dry vegetables on the floors. This is what V.I. writes in his explanatory dictionary. Dahl: “half (from half
) - in general, a platform or platform, a flooring raised above the floor and head; then: a platform in a peasant hut, from the stove to the opposite wall (above the doors, and to the bed, or on the other side, to the kuti); three corners of the floors are adjacent to the walls, the fourth to the golbts, or chamber pillar, and the flooring lies, to one side of the pillar, on the chamber beam, and to the other - on the voronets; this is a kind of mezzanine, mezzanine, useful for the sake of cramped conditions in the hut and for warmth; dormitory. In the old days, people also lived in boyar mansions.”
Podtopok is a small stove for heating a Russian stove (usually under a hearth) or on the side of the hearth.
Flood in a Russian oven
Stove with heating
Additional heating in the furnace
The information was supplemented by Yuriy, a visitor to the KaminTeplo blog.
Podshestok - a cold stove under a pole; small kitchen utensils were stored in it.
Podpechek, under-oven - a cavity under the hearth and bottom of the stove, where firewood was most often stored, dried before heating, and where pets lived.
Half-door - a small door for cleaning out soot, a door for an ash pan. The half-door was installed to provide access to the view.
Hailo - a hole for releasing flue gases into a chimney.
The throat is a hole above the hearth; if the hearth is open, then the stove simply does not have a mouth.
A hole is a window, for example, a window in the bottom of a stove, if the stove is not a classic one, but for example, a heated stove with a flood chamber.
A counter is a long box, a bench for storing utensils next to the stove.
Dushnik, samovar - a hole for connecting a samovar with a lid
Home heating options
The choice of heating method depends on the layout of the building - side or bottom. The first option is the best solution for houses with several rooms, since the adjacent room is heated using a side heating panel. The second method is used to supply heat to one room, but having a larger area.
The walls of the sub-floor space are heated from below. Currently, in order to increase efficiency, designs are equipped with a bell-type combustion, which makes it possible to ensure uniform heating and stable draft. In such units, fuel burns completely and less soot accumulates in them.
The device of a heated vehicle
Teplushka is a two-bell type of stove. Fire and smoke first enter the upper hood - the furnace of the furnace, and then fall into the lower hood, after which, having given off most of the heat, the smoke rushes into the sky through the chimney shaft. At the very bottom of the furnace there are small cleaning doors for cleaning the lower hood from soot and ash. The lower hood is lined with refractory bricks, which makes it possible to make the external and internal parts of the heated vehicle independent. This has a positive effect on the strength of the entire structure, helps to avoid overheating of the stove and increases the stove’s ability to retain heat.
Varieties of options
During the existence of the Russian stove, quite a lot of variants of its design appeared, which differ from each other in some design features. The first most obvious design element that immediately catches your eye is the type of bed - they come in different sizes or shapes:
- with transverse beds located behind the mouth with a pipe. This is a typical option, which provides two beds at once;
- with a longitudinal type of bed, when it is located behind the firebox. This makes the bed wider, and also provides additional storage space for various equipment.
Obvious differences may be different options for the inflow device:
- the classic inflow is located on one side;
- a firebox with a fireplace allows you to combine a stove with a fireplace, while the fireplace can be brought into another room.
Development of Russian stoves.
Initially, Russian stoves had a simple design, did not have a heating element, were fired through the roof of the stove in their structure and the efficiency (25-30%) was close to that of classic English fireplaces. At the same time, of course, there were obvious advantages: firstly, the roof of the oven, similar to the tandoor, had a large heat capacity and made it possible to cook food in various modes with temperatures from 90 to 350 degrees. After closing the view, the heat of the stove remained in the room for a long time; also, due to the open type of firebox, a fast air flow was created which made it possible to effectively ventilate the room, although at the same time the heat “went into the chimney”. But still, their main drawback was the weak heating of the lower part of the furnace array and the room.
Over time, Russian stoves began to be built with a side multi-channel panel and a flood chamber according to the operating principle of “channel Swedes”, this made it possible to slightly increase the efficiency of the stove. However, it was still not possible to achieve uniform heating of the furnace mass. A further improvement was the change in the heating shield from multi-turn to single-turn with 2-3 down channels and 1 up.
Nowadays, stove makers are increasingly switching to the laying of modern models of Russian stoves, which have a predominantly bell type of combustion proposed by Podgorodnikov in his famous “Teplushka” stove. Such stoves have a very high efficiency; the stove has a stable draft; they do not smoke; they heat the entire stove array evenly; and they hardly accumulate soot. due to complete combustion of fuel. The closest competitor to Teplushki, in my opinion, is Russian stoves of the channel-bell type with bottom heating by Porfiryev Ya.G. Its stoves have characteristics comparable to those of Teplushka, but are much simpler in design. They have a simple and reliable design that allows masonry to be carried out even by a person who has no experience in laying stoves.
Preparation of materials and tools
To build a Russian stove with a flood chamber with your own hands, you need to prepare in advance the full amount of building materials, tools, auxiliary equipment, as well as shaped parts made of cast iron and steel.
Materials
To design a Russian stove of traditional shape and dimensions: 1.9 - 2.0 m high, 1.6 m wide and 2.38 m long, you will need:
| Name of material or shaped part | Unit | Quantity |
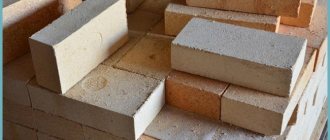
| Tempered red brick M - 200 | Thousand PC. | 1,75 |
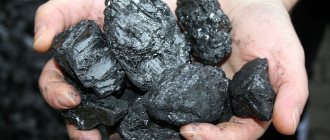
| Fireclay fire-resistant brick | Thousand PC. | 0,23 |
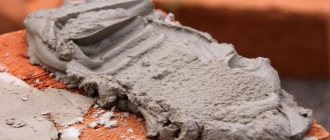
| Oily clay | kg | 250 |
| river sand | kg | 300 |
| Hob with two burners 40x70 cm | PC. | 1 |
| Grate 20x28 cm | PC. | 2 |
| Grate 25x38 cm | PC. | 1 |
| Fire door 25x21 cm | PC. | 1 |
| Fire door 25x18 cm | PC. | 1 |
| Cleaning door 13x13 cm | PC. | 2 |
| Blower door 25x15 cm | PC. | 1 |
| Smoke damper 18x26 cm | PC. | 1 |
| Damper 38x45 cm | PC. | 1 |
| Water heating tank 28x12x50 cm | PC. | 1 |
| Steel corner 5x60x60 mm | m | 1,5 |
| Steel strip 5x50 mm | m | 20-25 |
| Steel sheet 5x50x50 mm thick | PC. | 1 |
A Russian stove with a flood chamber is a rather massive structure and requires reliable support. When calculating its dimensions, not only the weight and dimensions of the furnace are taken into account, but also the soil composition and groundwater level in the area of the future pit. The support in the form of a rectangular slab should be wider than the main structure by 10-15 cm in each direction, and the depth, depending on the characteristics of the soil, should be 50-80 cm.
Concrete can be purchased ready-made, but it will be cheaper to mix it yourself. To build a monolithic foundation slab 1.7x2.5 m and 0.6 m thick, you need to purchase:
- crushed stone - 4.2 m3 (0.7 m3 - for the underlying layer and 3.5 m3 for concrete);
- sand - 3.5 m3 (0.43 m3 - underlying layer and 3 m3 - in concrete mortar);
- cement M400 - 0.66t (13 bags);
- reinforcement with a diameter of 8÷10 mm - 85 m (53 kg);
- board for formwork 40 mm thick - 0.2 m3;
- roofing felt - 9 m2;
- polyethylene film - 5-6 m2.
Tools
A standard stove maker's kit should consist of:
- Trowels (trowel) - used to take the masonry mixture from the container and distribute it over the surfaces of the brick. During the process of laying a Russian stove, a trowel is also used to clean off excess mortar that has protruded beyond the seam.
- Hammers - picks - split and trim brick blocks to fit individual masonry segments or give them a certain configuration.
- Joints are a special tool for designing seam lines.
- Cords - moorings - control the straightness of the rows and the perpendicularity of the walls, but more often craftsmen perform this work with a plumb line and a building level.
- Ordering - necessary to align the thickness of horizontal seams.
- Plumb line - a device for checking the verticality of walls.
- A building level is a tool for controlling the evenness of each row.
- Rules - used to create a smooth plane on top of the foundation structure.
- Shovels and two containers for making concrete and mortar.
- Measuring bar - for measuring the thickness of the seam.
Distinctive features and choice of materials
The Russian stove, as mentioned earlier, has a number of its own characteristic advantages and distinctive features, which you can learn more about from the following table:
| Photo of the heated vehicle | Benefits and Features | Detailed description |
| Optimal dimensions | It differs from the Russian stove in that it has optimal and relatively small dimensions. This, in turn, allows it to be placed not only in large, but also in standard medium-sized rooms, with an area not exceeding 15-20 square meters. | |
| Fast heating | Due to the unique structural features of such a heating unit, it is able to heat up quickly, while the bricks are heated not only from below, but everywhere, so the room is heated evenly at the bottom, in the middle and near the ceiling. To fully heat the structure, it will take about 40-60 minutes. | |
| Possibility of cooking | With the help of such a stove you can not only heat the room, but also cook food. At the same time, you can do this almost immediately after you have lit a fire in the firebox; you don’t need to wait until the logs have completely burned out! | |
| Using different fuels | The heater can operate not only on such classic solid fuel as firewood, but also on coal, briquettes, sawdust, etc. Therefore, this design is considered to be quite effective, economical and versatile. Today. There is a wide variety of various modifications that differ from each other in their dimensions, shapes, methods of arrangement and operational characteristics. However, the best and most popular option is considered to be a modification such as Teplushka 15. |
The heating stove requires the use of suitable materials for its assembly, which are purchased in calculated quantities. Before you start building a structure with your own hands, you will need to acquire:
- Four combustion doors (1x25 by 21 and 3x25 by 14);
- Grate 25 by 25 cm;
- Floor grate 30 by 25 - three pieces;
- View, summer valve, ventilation valve;
- Damper for the furnace 40 by 32;
- A hob consisting of two burners 71 by 41 centimeters;
- A box with which the water will be heated.
It is equally important to prepare suitable materials for the construction and construction of this heating unit. You need to get:
- Ordinary brick - about 800-820 pieces;
- Refractory bricks - about 80-90 pieces;
- Angles made of steel, which will differ in size - 3-5 pcs;
- Large nails - 30-100 pieces;
- Metal strip – 5-10 pieces;
- Square washers – 10 pieces.
The heater stove, which we will describe and build in this article, has a number of the following characteristic features: it has the following overall dimensions - 129 by 129 centimeters, the height of the structure will be only 32 brick rows or 224 centimeters in height. Using this brick structure, you can fully heat a small house, the area of which will be no more than 40 square meters.
A brick stove consists of one integral element - the core; for its construction and construction, a special heat-resistant composition is used, which is also called Plitonite. To adhere the brick itself, or rather the main frame, a special masonry mixture is also used, which is based on clay, cement and sand. If we talk about their ratio, then the proportion in this case will be as follows - 2 to 1 to 7.
Construction technology
For construction, it is important to find good drawings of the “Ekonomki” stove and an ordering diagram, or better yet, get acquainted with the recommendations of experienced stove makers and watch the entire work process
Dimensions
We take as a basis the dimensions of our stove:
- width – 890 mm;
- depth – 1400 mm;
- height – 2250 mm.
The dividing partition between the fireboxes is made with 3 cavities for the passage of gases, measuring 100/200 mm. The hob is heated by gases, so you can dry berries, fruits or mushrooms on it and cook food.
Materials and tools
For work we will prepare:
- pick and hammer;
- Master OK;
- a trough for soaking clay and preparing a solution;
- steel square for marking the corners of the furnace;
- plumb line, level;
- measuring instrument;
- large file for cleaning edges;
- up to 1300 ceramic bricks;
- 2000 kg of sand;
- 2500 kg of clay;
- air valve, 4 doors
Having prepared the tools and materials, we move on to the main work.
Description of the masonry
Photo of the arrangement of the “Housekeeper” stove:
A DIY wood-burning stove is made taking into account the ordering scheme and construction stages.
Row No. Description of work 1,2
We lay out 1 row on a solution of clay and sand. We lay the brick flat, maintaining the correct position and thickness of the entire row.
The entire design of the furnace depends on this. We lay the second row according to the diagram, begin to lay the ash pan channels and the ash pan.
3 We wrap the frame of the ash door of the main fuel compartment with asbestos cord and install them at the mounting points. We fix them with bricks and mortar. We install the frame and door of the ash pan of the small firebox.
4 We install and secure the blower door for the small combustion compartment on the other side of the stove. 5 We trim the edges of the inner row of bricks to install the grate. We carry out the laying according to the diagram. 6 Install the grate
It is important to provide a gap of 4 mm to the brick and fill it with asbestos cord. Such a device serves as a thermal gap. 7-10 We carry out the masonry according to the diagram
On the bricks of the 10th row, we select grooves for installing the hob. 11-14 On the 11th row, we fill the gaps with asbestos and install a hob with 2 burners. We carry out all work in order. 15 Bricks are cut at an acute angle. The formation of the roof of the brewing compartment begins. We install special ties on the sides to secure the structure. 16 We continue to install the couplers and form the mouth of the furnace. 17 We make a transition channel between the combustion compartments for the passage of heated gases.
All further rows are carried out strictly according to the ordering scheme and according to the drawing of the furnace. We determine and install an air damper on the chimney, making sure to seal the connection with a cord made of fire-resistant material.
Important! To bring the chimney to the roof, it is better to use sandwich pipes, connecting them to a brick pipe at the level of the floor slab. They are equipped with a layer of thermal insulation and do not heat up the wall surfaces
The internal pipes, made of stainless steel, are smooth. A layer of soot will not be able to settle on them.
All further work is carried out similarly to the process of drying and first firing of brick stoves. This work will take 3-4 days, but will allow you to check the stove for defects and smoke, eliminate faults and gradually dry the brick surfaces from moisture.
But before that, we open all the channels in the lower part of the furnace and combustion compartments and remove construction debris. We check the draft level in the chimney. If the torch flame does not draw into the firebox when the vent and air damper doors are open, this means that the chimney is clogged and needs to be cleaned. Only after achieving a normal level of traction can you start drying the “Housekeeper”.
Specifications: features, pros and cons
An improved model of the Russian stove has a built-in surface on which you can cook food. This allows you to use the stove as another source of heat: the side panel or bottom of the stove will heat up even if the main firebox is not burning. Side heating will provide heat to the adjacent room, while bottom heating will provide heat to all the walls of the heating area. Using this feature, you can kill two birds with one stone: cook food and heat a room of considerable size.
This unit has its pros and cons. It would be useful to know about them for those who want to make a Russian stove with a stove and a stove bench with their own hands. So, the advantages of the unit include the following points:
- more than 25 years of reliable operation;
- simultaneous heating of several rooms at once;
- gives off and retains heat well;
- original interior design;
- opportunity for rest and relaxation.
The main disadvantage of the unit is that to lay it you will need to hire a qualified stove-maker, whose work will cost a tidy sum. In addition, a large amount of firewood is required for the stove.
Construction techniques
Opeche
The wooden guard supports a stove weighing up to 1600 pounds (approximately 750 kg), i.e. small or medium without baking. It is made in the form of a log house with two belts, backfilled with rubble and a flooring made of beams. The flooring is covered with felt, properly soaked in a liquid solution of fatty clay, and roofing iron is applied over it.
Arches and vaults
Arches and vaults are laid out from an ODD number of bricks on formwork on wooden templates - circles. First, a life-size cross-sectional drawing of the arch is made, then the castle bricks are hemmed onto the wedge. A do-it-yourselfer need not try to lay out a vault with a direct lock or without a lock; not every experienced mason can do this.
Next, the circles are prepared taking into account the thickness of the formwork boards and the vault is laid on them without a lock. Then you need to thickly lubricate the grooves of the locks with the solution and insert the locks into the groove. The next stage is to gradually hammer the locks into place one by one and in several passes. You can't get by with a mallet; you have to use a log. But you can’t beat like crazy; you need to use the inertia of a heavy log, and not the force of a sharp blow.
The quality of the vault closure is controlled by squeezing out the mortar sausages from the seams: it should be more or less uniform over the entire surface. The thick solution flows slowly, so you need to take breaks between passes. The result is a prestressed structure; Only such a vault will last for many decades.
Material consumption
The classic Russian stove described above, depending on the size, requires approximately the following amount of materials:
- Small - 1500 bricks and 0.8 cubic meters. m of solution.
- Average - 2100 bricks and 1.1 cubic meters. m of solution.
- Large - 2500 bricks and 1.35 cubic meters. m of solution.
Possible difficulties
When building it yourself and lacking experience, it’s easy to make some mistakes:
- Use of low-quality materials - cheap bricks often have defects or crack when heated to high temperatures.
- If you do not soak the brick before construction, it will draw moisture from the mortar, which will lead to uneven drying and deterioration of the strength and tightness of the masonry.
- The seams between the bricks are filled unevenly and not tightly enough - this later leads to a violation of the seal.
To avoid these and other mistakes, before starting work, it is better to seek advice from an experienced specialist.
The Russian stove is the heart of the home
In Rus', the stove was called the Nurse, the Palm of God, the Queen of the House, and songs and fairy tales were composed in her honor. What was the first stove, how long did it take our ancestors for the stove to take on the appearance we are accustomed to?
The history of the Russian stove
What was the first oven?
The first stove consisted of stones stacked without mortar with a hollow for firewood. The design was called a stone hearth or stove-stove. Archaeological excavations indicate that such technology began to be used in the 9th-10th centuries AD. The simplest design saved us from the winter cold and allowed us to keep the room warm longer with less wood consumption than when lighting a simple fire. The stones heated up and after the furnace was fired, they gave off heat for some time.
Historians believe that the stone hearth heated residential buildings until the 14th century, and after that it was used for a long time to fire the Russian bathhouse. Moreover, modern sauna stoves are also called heater stoves and their operating principle is similar to ancient Russian stone hearths.
Stone hearth
Russian stove over black - “smoking”
In the 14th century, the first “chicken stoves” began to appear, which were built of stone using clay mortar. The chicken stove was heated black, the smoke came out through the slightly open door or through the fiberglass windows - holes in the walls of the hut that were closed after the fire. The hut in which such a stove stood was called a “chicken hut.” The huts had high ceilings to allow room for smoke.
Chronicles indicate that in the 16th century, chimneys appeared - a wooden pipe on the roof through which smoke from the attic went out into the street; smoke entered the attic through a hole in the ceiling. Heating a “chicken stove” was a great art; the smoke had to come out of the mouth of the stove, spread in a thin strip along the ceiling and exit through a glass window or chimney. A good housewife had clean walls in her hut; only the ceiling was covered with soot. The smoke from the stove did not go to waste. Nets were hung above the ceiling for drying, fish and meat for smoking.
When firing the stove in black mode, it was necessary to control the fire and not let it get too hot, otherwise you could get burned by the smoke or burn down the hut. In dry weather, fires often broke out, and in connection with this, in 1571, by royal decree, it was forbidden to light the stove from spring until the first frost. Only yard stoves could be heated.
Russian stove on black
Chicken huts
Russian stove in white
In the middle of the 17th century, stoves began to be equipped with through pipes to remove smoke from the stove to the outside. This is how the Russian white stove appeared.
In most cases, the Russian stove was placed in the center of the house to heat every corner of it. The stove was one and a half meters high and higher, depending on the height of the hut. On top of the stove there was a bed for sleeping. Inside, the stove reached two square meters.
The Russian stove was a kind of kitchen set, where everything that was needed for the house was stored:
- Podpeche – a place for storing and drying firewood;
- A shelf is a place to store dishes. After firing the stove, the hearth remained hot and food could be heated on it;
- Pechurki - a niche for drying mushrooms and berries.
Application of the Russian stove:
Our ancestors used the Russian stove in a wide variety of areas of their lives:
- The stove kept us warm in the severe frost. The hut was always dry and warm;
- In Rus', the stove was called a wet nurse, and this is not without reason - it was possible to cook dinner for a large family in it, and in those days there were 5-7 children in the family;
- The stove was used for washing; in Rus' they said: “Why heat the bathhouse when there is a stove.” After the firebox, they swept the ash into cast iron pots with water; steam could be supplied by splashing water on the hot walls;
4. They slept on the stove. The bed could accommodate three children;
5. Treated ailments. The bed was sprinkled with medicinal herbs and watered with water, after which it was covered with a sheet and the patient was laid down. It turned out to be a kind of inhalation with heating.
6. Washed the clothes. They put dirty laundry in the cast iron pot, filled it with water, added ash and put it in a warm oven, stirring it periodically. The result was a washing machine, where the ash played the role of washing powder.
Equipment for the Russian stove:
To care for and use all the capabilities of such a multifunctional device, you needed several devices:
- Rogach or grip - has different sizes depending on the cast iron that needed to be installed or removed
- Stove scoop - clean the stove from ash
- Gardener - a wooden shovel to get bread
- Chapelnik - a device for taking out frying pans (chapels)
Russian stove and equipment for it
Russian stoves today
Today you can also find a Russian stove in private homes. Modern Russian stoves are made from safer and more durable materials; they use cast iron stove casting, which decorates the stove; it is durable and convenient to use.
A Russian stove in a modern home not only stores heat and cooks food, it decorates it. Stove makers have learned to make a real work of art that will always warm and feed its owner.
Russian stove. Equipped with stove doors DTG-8AS “Onego” and DPU-3A LITKOM Plant
Buy DTG-8AS “Onego” Buy DPU-3A
The material used photographs from the sites:
- Festivals of Rus'
- Arts and crafts fair
- Ethnoworld
- Bricks
Laying 5 and 6 rows
Then the laying of the Russian stove continues, and the order looks like this.
To create the fifth row, two 3/4 bricks are laid in the second and third corners. The back side is made of two spoon rows. The side wall is laid out from bonded material. The first and fourth rows are filled with interlocking, non-full-size bricks.
The sixth row is laid out in the same way as the fourth. On this row, they begin to create an arch to cover the underarm. For this purpose, the spoon bricks are cut off to form a heel under the arch. When a Russian housekeeper stove is created, the ordering involves the use of beam vaults.
Selection of materials
The design of a Russian stove with a stove bench and stove is constructed using only high-quality solid ceramic bricks without damage. To fold the stove, you will need about 2000 pieces excluding the pipe. In addition, it is necessary to monitor the quality of not only the brick, but also the mortar. It is desirable that it be prepared on the basis of a building mixture. The required quantity is at least 100 buckets. It is also necessary to prepare the following design details:
- two-burner cast iron stove;
- firebox door – 14x25 cm;
- door for the blower – 13x13 cm;
- grate – 26x28 cm;
- two valves with a hole, each size 26x24 cm;
- view with hole – 22 cm;
- steel water tank – 40x26x28 cm;
- pieces of metal of various shapes and strengths: corner, strip, roofing.
Design of a Russian stove
Drawings of Russian stoves can be very different, because the structures differ very much from each other.
Depending on the size of the oven there can be: small, medium and large.
The Russian stove is used for heating and cooking; it has an oven and a stove bench. To build such a structure, it is necessary to study its structure.
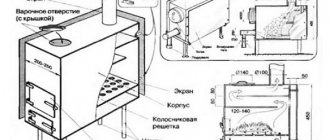
The design diagram of a traditional Russian stove consists of the following sections:
- oven - used for drying firewood. In many furnace structures there is no such department due to its lack of demand;
- cold stove - dishes are stored in it. It is also not always built;
- pole - represents a niche in front of the crucible. A cooking stove is installed in it. And if the stove is in a different place, food is placed on the stove so that it does not cool down;
- under is the bottom of the crucible. It must be installed with a slight inclination towards the entrance to the chamber to make it easier to move the dishes in it. The surface of this element should be sanded;
- crucible or cooking chamber - used for storing firewood and installing heat-resistant cookware. The chamber arch should also be made with a slight slope towards the entrance. Thanks to this configuration, hot air accumulates under the ceiling, warming up the stove bench and the sides of the stove;
- the overpipe is the niche above which the chimney pipe begins;
- view - is a window with a door with which the chimney is blocked. Through it they get to the damper, with the help of which they regulate the draft;
- stove bench - located behind the chimney, above the furnace. When the stove starts heating, it warms up well.
Modern Russian stoves are complemented by such elements as a cooking plate and a tank for heating water. In addition, in this structure the heating of the furnace section is carried out, which is why the furnace reaches the required temperature much faster, which means the room will warm up just as quickly.
Thanks to the presence of various departments in this building, there is no need to heat the entire room in the summer, but only use a hob to cook food. This creates a normal microclimate in the house and saves fuel. In winter, all sections of the oven are heated, which helps not only heat the water, stove and oven, but also the entire room.
To make a Russian stove with your own hands, preparatory work is carried out, starting with choosing a location.
https://youtube.com/watch?v=BbvQPy55lgQ
Russian stove projects
Home \ Artel "RemStroy furnaces" \ Furnace laying \ Furnace projects \ Russian furnaces
Sort by: Name Price Reset
View:
Russian stove: review of popular projects
A brick stove is not a museum exhibit, but an important element of the heating system of a private home, and the Russian stove is its best embodiment.
Before you order the masonry of a beauty, learn about some of the design features of Russian stoves.
Brief classification
The first parameter by which Russian stoves are divided is the material of manufacture. This classification appeared quite recently, since the “correct” masonry material was and remains brick. Today, supposedly “Russian” cast iron stoves and convection stoves have appeared on sale.
Traditionally, Russian stove designs come in two types:
· with bottom heating (installed, as a rule, to heat one large room - thermal energy goes upstairs and warms up all the walls of the underfloor chamber); · with side heating (used for heating adjacent rooms).
Russian stove projects
Before ordering a Russian stove project, make sure you are dealing with professionals. Documentation must include:
· mirror image of the product; · ordering of the pipe channel in the center of the gas collector; · separate drawings of vaults and arches; · formwork manufacturing algorithm.
The items listed are the technically acceptable minimum.
Projects of furnaces with side heating
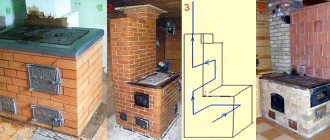
Rice. 1. Visualization of a Russian stove with side heating
Russian stoves of this type will heat two rooms with a total area of 40 square meters. Since the product belongs to the heating and cooking category, cooking is possible without threatening the temperature regime. For these purposes, a fire chamber and a heating floor are used.
The heating panel is located flush with the stove bench. For more intense heating of the adjacent room, it is placed higher.
Projects of Russian stoves with bottom heating
Used to heat one room with an area of 32±4 square meters. The design takes into account the cooking function - you can cook food on the flooring and in the fire compartment.
A Russian stove of this type assumes the presence of a horizontal gas circulation system (heat flows from bottom to top).
Rice. 2. Visualization of the Russian stove with bottom heating “Economka”
It is possible to develop a project for a Russian stove with bottom heating of the “Economka” type. It is capable of heating a smaller room, but due to the second heating element it heats its entire body. An excellent solution for the kitchen.
Projects of classic Russian stoves
Rice. 3. Visualization of a Russian stove with a trestle bed with an independent firebox
The traditional Russian stove is equipped with a trestle bed and an independent firebox. It will not be possible to make such a project using publicly available Internet sketches. Don’t take risks - contact the experienced designers of RemStroy Pechki. The project will be developed taking into account the characteristics of the house, safety requirements and SNiPs.