Difficulties in using fireplaces in wooden houses
Along with the presence of many excellent characteristics in wooden cottages, they also have a couple of serious disadvantages that introduce additional complexity when arranging fireplace structures:
- Flammability of wood. The use of fire retardants helps to somewhat optimize the situation, but the risk of fire still remains.
- Dimensional instability. Wooden log houses are characterized by the presence of significant deformation processes. Firstly, this is the shrinkage of the material during the first year after the completion of construction work. Secondly, even after this period is completed, the dimensions of the house remain “floating”. As a rule, this is affected by changes in humidity levels outdoors and indoors. For this reason, it is necessary to use special technologies when constructing a fireplace in a wooden house.
Also contributing to the inconvenience are two disadvantages inherent in the fireplaces themselves:
- Low efficiency. For example, classic English designs have it at 20%.
- Even when the fireplace is not lit, it operates in exhaust mode. To prevent this, you have to tightly close the chimney pipe. In operating condition, the draft of the fireplace is so large that, in addition to combustion products, it also removes significant volumes of heated air outside the room. If it is not replaced by an influx of fresh masses, there is a real threat of rarefaction in the room. This is accompanied by smoke being drawn into the home (the firebox begins to smoke). By opening the window, you can cause the room to cool down.
Therefore, when starting to build stoves in a wooden house, you should take into account all these points and take appropriate measures. It’s better to think through everything and make the heating of a wooden house truly reliable and efficient.
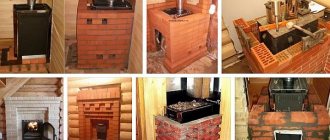
Brick stove fireplace
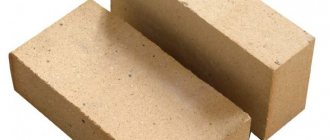
Kiln bricks are characterized by a fairly impressive weight: the mass of one element sometimes reaches up to 3.5 kg. Taking into account the fact that the fireplace consists of thousands of bricks, this requires the construction of a solid foundation, separated from the base of the walls, before installing the stove in the house on a wooden floor. This is done due to the difference in loads from wooden partitions and masonry. The advantages of brick are its solidity and excellent heat capacity. After heating, it is able to provide comfortable heat inside the room for a long time.
If the base for a fireplace stove on a wooden floor is done correctly, then fire safety problems will not arise. To do this, the masonry from the wall must be made at least 25 cm thick, filling the space between the wood and the brick with stone wool. There is also the option of pouring perlite or vermiculite into this period. Sometimes the gap is filled with asbestos cardboard or clay-impregnated felt. Construction stores offer many options for modern thermal insulation materials.
To achieve good efficiency of a brick stove in a wooden house, the following points must be taken into account:
- The dimensions of the firebox must be calculated as accurately as possible. This will allow most of the radiant energy to enter the room.
- To ensure that excess air does not escape outside the room, the cross-section of the chimney pipe must be determined correctly. This parameter directly affects the intensity of traction.
- The uniformity of heat distribution and the level of heat transfer depends on the area of the fireplace surface and where the stove is installed in the house. Heating engineers advise using structures of complex shapes that have protrusions, ribs and niches.
- To stabilize draft, prevent smoke and reduce air exhausted outside the room when installing a cast-iron stove in a wooden house, a simple but effective method is used. It consists of organizing an air channel into the fireplace grate from the basement, underground or street. This channel is equipped with a special damper or damper to stop the air supply during periods when the fireplace is not in use.
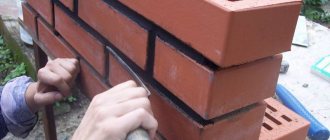
Using floor tiles
Ceramic tiles have a number of qualities that are necessary to ensure the fire safety of a fireplace, especially in a wooden house or in a brick building with wooden floors. It is known that laying tiles requires skill and experience, so weigh your options before undertaking the work. But if you decide to finish the floor in front of the fireplace yourself, then you should carry out some preparation of the surface.
Using ceramics on the floor
- To avoid differences in the horizontal plane, an analysis of the plank surface should be carried out. Detected irregularities should be processed with a plane.
- The tiles laid in front of the fireplace must have an ideal base, otherwise chips may occur in uneven areas. As such a base, you need to install a substrate made of plasterboard or plywood. The backing sheets are cut along the prepared contour and attached to the floor with self-tapping screws.
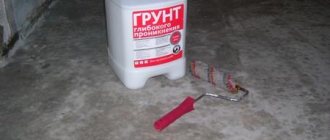
- At the next stage, the formed surface is treated with a primer. It is enough to apply it in one layer with a brush. The primer will promote better adhesion of the tiles and protect the substrate from delamination. You can continue work only when the soil is completely dry. According to preliminary estimates, this can take about a day.
- Using a spatula, apply special tile adhesive to the prepared surface. If a brick wood-burning fireplace is installed in the house, then the tiles should not only protect the floor from accidental ingress of hot particles from the firebox, but also prevent the harmful effects of high temperatures on the wood. This means that laying tiles is best done using heat-resistant adhesive. Its layer should be uniform. Despite the apparent pliability of the consistency, it will be impossible to level the tiles if they are unevenly applied.
Red tiles in the living room
The complexity of the work lies in the fact that the laid tiles under the fireplace on the floor reveal all the inaccuracies of the masonry, so you should constantly check not only the horizontal level, but also the width of the joints, which, in the absence of experience, is recommended to be increased slightly.
Good to know: How to properly insulate a fireplace, why thermal insulation is needed
Methods for increasing the efficiency of a brick fireplace
Proper determination of the dimensions of the firebox and proper execution of masonry work allows you to increase the efficiency of fireplaces with an open firebox to 35%. As a rule, this figure does not rise higher. To double the efficiency of the design, it is given some features of the oven - meaning the installation of a door. So that the opportunity to enjoy the burning flame is not lost, the door is made of heat-resistant glass.
In such cases, the fireplace insert with a door often has a “stove” configuration. As a result, a change in the nature of heat transfer is achieved, because the percentage of radiant energy drops by an order of magnitude (with an increase in the degree of heating of the massive masonry). These heat accumulations will gradually enter the home over a long period of time after the flame in the fireplace firebox has died out.
Another option for how to properly install a fireplace stove is to install a fireplace insert in the brickwork. To prevent overheating of the metal structure, its direct contact with the brick is prohibited. In such cases, when installing a stove in a house with your own hands, a small ventilation gap is left in this area. From a functional point of view, this combination can be called a closed firebox in a heat-intensive brick casing.
Tile markings (designations)
The markings (designations on the tiles) printed on the packaging will help you tell which tiles to use for lining the stoves. Depending on the type of tile, the following can be used:
- The letter “T” indicates heat resistance.
- Numbers 1 and 2 against the background of the flame indicate the number of firings. The higher the better.
- The letter “E” and the number indicate water absorption. The higher the number, the more moisture the surface can absorb. For a furnace, the figure should not exceed 3%. For comparison, the water absorption of granite is 0.5%.
- The designations “A” or “B” on the packaging or the back of clinker tiles indicate the technology of its manufacture. Option “A” is more technologically advanced and has clear dimensions.
- The PEI index in gradation from I to V will indicate the wear resistance of the tile. You can use any oven.
- The EN 122 standard, ranging from A to D, indicates the resistance of a product to chemical attack.
Tile cost
The price of facing tiles and the reputation of the manufacturer are not the last argument when choosing. Experts advise not to save on purchases, because... Constantly replacing cheap tiles will ultimately cost more. The cost of tiles by type is shown in the table.
Related article: Screwdriver bits: how to choose their types?
Based on this, it is easy to decide which tiles are needed for lining the stoves. But do not forget that the selected tile must correspond to the overall style of the interior of the room.
Steel and cast iron fireboxes
Steel and cast iron fireplace inserts with glass doors are a combination of fireplace and stove. The configuration of the firebox in this case is very similar to the classic options, due to which the maximum amount of thermal energy enters the home. The damper and transparent door provide not only visual observation of the burning flame, but also a adjusted dosage of air necessary for combustion.
Developed fins are used on the metal body, which, together with the large area, leads to a noticeable increase in the convective heat supply to the room, compared with a brick fireplace. Such design solutions make it possible to increase the efficiency level of modern fireboxes to almost 80%. These effective, inexpensive, compact and visually attractive products are lightweight.
The presence of these undeniable positive qualities explains the high popularity of steel fireplaces. Their only noticeable drawback is the rapid cooling of the heated surface. On the other hand, cold rooms are heated at a high speed, and one stack of firewood lasts for a long time.
The degree of heating of a metal combustion surface is an order of magnitude greater than that of a thick-walled brick structure. Because of this, you need to carefully plan where to place the stove in a wooden house: placing it close to the walls is strictly prohibited. The minimum possible distances to combustible wooden structures are indicated in the accompanying documentation for the operation of the firebox. In their absence, the guideline is the building codes on how to properly install a stove, which contain corresponding regulations for fireplaces.
It is prohibited to install an unlined iron stove closer than one meter from an unprotected wooden wall. Closer placement is permitted only if there are fire-resistant heat-insulating screens on the walls. This kind of protection is available for sale in many variants of substrates for stoves in a wooden house. The simplest and most inexpensive of them is 50 mm thick stone wool, gypsum fiber boards and a 20 mm air layer. As a result, the total distance between the rear and side walls of the metal firebox and the wooden surface will reach 100 mm.
Laying tiles on a wooden floor: preparing the base
Laying tiles on a wooden floor is not the best option in many ways. It's all about the completely different characteristics of two materials - ceramics and wood:
- Ceramics require a strong static base, and wood changes its dimensions within significant limits with changes in humidity and temperature. As a result, the tiles separate or crack during active movements.
- For normal operation, wood needs air, which does not pass through dense tiles and water-repellent glue. This situation causes the wood to quickly deteriorate.
You cannot lay tiles on such a floor: the floor will collapse after a while
- The service life of wood without repair is several times shorter than that of tiles. Tiles usually cost a lot. And it’s annoying to lose a good coating because you need to change the substrate.
- The weight of ceramics and mortar (glue) is several times greater than the weight of wood. If you do not pay attention to this, the mass of the new finishing coating may exceed the strength capabilities of the boards or joists. As a result, the floor will collapse. Therefore, it is advisable to minimize the load - choose tiles of light weight, and also increase, if necessary, the load-bearing capacity of the wooden floor (install logs more often or take boards of greater thickness).
So if you have a choice, try to abandon this idea. If you still decide to lay tiles on a wooden floor, be prepared for the fact that the amount of work will be large.
The first important rule: tiles should not be laid on a new wooden floor, in a new building or on a new floor. At least several years (one, or better yet two years) must pass, during which the main shrinkage occurs.
If the base is not strong enough, the boards will bend and the tiles will bounce off.
Before laying tiles on the floor, it is necessary to carry out preparatory work. Their main task is to create conditions acceptable for both wood and ceramics. There will be several stages, and as a result the foundation must meet the following requirements:
- Air access to the wood is ensured.
- The load is distributed evenly and is not excessive.
- The base is motionless.
In bathhouses, the need to lay tiles most often arises in the washing room: constant humidity creates ideal conditions for the development of rot and fungi. That’s why they try to protect wood with ceramics. In other rooms, it is better to consider other flooring options.
Insufficiently well-done waterproofing will cause boards and slings to rot from water.
Assessing the condition
First of all, in the room where you plan to lay tiles on a wooden floor, this floor needs to be disassembled: remove the boards. Next, a careful and meticulous inspection of all components of the structure is required: beams, joists, boards, insulation, water and vapor insulation. All the components of the pie.
If there are any signs of destruction, they must be eliminated. When inspecting the wood you can see the following:
- Rot. There are many types of this lesion: dry, white, soft. This is the result of the activity of wood-destroying fungi. The type of destruction varies, but in any case the tree becomes soft. The condition is checked simply: if you see any changes in color or structure, drive the tip of an awl into this place. If it goes in and out easily, the wood is destroyed. The affected areas must be removed. If a small fragment is damaged, remove it, capturing some of the healthy tissue, then treat everything with antifungal compounds. If the damage is significant, the structural elements are completely removed, adjacent and new wood is also treated with antiseptics.
- Wood-boring beetles. It is mainly the larvae that destroy the tree. They gnaw through numerous passages, significantly reducing strength. The approach to the problem is similar; if the damage is significant, the floor fragment is replaced, thoroughly treated with special compounds. And all bug exit holes are treated especially carefully.
These are the “surprises” you can see when you remove the floorboards
Many types of fungi that destroy wood can only develop in conditions of sufficiently high humidity - at least 20%. In dry rooms this occurs due to unsuccessful waterproofing. Therefore, we check the condition of the waterproofing materials along the way. If there is damage somewhere, we eliminate it and, if necessary, lay/apply another layer of insulating materials. Only with effective waterproofing will a wooden floor last a long time: fungi simply do not develop if there is insufficient humidity, even if there are spores in the wood.
Read how to fight fungi in a bath here.
Strengthening, leveling and processing
If the logs are laid in increments of more than 50 cm, additional ones must be installed, otherwise the structure will not support the weight of the new floor covering. When installing new elements, do not forget to treat them with antiseptics and fungicides.
Next, check the floor for horizontalness. This is done using a good building level. Usually there are deviations: shrinkage is usually uneven, in some places it will shrink more, in others less. All deviations are corrected: the lags are leveled. The excess is cut off with a plane, to increase the level, wedges are hammered under the joists or pieces of bricks and other materials are placed. In some cases, it is not possible to push anything down, then they stuff a board on top, removing the excess height with a plane.
The joists must be leveled
The next step is antibacterial and antifungal treatment. For a wooden floor under tiles, you need to find a composition with the longest period between two treatments. Then, according to all the rules, all wooden elements must be processed.
For baths, many people prefer to use only natural impregnations. The most reliable way is impregnation with hot drying oil. For normal protection it must be carried out several times. At least three, and preferably five. A new layer of hot drying oil is applied after the old one has dried. You can check this by touch: the surfaces should not stick.
Treatment with hot drying oil is an effective method of antifungal treatment
When processing, make sure that the drying oil does not cool down. When hot, it destroys spores, bacteria, larvae, and also becomes more fluid, penetrating deeper. So high temperature is the key to effective protection.
When heating drying oil, be careful: even vapors can flare up. Therefore, they heat the drying oil not on the tile, but above the tile, and keep a piece of tarpaulin or felt nearby to quickly cover the container that has caught fire. As soon as the smell of drying oil intensifies sharply, remove the heat source - a couple more moments and the vapor will flare up.
Preparing the boards
While the antibacterial treatment is drying/absorbing, it is necessary to treat the floor boards. If the previously used ones are in good condition, they can be installed again. But be sure to remove the varnish or paint with which they were covered before doing this.
If you have a sanding machine, removing paint is not a problem.
Removal of paintwork is possible using:
- Construction hair dryer. Set the temperature to about 200-250°C and direct the air flow to the surface. The paint swells with bubbles, you immediately pry it off with a spatula, a knife with a wide blade, or a scraper. Using a blowtorch is undesirable: the wood overheats, loses its properties and quickly collapses.
- Chemical removers. They are available in a wide variety at any hardware store or market. They are a gel-like mass. Apply to the surface with a spatula or brush. After a period of time, the paint softens and is removed with a spatula. Everything is fine, but if you need to treat a large area, a lot of washing is required, and this is not cheap.
- Clean off with a spatula or sandpaper. This is the cheapest, but also the most ineffective way. In the sense that it is ineffective because it requires a lot of time and physical effort. Paint can be removed faster if you have a sanding machine.
You should definitely not reuse boards that have been warped or damaged by pests. It's better to replace them. After cleaning off the paint, the boards are also subjected to antibacterial treatment. After drying, you can lay the subfloor under the tiles.
Sub flooring
The first step is to carry out insulation. The main requirement for insulation (except for low thermal conductivity): non-hygroscopic material. To prevent fungi and mold from developing, the floor must be dry. Secondly, it must be light: we need to make the load as small as possible. Extruded propylene foam has these qualities. Plus, bacteria and fungi do not multiply on it: there is no nutrient medium for them. The disadvantages of this material are its unnatural origin, the fact that it does not conduct air and is quite expensive.
The second material that can be used is expanded clay. It is, of course, heavier than polypropylene foam, and also more hygroscopic. But it is natural and conducts air.
The most common insulation material for bathhouse floors is expanded clay.
Having chosen the insulation, it is laid out on top of the waterproofing layer. The thickness is such that there is a distance of 5-7 mm to the boards laid on the joists. This is a ventilation gap that will provide the wood with normal conditions and allow excess moisture to be removed.
The floor will now be rough - the finishing coating will be laid on it. Treated old boards are a great option. They are laid across the joists, but not closely, as before, but leaving gaps of 3-4 mm. A ventilation gap is also left along the perimeter, along the walls: about a centimeter wide. These distances will allow the wood to expand as conditions change, and the gaps will then be closed with skirting boards.
Fasteners must be moisture-resistant: stainless or galvanized nails or self-tapping screws. At the points of attachment to the outer joists, they are driven in or screwed in two pieces; for all other points, one is enough.
The laid boards are puttyed if necessary, then smoothed using a sanding machine. Now all the cracks are sealed with polyurethane foam: it is hard enough to bear the weight of the tiles and adhesive and elastic enough so that the wood can expand and contract. After the foam has dried, it is cut off flush with the floor.
Waterproofing floors under tiles
The next step is to ensure tightness. The floor is impregnated several times with hot drying oil or covered with latex impregnation. This must be done carefully, sparing no materials: the waterproofing must be reliable. While the impregnation has not dried, roll out the painting mesh on top. The edges overlap each other by about 5-10 cm. This will be reinforcement that will reduce the effect of wood shifts on the tiles.
As an option, you can use rolled waterproofing materials. Often they put parchment paper, plastic film, or use bitumen or paraffin materials. They are also laid with an overlap, overlapping the edges by 10-15 cm and gluing them with tape.
Rough screed
Now we need to create a rigid base for the tiles - a rough screed. To do this, a metal reinforcing mesh with a pitch of 20 cm made of 3-5 mm wire is laid on top of the waterproofing layer on the prepared wooden floor. Fill with a thin layer of solution. What is the minimum layer of screed? At least 3 cm. A thinner base will crack.
Wet and semi-dry screed
You can use standard cement-sand mortar. You can add additives or add fiberglass to increase its elasticity and strength. For the washing room in the bathhouse, you can choose additives that at the same time make the concrete water-repellent.
Polymer screeds have good characteristics, but their attractive appearance is useless as a rough coating. And the high price calls into question the feasibility of their use.
When using a regular solution, you will have to wait 3-4 weeks for the screed to mature.
One of the compositions of the polymer screed - with liquid glass - can be made with your own hands. To do this take:
- two parts of liquid glass;
- two parts of washed and sifted coarse sand;
- one part water.
Everything is mixed and the floor is poured with this mixture. The result is a coating that is flexible enough to compensate for wood movement. Instead of liquid glass, you can use two-component polyurethane glue.
When laying the screed, try to make the surface as smooth as possible. According to modern building codes, tiles can only be laid on a perfectly level base. If you are making the floor in a washing room or shower room, then a slope towards the drain will be necessary. And it is formed precisely at this stage.
By adding plasticizers to the composition, the amount of water is greatly reduced. Because of this, the “setting” time of cement is reduced to several days.
Read more about how to make a concrete screed in the article “Do-it-yourself concrete floor screed”.
To make it easier to work with concrete, plasticizers are added to the solution. If the surface turns out to be not even enough, you will have to level it (remove unevenness and fill in depressions) and apply another layer of self-leveling mixture. To make the solution more homogeneous, it is advisable to treat it with a concrete vibrator.
After the screed has dried (takes several weeks), the preparation of the wooden floor for tiles is completed. You can start installation.
Dry screed for tiles
It is not necessary to use “wet” screeds in all rooms. For dry ones, you can prepare the floor for tiles using:
- moisture-resistant drywall (the most fragile of all the proposed materials, use only in extreme cases);
- GVL slabs (gypsum fiber sheets);
- CSP (cement particle boards);
- moisture resistant plywood.
But this option for preparing the floor for tiles is only suitable for dry rooms - a locker room or rest room in a bathhouse, a corridor or hallway in a wooden house. The tiles of a washing bath, in a bathroom or kitchen should be laid exclusively on a “wet” or “semi-dry” (with additives) screed.
Some people also lay gypsum fiber board, plywood, or fiber board under the tiles.
When using sheet materials, laying GVL, DSP, etc. has general rules. They need to be laid so that the joints of the sheets do not coincide with the joints of the boards or joists. This is only possible if they are placed at an angle of 30-45° to the boards. Moreover, the laying should be staggered - the sheets should be shifted one relative to the other.
The laid slab materials are secured around the perimeter and in the center with self-tapping screws. The distance between the fasteners is 25-30 cm. Then the seams are filled with compounds intended for moisture-resistant drywall. After drying, the seams are sanded. We can assume that the preparation is complete: we begin laying the tiles.
How to lay tiles on the floor in a bathhouse and sauna, read the article “Laying floor tiles in a bathhouse or sauna with your own hands.”
Options for preparing floors for tiles
Schematic representation of the “pie” for preparing the floor for tiles
As you can see, laying tiles correctly on a wood floor is not easy. It's a lot of work and it takes a lot of time. Is there any way to speed up and make the process easier? It is highly undesirable to skip any steps. There is only one option: if after disassembling part of the floor, you find that there are no “sores” or troubles. The floor is insulated, it is level and there is no need to level it. Then you can immediately begin laying the subfloor from the boards, but be sure to remove the paint or varnish. You should also not skip impregnation with protective compounds and the creation of a waterproofing layer.
You can somewhat speed up the process of laying the subfloor if you use slab materials rather than old boards (we don’t use new ones - they can still crack). Not everyone trusts them: it is unknown how the same GVL or DSP will behave under tiles, and even in a damp room. Therefore, whether to use them or not is up to you.
If you will make a subfloor for tiles from cement bonded particle boards, plywood or gypsum fiber board, they are laid staggered so that the seams overlap. A gap of several millimeters is left between the plates to compensate for the movement of the wood. They are then sealed with compounds for working with drywall. They are fastened with galvanized self-tapping screws, the caps are recessed into the material. When impregnating, creating a reinforcing belt is unnecessary - the slabs themselves are sufficiently rigid, but more attention needs to be paid to waterproofing so as not to create conditions for destruction.
conclusions
Laying tiles on a wooden floor requires serious preparation. There is a lot of work, they are diverse, they require significant funds and time. However, everything must be done correctly, otherwise the wood will rot or the tiles will bounce and crack.
Construction of a box and lining of a steel furnace
When installing the firebox inside the box, the following points must be taken into account:
- The wooden wall in the box itself must be reliably protected from heat from the fireplace as reliably as when using open installation. This involves strict adherence to the required distances and the organization of heat-reflecting screens.
- The upper and lower areas of the box are equipped with a ventilation notch to protect against overheating. It is recommended to install such gratings on two or three sides of the structure. If the instructions do not indicate their total area, it is taken at the rate of 0.15 m2 for the lower and upper notches.
- It is imperative to provide heat protection for a wooden ceiling. The simplest way is to have 350-400 mm of free space on top. This also ensures protection against shrinkage and seasonal size fluctuations. In the upper area, the box is made closed: the degree of thermal insulation of its horizontal overlap should not be inferior to that of the vertical walls.
- It happens that the design development involves the construction of a box up to the ceiling. The most reasonable solution on how to properly install a stove in a house in this case is to divide the box by height. An autonomous section with a height of 300 mm or more is left on top, separating it from the rest of the structure with a layer of thermal insulation. In addition, this autonomous section must have its own ventilation openings with a total area of 0.02 m2.
- Before installing a stove in the house with your own hands, you need to consider the possible shrinkage of the frame (the box should not rest against the ceiling). It is better to entrust the calculation of the required compensation gap to an experienced specialist. To decorate the gap that appears, a cornice attached to the ceiling is often used (it is advisable to use heat-resistant steel products, since the plastic may melt).
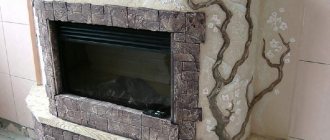
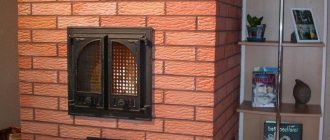
Furnace lining with ceramic tiles
How to tile a stove without it falling off? It is important to follow all measures to prepare the foundation. Only after they have been carried out can you proceed directly to the cladding. If the work is not completed, the adhesive will not set properly and the tiles will not sit straight.
On glue
Not only the tiles for the stove in a residential building must match, but also the adhesive. The stove heats up to high temperatures, and in the firebox it even reaches huge scales. Therefore, the glue must withstand all these conditions. You can buy a ready-made version or make it yourself.
One of the options for making your own: PVA glue, salt and Portland cement. But before choosing the DIY option, think carefully. It is quite difficult to select the proportions and follow all stages of the technology exactly, but the strength of the fixation depends on the glue. Perhaps it’s still better to splurge on a ready-made mixture.
Another difficult stage is cutting the material. The material is hard and durable and this part of the work does not seem easy. And cutting will definitely be required. First, practice on unnecessary material and only then proceed to facing.
The first row is the basis for all the others, so it is this that you need to pay special attention to. Therefore, no fitting by eye. Take the cord and, using a building level, pull it from above to the level of the first row.
The first row comes from the corner. First, the elements are on one side, then on the other, and only then the tiles are laid between. Check the very first tile with a level and if you need to adjust its position, use a mallet. Check the first row with a building level. And the rest should be leveled by it.
Seams are left between the tiles. To make them even, you need special plastic crosses. For ease of operation, they are purchased in larger quantities and are not recessed, but placed across them. This makes it easier to get them out. You can use whatever comes to hand, even pieces of the tile itself, but the main thing is that all elements must be the same in thickness.
The glue is applied with a notched trowel. It is applied to the tile and leveled. Press the tile firmly against the wall and insert the crosses immediately. Correcting the position of the tiles is only possible immediately, because the glue begins to set within 10 minutes. Remove excess mortar immediately. Keep a sponge or rag handy, otherwise the solution will get into the grout.
After all the tiles have been laid, you need to wait until the adhesive solution has completely dried. And then it’s time to grout. Take out all the crosses and get started. There are three ways to apply grout. It is less convenient to work with a rubber spatula. A more suitable option is a construction pistol. It's quick and easy to work with. Or you can make a homemade version from a plastic bag, add a solution there and cut off a corner.
Excess mortar that gets on the tiles must be removed immediately. Keep the sponge handy but dry. Try to avoid the seams themselves. You can choose any grout color, but make sure that it is in harmony with the overall interior and the color of the tiles.
No glue
Tiling a stove using the dry method is radically different. This option is more durable because the tiles are not glued, but installed on the frame. She doesn't care about the effects of temperatures or old plaster. In addition, the gap between the stove and the tile allows it to cool longer, which saves heat consumption. The tiles can be changed without the need to completely dismantle the coating. Simply remove the material from the profile and insert a new one.
This is convenient for those who like to change their interior frequently and saves them in the event of damage to one element.
The metal frame is the basis of the structure. First, markings are applied using a cord and level. The lower guide is installed from below. The distance from the floor is equal to the width of the baseboards. And then the top line of the end of the masonry is marked. Then the surface is lined to the width of the tile plus 2 mm. Aluminum corners and strips are attached to anchors.
A frame is obtained, and then vertical guides are attached along the marking line. Once the frame is ready, check it by running the tiles along all the guides. She should walk freely, but not too much, without stumbling, but also not ride. Then all rows are filled with tiles. After filling, the vertical corner profile and corners are attached. They are secured with self-tapping screws.
Chimney installation
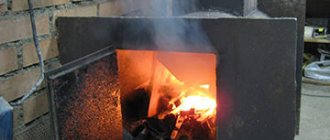
The efficiency and safety of a fireplace stove in a wooden house directly depends on the presence of a well-designed smoke exhaust system.
Rules for arranging a chimney when installing a stove in a house made of timber:
- A brick chimney in areas where it passes through combustible structures must have walls at least 250 mm thick. Direct contact with wooden and brick surfaces is prohibited: they must be separated by a layer of thermal insulation material.
- When steel chimneys are used, it is better to give preference to double sandwich structures, which include basalt wool and heat-resistant steel. The exception is the initial compartment (at a distance of 250-400 mm from the fireplace): for its manufacture it is advisable to use a single pipe. This will make it possible to protect yourself from excessive heating of the connecting point between the firebox and the chimney. The minimum distance between the double pipe and the wooden surface directly depends on the thickness of the thermal layer in the sandwich.
- When installing a stove in a country house, the arrangement of passage areas through the floors and roof involves the use of special protective adapters.
- When organizing a passage area for a chimney through roofing and interfloor slabs during the construction of a stove in a wooden house, it is necessary to take into account the degree of primary and seasonal shrinkage of wood. For these purposes, it is advisable to use movable aprons to design the passage. At the same time, the structural features of the chimney are taken into account, since the apron must be able to move along the pipe during changes in the size of building structures.
Above, only the main features of installing a stove in a country house were discussed. In addition to them, there are a number of secondary factors. Any devices and structures that use an open flame require special attention and strict compliance with all fire safety standards. It is advisable that all design and installation work on the installation of fireplaces and stoves be carried out by professionals who have the necessary experience and knowledge.