Using tiles
The tiles on the stove in the bathhouse are afraid of thermal expansion, therefore, when performing work, it is important to carefully follow the technological process. The lining of the stove in the bathhouse does not tolerate negligence.
Kinds
Typically, 7 types of tiles are used for cladding:
- Terracotta is a tile that has not been glazed. It consists of terracotta clay and fireclay, which are mixed in a certain ratio. Such tiles have been known for several centuries. A correctly implemented technological process greatly influences the final quality of the material. This tile can be easily recognized by its characteristic red tint.
- Clinker tiles - clay is the main raw material. The material is obtained by pressing, then it is fired at a temperature of +12000C. The crystal lattice of the clay changes and the tile acquires the properties of ceramics.
- Majolica is very difficult to produce. Previously, only manual labor was used for drawing. Now there are industrial designs. The glaze on the tile is obtained by firing. Properties resemble terracotta tiles.
- Tiles are the most preferred option due to the air gap between the tiles and the oven wall. This layer works as an additional heat insulator, allowing the stove to retain heat near itself even longer.
- Porcelain tiles can also be used for lining a stove. Marble chips added during the production of porcelain stoneware give the material unique decorative properties and high strength. Due to this, porcelain tiles are rapidly gaining popularity.
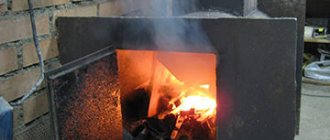
- Fireclay is able to withstand direct exposure to fire. Fireclay is pressed into blanks and fired at a temperature of +13000C.
- Tile - only a material with a high heat resistance coefficient can withstand temperature loads.
Expert opinion
Nikolay Davydov
Stove maker with 15 years of experience
Based on their properties, the most preferable option for lining a stove is tiles. It is also the most labor-intensive. The most budget option is special tiles with a high heat resistance coefficient, but with its help it will not be possible to finish the hottest areas.
Instructions
Do-it-yourself tiling of a sauna stove is done as follows:
- It is necessary to properly prepare the surface. All traces of old finishes must be removed from the wall. Each seam should be selected at 10-15 mm.
- We dilute a deep penetration primer and add marble chips to it. Carefully prime the surface. Do not forget that the primer must dry (at least 24 hours).
- We stretch and fix the metal mesh using dowels. Such reinforcement will significantly increase the strength of the structure.
- The tiles should not be laid on an uneven surface. We level the wall with plaster. We recommend using stove mortar that is specifically designed for plastering stoves. The plaster must be allowed to dry for 48 hours.
- Apply the facing adhesive evenly to the entire surface of the tile. Carefully cover the surface of the stove and press lightly. The tiles can be leveled in about 10 minutes. Then the glue will set. We check the correctness of the masonry using a level. The glue layer should not exceed 1 cm. To make the seams even, we use special crosses. The thickness of the seam is 2-3 mm.
- When the glue dries, we grout the joints.
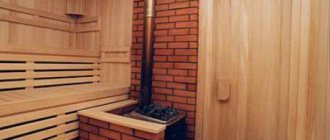
Finishing the stove with bricks
Traditionally, the stove lining is made with brick. This material is also suitable for wooden walls near the stove. It is an additional heat accumulator.
At the same time, the brick acts as a protective screen that prevents burns and has a presentable appearance. You can also line a metal stove with bricks.
Kinds
The following types of bricks are used for cladding the stove:
- ordinary ceramic brick (solid);
- refractory fireclay brick.
It is not recommended to use silicate and hollow bricks. It will not hold heat well and will collapse. Fireclay brick is preferable to use, but it is more expensive.
Instructions
- The laying is done using a mortar specially designed for ovens. It will ensure optimal structural strength.
- The foundation design must be designed to withstand such a load. Otherwise, you will have to make a separate foundation.
- The masonry is done in half a brick. The brick is placed on the bed. We start laying from the corner, bandaging 1/3.
- For heat exchange, ventilation holes must be provided in the masonry.
- Between the rows we reinforce the masonry with mesh.
- After completing the masonry, we perform jointing.
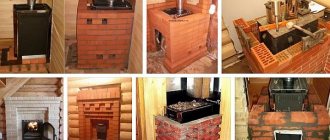
Examples of brick lining a stove in a bathhouse in the photo:
Photo 1
Photo 2
Photo 3
Photo 4
Photo 5
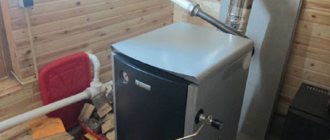
Metal sauna stove
This is the simplest and most traditional option for building a stove in a bathhouse.
The design has a number of advantages that make it popular:
- ease of installation;
- ease of use;
- heating in a short period of time;
- good traction;
- high efficiency;
- a budget option;
- economy in fuel consumption.
In order for the design to work properly, it is first prepared for operation and the initial characteristics are improved. We are talking about covering the frame with natural stone or brick. Considering the high cost of these materials, not everyone can afford to build a stove from them. And for cladding you will need much less of the same brick, so this option is quite acceptable for those who want to save money.
You can’t do without lining an iron stove in a bathhouse for several reasons:
- the metal quickly heats up, so being in the room becomes unbearable;
- rapid heating is replaced by rapid cooling. To maintain a certain temperature, you will have to constantly add firewood;
- the cladding will help optimize the heating process and maintain a comfortable temperature in the bathhouse, air humidity will be maintained at an optimal level;
- finishing materials will provide protection against burns that may occur if you accidentally touch the hot surface of a metal stove.
Stone
Decorative stone will fit well into a modern interior. Finishing the stove in the bathhouse with decorative stone will give it a finished look and will serve as an additional heat accumulator.
Kinds
The stone for cladding a sauna stove can be natural or artificial. Both types can be used when lining a sauna stove with stone.
- Natural stone - serpentinite, jadeite - has been used since ancient times when deciding how to decorate a stove in a bathhouse. It is very durable and holds the temperature well in the steam room.
- Artificial stone is, in fact, the same tile that repeats the pattern of natural stone in a steam room. The main advantage of this material is its low weight, which allows you to line the stove without an additional foundation. Artificial stone is cheaper. Therefore, it is becoming increasingly popular in the steam room.
Instructions
Finishing a sauna stove with stone is done in the same way as tiling. The glue should be applied evenly to the surface of the stone and to the wall. The thickness of the layer is 1-2 cm. If, as a result of cladding, a certain pattern should be obtained, you first need to make markings, number the necessary stones and only then proceed to cladding.
Examples of stove finishing with stone in the photo:
Photo 1
Photo 2
Photo 3
Photo 4
Stone sauna stove lining
The choice of finishing materials, as well as their quantity, depends on the quality performance of the stove in the bathhouse. It goes without saying that the financial side of the issue plays an important role, but the first place should be given to the performance of the structure, taking into account the fact that the structure is not temporary.
A sauna stove must have the following characteristics:
resistance to high temperatures;- high thermal conductivity;
- resistance to mechanical loads;
- strength and reliability;
- aesthetics;
- moisture resistance.
The following materials are suitable for finishing the stove: brick, tile, tiles, natural stone, wood. Each material has its own advantages and disadvantages.
Using plaster
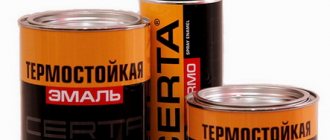
Plastering is the most budget-friendly option for finishing a stove yourself. The product takes on a finished look and looks good in the interior. After plastering, you can whitewash it with a special heat-resistant compound.
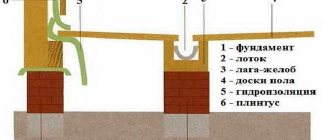
This type of finishing is quite often used for brick ovens. The technology is as follows:
- It is necessary to properly prepare the surface. All traces of old finishing, incl. plaster and tiles must be removed. Each seam should be selected at 10-15 mm.
- We dilute the deep penetration primer according to the instructions. Carefully prime the surface. Do not forget that the primer must dry (at least 24 hours).
- We stretch and fix the metal mesh using dowels. Such reinforcement will significantly increase the strength of the tile fastening.
- Apply plaster to the stove. We recommend using a ready-made mixture specifically for ovens. The plaster must be allowed to dry for 48 hours.
- Now the stove needs to be whitewashed.
Tiles
A stove with tiles is a rather labor-intensive process. Technology has simplified things a bit. But until now, the construction of such a furnace takes 4-5 months, if you use the classic version. The laying and lining of the furnace occurs simultaneously. Although, in a simplified version, you can line a finished stove.
Expert opinion
Nikolay Davydov
Stove maker with 15 years of experience
The drawing can be anything. Usually Russian folk motifs are used. The sizes of tiles are regulated by GOST 3742-47. Permissible deviations should not exceed 1 mm in all directions. Thanks to standardization, the cladding process has been significantly simplified. The most important thing is to choose the right material.
Instructions
You should be guided by the following rules:
- Material of manufacture. Impurities in colored clay will not allow the production of high-quality tiles, so it is not used. In contrast, white clay is an ideal raw material.
- The quality of a product is determined by its ability to absorb water. The more pores in a tile and the larger they are, the less quality the product will be.
- Choose tiles made by pressing.
- The surface of the product should not have a dull appearance and there should be no cracks on it. This happens when a product undergoes only one firing.
For cladding, tiles must be sorted by shade. They will need to be laid in such a way that the transition is not noticeable. The size is adjusted using a rasp and an angle grinder on all sides. Defective tiles should not be thrown away immediately. They can be used later.
The next step is to mark. The thickness of the horizontal seam should not exceed 3 mm, vertical - 1 mm. Now let's move on to installation.
Lay out the first row.
The process is very labor-intensive, but the result is worth it. The first thing to do is to properly prepare the tiles for installation. This will ensure the best result.
The installation order is as follows:
- immerse the tiles in water, waiting until the clay absorbs water;
- the clay in the tiller will increase the heat capacity, so you need to fill it halfway;
- steel brackets allow you to correctly connect the tiles to each other;
- We connect a row of tiles to a row of the stove using wire.
Scheme for fastening the tiles: 1 – lump, 2 – pin, 3 – wire, 4 – staples.
Subsequent rows.
- drill holes in the masonry;
- We use screws and wire as a connecting element;
- We fasten the steel pins using wire;
- we place the tile on the pin and bend the last one;
- the dry solution will fill all the voids between the tiles.
Sauna stove in tiles
Conclusion
The choice of one or another material for lining the stove in the bathhouse is determined by the result that needs to be obtained in the end. The most interesting option in terms of heat preservation is tiling, but it is also the most labor-intensive and expensive. If you want to veneer your stove cheaply, there is such an opportunity.
The most budget option is plastering the stove. It is best to line a metal stove with bricks. This will significantly increase the heat capacity of the oven and it will take longer to cool down.
Another great option is porcelain tiles. When deciding how to line a stove in a bathhouse, pay attention to the quality of the materials used.
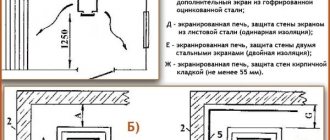
To insulate the space around the stove, it is advisable to use mineralite. This is an excellent sauna cover. They are used for lining the sauna - covering wooden walls, although these slabs can also be used to cover a house.
Using the step-by-step instructions in this article, you can not only choose the right material in the best way, but also do the lining of the stove itself and its surfaces with your own hands. This became the main purpose of this material.
Tiles for cladding
An ancient method of tiling is laying tiles. This finishing of the sauna stove portal and its surfaces gives the structure an unusual and rather original appearance. As a result of tile cladding, the stove in the room becomes a separate element of the interior.
Only a master can perform this reliable and durable finish. As a result, the stove structure has a higher degree of heat transfer compared to the use of other finishing materials.