Home / Installation, repair, maintenance / Waterproofing, vapor barrier / How to properly install a ceiling vapor barrier?
When building a house, the question of vapor barrier of the ceiling does not arise until the very last stage of construction - insulation of all surfaces. But, when it comes to this point, it turns out that not everyone adequately knows the design of a ceiling vapor barrier and the technique of laying vapor barrier materials.
Why do you need a ceiling vapor barrier?
In modern homes there is much more moisture in a vapor state than, for example, half a century ago. Its sources are the bathroom, kitchen, indoor plants, etc.
Part of the moist air escapes through the ventilation ducts (if the natural one cannot cope, you need to install forced ventilation). But even with optimal air exchange conditions in an apartment or house there will be higher humidity than outside (with the exception of a few days when the humidity outside is about 90%). But even in this situation, due to the higher partial pressure indoors (it’s simply warmer inside an apartment or house), steam molecules will break through the structural elements of the building (floor, walls, ceiling) to the outside.
As a result, the uninsulated ceiling under a cold roof will freeze. After thermal insulation, a second problem arises: the dew point shifts into the insulation, creating a new headache (what the “dew point” is and the processes occurring inside the insulation layer are described in the article “Rules for the selection and technology of installing vapor barriers for the roof”).
Attention: for those who do not want to look at the link, let us clarify a little: vapor barrier is not needed when insulating the ceiling between the floors of a residential building and between the living and attic premises - there is no critical temperature difference that causes the formation of condensation.
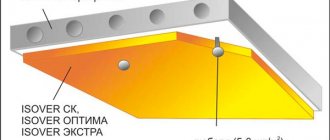
Scheme of vapor barrier from inside the room.
A vapor barrier film helps prevent the accumulation of moisture in the insulation - it puts a barrier in the path of steam molecules. It allows:
- extend the life of the ceiling, especially wood;
- eliminate the problem of accumulation of vaporous moisture in the insulation, preventing the formation of condensation in the winter;
- keep the insulation dry - any material in a dry state holds heat better.
Is vapor barrier necessary?
When it comes to finishing apartments in multi-storey buildings, there is no point in fixing insulation on top of the ceiling slabs or covering them with a layer of vapor barrier film. This is a simple overpayment, since the floor slabs in such houses are located in the area of the thermal contour of the building itself.
Such work is needed to insulate ceilings in private houses, where there are unheated rooms above living or any functional rooms - an attic, an attic.
Important! A vapor barrier layer is most important for spaces with high humidity. These are indoor swimming pools, spa areas, saunas, baths, balconies.
Types of vapor barrier films
Vapor barrier materials differ in the material from which they are made, the principle of operation and the level of vapor permeability, which must be kept in mind when choosing a vapor barrier for the ceiling.
Type of material
For the ceiling, you can use roll and coating (painting) vapor barrier.
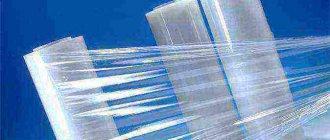
Rolled vapor barrier materials. Various types of vapor barrier films are classified as roll insulators. They can be in the form:
- films - do not allow steam to pass in both directions. This is a silent, although sometimes relative, vapor barrier. The vapor barrier film for the ceiling can be one-, two-, or three-layer, with or without reinforcing mesh;
- diffusion membranes that allow vapor to pass through from the side of higher partial pressure. Construction specialists and manufacturers sometimes say that these are membranes with one-way flow, which is fundamentally wrong. If you look at the material in cross-section (the diagram is shown below), you can see that vapor molecules can move in any direction. They cannot get to the insulation due to the higher vapor pressure in it. Therefore, the membrane can be laid on the ceiling on either side;
- foil films - used as reflective vapor barriers. Produced for baths, steam rooms and saunas. They are not used for residential premises - acquisition costs are disproportionate to the functions performed. Simply put, simple, cheap plastic wrap will work just as well.
Coating vapor barrier. Coating vapor barrier materials are represented by various types of mastics on a bitumen-polymer base. They can only be used outside and on concrete floors.
For a ceiling that is also a flat roof, in addition to mastic, liquid rubber is sometimes used.
Principle of operation
Vapor barrier film for ceilings can be of several types: A, B, C, D, F.
- A (some manufacturers mark it with the letters AM) - creates an insurmountable barrier to water molecules and allows steam to pass in both directions. Used to remove steam from the insulating layer;
- B is a typical representative of vapor barrier materials: does not allow steam to pass in both directions;
- C is a type of film B, only reinforced;
- D - laminated polypropylene;
- F - foil film.
Vapor tightness
Based on the level of vapor permeability, films are divided into classes:
- Class I - foil and foil films;
- Class II - vapor barriers made of propylene;
- Class III - soft material with a high coefficient of vapor permeability.
Sometimes, instead of a class, marking with the letters “SD” with a digital value of vapor permeability is used. For example, SD 50 means that in an hour, steam equal to 1 molecule of water will break through 50 m2 of film. For the ceiling, this indicator should be at the SD level of 30-40.
Criteria for choosing a vapor barrier for a ceiling
Before going to a construction market or hypermarket to buy building materials, the buyer always mentally determines the criteria by which he is going to choose the product he needs. With regard to vapor barrier films, the following requirements are reduced to:
- to the principle of film operation. Sometimes everything comes down to the coefficient of vapor permeability, which in principle one can agree with, although this formulation of the question is not entirely correct;
- type of material;
- strength;
- durability;
- resistance against low temperatures;
- installation features;
- cost 1 m2.
In addition, an important criterion is the film manufacturer.
Operating principle. For the ceiling you need 2 types of films:
- a one-way diffusion membrane that freely allows vapor molecules to pass through and retains water molecules. It is laid on insulation only if a vapor barrier is installed on the ceiling when the attic is cold from the outside. This means that when insulating the ceiling below and in the attic, it should not be there at all (if desired, you can install it in the attic, but this is money thrown away). Indicated on the packaging by the letter “A” or “AM”;
- classic vapor barrier film (type B or C), creating a barrier to the movement of steam in both directions.
Attention: when choosing a vapor barrier for a bath, you should buy foil film (type F) or clean foil.
Type of material. Vapor barrier for the ceiling in a wooden house should only be of the roll type. For concrete floors when insulated from below - film, from above - film or mastic. Their effectiveness is approximately the same. Here you need to look at other factors, for example, price.
Strength. For a ceiling, the strength indicator is not as important as for vapor barrier of walls or roof. It is only needed during transportation and installation. After all, cheap film materials can easily be damaged during the installation process by accidentally touching them with a tool, as a result of which the integrity of the vapor barrier sheet is lost. In addition, you need to take into account this point: durable film tolerates sudden temperature fluctuations.
For suspended ceilings you can buy films marked type B, for plasterboard sheathing and vapor barrier of external insulation - type C is better suited.
Durability. The service life of the vapor barrier should match the service life of the insulation or be longer. Information of this kind is difficult to find - only on the official websites of manufacturers, and even then not always. In this case, you need to focus on the warranty period - the higher it is, the longer the film will last. In addition, you can look at consumer reviews on various forums.
Resistance to critical temperatures. Temperature parameters are important only for the diffusion membrane (type A or AM) - they must be in the range from -70oC to +90oC. When purchasing other types of film, you can ignore this criterion.
Installation features. Recently, manufacturers have begun to indicate in the instructions the types of fastening the film to the ceiling: nails with a large head, staples, glue, lath, double-sided tape. Therefore, when buying a film, you must immediately take the appropriate fasteners.
Price. For the average Russian, price is of no small importance. We need to strive for the best ratio of cost and quality. But there are pitfalls here: the price is indicated per package, and different manufacturers have different film areas. Therefore, the cost of 1 m2 will be more objective. It is not difficult to perform such calculations on your own. The area is indicated on the packaging, the cost is in the price tag.
Features of bath vapor barrier
Ceiling vapor barrier in all wet rooms must be carried out with special care and only high-quality materials. A particularly important point is the vapor barrier in the bathhouse, since in this room a powerful stream of steam rushes to the ceiling, and if the finishing is improper, heat loss will increase. The penetration of moisture into the ceiling will contribute to the destruction of the ceilings and damage to the insulating layer.
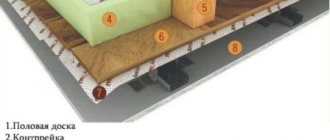
Scheme of a ceiling pie in a bathhouse
Improper vapor barrier will lead to the formation of ice under the roof of the bathhouse due to temperature changes. In cold winters, the bathhouse will freeze and the temperature inside the room will be too low.
For bathhouses, it is recommended to use reinforced or foil vapor barrier films. The joints are sealed with special tape with a foil layer. Roofing felt and glassine are not suitable for baths, because under the influence of high temperatures such materials begin to melt and release harmful substances.
Bath ceiling vapor barrier
When installing a vapor barrier layer in a bathhouse, the material is attached around the perimeter of the ceiling and lowered onto the walls by 15-20 centimeters. When choosing a material, you should pay attention to its characteristics. Certain types of materials are used for different rooms of the bathhouse. For example, in a steam room the air temperature reaches 90°C, so experts advise using the modern Penotherm material. The use of film for steam rooms is not recommended, since under the influence of high temperatures the material will quickly lose its qualities and will need to be replaced. Kraft paper is quite suitable for a locker room or rest room.
In bathhouses made of logs or timber, the floors are sheathed with boards on which aluminum foil is mounted; sometimes a cardboard layer impregnated with drying oil is used. A vapor barrier made of a mixture of clay and sawdust or clay and straw is laid on top of the first layer. Mineral wool or expanded clay is laid over the vapor barrier as insulation.
Specifics of vapor barrier for steam room
Important! The thickness of the vapor barrier cake in the bathhouse should be 150 mm. Materials must not come into contact with the stove chimney pipe. A steam room with high-quality vapor barrier must be thoroughly ventilated after each session.
The process of laying a vapor barrier on the ceiling is not particularly difficult, so you can easily handle it yourself. An important point in this regard is the correct choice of material and adherence to installation technology.
Prices for "Penotherm"
penotherm
How to cover the ceiling in a wooden house inside?
In this article you will find a description of all possible options, as well as step-by-step installation instructions! Also read about how to level a ceiling with your own hands.
Manufacturers
There is a huge selection of films from different manufacturers on sale. At the same time, high-quality vapor barriers can be found not only in time-tested brands. This means that when choosing a little-known supplier, there is a risk of receiving material that is not of the same quality as planned.
No, not a marriage, but a combination of characteristics. The conclusion is simple: either you need to have a recommendation from acquaintances, friends or professional builders regarding an unpromoted brand, or you still need to buy a product from a well-known company.
Promoted brands include:
"Izospan" - produces polypropylene films of all types (A, B, C, D, F). Products:
- elastic;
- UV resistant;
- with a wide range of operating temperatures;
- environmentally friendly.
You can buy "Izospan" DM for 44 rubles/m2, "Izospan" C - 25 rubles/m2, "Izospan" FB - 35 rubles/m2.
"URSA SECO" (). Under the URSA SECO brand, membranes of type A and AM, films B and D are produced. These are high quality products designed to protect various structural elements of a building from steam. Effectively performs its assigned functions throughout the entire service life of the insulation.
Membranes can be purchased from 110 rubles/m2, films in the range of 11-19 rubles/m2 (depending on the density of the material).
"TechnoNIKOL". For the ceiling, a universal film is used, consisting of 3 layers, the top and bottom of which are polypropylene. Price 1 m2 - about 20 rubles.
"Axton" is a trademark of the French company Leroy Merlin. Membranes (type A) and films of types B, C and D are produced. For the ceiling you need to buy membranes (price starts from 21 rubles/m2) and film type B for 15-17 rubles/m2.
In addition, the following companies should be noted:
- "Ecolife";
- Tyvek;
- "Utah";
- "Ondytis".
Sometimes they talk about such criteria as resistance to ultraviolet radiation and the possibility of leaks under the weight of rainwater. Such characteristics have nothing to do with the ceiling.
Types of materials
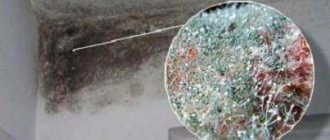
Vapor barrier and waterproofing are completely different concepts, so it is important to understand how ceiling vapor barrier works. It is a mistaken belief that the problem of excess moisture can be solved by ordinary polyethylene film.
This material reliably protects walls and ceilings from the penetration of steam and water. However, condensation will accumulate on the surface of the polyethylene, which will certainly fall on the facing material covering the plastic film. As a result, the cladding is deformed and destroyed, which affects the appearance of the room.
Modern vapor barrier materials are capable of transmitting a certain amount of moisture; as a result, walls and ceilings do not suffer from this negative effect. The ability to control the release of steam from the room gives such materials a great advantage over other analogues.
Among the large number of vapor barrier material manufacturers, it is difficult to determine which vapor barrier is best for the ceiling of a wooden house. There are several popular brands: TechnoNIKOL, Nanoizol, Izospan, Penofol, Tyvek.
Modern vapor barrier is represented by several types:
- Multilayer membrane.
- Foil material.
- Perforated reinforced polyethylene film.
- Polypropylene film.
- Liquid mastic.
You can protect wooden floors with any of the listed materials. All of them have been tested in practice and have many positive reviews. However, it is better not to use coating vapor barrier for residential premises; it is the best option for outdoor structures made of concrete and brick, as well as for industrial premises.
The vapor barrier of a wooden ceiling has some features, in particular we are talking about the following:
- It is recommended to lay insulation between floor beams, and materials in slabs or rolls can be used.
- The vapor barrier material is installed in several ways: directly in front of the thermal insulation material, after it, or on both sides. The choice is determined by the characteristics of the selected vapor barrier.
- The entire surface of the ceiling, including beams, is covered with vapor barrier material.
- The steam protection must form a continuous sheet. When using several pieces, the joints are securely glued together.
- The edges of the vapor barrier material must be pressed tightly and fixed to the walls, and not to the ceiling.
Required materials and tools
To vapor-waterproof the ceiling you need to buy:
- vapor barrier membrane type A (AM) - needed to protect the heat-insulating layer laid on top of the ceiling in a ventilated roof;
- vapor barrier film type (B);
- vapor barrier mastic for treating concrete floors outside the room (instead of film);
- double-sided tape or adhesive tape;
- polyurethane (acrylic) glue;
- fasteners: staples, nails, strips;
- construction stapler, if the film is secured with staples;
- hammer;
- roulette;
- construction knife (scissors);
- scaffolding, trestles or a strong table.
Which side to attach the vapor barrier
Laying a vapor barrier on the ceiling causes trouble for more than one craftsman. Many of them do not know which side to attach the membrane and film. We answer: there is no difference. Absolutely, unlike the walls and roof. For pedantic owners who carry out construction and repairs with their own hands, following instructions from “A” to “Z”, we clarify:
- the membrane should always be laid with the smooth side facing the insulation, the rough side facing outwards towards the attic space;
- The film is laid with the light side facing the insulating layer, and the matte side facing the outside, into the room.
To avoid making mistakes when laying a diffusion membrane, there are several tips from experienced craftsmen:
- You need to look at the pictograms - they indicate the outside.
- The outer side of the windproof film is always with a pile, the back is smooth. Determined by the touch of the palm, tactilely.
- The manufacturer's logo is always located at the top.
- The lighter side is placed next to the insulating layer.
- The roll is rolled out on the inside.
For vapor barrier films, it makes no difference how they are laid. If there is still a small pile on it, it is better to lay it with the smooth side facing the insulation, but this is only when insulating the ceiling from below. The fleecy side on top is useless - it does not work as the technologists intended.
How to install a vapor barrier on a ceiling
The correct installation of vapor barrier on the ceiling depends on:
- type of canvas;
- choosing the side for installation;
- fixing the product.
Which vapor barrier to choose for the ceiling
The type of vapor barrier for the ceiling depends on the room and how it is used. Highlight:
- economic;
- seasonal;
- with high humidity;
- residential.
For the first, they use budget material: plastic film or glassine. The first is a transparent or colored fabric, characterized by elasticity. The second is multilayer cardboard impregnated with purified bitumen. A vapor barrier in the form of a self-regulating membrane is installed on the ceilings in rooms that are used in the warm season. It changes permeability, adjusting to temperature and humidity. For rooms with high humidity and residential areas, foil material, polypropylene fabric and membrane are suitable.
Which side to put the vapor barrier on the ceiling
The direction of installation is determined by the direction of the air masses and the location of the insulation in the ceiling. Polyethylene film does not have vapor permeability and creates a sealed space, so it can be mounted on either side. Anti-condensation sheets, one side of which is smooth and the other is fabric, are deployed first towards the insulation. Thanks to this, moisture collects on the villi, evaporates and is removed through the ventilation.
Membranes with variable permeability are installed in accordance with the manufacturer's instructions. If it is installed indoors, then it is unfolded so that the moisture from the insulation escapes into the house or into the under-roof space. The foil material is unfolded with the metallized side inward to contain steam and reflect infrared radiation emitted by heating devices.
Attention! If extruded polystyrene foam and polystyrene are used as insulation, then a vapor barrier is not required. Polymers do not absorb moisture, so they act as a barrier.
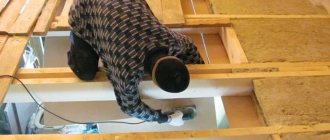
How to attach a vapor barrier to the ceiling
The vapor barrier is secured to the ceiling with a construction stapler if the installation is carried out on a wooden surface or lathing. Staples are placed every 15-20 cm. To ensure reliability, the puncture sites are taped with adhesive tape to prevent moisture from seeping through micropores. When installing simultaneously with insulation on concrete ceilings, plastic umbrellas are used that press the film.
Preparatory stage
The preparation stage includes:
- selection of membrane type;
- determining the required amount of material;
- tool preparation.
The number of membrane rolls depends on the area of the ceiling in the room. To do this, its width is multiplied by its length and divided by the area of one roll of vapor barrier. A margin of 10% is given to the final figure, because when laying the material, an overlap of 10-15 cm is made between the sheets and on the walls. From the tool you will need:
- construction knife;
- perforator;
- roulette;
- marker;
- adhesive tape;
- stapler
A hammer drill is needed when working with concrete slabs; for wooden ceilings, a stapler is used.
Advice! Some manufacturers produce vapor barriers with adhesive tape on the ends, applied from the factory. It is protected by a paper layer, which is removed during installation. In this case, construction tape will not be needed.
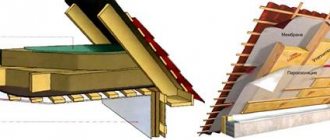
How to properly install a vapor barrier on a wooden ceiling
The type of attic determines the number of layers of vapor barrier installed on the ceiling. If it is cold, then the canvas is placed on the inside of the room. In this case, condensation will not accumulate on the mineral wool. A membrane mounted under the roofing removes moisture from the attic. When placing an attic under the roof or for storing things in the attic, two layers of film are laid so that the insulation is in a sealed bag.
Advice! For comprehensive protection of the under-roof space and insulation from condensation, a membrane is not enough. A ventilated ridge and cornices are installed, and aerators are installed to remove saturated matter.
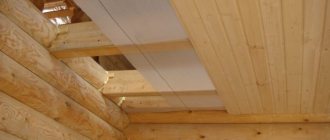
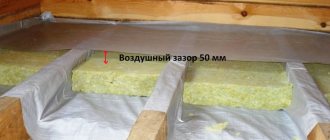
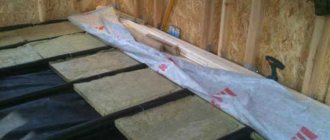
After installing the ceiling beams, a rough ceiling is filled, consisting of boards fixed from below. Due to this, cavities are formed into which mineral wool is placed. The latter is cut so that it fits between the beams with force, which is necessary to eliminate cold bridges. A vapor barrier membrane is laid on the rough layer. An overlap of 15 cm is made on three sides of the walls and taped. The film is fixed with staplers at regular intervals. The second sheet is laid with an overlap of 15 cm and the seam is sealed with tape. If the membrane needs ventilation, then a wooden beam with a cross-section of 5 cm is stuffed, which at the same time serves as a lathing for decorative finishing.
On the side of the attic, if it is to be used, a membrane is laid with a gap of 5 cm from the insulation. If the height of the beams is not enough, timber is stuffed on top to raise the film. It is laid in the same way as indoors. The next step is to install the subfloor, which is covered with parquet, laminate or linoleum. The mistakes in installing vapor barriers on a wooden ceiling are discussed in the video.
How to properly install a vapor barrier on a concrete ceiling
When laying the membrane on a concrete ceiling, a liquid vapor barrier is additionally used. The latter is:
- deep penetration composition;
- bitumen mastic;
- latex based paint.
The first penetrates the pores and crystallizes, making them impenetrable for water, but leaving a gap for air masses. The second and third options make the surface impermeable, stopping the diffusion properties of concrete. The surface of the slabs is cleaned of debris, mold and damage is eliminated with tile adhesive or sand-cement mortar. Mastic or paint is applied with a roller or brush. After drying, insulation and vapor barrier are attached.
Mineral wool slabs are temporarily fixed to the ceiling. Stretch the membrane, overlapping the walls. Through it and the insulation, a hole is drilled in the concrete floor using a hammer drill. A plastic umbrella is installed and a rod is driven in, pushing the body apart. The fungus cap should create tension in the vapor barrier. The following strips are laid in a similar way with overlapping and gluing the joints.
Advice! If during installation the membrane is damaged by a sharp object at the edge to a depth of less than 10 cm, then the cut is overlapped. If this happens in the middle of the sheet, then it is covered with two or three layers of adhesive tape.
If insulation is not carried out from the room, but from the attic, then the slab is not covered with mastic or paint. A wooden sheathing is made, to which a vapor barrier membrane is fixed with a stapler. This creates a ventilation gap between the surface and the membrane. From the attic side, wooden logs with a height of 5 cm greater than the thickness of the insulation are mounted on the ceiling. Mineral wool is laid between them. Stretch the vapor barrier and fix it to the top of the beam with a stapler. A frame for attaching lining or finishing panels is stuffed on top of the film in the room. A subfloor is laid on the attic side and covered with veneer.
Attention! Vapor barriers cannot be attached to a plastered ceiling. If you do this, the solution will peel off over time.