Preparing for replacement
To change the membrane in a gas water heater, first of all, you should shut off the water at the inlet to the water heater or in the entire apartment. After this, the gas valve closes and the hot water tap opens. You should open the tap that is located lowest in the apartment, usually it is in the bathroom. Then all the water from the system will drain and will not interfere with repairs.
To replace the membrane, we will need Phillips and flat-head screwdrivers, 24 and 19 wrenches, a new membrane or a repair kit.
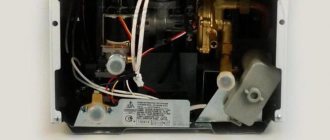
Before removing the casing, remove all the handles from the front side and disconnect the wires from the display, if present. In some speakers, the housing is additionally secured with screws that are located at the bottom and top of the speaker, under the adjustment knobs or decorative trims. The casing is also secured with simple latches.
Removing the water regulator
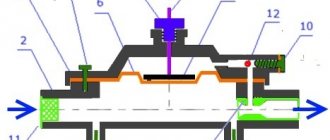
In older models of Neva and Astra water heaters, the water-gas system is located vertically. The water regulator is a separate part. On the left, water is supplied to it from the water supply system, and on the right it is discharged to the heat exchanger. There is a gas unit on top.
To remove such a device, we unscrew the two union nuts from the water pipes with a 24mm wrench and the three screws that secure it at the top to the gas part. Next, remove the regulator by pulling it down.
In modern models Neva 4513, 4511, 4510, Vector, Oasis and Electrolux, the water-gas system is located horizontally. Before disassembly, you can additionally drain the water through a special tap from below.
Here the union nuts are also unscrewed with a 19mm wrench. The ignition and ionization electrodes are disconnected and the screws securing the burner block to the rear wall are unscrewed. Next, the entire burner block is removed and the two screws connecting the water-gas unit and the manifold are unscrewed. We carefully unscrew all the screws, since they are tightly screwed and the caps often wear out. They may need to be replaced later.
Opening the water regulator
To open the water regulator of old Neva and Astra water heaters, you need to unscrew the eight screws on top with a flat-head screwdriver. If the column has been used for a long time and no maintenance has been carried out, the screws may be rusty. The upper half with the rod is removed and the membrane can be changed.
Stores sell repair kits that include the membrane itself, a plate with a rod, a brass bushing and a set of gaskets. You can also buy the membrane separately. Silicone specimens are the most reliable.
Next, you can remove the old membrane and replace it with a new one. It is important to align the bypass holes on the membrane and the regulator, otherwise the column will not work.
To remove the regulator cover in water heaters Neva 4513, 4511, 4510, Vector, Oasis and Electrolux, unscrew the four screws with a Phillips screwdriver. These speakers have a black rubber membrane. The old membrane is removed and a new one is installed. Its shape will not allow the part to be installed incorrectly, since here the bypass hole is located on the side.
How to change the membrane of a gas water heater Neva 3208
1. First, we need to dismantle the body of the water heater to gain access to the water part and more, this is easy to do. Remove the throttle control knob. Under it there are two screws that should be unscrewed using a pre-prepared screwdriver (-). The body itself can be removed quite simply, you’ll figure it out.
After removing the casing, you have free access to all components of the gas water heater. You will be able to visually inspect the gas water heater for mechanical defects, as well as clean it from dust and dirt. If such measures to clean the water heater and its main burner are carried out once a year, then you will reduce the frequency of calling a technician for emergency repairs of the gas water heater by half.
2. Below in the photo the arrow indicates the water part. The geyser membrane is installed inside this mechanism, so in order to change it we need to dismantle and disassemble it.
3. Using an adjustable wrench, unscrew and disconnect the tubes from the water part. When unscrewing, water may flow out, do not be alarmed, these are residues. Prepare and set out some dishes in advance.
4. After unscrewing the tubes, we should disconnect the water part from the gas block. Unscrew the three mounting screws and lightly hold the water assembly with your hand. If the water unit is not “stuck” to the gas block from oxide and rust, it should come out freely and remain on the palm.
5. Next we need to unscrew the tightening bolts in a circle and disconnect them.
6. Remove the old membrane and insert a new one. When installing, make sure that all holes match. We assemble the entire mechanism in reverse order and start the column. If you did everything correctly, the heating temperature of the gas water heater will increase significantly.
Aware means armed! Do you know that most of the reasons why the gas water heater does not turn on are due to the fault of the igniter. Visit our article: How to clean the igniter of a gas water heater yourself.
Assembling the device
In old Neva and Astra water heaters, we replace the top cover of the water regulator and tighten the eight screws according to the principle of one opposite the other. We determine where the entrance to the regulator is and place it next to the pipe through which water enters the column. The water unit is inserted into the gas unit and three screws are tightened, with which they are attached to each other. It is advisable to change the gaskets at the inlet and outlet. After this, tighten the union nuts with a 24mm wrench.
In new water heaters, we tighten four screws on the water regulator and screw the water-gas unit to the burner. Next, we screw the burner block to the rear wall, connect the ignition and ionization electrodes, and tighten the union nuts with a wrench.
After assembly we check. With the hot water tap open, gradually turn on the water at the inlet of the column. We make sure that there are no leaks anywhere. You can double-check by running dry wipes on the union nuts. After a few minutes, close the tap and check the same connections, but under pressure. If everything is in order, the gas valve opens and the operation of the column is checked. It is important to check the gas connections by applying a soap solution. If there are no leaks anywhere and everything works, you can attach the column casing.
Also, see the video for replacing the membrane of the Astra VPG-21 1-B11-UHL 4.2 column:
Sobmart - useful things
Gas water heater Neva 4511 There was a problem with the gas water heater Neva 4511 (4513), it stopped turning on when the water pressure was low, it simply doesn’t light up unless the tap is turned all the way.
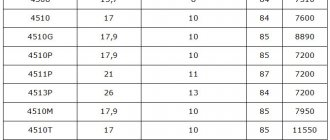
Brief technical characteristics of the water heater Neva 4511 Ignition type: Automatic Fuel type: Natural gas / Liquefied gas Combustion chamber: Open Power: 21 kW Capacity, l/min: 11 Dimensions HxWxD, mm: 565x290x221 Minimum water pressure for starting, bar: 0.15
The problem turned out to be a torn membrane (3227-02.278 diameter 76 mm) located in the water unit (3227-02.270), which ensures gas access to the main burner only in the presence of water flow, while simultaneously ensuring the operation of the solenoid valve.
The membrane can be purchased on AVITO
Replacing the membrane is quite simple, but it requires attention and order in what to remove.
Let's get started, turn off the water and begin to disassemble - remove the handles of the gas water heater, pry them off with a screwdriver and remove them tightly
HANDLE D 33 mm (light gray) NEVA 4511 (3272-00.006)
OVERLAY 66x192 WITH DISPLAY NEVA 4511 (3227-07.003, 3272-00.050)
Remove the batteries from the battery compartment:
Battery compartment NEVA 4510/4511/4513 (3227-00.008)
Unscrew the casing of the gas water heater and disconnect the display connectors
Gas water heater housing NEVA-4011, NEVA-4511 without lining 3272-03.000-02
Monitor display of geyser NEVA-4510, NEVA 4511, NEVA 5611 Article 3227-07.003 Housing of geyser NEVA-4011, NEVA-4511 without cover 3272-03.000-02
Unscrew the water supply pipes
Copper tube for geyser NEVA-4511 from the water unit to the heat exchanger
Cold water pipe for gas water heater Neva 4511
Unscrew the water assembly housing
Water unit for geyser NEVA 4011, NEVA-4510, NEVA 4511 3227-02.270
Water unit for geyser NEVA 4011, NEVA-4510, NEVA 4511 3227-02.270
We disassemble the water unit, unscrew the 6 connecting screws
Water unit for geyser NEVA 4011, NEVA-4510, NEVA 4511 3227-02.270
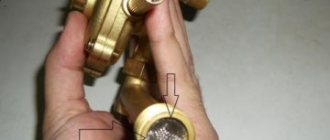
We take out the membrane of the water unit and inspect it for a rupture.
Hole in MEMBRANE NEVA 4511 (3227-02.278) d 76 mm
MEMBRANE valve NEVA 4511 (3227-02.278) d 76 mm
Comparing new and old membranes
MEMBRANE NEVA 4511 (3227-02.278) d 76 mm
We assemble the water unit and the rest in the reverse order; when putting on the membrane, I advise you to put it on the part with the water rod, and then press it.
MEMBRANE NEVA 4511 (3227-02.278) diameter 76 mm and water unit
This completes the procedure, but if suddenly you also want to clean the gas water heater, i.e. carry out maintenance, read on:
We remove the gas column, place it horizontally and begin to unscrew the combustion chamber, there are two screws on the sides
Combustion chamber of the gas water heater Neva 4511
Unscrew the draft sensor from the combustion chamber
Draft sensor 90°C for gas water heater NEVA-4011, NEVA 4511, NEVA 4513 (3222-15.000)
Unscrew and remove the burner, it is also held on by two self-tapping screws
Spark plug spark plug for gas water heater NEVA-4510M, NEVA 4511 (3227-02.130-01) Gas water heater burner Neva 4511
Afterwards we remove the heat exchanger - almost everything has been disassembled)
Geyser Neva 4511
Heat exchanger MasterGaz, Neva 4511, 6011,5111, 5611 3272-06.00
We dilute citric acid and pour it into the pipette with a pipette, and also spray the entire heat exchanger
A huge amount of scale was formed from dust in the air during combustion
Scale on the heat exchanger of the gas water heater Neva 4511
Scale on the heat exchanger of the gas water heater Neva 4511
Scale on the heat exchanger of the gas water heater Neva 4511
Let's clean the burner at the same time.
Gas water heater burner Neva 4511
Now that the cleaning is complete, we put everything back together and check for leaks and functionality.
If you require a membrane, please contact us.
You can also publish an article on your blog: