Every owner of a private home sooner or later faces a problem related to the issue of high-quality insulation of his home.
This question may arise at the design stage or when the purchased house requires some modifications to make living in it comfortable.
Why is the air temperature inside a living space not always comfortable? This is due to the following factors:
- The heating system does not function well enough;
- there are many cracks in the walls through which cold air penetrates;
- poor thermal insulation of walls (this is the most common reason).
You can insulate your home in one of several ways. Experts strongly advise insulating walls from the outside ; carrying out such work from the inside is recommended in extreme cases.
This is due to the following reasons:
- If the house is insulated from the outside, the walls will be protected not only from heat leakage, but also from the destructive effects of moisture . The heat that comes from inside the house warms the walls, and when moisture gets on them and condensation forms, it favors their rapid drying.
- By insulating the walls of the house from the outside, you will not only protect the room from the cold, but also preserve the usable area of the rooms .
On the modern building materials market there is a large selection of products designed for insulating walls and ceilings. Each of the materials offered by various manufacturers has many attractive qualities. But it often happens that the choice of product depends on one important detail - the cost of the product.
Naturally, building a house is not a cheap pleasure, and sometimes at the final stage of construction work, the homeowner’s wallet becomes much thinner. Therefore, we have to resort to various tricks in order to somehow get out of this situation with dignity. As for thermal insulation, there are many options to reduce the cost of construction, one of which is the use of alternative materials.
Materials for insulation can be:
In this article we will dwell in detail on one of the possible options for wall insulation - thermal insulation using sawdust .
If you use this method correctly, you can achieve good results. This will cost significantly less money, but you need to be prepared for the fact that you will have to do a much larger amount of work.
For this technique, carpentry workshop waste is suitable. This material has both positive and negative properties. Therefore, before making the final decision to begin measures to thermally protect walls with sawdust, you need to carefully weigh everything and study this issue to the smallest detail.
Insulating walls with sawdust: pros and cons
, wood waste from hardwood , namely ash, spruce, pine, etc., is most often
For this purpose, oak sawdust is considered the most suitable option. These raw materials are expensive, but they help preserve heat in the house even in 30 degree frost.
The best option is pine shavings - it contains resin that repels rodents and bugs.
It is best to take sawdust of the medium fraction, since small ones will produce a lot of dust, and large ones will have little effect.
After the sawdust is completely dry, it is worth adding a mixture of copper sulfate and slaked lime (10% by weight).
Insulating external walls with sawdust has its advantages:
- it is easy to work with;
- getting sawdust will not be difficult for you. There are wood processing enterprises in many localities;
- long service life;
- high efficiency;
- environmental Safety;
- low specific gravity;
- excellent noise-absorbing and heat-insulating properties;
- This product can be purchased at the sawmill for free or for a nominal fee.
Disadvantages of the material:
- The insulating layer is of considerable thickness . If the sawdust layer is small, then their effectiveness as insulation will be minimized;
- high fire hazard of the material . Wood shavings readily burn. Using sawdust as insulation for walls greatly increases the likelihood of a fire occurring and spreading;
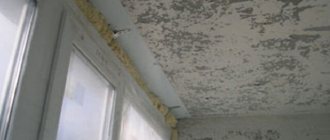
- the material is not resistant to moisture, it absorbs it well . As soon as liquid gets on the insulating layer, it is fraught with negative consequences: dampness, mold will appear, and harmful insects will appear.
Therefore, if you decide to install such a structure, you need to pay special attention to vapor and waterproofing . If these layers are made without following the technology, the insulation will quickly become unusable. To prevent sawdust from being exposed to moisture, they are treated with special reagents.
But the cost of such material becomes many times higher, and it also becomes toxic and can even cause an allergic reaction. It is not safe to use processed sawdust as a thermal insulation material in a residential frame house.
Insulation of walls with sawdust and lime
In order to make wall insulation, which includes lime and sawdust, you need to take these ingredients in a ratio of 1:10 . You need to add a little antiseptic solution (25g per 1 bucket) to the prepared mixture.
Insulation with lime and sawdust
Lime is used to protect insulation from microorganisms. The lime component is an antiseptic against mice, rats and bugs.
To prepare a mixture of wood waste and lime, a volume ratio of 1:10 is required. For 1 bucket of lime, take 10 buckets of aged sawdust. When replacing lime with lime paste, its amount is doubled.
If gypsum is added to such a solution in an amount of 0.5 parts, then mixing is carried out in portions of no more than a bucket and done directly at the installation site, in the attic. Gypsum transforms the bulk mass into a solid consistency that does not shrink. This solution sets quickly.
Stirring proceeds with the gradual addition of water. The suitability of the solution for installation is checked by squeezing it in your hand. The mixture is ready when it does not crumble and no moisture flows out of it.
There is one layer of sawdust and lime insulation, over 10 cm thick. Mechanical compaction is also required.
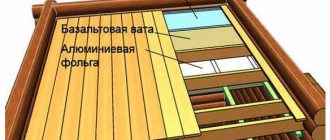
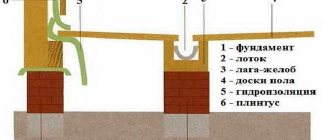
Wall pie device
One of the most important factors when building a house is the correct design of the walls. It doesn’t matter whether you carry out all the construction work yourself, or order a ready-made option, in any case, you must know the correct composition of the “pie” of a frame house.
Layers of the correct “pie” of the wall:
- Frame made of wooden beams.
- There should be insulation between the racks.
- Fiberboard (OSB).
- Horizontal sheathing.
- Insulation.
- Multifunctional membrane.
- Vertical lathing.
- Finishing.
- Vapor barrier.
- Internal lining.
If you use sawdust as wall insulation, you need to make a lathing.
First of all, you need to mount the frame. Then, at a certain distance, you need to attach wooden slats to the wall and lay the sheathing on them.
Detailed installation diagram of sawdust with clay
If you make a mixture consisting of clay and sawdust , you will get an excellent material with waterproofing and thermal insulation properties.
It is well suited for insulating the walls of a house built in any region.
This mixture will keep the house warm in severe frost and will not allow the room to warm up during the summer heat.
Insulating walls using sawdust-clay material is not as simple as it might seem at first glance.
Therefore, during the work process, you must strictly adhere to the following recommendations:
- When preparing the mixture, you must adhere to the exact quantitative ratios of the ingredients.
- The finished mixture must be applied to the walls at a certain thickness. This is the only way you can achieve maximum effect.
- For thermal insulation of walls, you need to make slabs from clay and small sawdust.
Lathing for insulation
A mixture of clay and sawdust can be made and laid in several ways; we will consider one option, that is, laying the wet substance on a sheathing pre-fixed to the wall.
What proportions must be maintained to make the mixture plastic?
Clay diluted with water should be mixed with sawdust in a shallow metal container. You can use a concrete mixer to mix the composition . The finished composition must be applied to the walls.
You can also insulate the walls with such a mixture by pouring it into the formwork attached to the frame wall . If you fix shingles on the wall, then you can spread the clay in a layer of no more than 30mm.
After the sawdust-clay layer has dried, it needs to be leveled with cement-sand mortar and only then plastered.
Manufacturing and laying of slabs
Advantages and disadvantages of clay insulation
Clay heat insulator has gained popularity for the following properties:
- Minimum cost. According to this criterion, clay has no equal insulation. You can extract and bring raw materials yourself.
- Clay does not burn and does not support combustion, that is, it does not contribute to the spread of flame, so it is allowed to be used around chimneys.
- The material is not damaged by insects, rodents, mold and rot.
- Since light fillers are added to the solution, the weight of the raw materials is significantly reduced, which makes it possible not to weigh down the floors and reduce the load on the walls.
- The environmental friendliness of the material is one of its main advantages.
- The insulation technology is quite simple, so it can be done independently.
- Clay interacts well with wooden load-bearing floor elements, so they retain their performance characteristics for a long time.
- The clay mixture can be reused by soaking it in water. This avoids waste during the construction process.
- After soaking in water, the clay becomes plastic, so it fills well all the cracks and voids in surfaces of complex configuration.
- Because clay insulation dries hard, there is no need to install walk-on boards in the attic.
Despite its many advantages, the material has practically been replaced by modern heat insulators.
This is due to its following disadvantages:
- This method cannot be called the most effective. The best option is when clay is used in combination with another, main heat insulator.
- It is important to strictly observe the proportions when preparing the solution. Otherwise, it will be crumbly and will not be able to perform its tasks.
- Despite the addition of light components, the clay mixture is very heavy, which requires the use of floors designed to withstand significant loads.
Advantages and disadvantages
Recently, the popularity of environmentally friendly construction without the use of artificial materials and without harm to the environment has been increasing. Clay is an affordable material, and sawdust is a waste-free way to use wood. Sawdust has very low thermal conductivity and can retain heat for a long time. Clay is a binder and gives sawdust the opportunity to retain its properties for a long time.
- Insulating walls with sawdust will be very cheap or even free.
- You can repair finished insulation yourself and very quickly. It is enough to mix a small amount of the mixture and troubleshoot.
- The resulting material is an excellent sound insulator on par with the most modern inventions in the construction industry.
- Walls with clay “breathe”, condensation does not form on them, and they do not require the installation of a vapor barrier layer.
Advantages and disadvantages of sawdust as insulation
Despite the frequent skepticism towards the use of sawdust, they have several undoubted advantages over other insulation materials. And some of their shortcomings are eliminated by using them in combination with additional substances.
Pros:
- Low thermal conductivity. Wood itself is a reliable heat insulator, and the dense layer of sawdust also contains air, which improves resistance to heat transfer. According to this indicator, pure sawdust is only 2 to 3 times inferior to materials such as polystyrene foam and mineral wool. But by increasing the thickness of the thermal insulation layer, a comparable result can be achieved.
- Unique value. You can buy wood waste very cheaply, and some sawmills even give it away for free. So the main costs are only for delivery.
- Environmentally friendly. Natural material that does not contain or emit any harmful substances.
- Vapor permeability. This is the ability of a material to absorb moisture and then evaporate it naturally. In terms of this indicator, only mineral wool insulation is comparable to sawdust. Most other materials are almost impervious to steam.
- Long service life when installed correctly. The age of some houses in which the floors are insulated with sawdust reaches 100 years or more.
Minuses:
- Fire hazard. Insulating the floor with sawdust, and especially shavings, is fraught with the danger of rapid fire when exposed to an open flame. But even clean sawdust treated with modern fire retardants no longer ignites so easily.
- Drying out. Over time, the layer of any sawdust inevitably decreases in volume. It is necessary to backfill or initially fill a layer of greater thickness.
- Tendency to rot. With prolonged high humidity and poor ventilation, they can rot or mold. Therefore, it is mandatory to treat the material itself and all structural elements of the floor with an antiseptic.
- The features of this type of insulation do not imply its use under a concrete screed. The sawdust layer of insulation is unable to withstand the weight of concrete.
- Attractive to insects and rodents. Insulating the floor with sawdust and lime almost eliminates this drawback.
- All these shortcomings ultimately lead to the fact that sawdust insulation must be monitored, occasionally checking its quality and eliminating noticed problems.
Technology
The process of insulating walls with sawdust concrete is a difficult and labor-intensive process that requires great physical strength, endurance and patience. One person can complete all the work, but with assistants the process will take much less time.
Clay is a heaving material, which means that when it freezes in a water-saturated state, it will swell and collapse greatly. It is recommended to carry out insulation of walls in the summer, then before the first cold weather the mixture will have time to dry and gain strength.
How to prepare the solution?
Clay with sawdust works well as wall insulation only if the materials are selected, prepared and applied correctly. The process of insulating a house begins with preparing a solution and selecting materials. Both components of the mixture can be obtained for free. But it is worth paying attention to their quality.
Clay
The material is available, inexpensive, and in some cases can be obtained for free. You should pay attention to the quality of the material: the presence of foreign objects in the material is not allowed.
You can use clay that you just brought, but to obtain the ideal consistency of the mixture and the durability of the insulation, you need to prepare the clay. To do this, fill it with water, mix it and leave it for the winter. During this time, the material goes through several cycles of thawing and freezing. Natural heaving forces the material to expand and contract again several times, the clay becomes homogeneous and plastic.
Clay can be “skinny” or “fat”; plasticity depends on the fat content. When using “oily” (plastic) clay, it is necessary to add a little sand to the insulation composition.
Clay for preparing the solution
Before starting work, the clay must be prepared: left for the winter in a water-saturated state.
Sawdust
Sawdust is a waste product from the wood processing industry. They can be specially purchased at a low price at any enterprise. To insulate walls, you can use different sawdust, which have their own beneficial properties:
- Oak almost does not change its size and density under the influence of moisture, almost does not rot, and is resistant to bacteria.
- Coniferous sawdust is less susceptible to mold formation than other types of wood due to its high content of essential oils.
When insulating walls, you can use a mixture of several types of sawdust.
Before starting work, sawdust must be prepared:
- First, the sawdust is removed from impurities, sifted and washed.
- After this, the sawdust is thoroughly dried.
- Dry sawdust must be impregnated with compounds that protect the wood from rot, mold and fire.
Sawdust for preparing the mixture
You can use mixed sawdust to obtain better properties of the thermal insulation material.
Preparation of the solution
To properly prepare the mixture, you need a set of tools:
First, the clay is soaked in one of the barrels. Leave it for several hours and stir occasionally until it becomes homogeneous. After this, 1–2 buckets of clay are poured into a concrete mixer and sawdust is gradually added there in a ratio of 3:2, respectively.
To achieve better thermal insulation properties, technical salt is added to the mixture, but in this case the proportion of clay and sawdust changes to 1:1.
After a short stay in the concrete mixer, the mixture is ready for use; it is poured into a second barrel or installation begins immediately.
Application
To apply insulation to the walls, you can use formwork, but this method is very labor-intensive; it is much easier to prepare slabs from insulation:
- To make slabs, you need to make several molds for them in advance. Their size will depend on the parameters of the wall. You can prepare the forms yourself by assembling them from plywood and blocks using nails and a hammer. The thickness of the insulation boards will depend on the average winter temperature and the presence of technical salt in the mixture.
- The mold is filled with the prepared solution in small portions and periodically leveled. It is advisable to minimize the number of air bubbles and thicken the mixture.
- The installation of the slabs is carried out after the material has hardened; you can use slabs that are not completely dried, it is enough that they simply hold their shape.
- The plates are installed close to each other and secured.
- The joints, chipped corners and gaps are covered with the remains of the clay mixture.
Installation of clay slabs with sawdust
For installation, wooden guides are used, slabs are placed between them and then the joints are rubbed with the remainder of the clay mixture.
This technology for home insulation ensures cleanliness in the room during installation. Raw clay is a very dirty material that is difficult to clean. It is not recommended to use it in rooms where installation work has already been completed. The slabs can be prepared in another place, keeping the room clean.
It is very important to dry insulation boards correctly. When the slabs dry quickly, a dense dry crust forms on the surface, preventing the water inside from escaping, which leads to uneven drying, damage and loss of thermal insulation properties. To dry the slabs evenly, they must be left in a room with sufficient humidity and protected from direct sunlight.
Insulation with sawdust and clay
It is best to insulate the ceiling of a bathhouse with sawdust in the following way. For work, take shavings that are treated with lime, but in no case with brownstone or copper sulfate. These materials emit harmful fumes when heated, which can lead to human poisoning.
The clay must be clean, free of debris and foreign matter. If necessary, you can pass it through a sieve.
Insulating the ceiling of a bathhouse with clay and sawdust begins with preparing a solution. To do this, mix wood-based material, clay and water. The proportions of the components are 10:5:10. The amount of water can vary between 7-14 parts; it is added until a mixture of the required consistency of clay and sawdust is obtained.
The clay solution is prepared as follows. The clay is filled with 2 parts of water. It is left until completely soaked. After this, mix it thoroughly, add water until a creamy consistency is formed. The clay should be homogeneous, without lumps. The prepared sawdust is gradually added to the mass, constantly stirring it. The result should be a thick and viscous solution.
The finished mixture is laid on the ceiling and evenly distributed between the beams. The thickness of the insulation should be 10-15 cm.
Instead of clay, you can use gypsum. But this solution dries very quickly, so you have to prepare the mixture in small portions. As a result, the complexity of the process increases.
The heat insulator takes about a day to dry. Complete hardening occurs in approximately 1-2 weeks. A vapor barrier is applied to the surface of the insulation. If necessary, make flooring. This completes the insulation of the ceiling with clay and sawdust.
Finishing
The slabs of clay with sawdust themselves have an uneven surface; it can be leveled using a special plaster mixture made from sawdust - wood concrete.
The mixture is applied after the insulation boards have completely dried. Plastering of walls occurs in 2 layers: first, rough rough plaster, then grouting without adding sawdust.
To prepare the solution you need to take small sawdust, water and clay with lime. The materials are mixed using the previously described technology and immediately applied to the walls, further increasing thermal insulation. Apply the solution with a spatula and level it as much as possible. The layer thickness is 2–3 mm.
The final layer will be the same solution, but without adding sawdust; it is carefully applied to the walls, leveled and soon hardens. After this, the room can be wallpapered or painted. The material is durable, reliable and easy to repair; the insulation will serve the owners for many years.
Hello, our dear readers.
We live in difficult times. The cost of living is growing exponentially every day, forcing you to save on literally everything, or at least try to do so. Of course, it was time for building materials. So, some are trying to find out what kind of insulation clay is.
The product is essentially a “ball” product, you don’t have to buy it in a construction store, just take it and dig, there are places for this in any village. Let’s also look for the truth, because if the “Kulibins” are right, then there is no point in buying environmentally questionable foam plastics.
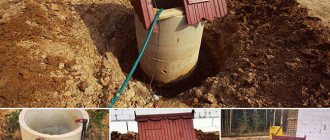
Insulation of a bathhouse ceiling with sawdust
Quite common methods include insulating the bathhouse ceiling with sawdust. This material is especially recommended for use where the bathhouse will be used by elderly people and children. It is the safest.
However, you should know that using sawdust exclusively can also be fraught - uncovered scattering of sawdust:
- fire hazard (any spark can cause a fire);
- too dirty (a draft can scatter sawdust throughout the bathhouse).
It is best to use sawdust mixed with clay or cement. The advantages of clay are described above, and sawdust combined with cement provides a reliable and strong screed on the ceiling.
Common options include a layer of sawdust covered with a layer of earth on top. This guarantees protection from possible fire, and the layering guarantees high insulating properties.
Insulation of a bathhouse ceiling with clay and sawdust
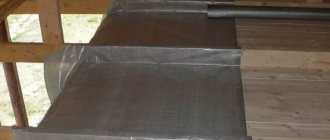
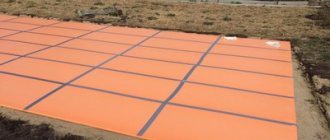
It is important to remember that the “pie” of ceiling insulation requires compliance with the established regulations:
- preparing the ceiling for filling with clay and sawdust (preparing a flat ceiling or creating formwork);
- it is advisable to divide the ceiling into sections (this will facilitate the insulation process in the future);
- mandatory use of waterproofing (you can limit yourself to covering the ceiling cracks with clay, but it is best to use rolled waterproofing materials);
- laying a mixture of clay and sawdust;
- It is possible to add an additional layer of sand after the clay has completely dried.
The most difficult part of this process: creating the mixture itself.
It is important to maintain the required proportions of the substance and choose the right consistency, as well as choose the right clay and sawdust. With clay, everything is quite simple: any clay will do, red is considered the most common. But the sawdust must be dry; fresh will not work. The ideal choice would be oak sawdust, but they are rare, so you can go with coniferous wood. The clay must be soaked with water (a metal barrel usually requires 4-5 buckets of clay). Constant stirring will not be very effective: it is best to fill the clay with water and leave it for a couple of days. After which it needs to be stirred and the remaining water drained. As soon as the consistency of the solution has become homogeneous, sawdust is added at the rate of 2/3 buckets per 1 bucket of clay.
The ready-made mixture can be used to lay the ceiling. The required layer is 8-15 cm, a thicker one is needed in areas with cold winters. But in any case, the clay insulating layer should not exceed 30 cm (and even less with an additional layer of sand). Clay is a fairly heavy material, and an excess layer can negatively affect the foundation and the structure as a whole.
The composition is applied in an even layer, application in two stages is allowed:
- laying out the initial layer (waiting for it to dry);
- laying the second layer.
Useful video
Look, one bathhouse owner shares how he made the thermal insulation; pay attention, he shows that the result is a monolith:
Insulation of a bathhouse ceiling with sawdust and cement
The "pie" principle is no different from using clay as a base. A distinctive feature is the mandatory use of roll or other waterproofing materials (putting cracks in this case will not work).
This mixture is heavier; this must be taken into account when calculating the load. The recommended thickness is the same 8-15 cm. Preparing the mixture with cement takes less time and it is possible to use a concrete mixer, which greatly facilitates this process. Sand is also added to the mixture based on the proportion: 1:2:6 (cement, sand, sawdust).
The resulting surface must be leveled.
Useful video
Watch a visual video of how the owner of a bathhouse insulates the ceiling of a bathhouse with sawdust and cement:
Pros and cons of such methods of ceiling insulation
- The advantages include that these methods guarantee the environmental cleanliness of the room.
- In addition, clay and cement are not susceptible to damage by insects and rodents .
- And the use of these materials is available to anyone, you don’t need to be a professional in this matter.
- Cement has guaranteed durability , and a clay ceiling will require periodic repair of cracks (but not too often).
The disadvantages of such insulation are:
- labor intensity (especially when using clay);
- heavy weight of the final coating;
- Difficulty performing alone (preferably having an assistant).
The experience of ancestors is rarely wrong, so insulation with sawdust in combination with clay (and in current realities, with cement) is a proven and reliable method of insulation, which will not raise the question of the possible release of harmful substances when heated.
It will sufficiently save your budget, and the saved funds can be redistributed to other tasks.
But it is worth remembering that working with clay and cement is very time-consuming: from the moment the mixture is prepared to the complete drying of the heat-insulating layer, it can take more than a month (with cement this period will be slightly shorter).
The recommendations presented in the article for ceiling insulation can be used when insulating baths made of foam blocks and timber, as well as frame and frame-panel buildings. Block baths are popular, their advantages make this solution popular, so the nuances of their insulation, foundation arrangement and finishing are discussed in detail.
A little physics
Before delving into the technological aspects of using the product, let’s look at its physical and technical characteristics. And they are not too happy. Thus, the density of hardened clay is 1600-2400 kg/m3 (slightly less than that of concrete), and the thermal conductivity is 0.7-0.9 W/m°C.
It turns out that clay as a wall insulation is, to put it mildly, useless, so why is it still used?
The fact is that this material is an excellent binder, the strength of which is not affected in any way by the sucrose found in organic fillers (it is destructive for concrete), and this, in turn, opens up the widest scope for maneuver.
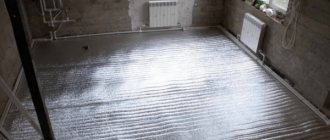
Technologies for floor insulation with sawdust
There may be several such technologies:
- The simplest way is to add dry sawdust;
- fill with a mixture of sawdust and cement diluted with water;
- cover with a mixture of sawdust with clean clay or clay and sand.
Dry method of insulation with sawdust
When filling in dry insulation, it is better to make two separate layers: add shavings or sawdust of large fractions below, and fine dust on top. Thanks to this, there will be less dust in the house, because if you use only the fine fraction, it will be difficult to get rid of the dust.
If you fill the space only with large sawdust, then it will be impossible to compact them thoroughly, and this will lead to an increase in heat loss.
When insulating the floor with sawdust in a wooden house, it is advisable to spill it with liquid lime mortar or an antiseptic, due to which the sawdust will become more resistant to rotting.
- After treating the sawdust with an antiseptic, you need to mix and dry it, and only then arrange the subfloor.
- All joists and ceilings must also be treated with an antiseptic, after which a plank subfloor should be laid and covered with waterproofing material.
- You need to pour at least 10 cm of sawdust onto the waterproofing and tamp it down.
- Sprinkle a layer of smaller sawdust of the same thickness on top, and then compact everything thoroughly again.
- Before laying the finishing coating, it is necessary to completely dry the insulation, which will take at least 3-4 days. During this time, the layer of sawdust will settle and will have to be added. You can also make a thicker layer in advance (from 14 cm), which will certainly settle over the next year, so this is perhaps the best option.
Even before installation, you need to carefully consider the system of waterproofing and ventilation of the sawdust layer. Otherwise, the thermal insulation layer of sawdust will lose its useful qualities in a short time.
Video about the dry method of insulating a floor with sawdust in a wooden house using the example of an attic:
Sawdust with cement
Necessary materials
Before you start insulating a wooden floor with sawdust, you need to prepare all the necessary materials and tools, including:
- cement-sand (1:3) mortar;
- sawdust;
- Red brick;
- roofing felt;
- vapor barrier;
- nails and hammer;
- plywood;
- boards;
- roulette;
- chalk, marker or pencil;
- jigsaw
Sequence of work
If you need to insulate the floor on the first floor with sawdust, then it is most convenient to make a double floor system.
- Dismantle the old floor, while simultaneously getting rid of rotten, bug-eaten or other defective boards.
- It is necessary to estimate the thickness of the joists on which the floor boards rested. If the joists are thick enough and suitable for subflooring, then they can be left, but if they are too thin, then they should also be dismantled.
- “Skull” bars, measuring 30x40 mm or slightly smaller, need to be nailed to the lower side of the log on both sides, since they will only have to support a small weight of the insulation.
- Place, but do not fasten, sheets of chipboard or low-grade boards on the skull blocks, which will serve as the bottom for the insulation tray.
It should be noted that all wooden parts, regardless of their purpose, should be treated with an antiseptic.
- Lay waterproofing on boards or chipboard and attach it to the joists with wide-headed nails or a stapler. Polyethylene film as a waterproofing material will be the cheapest solution. When working, you must be careful not to tear the material.
- Next comes the turn of the insulation. Before making a heat-insulating mixture of sawdust and cement, you need to select slightly damp shavings that can be stored for at least a year. They should be free of traces of bacteria, fungi and mold. The ratio of components in the mixture is 20:3:2.
You can also insulate the floor with sawdust and lime. To do this, prepare the following mixture: 1 part cement, 1 part slaked lime (fluff) and 10 parts sawdust, fill all this with a 1% solution of boric acid instead of water.
- To prevent the solution from drying out, it should be prepared in small portions, and water should be added to the mixed components carefully, avoiding the appearance of unmixed lumps.
If during the preliminary preparation of sawdust they were not treated with an antiseptic, lime or copper sulfate, then they can be added at least to the cement mortar.
- Before filling the sawdust with cement, you can first make a sandy substrate, where you can lay out the insulation.
- The insulation must be laid tightly between the joists, then it must be compacted to a layer thickness of 5-10 cm, but for buildings located in a more severe climate, it can be thicker. In this case, the base should become elastic; it may crunch slightly, but not fall through.
- If a cement mixture with lime was used, it must be dried for at least two weeks.
- A film vapor barrier is laid over the insulation, which will prevent water vapor from the room from penetrating into the insulation. The cheapest option here may be polyethylene film, and in addition to it you can use polypropylene, foil laminated, or reinforced film. As a result, the insulation ends up in a hermetically sealed space, which is filled with it without voids.
- After this, the finished floor is installed or the base for the floor covering is prepared. In this case, you should leave a gap between the vapor barrier and the upper floor, necessary for ventilation. If the log height is not enough for this, then you can use a counter-lattice.
- You need to lay another layer on the boards, which will level the floor surface. Here you can use fiberboard, chipboard or plywood, and lay linoleum or laminate on top. And if such a floor is used in the attic, then the insulation does not need to be covered.
Video about floor insulation with sawdust and cement:
Floor insulation with clay and sawdust
In this way, you cannot insulate the walls, but only the floor, since the material here needs to breathe and allow water vapor to pass through without forming condensation.
- Insulation of the floor with clay and sawdust must begin with the installation of waterproofing, for example, in the form of a fairly thick film (0.15-0.22 mm). To prevent the film from moving, it must be glued to a wooden or concrete base. It needs to be laid with a large overlap so that the liquid mixture of clay and sawdust does not seep down.
- By adding water, you need to bring the consistency of the clay solution to something like liquid sour cream; for this, 5.5-6 buckets of pure clay need to be diluted in 100 liters of water. Depending on the fraction of sawdust used, the density of the solution should be adjusted.
- It is impossible to mix it with your hands; you need a construction mixer or concrete mixer.
- The kneading is carried out gradually, diluting 1-2 buckets of clay with water in each portion and adding sawdust to the desired consistency.
- This mixture is laid out in a layer no thicker than 10 cm, and it can be pressed with a large flat object (board, board).
- After a couple of weeks, “ripening” ends, although this time depends on the initial density of the mixture and the temperature and humidity of the air.
- As the clay dries, cracks appear that need to be covered with the same mixture.
- If there is a damp room above the insulation, it should be treated with moisture-resistant mastic and only then can the finishing coating be installed.
Clay with sawdust as insulation
One of the most popular options is clay with sawdust for insulation on the ceiling. Wooden shavings, especially in their loose state, retain heat well, and you can collect them in any carpentry shop for a nominal fee.
There is only one drawback: over time, the loose mass sags, losing part of its thermal insulation properties.
But if it is mixed with gypsum or liquid clay, the “fluffy” structure will remain for a long time, which means that the use of such technology is not without meaning.
The process of insulating the ceiling with clay and sawdust
First of all, you need to carefully inspect the entire surface for laying the insulating mass in the attic. Carefully seal the cracks in the ceiling and the joints of the ceiling with the walls with polyurethane foam for external use. Some layers of foam may not get under the insulation cover and, during winter frosts, may crack and become unusable and not insulate the gaps.
Impregnate all wooden surfaces with antiseptic. Coal tar creosote works well.
Keep the base area clear of debris. For the substrate under the sawdust layer, thick cardboard from boxes or packaging of large items is used. It is nailed to the wooden parts of the base.
The composition of the insulation mixture consists of 10 parts wood and one part clay. First, the dry ingredients are mixed, and water is added gradually along with thorough mixing. The above composition of materials uses approximately 1–1.5 parts of water.
Mixing the clay solution with sawdust is done in small batches below and lifted into the attic in buckets. If insulation is carried out with an uncovered attic roof, then winches and lifting roller mechanisms can be used for supply.
Ceiling insulation is done in two layers. The first is made from larger wood waste with a thickness of 5 to 10 cm. The second should be prepared practically from dust, its thickness ranges from 8–15 cm.
Laying the second layer ensures that the first one dries completely. When setting, small cracks will certainly appear on the surface of the mass, which are sealed with the same solution.
When applying insulation, a light seal is made. To do this, you can make a primitive rammer from scrap materials with a working base area of approximately 25 by 25 cm.
Complete drying of the insulation is achieved within 3–5 weeks. Next, a floor is made on which people will walk when using the attic space.
The floor screed is made from cement-sand mortar in a ratio of 1 part cement and 3 parts sand. Further finishing of the floor depends on the wishes of the customer and the functional purpose of the attic.
If a plank floor is provided, then the installation of the joists is done before laying the insulation, and sawdust is placed in the spaces between the joists. In this case, it is necessary to protect not only the floor surface, but also the joists with cardboard.
Recipe
If you are interested in clay with sawdust as insulation, the proportions here are simple. For three buckets of clay, take two buckets of wood shavings, mix it all and fill the space between the joists with the resulting mass.
You can easily not only walk on such insulation, but also dance, but you can’t call it too effective. Of course, the proportion of wood material can always be increased, but then the insulation will lose strength, which means that some kind of floor will have to be invented on top of it.
Preparation of material
At the initial stage of ceiling insulation, sawdust is thoroughly dried , which can take several weeks or even months. Dehumidification occurs in a closed room with natural ventilation.
At this time, the substrate must be treated with antiseptics and fire retardants . These are special solutions that prevent the formation of mold and mildew, as well as reduce the natural fire activity of raw materials.
One of these time-tested folk remedies Before drying begins, it must be sprayed through a coarse spray gun on top of the bulk material.
A solution of copper sulfate or borax is poisonous , so you only need to work with it wearing rubber gloves, protecting your respiratory organs with a gauze bandage.
When drying is complete, the material must be sprinkled with lime in a ratio of 10:1 . In building materials stores you can find quite a lot of options for ready-made antiseptic impregnations and fire-resistant solutions to increase the stability of sawdust.
It is also possible to pre-treat sawdust with any paint and varnish material that does not have a sharp specific odor. The material prepared in this way can already be used to insulate the ceiling in a private house.
Other options for insulating “filling” for the ceiling using sawdust involve preparing a solution based on water and a hardener, which, after drying, takes on a solid state.
After such preparation, sawdust loses all negative qualities as a woodworking product. This alternative is more expensive , but is used in practice much more often due to its greater practicality and durability of use.
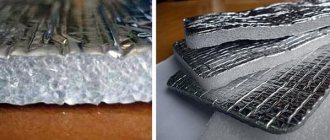
Sawdust and cement (gypsum)
For this option for ceiling insulation, cement or gypsum in a ratio of 10:1. It should be clarified that gypsum is a more expensive material than cement, which will significantly affect the insulation budget.
also necessary to take into account that it sets quickly, so it is advisable to dilute it in small portions and work with the finished solution quite quickly. In this case, the drying time for sawdust and shavings can be reduced, since water will be used during the preparation of the solution.
To simplify the preparation of the finished composition, lime and cement (gypsum) are mixed in advance in a ratio of 1:1 per 10 parts of sawdust (not dried). And copper sulfate is added to the water that will be used to knead the ingredients. This work is very labor-intensive, so it is more convenient to use a concrete mixer, which will save both effort and time.
Sawdust and clay
This method involves adding liquid clay to sawdust. The resulting mixture is better suited than others for ceiling insulation. Before “kneading the dough,” you need to soak the clay in water in advance and let it sit for several days.
Further work consists of mixing sawdust raw materials into the soaked clay; there should be about three times more sawdust. Automation of labor with a concrete mixer will speed up the labor-intensive process many times over.
Advice : insulation of the ceiling with clay and sawdust should be carried out only in the summer, since the hardening of the insulating filling requires a moderately warm temperature for better setting.
If the ceiling is insulated in a residential building, then it is worth adding lime 10% of the amount of sawdust. When insulating a bathhouse, the clay-sawdust mixture does not require any additional chemical ingredients.
This “pillow” is ideal for thermal insulation in baths, since when the temperature rises, oxidative processes of decomposition of unstable chemical elements will not occur.
Adobe as insulation
Another interesting option for using clay is adobe. Previously, it served as the main structural material for the construction of walls, but today it is used only as insulation.
Here the filler is no longer sawdust, but straw. Again, an environmentally friendly product with excellent thermal insulation properties and, again, the purchase of which will not ruin your budget.
To acquire adobe, you only need to have a wooden mold and the desire to work. Kneading (clay and straw are kneaded with feet) is usually done right next to the clay quarry, where the resulting mass is filled into molds, and the blocks dry there.
The whole process is quite labor-intensive, but if this point doesn’t bother you, you can get a material with a thermal conductivity of 0.1 W/m°C, and this is already a pretty good indicator.
Expanded clay as insulation
But still, the best filler should be considered not sawdust or straw, but ordinary air. The developers of expanded clay were probably guided by these principles when they created their product.
Yes, if anyone didn’t know, expanded clay is foamed and fired clay. This insulation is proven and, especially in Soviet times, was used everywhere in construction. Among its disadvantages are its rather significant weight (and in private construction, every kilogram counts) and fear of water.
By the way, hydrophobia is a common disadvantage for all clay insulation, so if you plan to use them in a humid environment, you can abandon this idea right now - nothing good will come of it anyway.
Unfortunately, you won’t be able to make expanded clay at home, but its market value is not too high anyway, so if the strength of the floors allows it, take note of the material.
Well, that's practically all. We have dealt with clay as an insulation material. Tips on how to use this wonderful natural product were given. It's time to say goodbye. Goodbye and see you soon on the pages of our blog.