The installation of heated floors on a concrete subsurface can be done using:
- electrical cable;
- infrared film;
- thermomats;
- water circuit.
Installation of a concrete base for heated floors
Of all systems, the water circuit has special advantages:
Advantages of water heated floors over conventional heating
- saves thermal energy consumption - from 20% to 50%. This occurs due to the low temperature regime, heating does not exceed 50°C;
- creates increased comfort, since heat transfer is carried out from a large area, and there are no cold zones;
- Warm air is distributed throughout the entire height of the room. When using only radiator heating, cold air sinks to the floor and warm air rises to the ceiling. As a result, it becomes difficult to breathe and your feet feel cold;
- hygiene – lack of air circulation eliminates drafts and raising dust;
- the water circuit provides radiant heat that is comfortable for humans, which is best perceived by the body;
Warm floors are ideal for children's rooms - using a warm water floor, the best ventilation effect is achieved: when cold air is brought in, the temperature in the room will decrease slightly;
- the water circuit does not dry out the air in the room;
- savings on heating costs - the operation of such a system will be 40–50% cheaper than electric heating elements.
Before deciding to install a heated water floor, you should consider some negative points:
- the cost of installing such a system will initially be two to three times higher than analogues;
- you need to pay special attention to waterproofing, since the risks of leaks are high;
Total costs for underfloor heating systems - such a system requires better thermal insulation to eliminate large heat losses, especially if we are talking about a wooden house or apartment on the ground floor;
- the height of the entire cake is at least 20 cm. This should be taken into account in rooms with low ceilings;
- Not all topcoats are suitable for installation on a water circuit. This should be further clarified before purchasing.
Technology for installing water heating systems on concrete screed
It is best to install a heated floor with a water circuit on a concrete base, so owners of a private house with wooden floors often refuse this system.
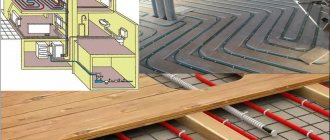
DIY water heated floor
Installation is carried out sequentially, in layers:
Screed for water heated floors
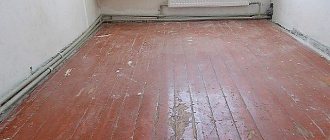
- First, you should clean the rough surface from dust and debris;
- then a layer of waterproofing is laid;
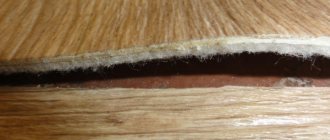
- Damper tape is glued around the perimeter of the room. It will compensate for the linear expansion of the screed under thermal influence;
- a layer is created that acts as thermal insulation;
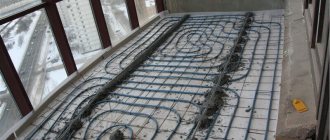
Installation of water heated floors with concrete screed - pipe laying;
- checking the water circulation in the system, which will also remove excess debris, construction dust and all air;
- laying reinforcing mesh on pipes;
- pouring concrete screed, semi-dry mixture or self-leveling compounds;
- installation of the finishing coating.
Step-by-step instruction
When the underfloor heating system is prepared and the solution is mixed, you can start pouring it with concrete. Do-it-yourself pouring takes place at temperatures of 5 °C and above, otherwise the grade of concrete will not correspond to reality, and it may begin to crumble at any time. The thermal element in the pipes must be under operating pressure. This is necessary so that the concrete does not deform the pipes, and the pipes, in turn, do not destroy the screed when heated.
Related article: Gas heat exchanger
After pouring the heated floor with the solution, it is left for 21-28 days. During this time, the concrete will gain its basic strength indicators. When the concrete solution becomes solid, a control start-up of the heating system is performed. Moreover, the temperature is increased gradually over some time until operating characteristics are achieved. If the heating system equipped with the working floor has drying, it should be turned on 10 days after pouring. The underfloor heating program increases the temperature every day by a couple of degrees, and it can also be adjusted manually.
First, you need to consider pouring a water-heated floor, since the electrical system is laid out almost according to the same scheme, but with some differences. For example, a reinforcing mesh is placed under heating electrodes. Foil roll sheets are placed under the cables that supply voltage to the heater.
When installing a heated floor, you need to choose pipes, because this is one of the most important elements in laying the floor. The operation of the entire heating system depends on the quality of the pipes. The ideal material for pipes is copper, as it has high thermal conductivity, and the material itself does not rust or age. However, copper is an expensive metal, and you will need a lot of pipes to make a warm floor. Installation of copper pipes will also require special welding.
In this regard, it is best to use metal-plastic pipes. Metal-plastic is cheap and easy to install, and also unpretentious in operation. It is ductile, meaning it can be bent, has high temperature characteristics and does not age over time. Metal-plastic does not require welding, as it is easy to install by hand.
When laying a layer of floor insulation, it is important to arrange the pipes so as to ensure uniform heating of the entire surface area, that is, it is necessary to create the same thermal conductivity in all places. When installing pipes, it is important that the pitch is observed and that the diameter of the pipe itself matches it. Calculations show that with a pitch of 300 mm, the diameter of the tube should be 20 mm. This is another advantage of metal-plastic pipes: they can withstand standard pitch.
Related article: Construction of a plastic balcony door
What to choose as waterproofing
For a concrete rough foundation, it is necessary to select a good waterproofing material so that in case of leaks it does not spoil the entire system and prevents water from penetrating to the neighbors below, if any.
Warm floor made of cross-linked polyethylene
Waterproofing materials most often used for water floors:
Layout of a cake for a heated floor with waterproofing
- rolled roofing felt;
- polyethylene film. It should be dense, at least 200 microns;
- mastic is the best waterproofing material; it is what experts recommend when installing water floors in multi-storey buildings.
Waterproofing installation technology:
- When using rolled bitumen materials, they are rolled out onto a pre-leveled surface (you can use a thin screed or primer). The material is cut right in the room, the canvases are placed overlapping (allowances 3 cm). The lower surface of the canvas is heated with a burner and glued to the base. Particular attention should be paid to the joints;
Installation diagram of waterproofing for heated floors - Polyethylene film is also cut in the room. You should make allowances for the wall along the entire perimeter (10 cm is enough). The canvases are placed overlapping (leaving 10 cm at the seams) and connected with tape. This material is not recommended for use in a wooden house with a beamed floor;
- Liquid mastic is applied with a brush or using a construction sprayer along the entire perimeter of the room. It is necessary to make a layer of 2 cm and make sure that there are no gaps. The mastic penetrates into all pores, creating an ideal waterproof contour.
Instructions for insulating a concrete floor
Next, you are invited to familiarize yourself with step-by-step guides for working with each of the materials discussed above.
We use fibrous materials
When choosing the thickness of the thermal insulation layer, you should focus primarily on the manufacturer’s recommendations given in the accompanying instructions. In practice, a 50-100 mm layer of insulation is usually sufficient. In regions with cold climates, this figure can be increased.
First step. Preliminary preparation of the base is carried out. It is necessary to seal all detected cracks (cement mortar or other suitable composition will help), traces of grease and other substances (removed with solvents or special detergents). The surface is thoroughly cleaned of debris and dust.
The concrete floor must be carefully prepared
Second step. The base is covered with a layer of waterproofing film, or even better - with a modern material that combines the properties of vapor and waterproofing, for example, isospan. When laying film sheets, a traditional 10-15 cm overlap is maintained. Subsequently, the joints are taped with metallized tape.
Laying isospan
Third step. Logs are installed. The height of these elements must correspond to the thickness of the thermal insulation layer being installed. Also choose the installation step in accordance with the size of the insulation - it should fit tightly into the openings and without gaps. To fix the lags, dowels, screws or other suitable fasteners are used.
Scheme of laying support beams concrete base
The photo shows how to install the logs
Fourth step. The insulation is placed in the space between the joists and covered with a special waterproofing membrane film with vapor-permeable properties. This material has a rough and smooth side. The rough side of the film should be laid towards the thermal insulation, the smooth side away from it. Thanks to this material, steam will be removed from the thermal insulation layer, which will eliminate the risk of the mineral wool becoming damp and will additionally ensure its protection from water.
The principle of laying insulation between joists
Multilayer laying of insulation
Vapor barrier film
Fifth step. On top of the resulting structure, perpendicular to the joists, sheet plywood or tongue and groove boards are laid. The flooring elements are attached to the joists using self-tapping screws. After this, you can arrange the selected finishing on top, completing the necessary previous measures, if required by the installation technology of a particular material.
Floor plan with plywood covering
We use foam materials
Most often, polystyrene foam/polystyrene is laid followed by pouring a concrete screed. The mentioned materials are characterized by good waterproof properties, which allows them to be used in kitchens, bathrooms and other rooms with high humidity levels.
Extruded polystyrene foam
| Index | Polyspen | Polyspen Standard | Polyspen 45 | Control method |
| Density, kg/m3 | 30-38 | 30-38 | 38,1-45 | 5.6 each |
| Bending strength, MPa, not less | 0,4 | 0,4 | 0,4 | 5.8 each |
| Water absorption in 24 hours, % by volume, no more | 0,4 | 0,4 | 0,4 | 5.9 each |
| Thermal conductivity at 25+-5 degrees Celsius, W/m * °C, no more | 0,028 | 0,028 | 0,030 | at 5.10 |
| Toxicity, Hcl 50, g/m3 | T2 moderately hazardous | T2 moderately hazardous | T2 moderately hazardous | at 5.11 |
| Flammability group | G-3 normal-flammable | G-4 highly flammable | G-4 highly flammable | at 5.12 |
| Flammability group | B-2 moderately flammable | B-3 flammable | B-3 flammable | at 5.13 |
| Smoke coefficient | High smoke generating ability | High smoke generating ability | High smoke generating ability | at 5.14 |
| Compressive strength at 10% linear deformation, MPa, not less | 0,2 | 0,2 | 0,3 | 5.7 each |
The preparatory stage is similar to the previous instructions. After completing the necessary preceding activities, the main stage of work begins, carried out in the following sequence:
- Plates of heat-insulating material are laid on the surface. If you bought polystyrene foam/polystyrene designed specifically for thermal insulation work, the elements will most likely be equipped with special grooves. Thanks to these devices, the work will be done easier and better, without the appearance of gaps;
Laying slabs on the floor - the lower part of the walls along the entire perimeter of the room is covered with a damper tape made of foam material. Thanks to this tape, thermal deformations of the screed will be compensated, which will preserve the integrity and performance properties of the structure. If there is a layer of adhesive at the bottom of the tape, fixation is performed with its help. If this is not available, the material is secured using dowel-nails;
- the insulation is covered with thick polyethylene film. The strips are traditionally laid with a 10-15 cm overlap, followed by gluing the joints with tape. The film will prevent the screed being poured from falling through between the slabs, which will prevent the formation of voids and cracks;
- a reinforcing frame made of steel or PVC is laid, the screed solution is poured, leveled over the base and left to gain strength. Traditional concrete screeds take about a month to dry. It is recommended to cover the concrete with a layer of polyethylene while it hardens, and regularly moisten the screed with water to prevent the formation of cracks. Finally, all that remains is to lay the selected finish on top of the dried screed.
The photo shows a layer of expanded polystyrene with reinforcement and pouring the solution
The considered thermal insulation system can be used in combination with a water floor heating system. In this case, the heating circuit will be laid on top of the reinforcing mesh.
We use sprayed materials
As noted, the application of sprayed thermal insulation materials requires appropriate skills, and, in the case of most insulation materials used in this category, special equipment.
The process of spraying insulation
The surface is covered with heat-insulating material, in most cases in the form of foam. As the material dries, it expands, resulting in a seamless insulating layer. To apply foam, a special apparatus is used, designed to mix carbon dioxide and polymer liquid under high pressure conditions.
Characteristics of pneumatic equipment for applying insulation
The actual work on arranging sprayed thermal insulation for a concrete floor is carried out in the following sequence.
First step. Dust and debris are removed from the surface. The floor is cleaned of all kinds of stains, traces of bitumen and other similar things - because of them, the structure of the foam will be disrupted. There is no need to pre-level the base if there are no large bulges or depressions.
Second step. Wooden logs are attached to the base. To make them, you can use a 4-centimeter board or timber. The elements are fixed in a standard way, using self-tapping screws, dowels and corners. The logs are set according to level. They will allow you to control the level of arrangement of the thermal insulation layer and facilitate the process of further installation of the finishing floor covering.
In the photo there are logs and sprayed insulation
Third step. The concrete base is moistened. This will improve the adhesion of the foam to the base.
Fourth step. Using a special installation, polyurethane foam is sprayed over the surface. The performer’s task comes down to uniformly filling the space between the previously installed logs. It is important to remember that as the foam hardens, it increases in size.
Insulation of concrete screed under the floor in an apartment
Standard sprayed thermal insulation materials take about a day to dry. After the polyurethane foam has dried, sheets of plasterboard, a wooden board or sheet plywood are laid on top of the joists, and then the selected finish is installed.
Due to good adhesion to all building materials, the foam forms a continuous layer
Important! Polyurethane foam does not tolerate direct contact with sunlight. It is strictly not recommended to leave the material uncoated for a long time.
You have become familiar with the procedure for insulating a concrete floor in accordance with the most popular and preferred methods. Of course, there are other technologies, for example, dry filling with expanded clay, but the effectiveness of such methods is in many ways inferior to those studied above. Otherwise, the choice of a specific thermal insulation option is up to you. Focus on the features of the location and operation of the building, the available budget and your personal preferences. You have already familiarized yourself with all the necessary information for the successful implementation of thermal insulation measures.
Good luck!
Screed
For warm water floors, it is not recommended to use ordinary cement mortar, since it is not strong enough and cracks may occur from constant thermal exposure.
Screed for heated floors
Types of screeds:
Composition of a water-heated floor with a concrete screed
- wet – concrete screed with the addition of special plasticizers;
- semi-dry screed - similar in content to concrete, but less water is added;
- self-leveling screed - ready-made dry compounds into which water is added immediately before pouring the screed. They evenly fill all voids, and the surface is leveled under its own weight.
Any screed must rise above the level of the pipes by at least 5 cm.
The choice of screed is determined by personal preferences and capabilities. It should be noted that you can start laying the finishing coating:
- for concrete screed – after 28 days;
- for semi-dry – 4 days;
- if dry – after 24 hours.
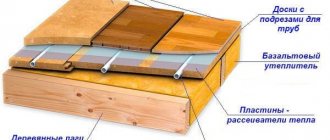
Using wooden coverings for heated floors
In a wooden house with weak floors, concrete screed is not recommended due to its heavy weight, so you can use gypsum fiber boards (GVL). They are laid in two layers, in a checkerboard pattern. This option is also suitable for rooms with low ceilings, since the thickness of the entire heated floor pie will not exceed 10–15 cm.
Preparatory stage of installation
The preparatory stage of installation proceeds according to the following scheme:
- Calculation of the volume of required materials, choice of laying scheme.
- Rough leveling of the surface, sometimes with preliminary removal of the old screed.
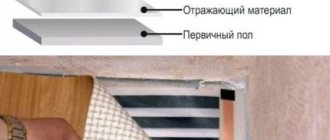
- Installation of waterproofing after the previous layer has completely dried.
- Attaching the heat reflector and gluing pipe holders to it. If a reinforcing mesh is used, the pipes can be attached to it, and the mesh itself is fixed to the floor using dowels.
- Taping the perimeter of the room with damper tape to allow expansion of the screed without cracks.
Finish coating
The installation of water floors ends with laying the finishing coating. It could be:
The process of laying parquet boards on a heated floor
- laminate;
- tile;
- linoleum;
- parquet.
The only condition for choosing is the labeling of materials - manufacturers indicate whether the coatings are suitable for heated floors. Particular attention should be paid to laminate and linoleum.
Carpet is less preferred as a finishing material due to its high thermal conductivity and fire risks. If the heating system is installed on a wooden floor, then most often they use parquet and, less often, ceramic tiles, due to their heavy weight.
What to do if the basement is freezing?
If the house has a basement, then first you should take measures to ensure the dryness of the underground space.
In order for the space under the basement to be ventilated and dry, ventilation holes are made. The ground below is strongly pressed and sprinkled with sand to a depth of 20 cm.
Instructions for insulating the room above the basement:
- We nail cranial beams to the joists along their entire length. We attach boards to them, mounting them tightly to each other;
- We put a film on the mounted roller that performs water-repellent functions;
- Then you need to insulate the structure (it is correct to use insulation with fiberglass and basalt - they allow air to pass through);
- We build the floor under the basement: we nail wooden blocks, chipboard, or unedged boards to the ceilings. We leave a small gap of 1 cm between the floor and the wall, which is sealed with a plinth.