The best choice is infrared heating under linoleum
There are several reasons to consider infrared film the best choice for installing heated floors when laying linoleum. Options such as water or electric heated floors in the form of a cable require more effort and expense for installation.
Their installation involves the installation of a cement screed, and this is a wet job, and it will take a lot of time for such a warm floor to dry. Infrared film can be installed easier, faster, and you won’t have to bother with the solution again. It is worth remembering the high fire safety of this system.
An infrared heated floor, which is correctly installed and operated in compliance with all requirements, almost never breaks.
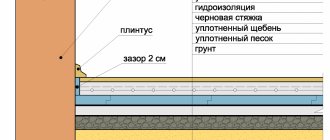
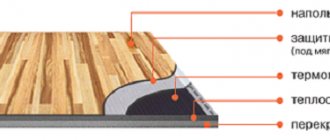
This diagram demonstrates the installation of an infrared floor under linoleum. The thickness of the system is small, so the height of the floor covering will change slightly
Ensuring proper heating is a key task when installing a heated floor in combination with linoleum, which is very sensitive to heat.
Firstly, this flooring cannot be heated too much; there are certain restrictions on the temperature during its operation.
Secondly, uneven heating can also destroy linoleum. In such areas it can deteriorate, which manifests itself in the form of deformation, color distortion, change in texture, lag from the base, etc. A damaged coating is less resistant to mechanical stress; if handled carelessly, it can easily tear or cause other damage.
In addition, excessive heating of linoleum can cause the release of substances hazardous to health, such as phenol.
Infrared film allows you to ensure both uniform heating and normal temperature conditions due to the features of this type of floor heating system. For linoleum, it is best to choose a system whose power does not exceed 150 W per square meter. m.
The necessary calculations should be entrusted to an experienced electrician.
Step-by-step guide to installing heated floors under linoleum
Step one is preparing the base. When you plan to install the floor on a concrete floor, first of all, the surface should be leveled. To do this, it is advisable to lay the screed using a cement-sand mortar, avoiding the presence of protrusions larger than 3 millimeters.
After it has completely dried, a layer of waterproofing is laid, for which regular polyethylene or modified bitumen mastics are used. Sheets of plywood or OSB are mounted on top. They are attached to the concrete base with dowels, arranged in a checkerboard pattern. If there is no need to level the base, you can lay a heated floor under linoleum without a screed.
Step two is to take measurements and draw up a diagram for installing the thermal film. At the same time, the features of the layout of the room, the location of sockets or boxes intended for wiring electrical cables are taken into account.
Before installation, be sure to pay attention to the possibilities of electrical wiring in the house or apartment. The fact is that an electric heated floor under linoleum consumes about 200 W per “square” of area. Detailed information about this can be found in the manufacturer's instructions. The load on the electrical network increases significantly and you need to be sure that the cables and protective fittings can withstand this.
When the heating power exceeds 3 kW, then it is necessary to lay a separate line. The problem may have to be solved with the help of electricians, or the wiring and protective devices must be changed, or permission must be obtained to increase the power of the electrical network.
Step three is choosing a location for the thermostat. It should be located so that the distance to the power source is minimal. The optimal place for this is near existing sockets or switches.
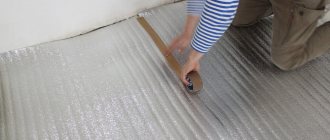
In order to improve insulation and reduce heat loss, a thermal insulator with reflective aluminum foil is placed on the base of the floor under the thermal film. Its thickness should be 5–6 millimeters. There are rolls of such foil available for sale that have the necessary performance properties. To fix the thermal insulator, use double-sided tape or a stapler plus staples. The joints of the strips are sealed with tape, thereby creating a sealed surface.
Step four - installation of thermal film. In this case, you should pay attention to the existing markings, since the bottom side must be positioned towards the heat-reflecting film. Heating should not be installed under low pieces of furniture, since air convection under them will be weak, and elevated temperatures will cause rapid wear and tear. In the places indicated in the diagram, the thermal film is cut according to size.
Step five - connection and isolation are performed. All work related to how to lay an infrared heated floor under linoleum is carried out in accordance with the requirements of the PUE and the recommendations of the manufacturer. The purchased kit contains a full set of connecting parts and special insulating materials that ensure long-term and safe operation of the heating system.
The places where the copper busbar was cut are treated with special bitumen insulation, which must adhere along the entire length of the conductive element. At the points where the wires are connected to the bus, contact clamps are placed, one side of which is located inside and the other outside the thermal film. Then the clamps need to be squeezed tightly with pliers.
Step six - the thermal film is fixed with tape. This must be done to eliminate the possibility of it shifting. Next, you should make sure that the clamps and film are installed correctly. When everything is good, proceed to connecting the power. To increase the service life, it is better to tin the bare ends. Thanks to this, contact will not only improve at the joints and prevent oxidative processes, but will also increase the safety of using heated film floors laid on a wooden floor.
The fact is that in the absence of sufficient contact, the clamps can overheat and melt the linoleum. In addition, electric shock, fire and burns to the feet are possible. Clamps with connected wires require insulation on both sides with a special bitumen film. In this case, the silver contacts of the thermal film must be insulated both above and below.
Step seven - connecting the thermostat. This work begins only after studying the manufacturer’s instructions. The heating temperature sensor is placed on the black strip on the thermal film and secured with insulating tape. There are cases when it is mounted above the floor and as a result it reacts to the temperature of the air masses inside the room.
Step eight - installation of sensors. Using a mounting knife, recesses are made under these devices and clamps in the thermal insulation, into which the protruding parts of the parts are hidden, and then the floor is level. Similar grooves are created for the wires so that they are in the right places. Tape is used to secure the top.
Step nine - attach the thermostat to the wall. First, take out the mounting panel, then make markings for the dowels. To drill holes, use a drill with pobedite surfacing. Next, you need to firmly fix the body so that it does not wobble.
When drilling holes in a brick wall, sometimes the drill gets into a seam and then the fastening strength in this place will be insufficient and the dowel will begin to wobble and fall out. To ensure a strong fixation, you need to insert toothpicks or matches into the hole around the perimeter, which will press the dowel tightly on all sides. The connection will be reliable after driving in the dowel-nail.
Step ten - connect the system to the power grid. According to the diagram, the wire is connected to the thermostat. If the heating power exceeds 2 kW, then you need to install a separate machine. After this, the installation of a heated floor under linoleum on a wooden floor is considered complete.
Required materials and tools
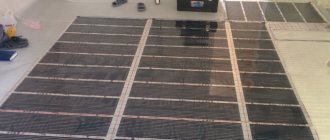
To install a heated floor, first of all, you will need infrared film. It is sold in the form of rolls, the unit of measurement is a linear meter. The required amount of film is calculated depending on the area of the room, as well as the layout of the heated floor.
In addition to the film, you will need the following materials and tools:
- special clamps for contact and insulation;
- thermostat (one for each room);
- electrical cable;
- thermal insulation material (infraflex, isolon, penotherm, etc.);
- regular and double-sided tape, etc.
When choosing a material that reflects heat (it is placed under the film), you should remember that in this case only a substrate with a soft base is allowed, and thermal insulation on aluminum foil is not suitable for infrared film.
Film installation procedure
The process of installing an infrared heated floor under linoleum is presented in detail in the following video instructions:
After the film installation scheme has been drawn up and all the necessary calculations have been made, you need to prepare the floor for further installation of the system. First, the floor must be cleaned of dirt, and then check how smooth its surface is.
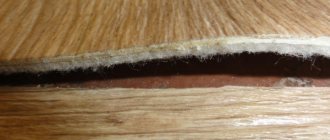
Before laying the infrared heated floor, you need to carefully level the base, eliminating even small irregularities. The height difference should not exceed 3 mm per square meter of base surface
In order for the installation of infrared film to be done efficiently, the base must be almost perfectly level. The permissible error is no more than 3 mm per square meter of base. Sometimes it is enough to eliminate a few damages and irregularities.
If the surface is severely damaged, for example, after dismantling the old floor covering, it makes sense to fill it with a new screed. In this case, you need to wait until the surface has completely dried, and only then continue installation work.
Strips of heat-insulating material are placed end-to-end and secured with special tape. For infrared heated floor systems, Izolon thermal insulation, etc. is used.
First, the prepared base is covered with a layer of heat-reflecting material. The individual parts of the heat insulator are connected using ordinary wide tape. Then you can begin laying the infrared thermal film. The material is cut into strips of suitable length in accordance with the laying pattern. Be careful not to damage the film.
Lines along which cuts can be made are marked on the surface. You cannot cut thermal film in any other places.
The infrared film should be cut into strips of the required length only along the cut lines marked on its surface with a large dotted line
The layout of the film should be carefully considered. The longer the strips are, the fewer special connectors will be needed for its installation and the cheaper the work will be.
The film strips are placed on a heat-reflecting material so that the copper strip is at the bottom.
The infrared film is laid out and fixed in accordance with a pre-designed diagram on a layer of thermal insulation, laid with the reflective layer up
It is important to ensure maximum adherence of the film to the base of the heat-insulating material so that there are no air bubbles left between them, which lead to poor contact.
Individual strips of infrared film should be placed very close together to ensure even heating of the floor.
When laying infrared heated floors under linoleum, the attachment points of all clamps should be reliably protected with a special insulating coating
After the film is laid out, a contact clamp is attached to its conductive copper strip, which is fixed using ordinary pliers or pliers. When cutting the film into strips, the copper bars were also cut.
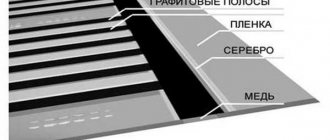
The places of such cuts, as well as the places where the silver connectors are attached, which ensure contact of the copper busbar with the graphite heater, must be insulated.
For this purpose, a bitumen insulator is usually used.
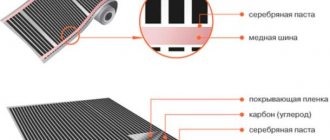
The conductive strips are connected to the wire using a special terminal (1), which must be riveted with a special tool (2). The attachment point is completely isolated (3)
In those places where the black heating strips were cut, a special die-cut is made, and then special terminals are installed on these strips. If the terminal is located in a pocket made of two layers of film, it is fixed to the current-carrying strip using a special rivet, which is then riveted.
Now the infrared film must be fixed to the base so that it does not move during further work. The film is secured with tape. After this, a thermostat is installed on the wall, in a pre-selected location (to which adult residents of the house have free access).
The thermostat for infrared heated floors should be placed on the wall. The place is chosen in such a way that adult family members have free access to it, but not children
It is best to hide the connecting wires under the baseboard on the floor. On the wall, the wire is placed in a prepared groove or hidden with a decorative plastic box.
The ends of the wires are stripped and fixed in contact clamps. All connections between the cable and the infrared film are also carefully insulated.
It is recommended to check the reliability of the fastening first.
It is recommended to install and connect the thermostat after carefully studying the manufacturer's instructions, strictly following all the recommendations given.
After this, the temperature sensor is installed and connected. It should be placed under the infrared film near the wall on which the thermostat is installed. The sensor must not touch the heating element.
Then the temperature sensor is connected to the thermostat, and power is supplied to the latter. It is best to have this step performed by a qualified electrician.
Preparing the base
This is a general point and the quality requirements will be similar regardless of the floor covering. There are only two requirements - thermal insulation and smoothness.
For high-quality thermal insulation, a material is needed that, with low thermal conductivity, has high elasticity.
Of the entire range of materials offered, the ones best suited for our purpose are:
- Cork backing;
- Cross-linked polyethylene foam;
- Extruded polystyrene foam.
The difference between them is that the cork backing is laid on a plastic film to avoid exposure to residual moisture from the screed. In terms of thickness, it is best to use 4 mm material.
But the substrate must be laid only on a perfectly flat and smooth surface. The concrete base should be leveled with a quick-drying self-leveling screed. It gains strength throughout its entire thickness within 1-2 days. And what’s especially nice is that you can do without beacons. The mixture prepared according to the instructions will level itself to the horizon level. After the screed has matured, it is coated with a primer.
See also: Heated floor thermostat
Wood floors require a different approach. Moisture-resistant plywood, 18-20 mm thick, is best suited for leveling them. Before work, the sheets should be sanded from the bottom side. The sheets are laid end to end and screwed with self-tapping screws. There is an allowance of 1 cm between the wall and the covering. The frequency of fastening along the edge is 15-20 cm, and in the center 30-40 cm. The heads of the screws should be slightly recessed. After fixing the plywood, they go along the seams with a sander. This will allow you to even out minor elevation differences. The best test of reliability is your own feelings. Walk on the floor, jump in different places. If there is no creaking or vibration, then the base is ready for thermal insulation.
Lay a substrate on the prepared base. It can be fixed with double-sided tape. In this case, the adhesive tape must be pasted in such a way that the edges of adjacent sections of the substrate fall on one strip.
IMPORTANT: the direction of laying the substrate must be perpendicular to the strips of the heating film.
Pay special attention to the joints between adjacent strips of insulation. OVERLAPPING IS NOT ACCEPTABLE!
On top, sections of heat insulation are taped along the seam.
Checking the operation of the heated floor
You can now test your infrared floor system. To do this, turn on the power supply and wait for heating to start. To check, you should compare the heating intensity of each individual strip; the degree of heating should be the same.
All insulation points are checked with an indicator screwdriver to make sure there is no voltage at these nodes. If problems are identified as a result of testing, they need to be eliminated: correct installation flaws, improve insulation, etc.
When the system demonstrates a sufficiently high quality of operation, it is disconnected from the power supply. Then a layer of vapor barrier polyethylene film is laid on top. You should act carefully so as not to damage the thermal film or move it.
The vapor barrier layer is also connected and fixed with tape.
Flooring installation
At this point, the installation of the underfloor heating system itself can be considered complete, and the installation of the floor covering begins. It is recommended to use fiberboard as a base for linoleum. Linoleum is laid and secured on top in accordance with technology.
After this, it is recommended to set the thermostat to approximately 28 degrees and turn on the power to check the system again.
In combination with a heated floor system, it is recommended to use high-quality linoleum that is not too thick to ensure sufficiently high heating efficiency. Before laying, the material should be laid out on a flat surface and left for a day or even longer to level it.
After the film is laid and covered with a fiberboard base, linoleum is laid on it, but it is not secured first. The heated floor is turned on so that the floor covering warms up and becomes as even as possible.
This will have a positive effect on the quality of the floor covering and on the uniformity of heating.
Linoleum in combination with a warm infrared floor system is recommended to be fixed with a special mastic, and not with double-sided tape
It is not recommended to use double-sided tape to secure linoleum with a heated floor system. Adhesive mastic allows for the most reliable and uniform adhesion of the coating to the base, which means more uniform heating.
For installation on a heated floor system, it is recommended to choose linoleum with the highest thermal conductivity. Since the heating process can lead to deformation and changes in the surface of the coating, preference should be given to a material that is resistant to thermal effects.
Most often, multilayer polyvinyl chloride linoleum, which has the above characteristics, is chosen for underfloor heating systems. The color palette of this flooring is very wide; there is almost always a suitable option.
But it should be remembered that excessive heating of any linoleum during its operation is unacceptable.
Heating system testing
To do this, set the heating indicator on the thermostat at 20 - 25 degrees and wait a few minutes. Check with your hand whether the mounted film heaters have warmed up. Then the power is turned off completely to see how the electrical connections heat up.
We recommend: Operating pressure in the heating system in a private house: what should it be, how to create it?
Their temperature should be the same as that of the film. In the case when it is much higher, this means that the contacts are unreliable. They must be checked, and the cause of excessive heating must be identified and eliminated.
Helpful tips and advice
When laying film heated floors under linoleum, a number of important nuances should be taken into account:
- The layout of the infrared film is carried out in such a way that the areas located under stationary household appliances and furniture do not warm up, since this is not advisable.
- Sometimes various communications are located under the floor covering. For example, part of a home's electrical system. In this case, it is necessary to ensure a sufficient distance between the cable and the film; it should be at least 50 mm. The cable must be additionally covered with a layer of heat-insulating material.
- If in the room where the infrared floor heating system is being installed there are other heat sources (heating radiators, stoves, fireplaces, etc.), there must be a distance of at least 200 mm between them and the infrared film
- When connecting the heating elements of individual strips of film, special contact clamps should be placed so that the tip of the wire is inside the two-layer thermal film and touches the contact strip. A grommet is inserted into the resulting hole and riveted with a hammer or stapler.
- The connection of individual strips of infrared film is carried out in parallel.
- The total power of all thermoelements that are connected to one thermostat should not exceed 3.5 kW.
- If this value is exceeded (3.5 kW), it is recommended to install separate electrical wiring for the underfloor heating system, as well as use a circuit breaker.
- If it is planned to simultaneously connect not only a warm floor, but also any household appliances to the same network, the additional load on the network should be taken into account.
- To connect the heating elements, a special magnetic starter is used.
- The contacts must not touch the strips located next to them.
- In addition to tape, you can use a construction stapler or furniture nails to fix the thermal film.
- Fastening is carried out through a transparent shell located next to the heating elements.
- A plywood or fiberboard base is fixed through the same shell using screws.
- When laying the base under the linoleum, its surface must be checked using a level to ensure it is level.
- The insulation layer creates a noticeable thickening and the floor surface becomes uneven. To compensate for this difference in thickness, part of the heat-insulating substrate is cut off, and the floor surface becomes flat again.
- When checking the operation of an infrared heated floor, it is recommended to measure the resistance of each individual strip.
- It should be remembered that thermal insulation material is laid with the reflective side up to ensure maximum reflective effect.
- The thickness of the base for linoleum should not exceed 8 mm; it is better to take plywood or chipboard with a thickness of 6 mm.
- It is recommended to lay linoleum in a room with an air temperature of +18 degrees or higher.
- The humidity in the room where linoleum is being installed should not exceed 65%, otherwise the material may deteriorate and its fastening will become less durable.
- Before laying linoleum on a heated floor, the heating system must be turned off at least 24 hours before the start of work.
It is not recommended to heat linoleum to a temperature no higher than 28 degrees. Since this is below the normal body temperature of a healthy person, when the heating system is operating, the floor will feel exactly neutral warm, this is normal.
If all or part of the linoleum feels hot, the coating may be overheating. This may indicate a breakdown and the need for immediate diagnosis of the system condition.
A few words about safety precautions
In order not to damage the elements of the heated floor system, as well as not to harm your own health, it is recommended to adhere to the following simple rules:
- Do not lay thermal film strips overlapping; installation should only be done end-to-end.
- Never neglect to check the reliability of the insulation of each connection.
- Do not install the thermostat unless the power supply is turned off.
- Do not set temperature restrictions above 30 degrees.
Additional safety precautions can be found in the manufacturer's instructions for the heated floor system. These recommendations should also be followed.
The main problem when laying an infrared floor under linoleum is the correct electrical connection. Otherwise, even a novice craftsman can install this system and flooring on his own.
Conclusions and useful video on the topic
This video demonstrates in detail and clearly the process of laying an infrared floor:
Film heated floors are an excellent choice for laying under linoleum. Installation of such systems does not seem too complicated, but it is deceptively simple.
When laying infrared film, you must strictly adhere to the work technology and strictly follow the manufacturer’s recommendations. This will allow you to avoid mistakes and install the system correctly to ensure a long service life.
Would you like to talk about how you built a floor heating system with your own hands? Would you like to share information that will be useful to site visitors? Please write comments in the block below, post photos related to the topic of the article, and ask questions.