Preparatory work
Before you begin insulating the ceiling surface on the balcony, you will need to do a large amount of preliminary work. They are performed in a certain sequence.
First of all, before you insulate the ceiling on the loggia, you should glaze it. This is one of the main preparatory activities. As for balconies, in houses built during the Soviet period they were not glazed and window frames were not installed on them. True, even today some developers commission buildings with unglazed loggias.
The fact is that without securely installed frames with glass there will be no point in thermal insulation of loggias and balconies. Many companies and firms are currently engaged in this type of activity such as glazing. The main thing is not to install cheap plastic frames, but to give preference to reliable and high-quality products, not necessarily expensive.
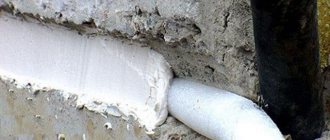
Then proceed to the next stage - arranging waterproofing. It is necessary to eliminate all cracks, gaps and cracks through which heat can leak. Cold air also penetrates through them and moisture from the street enters, which provoke the spread of fungus and mold, which are very harmful to human health.
If there are large gaps in the corners of the balcony, they can be eliminated by blowing in foam. When it dries, the excess part is cut off and the corner is covered with a cement-sand mixture or facade putty, or special sealing compounds - such as “Trowel” or “Carbolate”.
It is also possible to use bitumen-rubber or rubber sealant if the gaps, seams or cracks are small. In any case, before you insulate the ceiling on the balcony with your own hands, you must do everything to ensure that the floor slab on the inside of the room does not allow moisture from the outside to pass through. For this, you can use special building mixtures, for example, “Penetron” or “Penecrete”.
What to consider when insulating the ceiling on a balcony
Before insulating the ceiling on the loggia and balcony, you need to decide how much time you will spend on your “extra” square meters, how the room will be used, and also take into account several nuances.
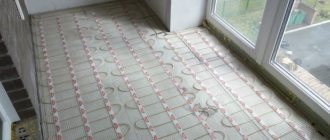
For warmth, it is very important to properly insulate the ceiling
Glazing of a balcony/loggia
High-quality plastic windows and glazing are what, together with insulation, will allow you to create a truly comfortable mini-room. You need to think about how you will insulate the ceiling space even before installing the windows. It is necessary to take into account the thickness of the insulating and decorative (putty, panels, etc.) layers, and then either install a beam of the required thickness at the level of the future double-glazed window yourself, or discuss these points with the window installer.
General insulation
If you have seriously taken up the arrangement of your loggia, it makes sense to insulate the floor, walls, and ceiling at once, so that the heat does not escape through the icy outer wall. First, the insulating coating is installed at the top, then the walls and floor.
Room humidity
Before starting work, carefully check whether the ceiling or roof is leaking anywhere (especially if you live on the top floor). Even the slightest leak can cause condensation on the ceiling, which in turn will lead to rot, mildew and mold. In this case, an additional layer of special moisture-resistant fabric is required.
Future ceiling decoration
The type of insulation and surface treatment will depend on the method of finishing the ceiling of your balcony (loggia). If you are planning to putty, it is better to choose polystyrene foam or other solid panels, and also level the ceiling so that a thick layer of the mixture does not become an unnecessary load on the insulation. If your choice is plastic panels, you can lay inexpensive mineral wool and not have to worry about perfect alignment.
Ceiling condition
Before laying the insulating layer, be sure to foam all the cracks on the balcony ceiling with foam (cut off any excess), treat the surface with an antifungal agent and clean it from dust.
Balcony ceiling insulation scheme
Balcony thermal insulation work
After completing the glazing of the loggia and eliminating the immediate sources of moisture and cold, the room will still not be warm. If you have a concrete floor and bare brick walls, insulating the ceiling on the balcony will practically not change anything. The fact is that both walls and floors require thermal insulation.
The insulation of balconies and loggias must be carried out in a certain sequence - first the floor is insulated, then the walls and finally the ceiling plane. There are several methods of floor insulation. For example, when the height of the room allows, you can lay a wooden covering on the joists, and insulate the space under it with polystyrene foam or polystyrene foam.
If the height is not enough, use the following option:
- foam or polystyrene is glued to the floor;
- lay the reinforcing mesh;
- a cement-sand screed is installed on top of it.
On a wooden floor surface or a poured cement floor, you can lay, for example, laminate or linoleum.
Walls can be insulated in various ways:
- Assemble a metal frame or wooden sheathing with internal insulation and external cladding with clapboard - plastic or wooden.
- Glue polystyrene or foam plastic, lay a reinforcing mesh on top and treat with putty and plaster compounds.
After thermal insulation of the floor and walls, work on the ceiling begins.
How to insulate a ceiling on a balcony: step-by-step installation
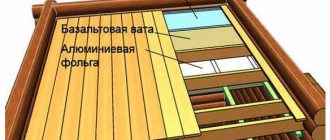
Insulating the ceiling on a balcony is not an overly complex type of work, so if you have certain skills, it can be done independently. We will insulate the ceiling of a balcony or loggia using penoplex in tandem with penofol. This method is optimal for insulating ceilings and even balcony walls.
Necessary materials:
- penoplex;
- penofol;
- wooden bars for sheathing;
- plastic dowels with wide caps;
- construction stapler and staples;
- polyurethane foam.
Required tools:
- building level;
- knife for cutting foam boards;
- perforator;
- screwdriver
Preliminary preparation
Preliminary preparation of surfaces is one of the important stages that ensures the durability of the structure. All decorative finishing (paint, decorative panels) must be removed, and the layer of fungus (if any) must be removed. The optimal degree of cleaning will be ensured by a grinding machine.
Installation
- First, we measure the width of the balcony ceiling, mark the required segment on the foam sheet and cut it using a construction knife.
- We drill holes in the ceiling and use plastic dowels to secure the foam boards to the ceiling.
This is what it should look like in the end. - Using polyurethane foam, we seal the joints between the foam sheets, as well as between the foam and the side wall of the balcony on the ceiling.
- Let's move on to installing penofol. We fasten the penofol using a construction stapler.
- Next, we move on to constructing the sheathing for subsequent fastening of the decorative material. For the lathing, you can use wooden blocks with a cross-section of 3 by 3 cm. Their task is to provide a ventilation gap between the insulation and the decorative material, through which the moisture accumulated inside will be removed.
- At this point, the insulation of the balcony ceiling can be considered complete. Next, you can proceed to the installation of decorative material.
Video instruction:
Choosing insulation for a balcony ceiling
The domestic construction market offers a wide range of materials for thermal insulation. The most popular among consumers are insulation materials such as polystyrene foam, mineral wool and expanded polystyrene (otherwise known as penoplex).
Each of the above materials is a good heat insulator in its own way. But, according to experts, the use of foam plastic or penoplex is more preferable, since they have a sufficient degree of density and are non-hygroscopic.
In addition, you can do the insulation of the ceiling on the balcony with penoplex yourself. Another advantage of using such heat insulators is that working with them is convenient and safe for health.
For example, the use of mineral wool is accompanied by the release of fibers into the air, which cause severe allergies in some people. Therefore, when working with it, it is necessary to take precautions using a respirator and safety glasses. If polystyrene foam is used for thermal insulation, these protective measures are not required.
Installation diagram of insulation without sheathing
If the ceiling on the balcony is finished with sheet foam, then there is no need to construct a lathing on the ceiling surface. After attaching the foil waterproofing and reflective layer to the base base, the installation of insulation begins. To fix it, use foam without toluene.
The slabs are pre-cut into pieces of the required size. After this, an adhesive composition is applied to their surface. The slab insulation is applied to the ceiling and pressed tightly. The adjacent product is glued closely to the previous one. When all the plates are glued, they are additionally fixed with disc dowels. The seams between the insulator sheets are filled with polyurethane foam and taped with reinforced tape.
Performing markup
It is necessary to mark the level of the ceiling surface in order to know where its plane needs to be completed, since after installation is completed, the ceiling should not interfere with the opening of the windows. This means that the distance from the structure to the window sash when open cannot be less than 2 centimeters.
If preference is given to wooden lining with a thickness of 1.5 centimeters as the material for cladding, the sheathing should be placed at a distance of 3.5 centimeters from the window sash.
Since balcony frames are usually placed level, focusing on their elements, an even horizontal line can be obtained along the window. Then it is transferred to the opposite side using a spirit level. The line from the window drawn on the adjacent wall is also moved to the opposite side. Marks are made in the four corners with a pencil and connected with a tracer, which requires the participation of a partner.
Types of building materials for ceiling insulation
Each of the insulation materials has both its pros and cons. In most cases, the effectiveness and long-term service of thermal insulation depends on the initial conditions of your house or apartment, such as: floor, humidity level, temperature, permissible weight of the balcony slab, area of the loggia, etc. Therefore, you need to choose which insulation is best for the ceiling of your loggia, focusing on the conditions of the room itself, as well as the advantages and disadvantages of each insulation.
Popular thermal insulating materials:
- Construction foam.
- Penoplex (extruded polystyrene foam).
- Construction mineral wool.
- Construction penofol.
Before we begin the step-by-step installation of ceiling thermal insulation, let's briefly describe each of these insulation materials.
Construction foam
Polystyrene foam is a foamed, pressed mass of varying densities intended for construction purposes. The material has a square or rectangular shape and a small range of colors, and is made in slabs. Insulating the ceiling on a loggia with polystyrene foam has a long service life and can be combined with other insulation materials, such as penofol, but in general it significantly makes the balcony structure heavier and also reduces the area of the room.
Construction foam
Penoplex insulation
A building material that is made by extruding plastic elements. It has a rectangular or square shape, colors and is produced in standard slabs. Can be combined with other insulation, such as penofol. The material is characterized by ease of processing (installation), its density and does not tolerate chemicals. solvents, has average flammability. It is considered one of the best options for insulating the ceiling of a loggia or balcony.
Construction material mineral wool
This insulation is obtained from sedimentary, volcanic, glass melts and is produced in standard slabs and rolls. It is considered a popular material for thermal insulation of loggias, but it has a noticeable mass that affects the weight of the entire structure of the room. Another disadvantage of mineral wool is its price in relation to other insulation materials.
Mineral wool
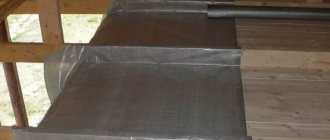
Construction penofol
It is made on the basis of polyethylene mass (filled with gas) covered with aluminum foil on one or both sides, it is easy to install and process, and is excellent for butt and overlap installation. The aluminum surface of the material has a high level of heat reflection, increasing the thermal properties of penofol several times. Penofol is effectively combined with insulation such as penoplex or construction foam, and has a low cost.
Construction penofol for insulation
Installation of sheathing
When you do the insulation of the ceiling on the balcony with your own hands, after applying the markings, they begin to build the sheathing from timber or profile:
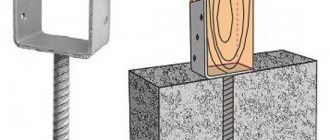
- Along the length of the ceiling plane, focusing on the line drawn along the perimeter, slats or beams are fixed. To do this, holes are made with a hammer drill at intervals of 60 centimeters and nylon dowels with a diameter of 8 millimeters are driven into them with a hammer.
- Next, use a screwdriver to screw the screws through the beam in accordance with the diameter of the dowels. If, due to the unevenness of the floor slabs, the beam begins to deviate from the horizontal markings, then at the fastening point, place a chip under it and fix it with a nail so that it does not jump out. Similarly, it is displayed against the wall.
- First of all, the beams are mounted near the window and on the side opposite to it, and the middle elements are aligned with them. To control the placement of the timber in one horizontal line, a spirit level is used, which allows for a level ceiling plane.
If it is planned to cover the balcony with plasterboard, then CD and UD metal profiles are used to assemble the sheathing. Along a line running along the perimeter of the loggia, a UD profile is nailed to walls made of brick or concrete using a hammer drill, and self-tapping screws are used to fix it to the plastic frame. You can use fleas - fasteners 9.5 millimeters long.
Along the width of the room, the CD profile is placed at intervals of 40 centimeters. In order to give rigidity to the frame, the CD profile is secured with U-shaped hangers, fixing it to the ceiling with 6x40 dowels. To screw the profile with fleas, use a screwdriver. The spirit level helps control the placement of CD profiles with UD in a single plane.
Step-by-step installation
First you need to take the following tool:
- perforator;
- screwdriver;
- roulette;
- pencil;
- spirit level, level (80-100 cm long);
- hammer;
- tracer;
- drywall knife.
Marking
It is necessary to mark the level of the ceiling, that is, where it is planned for the plane to end. This is necessary so that when the ceiling is completely installed, it does not interfere with the window sash opening. Therefore, it is important that the ceiling does not reach at least 2 cm from the sash when open. If the facing material is wooden lining, it is 1.5 cm thick, which means the ceiling sheathing must be placed at a distance of 3.5 cm from the sash.
Since balcony frames are usually placed level, starting from the frame elements, you can get an exceptionally even horizontal line along the window. It needs to be moved to the opposite wall. A spirit level will help with this. Along the adjacent wall, the line from the window is transferred to the opposite wall. Marks are placed in the four corners with a pencil. These marks are connected with a tracer. You can't do this without a partner.
Installation of sheathing
After marking, you need to install a sheathing made of slats or timber. Focusing on the line along the perimeter of the balcony ceiling, a beam/rail is placed along its entire length, secured to the ceiling. Using a hammer drill, holes are drilled along the place where the beam will be in increments of 60 cm, a nylon dowel with a diameter of 8 mm is driven into the holes with a hammer, and then a self-tapping screw corresponding to the diameter of the dowel is screwed through the beam with a screwdriver. If, due to the unevenness of the slab laying, the beam deepens from the horizon mark, then in the place of the screwed-in screw, you need to place a wooden chip under the beam and secure it with a small nail so that over time it does not jump out from under the beam. The timber is placed against the wall using the same principle.
Wooden sheathing on the balcony ceiling
First, the beams are installed at the window and at the opposite wall, and the middle beam is aligned with those already installed. A spirit level will help ensure that all the bars are in the same horizon line. This will ensure the ceiling is even.
If you plan to cover the balcony with plasterboard, then the sheathing should be made from CD and UD metal profiles. Thanks to the markings, there is a line around the perimeter of the balcony. We nail the UD profile onto the brick (concrete) walls with a hammer drill, and screw it onto the plastic window frame with self-tapping screws. Flea beads and self-tapping screws 9.5 mm long will do. The CD profile is installed along the width of the balcony in increments of 40 cm. For rigidity, the CD profile is fixed with U-shaped hangers, which are attached to the ceiling with 6x40 dowels, and the profile itself is screwed with a flea screwdriver. A spirit level will help to control the uniform plane of the CD profile with UD attached to the walls.
Ceiling lathing with metal profiles
Laying insulation
After the sheathing is installed, you can lay insulation: polystyrene foam, penoplex or mineral wool. Having measured the width between the beams or profile with a tape measure, use a drywall knife to cut the required size from the insulation sheet. The size should be made 2-3 mm larger than the required size so that the cut pieces of foam foam fit very tightly into the space of the sheathing. This will allow it not to fall out when nailing the facing material (you can use glue to properly fix the insulation). It is advisable to fill any small cracks with foam.
We insulate the ceiling with penoplex, laying it between wooden sheathing
Important: If insulation is done with mineral wool on a metal frame, then you need to make sure that it also fills the space behind the profile. Metal tends to freeze, but the mineral wool surrounding it will not allow this.
Laying thermal insulation
After completing the assembly of the lathing, they begin to insulate the ceiling on the loggia with their own hands, using any of the above materials. Having measured the width between the profiles or beams, cut off the insulation with a knife, the size of which should be a couple of centimeters larger than this value so that the pieces of material are tightly located in the space of the frame and cannot fall out when the cladding is nailed.
To ensure high-quality fixation, when insulating the loggia ceiling with penoplex, glue is used. It is better to fill out minor cracks with polyurethane foam. When thermal insulation is performed using mineral wool, laying it on a metal frame, it is necessary that the insulation fills the space behind the profile. Since metal is capable of freezing, mineral wool surrounding it will prevent this from happening.
Insulating the ceiling slab with foam plastic
Foam insulation can be attached with glue or special dowels.
Insulating the ceiling on a loggia with foam plastic can be done either using adhesive solutions or using mushroom dowels.
In the first case, you should purchase a ready-made adhesive solution or a dry concentrate made on a cement or polymer base at a hardware store.
The dry mixture is diluted with water to the desired consistency in the ratio indicated on the package. After which the glue is applied to a sheet of polystyrene foam pre-cut to size. It is recommended to apply it in a strip along the perimeter of the sheet and pointwise in 5 - 6 places in the central part.
Another way to install polystyrene foam is with the help of special plastic mushroom dowels. This is a fairly universal fastening material, suitable for installing almost any fairly dense insulation - mineral slabs, foam sheets and penoplex.
Insulating a loggia ceiling using mushroom dowels looks like this:
- A sheet of insulation of the required size is cut out and applied to the ceiling.
- Using a hammer drill, holes are made in several places on the concrete slab through the insulation sheet for dowels in accordance with their diameter.
- A mushroom dowel is inserted into the drilled hole and wedged in it using a plastic nail. The plastic nail that comes with the “fungus” is driven in with a hammer. In this case, you should be careful not to break it.
Polystyrene foam is highly flammable
The insulation of loggia ceilings with penoplex is carried out using the same technology as the installation of sheets of conventional polystyrene foam.
The only difference is that when attaching foam plastic to dowels, the step between them can be greater than when installing foam plastic.
This is due to the greater density and strength of penoplex, which is 35 kg/m3, versus 15 kg/m3 for polystyrene foam.
Polystyrene foam itself is very flammable, so on a balcony insulated with it, fire safety rules should be strictly observed. Especially if you are going to use the insulated loggia as a kitchen.
Thermal insulation of the loggia ceiling in a different sequence
The process of how to insulate a ceiling on a balcony can be performed in a different sequence. In this case, before installing the lathing or frame made of metal profiles over the entire ceiling surface, place a layer of thermal insulation made of penoplex foam.
The insulation is glued using a special adhesive composition, and plastic dowels “fungi” are used to fix its sheet in five places - in each corner and in the center. In this case, the joints of adjacent elements are treated with polyurethane foam for additional insulation.
The same can be done when insulating the ceiling with mineral wool. Plastic “fungi” fix it well, pressing it tightly to the concrete surface. If the penoplex is not planned to be plastered, then a layer of foil heat reflector, for example, isolon or penofol, should be placed on top of the insulation.
When mineral wool is used as a heat insulator, then a heat reflector is certainly installed, which combines several other useful qualities, including sound, steam, hydro and wind insulation. The joints of sheets of this material are glued with special tape.
Then a sheathing or metal profile frame is assembled from beams, which will additionally press the thermal insulation. Whether it is necessary to insulate the ceiling on a balcony using this method depends on whether the plastic window frame is mounted close to the floor slab. This scheme is applicable when it is not adjacent to the ceiling surface.
Step-by-step technology for installing insulation with lathing
Insulating the ceiling on a loggia or balcony begins with preparing the ceiling surface. It is cleaned of old finishes, dirt and dust. If there is mold, then antiseptic treatment is carried out. There is no need to level the ceiling particularly carefully, because the heat insulator and frame will hide minor defects in the slabs. However, you need to glue polystyrene or expanded polystyrene on a relatively flat base in order to achieve good adhesion.
At the preliminary stage, the balcony ceiling must be waterproofed from the inside. For these purposes, foil insulation materials (penofol, isolon and others) are used. These materials simultaneously perform the functions of insulation, vapor and waterproofing. They are mounted so that the foil layer is turned inside the room.
The sequence of installation of waterproofing in frame and frameless insulation methods is the same:
- The foil insulator is cut into strips of the required length and glued to the ceiling surface with polyurethane glue.
Attention! Penofol, isolon and other foil insulators are attached joint to joint. When laying with an overlap, condensation will form on the vapor barrier on the ceiling, which will destroy the insulation.
- The joints between the waterproofing strips are taped with reinforced tape.
- For additional fixation of the material to the ceiling, you can use mushroom dowels.
Further work depends on the type of insulation (frame or frameless), so we will describe the installation sequence for each method separately.
Tools and materials
Before insulating the ceiling on the balcony, you need to prepare all the necessary materials and tools:
- wooden slats or metal profiles for assembling the frame;
- metal hangers for fixing the sheathing to the ceiling;
- dowels and screws;
- mushroom dowels for additional fixation of insulation on the ceiling;
- mineral wool or polystyrene foam;
- foil insulation (purchased at the rate of two-layer laying on the surface of the balcony ceiling);
- reinforced construction tape;
- Double-sided tape;
- polyurethane glue;
- polyurethane foam (without toluene, which destroys foam);
- moisture-resistant drywall;
- finishing materials (tiles, panels, emulsion, plaster);
- scissors;
- construction stapler and staples;
- stationery knife;
- screws for metal or wood;
- ruler;
- roulette;
- hammer drill or drill;
- screwdriver;
- construction and laser level;
- ladder.
Installing sheathing on the ceiling
To make the frame, wooden slats or metal profiles are used. The distance at which the lathing is mounted from the base ceiling surface depends on the thickness of the thermal insulation layer.
Frame assembly sequences:
Do-it-yourself insulation of the ceiling with ecowool in a private house
- The room is being marked out. Using a level and a paint cord, lines are drawn on the walls along which the guides will be attached. To do this, the amount of lowering of the ceiling is set down from the lowest angle. This mark is transferred to other angles using a laser level. All marks are connected by lines on the walls.
- On the ceiling surface, mark the places where the hangers are attached. It is taken into account that the pitch of the frame guides is equal to the width of the heat insulator slabs.
- After this, guide profiles or wooden blocks are attached to the markings on the wall surface. For fixation, self-tapping screws and dowels are used, which are installed in increments of 30 cm.
- Next, the longitudinal profiles of the frame are mounted. Given the small width of the balcony room, one longitudinal profile is usually sufficient. It fits into the groove of the guides on the end walls and is attached to them with a metal screw. In the central part, the longitudinal rail is attached to the suspensions on the ceiling. The wooden planks of the sheathing are simply twisted with self-tapping screws or connected using metal plates.
- The transverse battens of the sheathing are attached. Their pitch depends on the length of the insulation boards. Additionally, there is no need to fix the transverse elements to the suspensions on the ceiling.
Installation of insulation
After assembling the frame, they begin laying the heat insulator. The material is cut into pieces of the required length and width. Please note that soft insulation (mineral wool) should be placed tightly between the lathing slats, so that it does not fall out under its own weight.
When all the insulator slabs are laid between the sheathing guides, proceed with the installation of the second layer of vapor barrier foil material. To do this, it is cut into strips of the required length. They are attached to the frame end-to-end, and all seams are taped with reinforced tape. To fix it to the wooden sheathing, use a construction stapler with staples, and the foil insulator is attached to the metal guides with double-sided tape.
The insulator is additionally fixed on top by another frame made of slats. It is needed not only for strong fastening of the material, but also for creating the necessary ventilation gap between the insulator and the finishing layer. This air gap will protect materials from condensation accumulation.
Insulation of the balcony ceiling on the top floor
When the apartment is located on the top floor of the building, the approach to ceiling insulation should be much more serious, because:
- There is a real possibility that water will leak from the roof. For this reason, it is necessary to take care of high-quality insulation of the balcony canopy.
- Before installing the sheathing, you should carefully insulate the corners of the loggia from possible penetration of moisture.
- After assembling the frame and laying the insulation, you need to stretch the vapor barrier over the entire ceiling plane before lining it with clapboard or other materials.
Foam insulation
Polystyrene foam , consisting of gas-filled plastic, is one of the most affordable and common materials for thermal insulation . If installation is planned under decorative panels - such as MDF, plasterboard or PVC - then the optimal density will be 15 kg/cub.m, if under putty - 25 kg/cub.m.
Among its advantages we note:
- excellent sound and heat insulation qualities;
- affordable price;
- ease of installation;
- versatility - the possibility of installation on concrete and under the roof, as well as use as the main and intermediate insulation and connecting it with other materials;
- environmental friendliness.
The disadvantages of polystyrene foam are:
- fragility;
- instability to fire;
- destructibility when exposed to acetone and other technical liquids.
The ceiling on the loggia can be insulated under the slab or directly under the roof if it is located on the top floor . Sheets cut to size are inserted into the opening and then blown in with foam.
When making insulation under putty , the foam plastic should first be glued to the slab with glue (usually ceramic tile adhesive is used for this), and then fixed with dowel mushrooms. For fixation purposes, four points are used in the corners and a fifth point in the center.
Finishing work
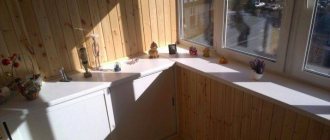
Finishing begins when the thermal insulation of the floor, ceiling and walls is completed. There will be no problems with cladding with wooden lining. If you plan to use plastic products for finishing, then you can install both them and putty compounds on the remaining walls. This work must be done before covering the ceiling surface.
When the balcony is covered with sheets of plasterboard, preparation for finishing involves cleaning the ceiling and walls from dust with a damp sponge in order to create good adhesion of the putty mixture to the surfaces.
Thus, following the step-by-step instructions, it will not be difficult to insulate the ceiling on the balcony with high-quality materials.
Preparation for finishing
After the floor, walls and ceiling are insulated, you can begin finishing. If the entire balcony was planned to be lined with wooden lining, then nothing prevents this from being done. If the ceiling is lined with plastic lining, then the remaining walls can be finished not only with the lining itself, but, if desired, with putty mixtures. This can be done before covering the ceiling.
We finish the ceiling with plastic panels after insulating it with foam plastic
If the balcony was covered with plasterboard, then preparation for finishing can include cleaning the surface of the walls and ceilings from dust so that there is good adhesion of the putty mixture to the surface. This is done by wiping the surfaces with a damp sponge or priming.