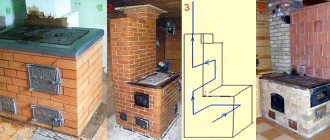
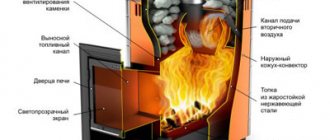
Device
Studying the design will allow you to understand what a deck oven is. It consists of 11 most important elements:
- No. 1 - Convection chamber with louvers and valves on top.
- No. 2 - The body is made of steel or fireclay.
- No. 3 - “Direct stroke” valve (summer stroke type), directing smoke directly into the chimney.
- No. 4 – Main firebox (chamber).
- No. 5 - Side fireboxes.
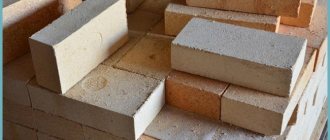
- No. 6 - Fireclay brick of the side firebox (refractory element).
- No. 7 – Under (lower horizontal surface of the stove)
- No. 8 - Reinforced wall (made from SHA-94 brick).
- No. 9 - Fireclay brick in the 4th combustion chamber.
- No. 10 – 4th combustion chamber.
- No. 11 – chimney outlet, the chimney pipe is attached here.
The listed stove parts are shown in the diagram:
Scheme
All models are equipped with doors (cast iron, steel). Sometimes a heat-resistant window is made in the center of the door, allowing you to observe the flame.
If the stove will be used for cooking, it is equipped with grates and burners that reduce the thermal stress in the stove, then dishes can be placed on it.
Principle of operation
A bottom combustion furnace allows you to achieve high efficiency with minimal fuel consumption. The device allows for “top” combustion, evenly distributed from the top layers of firewood to the bottom. The air supplied through the combustion door ensures good oxidation of the fuel, which improves the quality of its combustion and increases the intensity of heat release.
The body of the stove is made of a polished stainless steel alloy, and the firebox is lined with fireclay bricks or other refractory material. This allows you to achieve a heating temperature of up to 420 degrees. The bricks heat up to 700 degrees, which guarantees stable combustion of the fuel even in difficult conditions (for example, with high humidity in the room where the stove is located).
Types of furnaces
Top combustion products come in different types. According to their purpose, they are divided into kitchen and heating. According to the type of heat source used - gas, electric, wood. Based on the main material, hearth products are either metal or brick. Let's look at the features of different types.
Kitchen
As the name suggests, these ovens are designed for installation in the kitchen and subsequent cooking on them (baking bread, confectionery). It can be as simple and miniature as possible, suitable for private homes. For restaurants and bakeries, there are functional and production models on sale that allow you to prepare many dishes at the same time.
Gas
Inside the housing there is a burner and ring-shaped pipes (up to 19 pieces) through which gas passes. There are 2-5 tiers inside, for each the temperature is regulated separately. The maximum operating temperature in gas stoves is 300 degrees. You can work with her around the clock. The energy created by the burner passes through three circles: in the first, it directly heats the area near the burner; in the second and third circles, the pipes and bricks that form the bottom and walls of the furnace are heated with flammable gas. The heated parts begin to distribute uniform heat.
Design example
Electrical
Externally, gas and electric hearth ovens are no different. The differences lie in the “filling”. Inside, instead of a gas burner and pipes, there is a heating element (in the upper and lower tier it is possible to arrange the turns of the heating element in the center)
As in gas ovens, electric ovens can have from 2 to 5 independent chambers. The temperature inside each chamber may be different, allowing you to cook different dishes.
From a financial point of view, gas is a more economical fuel, but from the point of view of safety and ease of control, electric furnaces will be more profitable.
Wood burning
A wood-burning hearth oven was used by our ancestors. True connoisseurs believe that food made from it will be much tastier than that made on an electric or gas stove. The light aroma of wood adds a zest to the dishes. Cons: The wood stove is the most difficult to use. You have to manually add fuel and monitor its burning.
Heating
The difference between heating stoves and kitchen stoves is their single-chamber design - there is no need to create separate zones for kitchen baking sheets. In Europe, a hearth-type stove is the only permitted heating structure inside residential buildings. This is explained by the safety and environmental friendliness of the system - in a deck stove the fuel burns out completely; There is no exhaust of smoke polluting the atmosphere through the chimney.
Metal
For the manufacture of such stoves, cast iron or steel alloy is used. The advantage of the design is simple installation and maintenance. The downside is that the body gets very hot, so you can get burned if you touch it. The service life with proper operation is 30-50 years. Minus - metal stoves do not tolerate sudden changes in temperature, which can cause them to crack.
Brick
Such a stove accumulates (accumulates) heat better and releases it longer. It looks very impressive, so it will decorate any classic interior. It lasts twice as long as a cast iron or steel structure, but it costs an order of magnitude more. Installing a brick stove is difficult; it is better not to install it yourself without specialists.
Expert opinion
Pavel Kruglov
Stove maker with 25 years of experience
The downside is the lack of portability - after installation it will not be possible to quickly move it to another place (you will have to completely disassemble the structure).
Beautiful brick hearth oven
SALVA deck ovens
| Salva modular deck ovens are ideal for baking confectionery products with impeccable quality of the finished product. Thanks to their versatility and uniform quality of baked products, Salva deck ovens are recognized as the most famous among the world's confectioners. These characteristics make Salva ovens indispensable for baking delicate products such as eclairs, biscuits, puff pastries, etc. | |
BREAD RANGE Series
| BREAD RANGE deck ovens are the ideal solution for bread producers who want to produce a wide range of high-quality baked goods, but with an oven that is lighter and more flexible than a traditional multi-hearth oven. Thanks to the flexibility of these ovens, they can be installed in almost any bakery, regardless of the room size. The surface of the baking chamber is made of refractory material, which promotes the formation of a hard crust at the bottom of the product and the presence of a crispy crust in the baked bread. |
PASTRY RANGE series
| Baking deck ovens of the PASTRY RANGE series are ideal for baking confectionery products with impeccable quality of the finished product. Due to their versatility and uniform quality of baked products, PASTRY RANGE ovens are indispensable for baking delicate products such as eclairs, biscuits, puff pastries, etc. All models of ovens designed for baking confectionery products are equipped with a special door that opens outward and panoramic inner glass with extremely low heat transfer. |
PIZZA RANGEEDIENFELD Series
| Every professional baker knows the secret to good pizza: the dough. Taking into account this information, Salva has carefully approached the issue of equipping all its ovens with the best components, using technical features that meet all the necessary conditions and requirements for a high-quality pizza baking process. Thanks to absolute temperature control in the lower and upper parts of the baking chamber of Salva deck ovens, the output products are of impeccable quality. The surface of the pizza baking chamber is fireproof and can withstand temperatures of 375°C, so fresh pizza dough is baked in 4-5 minutes, and pre-prepared pizza bases are baked in 2-3 minutes. All deck ovens designed for baking pizza are equipped with a special door with panoramic glass that can withstand high temperatures. |
Control panels
E-ADVANCE control panel
| FUTURE control panel
|
Advantages and disadvantages
Stoves of this type have advantages and disadvantages over other types of heating and kitchen devices. The main advantages are:
- It is possible to install several tiers to cook many dishes at the same time.
- Quickly warms up large rooms.
- It does not pollute the atmosphere with its smoke (unlike grate stoves).
- Easy to use.
- Durable (subject to operating rules).
It is also worth noting the high efficiency of the stove (79-82%), long burning period (in a wood-burning stove, 10 kilograms of briquettes burn out in 10-12 hours).
The downside is that the design requires only one heat source (wood, electric heating or gas). There are no hearth stoves that run on peat or coal.
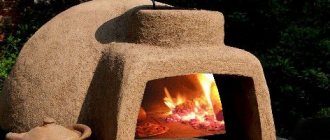
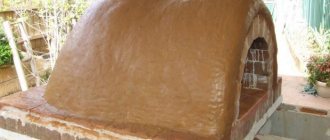
Instructions: making a wood-burning Pompeii pizza oven with your own hands
Options for constructing a Pompeii furnace may differ, because... this depends on the design decision, the materials available and the size of the oven. The instructions will provide general recommendations and work procedures for the construction of a traditional Pompeii oven.
Let's look at an example of building a Pompeian stove with your own hands with these basic parameters.
Foundation. The foundation is in the form of a monolithic reinforced concrete slab, 100-200mm thick.
Oven stand. The material from which the pedestal is built is cinder blocks, the size of the cinder blocks is 200x200x400mm. The size of the pedestal in plan is 1200x1200mm. Pedestal height 800mm. The thickness of the monolithic reinforced concrete slab of the tabletop is 100mm. The heat-insulating layer between the stove stand and the stove itself is made of fireclay bricks.
Bake. The internal diameter size is 840mm. Accordingly, the height of the dome arch inside is 420mm. The first layer of thermal insulation is mineral wool - 2 layers. The second layer of thermal insulation is cement mortar with the addition of perlite. Perlite can be replaced with vermiculite or expanded clay.
The whole process is divided into two stages:
Stage 1 – construction of a stand for the stove;
Stage 2 – manufacturing the furnace.
Stage 1. Construction of a stand for the stove.
Step 1. Construction of the foundation. In the place planned for the stove, a hole is dug with a size of 1500x1500mm (100-150mm wider than the size of the pedestal on each side) and a depth of 350mm.
The bottom of the pit is compacted with crushed stone and a sand cushion 200 mm thick is made. Formwork is assembled from boards. To make it easier to pour the concrete mixture, a plastic film is spread over the sand.
A reinforcing mesh of rods 8 (12) mm thick is laid on it. It is necessary to place small supports under the reinforcement so that there is a gap of 3-5 cm to create a layer of concrete under the reinforcement. The formwork is filled with concrete. The top of the foundation slab is leveled and checked for level. The concrete is moistened with water, covered with a film and left to harden and set for 5-7-10 days.
Step 2. Construction of the pedestal. After the concrete has hardened, you can begin to build a stand for the stove. In this case, it is made from cinder blocks.
We install the blocks in the letter “H”. The plan should be a square with sides 1200mm (3 blocks each 400mm long). The shape of the pedestal in plan can be in the form of the letter “P”. It depends on your decision.
But the advantage of the letter “H” is that the middle wall serves as an additional support for the furnace and thus the load from it is transferred to all structures more or less evenly.
The blocks are placed dry. After installation, check the evenness and verticality of their installation. Reinforcement is inserted into the holes so that the blocks do not move when poured with concrete. We fill the holes through one with concrete. After this, you need to let the structure stand for a couple of days for the concrete to set.
Step 3. Construction of a monolithic reinforced concrete countertop. The formwork for the tabletop is being made. In order for the tabletop to be the required size (1400x1200mm), the formwork needs to be made 200mm longer in front. Table top height 100mm. The bottom of the formwork can be moisture-resistant plywood or boards covered with polyethylene.
Inside, the fittings are laid out again on stands with a gap of 3-5 cm.
In parts where the tabletop extends beyond the pedestal, add additional reinforcement.
The formwork is poured with concrete, the surface is leveled, and its horizontalness is checked. Next, the countertop is watered with water, covered with film and left for several days (5-7-10) for the concrete to harden.
This completes the stage of creating a stand for a wood-burning stove.
Laying a pizza oven is discussed in the sequel.
Useful video
Continuation.
The construction of a traditional Pompeian furnace is a lengthy process and requires compliance with the sequence of work and maintaining the necessary intervals so that the supporting structures gain the necessary strength. The whole process is divided into two stages:
- Stage 1 – construction of a stand for the stove;
- Stage 2 – making the furnace
What is better: a hearth stove or a grate stove?
When purchasing a heating device, the question arises: a hearth stove or a grate stove, which is better to buy?
Expert opinion
Nikolay Davydov
Stove maker with 15 years of experience
It all depends on the basic requirements for the device. The hearth product is more airtight and safer, retains heat longer. In such a furnace, carbon dioxide emissions are minimal (4-5 times less than that of a “competitor”). But the device with a grate heats up faster and has an efficiency of 3-5% higher.
WIESHEU deck ovens
The Ebo baking oven is a modern classic among deck ovens. The new mechanical door system with a special cleaning position allows for simple, two-way cleaning of the glazing. High quality baking is achieved thanks to precise dosing of steam and regulation of the temperature of the top and bottom of the baking chamber, as well as a stone hearth with a non-stick coating. On request, the Ebo oven is equipped with STIR® technology, which reduces baking time by 30%. Baking chambers are supplied in heights of 145 mm and 195 mm, and as a double baking chamber in height 2x125 mm. Ebo can be combined with Dibas convection ovens to form a Vario system. The Ebo stove is available in two versions: modern design or nostalgic design.
| Name | Stands | Overall dimensions WxDxH, mm | Internal dimensions WxDxH, mm | Tray size, mm | Electrical connection V / kW / A | Weight, kg |
| 1 | 930x958x300 | 655x645x145 | 600×400 | 400/2,75/5,1 | 88 | |
| 1 | 930x958x350 | 655x645x195 | 600×400 | 400/2,85/5,2 | 91 | |
| 2 | 930x958x450 | 2x655x645x125 | 600×400 | 400/5,6/10,3 | 160 | |
| 1 | 930x1358x300 | 655x1045x145 | 600×800 | 400/4,1/8,1 | 126 | |
| 1 | 930x1358x350 | 655x645x195 | 600×800 | 400/4,3/8,4 | 129 | |
| 2 | 930x1358x450 | 2x655x1045x125 | 600×800 | 400/7,4/15 | 215 |
How to choose?
It’s easy to get confused in specialized stores, as they offer a wide range of different deck ovens and fireplaces. Let us briefly examine the most important criteria for choosing heating devices for kitchens, heating residential and non-residential premises.
For kitchen
If you buy a stove for subsequent cooking, you need to choose a model that has the required number of tiers. The depth of the oven should allow you to place the number of baking sheets or cooking containers you need. It is better if the oven has more different programmable modes - this will allow you to cook more varied dishes.
Example of a deck oven for baking bread
Popular kitchen stoves are the following models:
- Steel deck ovens for BASSANINA bakeries – models FM 2T-4T, 3T-6T for 2-6 baking trays measuring 40×60 // 46×66 cm.
- Stainless steel ZOOM oven. It has a wide bottom where large containers can be placed. At the top there are 4 rows of independent compartments.
- Electric model PAVAILLER. Contains 4 tiers, with 2 separate doors. The area of the “culinary” zone is 9.5 square meters.
For home heating
When choosing a stove, you need to evaluate the capabilities of the room where it will be installed. First of all, it is important to calculate the appropriate dimensions of the device. When installing a stove, you must ensure that the chimney pipe is at least 1 m long; this is the only way to ensure heating of living spaces. When buying, pay attention to the power - a strong model will warm up the house better, but will require more fuel.
Mini hearth stove for home heating
Among heating systems, it is worth paying attention to the following options:
- Heating fireplace stoves WGO. A high-quality German model, made from fireproof fireclay HBO+. Size from 52x54x11 cm.
- Hearth burning fireplace ECO+. Distinctive features are the simplest design and affordable price of a deck oven. Made from fireproof fireclay. Dimensions – 56x56x89 cm.
For bathhouse and garage
To heat non-residential premises, it is necessary to choose products with exactly the same requirements as for a residential building. The most important criteria are dimensions and power. Unlike models of hearth ovens for homes, devices for garages and baths may be less attractive. The absence of external decor will significantly reduce the price. Suitable models are:
- Stove in the form of a fireplace of the KIV series. The narrow rectangular shape allows you to place it even in a small room (up to 45 sq.m.).
- Round heating stove PKO-40 with a metal body. Thanks to the barrel shape
- The device warms up evenly. The oven body is made of steel, painted with powder enamel, and the inside of the oven is lined with wedge-shaped heat-resistant bricks.
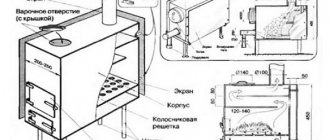
How to make a simple but effective stove?
This option can serve as an alternative to the simplest metal heating devices - for example, a potbelly stove. With the help of this stove you can heat the room, cook food, and even admire the flames.
This is interesting: Methods of making fire in natural conditions
The structure occupies just over half a square meter. Unlike full-fledged brick ovens, this one does not require a foundation. The weight of the structure is not so great as to make a strong base - it is enough to lay a strong board.
The oven can be made in just a day. One of the advantages of this option is that starting heating is possible in the evening. Certain skills are necessary, but they do not go beyond the skills of the average male.
On a note! No qualifications are required to build stoves. But it is necessary to maintain order - this will make the design as effective as possible in the context of its potential.
What will you need for the job?
This is not only a simple, but also a budget option. To build the structure you will need:
- brick:
- *fireclay – 37 pcs.;
- *red – 60 pcs.;
- ash door;
- firebox door;
- lattice;
- valve;
- hob made of cast iron.
It will also be interesting: barbecue oven - types and characteristics.
Preparation
The first step is to decide on the location of the stove. Since the mass of the structure is small, there are no limitations inherent in traditional brick solutions. By securing strong boards or a suitable alternative material, the “foundation” is thermally and waterproofed.
The role of an insulator can be played by a non-flammable material - for example, basalt wool. Polyethylene or roofing felt is placed on top of the base. The size of the latter corresponds to the dimensions of the base plus a small allowance.
A layer of sand 1-2 cm thick is poured on top. The bedding is leveled. It is important to make the base level - the quality of the design and the convenience of subsequent work depend on this.
Masonry scheme
- The first row is laid on sand without using a solution. A dozen bricks are leveled strictly. The bricks are coated with a thin layer of the mixture, after which the blower door is mounted at the end. The door is pre-wrapped around the perimeter with an asbestos cord, which compensates for the thermal expansion of the metal.
- After fixing the door with wire, lay the second row according to the diagram. Form a ash pit.
- Fireclay is used (in the diagram it has a yellow tint). After laying, a grate is installed above the ash pit.
- Before this, bricks were laid flat. On this row it is placed on its edge. A smoke exhaust channel is formed, inside which a base for the partition is made. One of the bricks (seen in the illustration) is laid “dry” - it will later be removed. After this, the firebox door is installed, which is wrapped several times with asbestos strips before installation. But this must be done so that the door opens well to the top. The element is fixed with wire and a pair of bricks.
- The brick is laid flat again, duplicating the previous row.
- Again the “rib” row is the second and last row in which the brick is laid in this way. The exception is the next row, in which one of the walls is formed by laying on edge. The walls of the chimney channel should be wiped with a damp cloth.
- The brick is laid flat according to the diagram. The back wall is made using the edge-on format again.
- This row closes the firebox. A couple of bricks should hang over the firebox so that the flame moves to the middle of the hob - in case the stove will be used as a fireplace (without closing the firebox door).
- The bricks are moved slightly towards the back wall to support the firebox door. Strips of asbestos soaked in water are laid in front of the brickwork. Thanks to this, they ensure sealing of the gap between ceramics and cast iron. A cast iron panel cannot be placed directly on a clay solution, otherwise the difference in the thermal expansion parameters of the materials will lead to the appearance of cracks.
- At this stage, the formation of the smoke exhaust pipe begins. The latter, according to the plan, should gradually expand towards the back side. But only the chimney base is made of brick. The rest is made of light metal. Otherwise, the excess mass of the element may lead to a shift in the center of gravity of the stove.
- A valve sealed with asbestos strips is installed here. It is recommended to pre-coat the latter with clay mortar. This is the final row, which is used to complete the construction of a brick oven directly with your own hands. The remaining couple of rows are given to the chimney, which will then be connected to a lighter metal channel.
This is interesting: What kind of stone can sparks be struck from?
After this, those bricks that were laid “dry” on the 4th row are removed. At the same stage, the smoke exhaust duct and the surface of the stove are cleaned of construction debris.
Final works
The simplest stove does not require serious decorations. The only decoration is whitewashing. It is recommended to add a little blue and milk to the composition - this will protect the coating from the formation of a yellow coating and bleaching.
Important! Brick and metal should be protected before work. If this is not done (for example, using film), you will not be able to get rid of the stains.
It is necessary to coat the seams between the brick and the metal of the chimney very well, as well as the seams between the ceramics and cast iron.
It is imperative to close the joint between the stove brick and the floor. This will prevent oven sand from getting into the room. It is advisable to cover the joint with an L-shaped sheet. Then they make a plinth edging, which serves both as decoration and as an additional element that prevents the “foundation” bedding from spilling out.
Figure 3. Functioning oven
The stove is ready. The entire process took no more than one working day. Now you can try making low-power kindling. You cannot use logs - only wood chips or paper. Wood burning will create too high a temperature and the structure will crack. For the mixture to fully set, you need to give it a week or two. After this, you can already heat it “like an adult.”
Features of operation and safety precautions
Using hearth-type ovens is not particularly difficult.
Here are instructions for heating the product:
- The wood-burning hearth oven is loaded with pallets. Gas and electric are connected to the network or gas pipeline.
- Electric models require preliminary drying of the heating element after a long period of inactivity. Other types of stoves do not require such an operation.
- The required program modes are installed.
- The chimney is heated to ensure stable draft (this is done by opening the damper for 6-7 minutes).
The temperature in the oven must be maintained automatically using temperature controllers, as evidenced by indicators on the housing panel. If there is no automation on the stove, you will have to independently monitor the thermostat indicators.
If a hearth-type stove is used for cooking, then after heating to the desired temperature, you need to open the lid and load sheets of kitchen utensils into the chambers. After finishing work, you must turn off the device; keeping it running unnecessarily for more than an hour is prohibited.
Expert opinion
Pavel Kruglov
Stove maker with 25 years of experience
It is worth remembering that steel structures become very hot. When loading and unloading baking sheets, be sure to use oven mitts, oven mitts, and a towel. Failure to comply will result in burns.