We eliminate leaking pipes on the roof and roofs next to the pipe
If a pipe on the roof is leaking or the roof is leaking near a stove or vent pipe, then you can eliminate the malfunction that could lead to harmful consequences on your own. To choose a method for troubleshooting, you need to determine the location of the leak and, depending on the type of pipe and roof, prepare the necessary materials.
Broken seal near the chimney
Chimney design requirements
Requirements for the design of chimneys are determined by SNiP 41-01-2003.
- the height of the channel should not be less than 5 m;
- the height of the pipe above the roof is at least 1 m for a flat roof;
- the height of the pipe with a pitched roof is determined depending on the ridge (with a distance from the ridge to the head (horizontally) of 1.5 m - at least 0.5 mm; with a distance of 1.5 m to 3 m - flush with the ridge; with a distance more than 3 m - the angle between the horizontal and the line passing through the top of the pipe and the ridge should not exceed 10°);
- the length of the horizontal hog should not exceed 1 m;
- the sum of projections onto the horizontal of horizontal and inclined sections should not exceed 2 m, while the length of the vertical section increases by the same length.
Repairing pipe leaks on the roof
If water gets into the stove when it rains, the cause of the leak is a leak in the stove pipe. The chimney can be made:
- made of brick. Brick is the most durable material, but when constructing a chimney you should follow clear rules;
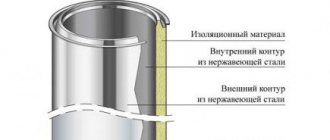
- made of metal. The most popular are chimneys made of sandwich pipes, which consist of two layers of metal separated by insulation;
- from asbestos. Asbestos is a non-flammable and relatively cheap material, which explains its widespread use.
Fixing brick chimney leaks
To eliminate a pipe leak on a brick roof, you will need:
Elimination of leaks occurs according to the following scheme:
- a solution is mixed from sand, cement and water;
- the leak site is cleared of dirt and remnants of destroyed bricks;
Cleaning the chimney from brick residues
- Using a trowel, the prepared mixture is applied to the damaged area of the chimney.
Fixing a leaking brick chimney
Repairing metal chimney leaks
To eliminate a leak in a metal pipe with your own hands, you can use:
- special clamps that are secured around the gap. The diameter of the clamp should be approximately equal to the diameter of the chimney, and the length of the clamp should be slightly larger than the size of the crack;
Devices for eliminating leaks of various sizes
- cold welding. A special mixture is applied to the leak site, according to the attached instructions.
Mixture for eliminating leaks on a metal pipe
Repairing asbestos chimney leaks
Instructions for eliminating an asbestos chimney leak involve the following actions:
- You need to prepare cotton fabric and red lead paint. You can purchase materials at any hardware store;
Special paint for eliminating leaks
- a thick layer of paint is applied to the damaged area, protected from dirt and dust;
- the pipe is wrapped with fabric over the paint;
- a second coat of paint is applied.
How to fix a roof leak near a pipe
If a pipe on the roof is leaking or the roof is leaking near a stove or vent pipe, then you can eliminate the malfunction that could lead to harmful consequences on your own. To choose a method for troubleshooting, you need to determine the location of the leak and, depending on the type of pipe and roof, prepare the necessary materials.
Broken seal near the chimney
If water gets into the stove when it rains, the cause of the leak is a leak in the stove pipe. The chimney can be made:
- made of brick. Brick is the most durable material, but when constructing a chimney you should follow clear rules;
- made of metal. The most popular are chimneys made of sandwich pipes, which consist of two layers of metal separated by insulation;
- from asbestos. Asbestos is a non-flammable and relatively cheap material, which explains its widespread use.
To eliminate a pipe leak on a brick roof, you will need:
Elimination of leaks occurs according to the following scheme:
- a solution is mixed from sand, cement and water;
- the leak site is cleared of dirt and remnants of destroyed bricks;
Cleaning the chimney from brick residues
Fixing a leaking brick chimney
To eliminate a leak in a metal pipe with your own hands, you can use:
- special clamps that are secured around the gap. The diameter of the clamp should be approximately equal to the diameter of the chimney, and the length of the clamp should be slightly larger than the size of the crack;
Devices for eliminating leaks of various sizes
Mixture for eliminating leaks on a metal pipe
Instructions for eliminating an asbestos chimney leak involve the following actions:
- You need to prepare cotton fabric and red lead paint. You can purchase materials at any hardware store;
Special paint for eliminating leaks
- a thick layer of paint is applied to the damaged area, protected from dirt and dust;
- the pipe is wrapped with fabric over the paint;
- a second coat of paint is applied.
Using fabric and special paint
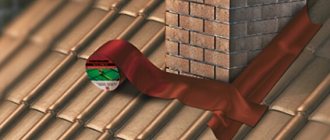
If, during precipitation or melting snow, water flows down the drain pipe or chimney, then the cause of the leak is a violation of the seal at the junction of the pipe and the roof. When a roof leaks near a pipe, you can fix the problem in one of the following ways:
- applying bitumen tape;
- installation of a rubber cuff;
- production and installation of a metal apron.
If a drain pipe or chimney is leaking where the roof passes, then the simplest and cheapest way to eliminate the leak is to form an apron from bitumen tape.
Roof sealing material
- ribbon;
- scissors;
- metal brush;
- gas-burner.
You can seal the connection as follows:
- a metal brush is used to clean the roof around the pipe and the lower outer surface of the chimney (fan pipe);
- Use a damp cloth to remove any remaining dirt and dust;
- a piece of insulating tape is glued to the junction of the pipe and the roof with the bitumen layer down;
Applying waterproofing tape to the joint
- using a burner, the tape is heated and pressed against the surface of the roof and pipe;
- for greater reliability, the tape can be secured with a wooden board or block.
A more reliable method of eliminating a leak is to install a rubber cuff at the joint. For this:
- you need to purchase a special cuff;
- in the upper part, cut a hole equal to the diameter of the pipe being insulated;
- put the prepared cuff on the pipe;
- insulate the area where the cuff meets the roof with sealant;
- Screw the lower part of the cuff to the roof.
Instructions for installing a rubber cuff on a pipe
If the roof is leaking in the area of the pipe, then installing a metal apron will be a reliable way to eliminate the problem:
- An apron is made from a metal sheet, the dimensions of which fully correspond to the dimensions of the pipe going to the roof. The finished product can be purchased at a specialized store;
Metal apron for roof insulation
- the upper part of the apron is attached to the pipe using a crimp clamp;
- the lower part is fixed to the roof with self-tapping screws. To achieve the greatest tightness, the lower part of the plate is attached over the roofing material, and the upper part is tucked under the sheathing.
Scheme of correct installation of a metal apron
How to make a metal apron from scrap materials is shown in the video.
It is necessary to eliminate roof leaks as soon as possible, since the constant flow of water can lead to destruction of the chimney, damage to furniture and other property.
A real man should be the master of the house!
How to eliminate gaps Seal gaps between a pipe and a slate roof Getting rid of gaps on a roof covered with tiles Material for waterproofing a bitumen roof The process of eliminating gaps in a corrugated roof
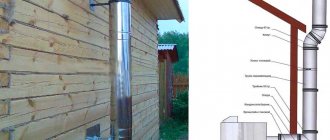
Installing a chimney is usually not a difficult process, however, in some places, such as floor crossings, some difficulties may arise.
An important point is to ensure proper waterproofing. We will talk about this and other nuances related to how to seal a chimney pipe in this article.
Even if the pipe is placed as tightly as possible on the roof, minor gaps will still remain. When it rains, moisture will constantly enter the attic through them, which over time will lead to damage to the roofing structures. This is why roof pipe sealing is so important.
The easiest way to solve the problem of how to seal the gap between the pipe and the roof is to install an apron on top. You can do it yourself, in which case you will need to provide strips for connection to the pipe in advance. There is an easier way - to buy a ready-made stainless steel roof passage. Often, round passages are made for the chimney, and they are made of stainless steel. The passage is placed on the pipe, and the joint is fixed with a steel clamp.
If you need to seal minor gaps formed between the pipe and the roof, then for these purposes you can use silicone sealant (read: “Which sealants for chimneys are best to use - types, characteristics”). You can find a huge variety of them on sale, but we need a heat-resistant type.
The process of how to seal a roof around a round pipe will differ slightly depending on the type of roofing, that is, in addition to the basic recommendations, there are also algorithms that will vary somewhat.
Sometimes the question arises of how to seal the gap between the pipe and the slate.
The technology provides the following sequence:
- First, a round hole is cut in the steel sheet that will be needed to finish the ridge.
- Next, a ring of sheet asbestos cement is placed on the pipe.
- For absolute sealing, so that in the future there will be no problems with the leaking pipe on the roof, the joint between the pipe and the roof is sealed with an asbestos cement solution (proportion 1:2).
- In addition, the same solution is used to fill the gap between the chimney pipe and the slate sheet. To do this, you can temporarily make a limiter out of cardboard.
On a tile roof, it is best to seal the cracks with a solution of sand and cement, which will best protect the inside of the building from moisture and precipitation.
To achieve the best moisture insulation, you will need:
- Install a galvanized collar on the roof, thus creating a place for pouring the solution.
- Pour a solution of cement and sand, making sure that it clearly fills the entire space between the roof and the chimney.
- In addition, you will need to make a surface and place it at an angle so that excess liquid flows down it.
Among the options for covering a pipe on the roof if it rises above a bitumen roof, the most optimal is the use of Wakaflex self-adhesive tape.
You can perform isolation in this way:
- First, cutting is done from the Wakaflex tape.
- At the next stage, this cutting needs to be pressed with a pipe case.
- At the end, all remaining gaps between the parts being connected are sealed with bitumen mastic.
As a rule, when installing a chimney through a corrugated roof, a ready-made Master Flash pipe cutting is used. Another advantage is that this set is very convenient to use; it can be used for roofing made of almost any material.
Is your roof leaking or your chimney leaking?
Before starting work, it is important to identify the nature of the leak :
- The roof is leaking near the pipe. The pipe passage unit is not sealed, but the chimney has no defects. The problem area of the roof needs to be .
- The chimney is leaking. The cause of the leak is the destruction of the pipe and damage to the wind vane. The situation is typical for brick chimneys. Pipe restoration , masonry and plastering work is required If the masonry is made of low grade brick, it is recommended to insulate and line the chimney to protect it from environmental influences.
Related article: Roof arrangement of a private house diagram
Repair of the roof at the chimney passage
There are two types of chimneys:
- single round pipes;
- chimneys and ducts of rectangular section.
Depending on the type of chimney, the repair method is selected. The joint of a round pipe is best sealed with a passage element, for example, Master Flash. The passage of a rectangular chimney is designed as an abutment, the design of which depends on the roofing material. The components and methods for their repair will be discussed further.
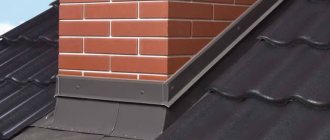
Round pipe outlet. Repair using Master Flash
A simple and reliable option for eliminating roof leaks near the chimney is to use a passage element, for example, Master Flash. This method is used to pass through the roof of pipes with a diameter of 75 to 1050 mm.
The passage element is a sealing part consisting of a cuff and an elastic base. The cuff fits tightly onto the pipe. The base takes on the profile of the roofing material, is sealed and secured with self-tapping screws and sealing washers.
Connection of a rectangular chimney. Units and repair methods for different roofing materials
Before you fix a roof leak near a chimney, you need to understand the connection structure.
Slate. The junction unit was made the “old fashioned way”: using bitumen or mortar. Sometimes an apron made of roofing iron was installed over the joint.
It is necessary to repair the damaged areas using traditional methods - “cheap and cheerful”.
Odnulin. The manufacturer offers its own version of the connection and all the materials necessary for this - a side and covering apron, sealing tape.
How to fix a leak?
If the assembly has minor defects, the cracks should be sealed with sealant . If the connection is severely damaged or made incorrectly, the unit will need to be reworked according to the manufacturer's instructions.
Bitumen shingles and soft roofing. At the junction, a fillet is installed - an analogue of a plinth. An under-roof insulation is placed on the walls of the chimney, the junction is glued with pieces of valley carpet with an overlap over the pipe. The joint is reinforced with metal special strips.
In the case shown in the photo, a complete rework of the unit is required.
If the connection is made correctly, to eliminate the leak it is enough to seal the damage.
Metal tiles and corrugated sheets. The junction node is one of the most complex. Manufacturers offer to install special flashings and aprons.
Often the cause of leakage is unscrupulous installation. In this case, it is necessary to completely sort out the node.
Seam roofing. The joints in the junction assembly must be made with a double lock or a single lock, but must be carefully sealed.
It is better to entrust the repair of a complex assembly to experienced seam roofers.
Cheperepitsa. According to traditional technology, the junction was covered with mortar. Modern tile manufacturers offer to seal the joint with sealing tapes.
In this case, it is enough to re-glue the joint. However, there are situations when the assembly is made incorrectly, and a complete rework of the junction is required.
The main defects and ways to eliminate roof leaks near the chimney are listed. In many cases, you can fix the leak yourself by sealing the cracks.
To eliminate leaks at complex junctions of metal tiles, as well as assemblies of expensive tile and seam roofs, it is better to contact specialists. Experienced roofers will find the root cause of the leak and make expert repairs.
Our specialists will answer all questions about your roof leakage
Why is condensation in a chimney dangerous?
You need to take action immediately if condensate is leaking from the chimney; we figured out why this happens, but it’s also worth paying attention to the possible consequences. Moisture itself has great destructive power. If we talk about brick passages, condensate easily penetrates into microcracks and crevices. When temperature changes, it expands and is capable of destroying bricks. If the cause is not eliminated in time, there is a high probability of the need for major repairs. In addition, condensate flowing down can destroy a stove or fireplace.
Owners of stainless pipes should not relax either. Since combustion products contain acidic compounds, condensate has an aggressive effect and can destroy even corrosion-resistant metal.
Also, moisture in the chimney leads to poor draft. Because of this, combustion products are not completely removed and partially enter the room. This phenomenon can cause carbon monoxide poisoning, so you should not ignore the smell of smoke in the room, as well as the water flowing through the pipes.
Take action if water is leaking from the chimney, why you shouldn’t ignore the problem, we figured it out. A simple and effective solution can be the use of FuranFlex technology, but if the system is not designed correctly, then you will have to resort to more radical measures.
Similar articles:
You have questions? We can call you absolutely free!
We will contact you and answer any questions you may have!
How and with what to seal the gap between the pipe and the roof - different options for different materials
Installing a chimney is usually not a difficult process, however, in some places, such as floor crossings, some difficulties may arise. An important point is to ensure proper waterproofing. We will talk about this and other nuances related to how to seal a chimney pipe in this article.
Even if the pipe is placed as tightly as possible on the roof, minor gaps will still remain. When it rains, moisture will constantly enter the attic through them, which over time will lead to damage to the roofing structures. This is why roof pipe sealing is so important.
How to find the location of heat loss
We will need to measure the temperature of the flue gases at the level of the top valve. If you don’t have a special thermometer, you can measure it in the old proven way (so to speak, the old-fashioned way).
Take a thin dry splinter and insert it into the hole of the valve (remove the valve first). Heat the stove, remove the splinter and clean it of soot.
At temperatures below 150º the torch will not change color, but at 200º it will turn yellow, like the crust of white bread. And if the splinter has acquired the color of the crust of rye bread - 250º. If the temperature is lower than 200º, look for the cause in the oven. You need to take a close look at it - the features of the device, how and with what you heat it.
Stove
Damp firewood does not create the required temperature, burns poorly, and evaporates a large amount of moisture. But dried firewood may be able to solve your problem. Correct loading of the firebox is necessary. Of course, you shouldn’t overuse the stove with wood.
A large layer of firewood or coal can obstruct the passage of air from the ash pit, which also leads to condensation. When laying the stove, the builders may have laid the grate too large, so it is not completely covered with firewood.
And the cold air, bypassing the combustion zone, enters the chimney. This lowers the temperature of the outgoing gas. You can simply cover part of the grate with iron or brick. It is also necessary to carefully inspect the stove, hog and pipe for any cracks.
If you find any cracks, cover them with clay. If the cause of condensation is not found in the stove, then it lies in the chimney. Chimneys can be very long (6 meters) or too narrow. You shouldn’t undertake such a serious alteration yourself; entrust this task to specialists.
Attic
The hog (part of the chimney located horizontally, leading from the stove) is laid with bricks laid flat. Usually the height of the passage is three rows, and the top and bottom are covered with at least two more rows of brick.
If you find that your hog is bricked on edge, cover it with another layer of brick, or make a new one. According to the norm, the clearance of the pipe should be the same as the clearance in the chimney.
If the fire is not fired regularly, it is recommended to put a cap on the pipe, which will protect the pipe from rain and snow. So now you know why condensation can form in chimneys. Perhaps this article will help you rid your chimney of condensation and your home will always be warm and cozy.
Watch the video: Condensation in the chimney.
Source
How can you eliminate gaps?
The easiest way to solve the problem of how to seal the gap between the pipe and the roof is to install an apron on top. You can do it yourself, in which case you will need to provide strips for connection to the pipe in advance. There is an easier way - to buy a ready-made stainless steel roof passage. Often round passages are made for the chimney, and they are made of stainless steel; a galvanized chimney pipe is also used, most often. The passage is placed on the pipe, and the joint is fixed with a steel clamp.
If you need to seal minor gaps formed between the pipe and the roof, then for these purposes you can use silicone sealant (read: “Which sealants for chimneys are best to use - types, characteristics”). You can find a huge variety of them on sale, but we need a heat-resistant type.
The process of how to seal a roof around a round pipe will differ slightly depending on the type of roofing, that is, in addition to the basic recommendations, there are also algorithms that will vary somewhat.
Seal gaps between chimney and slate roof
Sometimes the question arises of how to seal the gap between the pipe and the slate.
Related article: How to make a cuckoo on the roof
The technology provides the following sequence:
- First, a round hole is cut in the steel sheet that will be needed to finish the ridge.
- Next, a ring of sheet asbestos cement is placed on the pipe.
- For absolute sealing, so that in the future there will be no problems with the leaking pipe on the roof, the joint between the pipe and the roof is sealed with an asbestos cement solution (proportion 1:2).
- In addition, the same solution is used to fill the gap between the chimney pipe and the slate sheet. To do this, you can temporarily make a limiter out of cardboard.
Getting rid of cracks on a tiled roof
On a tile roof, it is best to seal the cracks with a solution of sand and cement, which will best protect the inside of the building from moisture and precipitation.
To achieve the best moisture insulation, you will need:
- Install a galvanized collar on the roof, thus creating a place for pouring the solution.
- Pour a solution of cement and sand, making sure that it clearly fills the entire space between the roof and the chimney.
- In addition, you will need to make a surface and place it at an angle so that excess liquid flows down it.
How and what to use to fix a leak on the roof near the pipe?
A situation where a pipe on the roof is leaking, or there are leaks in the roof near it, requires immediate intervention. Otherwise, such damage to the roof can lead to harmful consequences. Fortunately, fixing such a defect with your own hands is quite simple. The main thing is to decide how to seal the gap between the pipe and the roof. To do this, you need to choose the right method to eliminate the cause of the leak, determining the location of the leak and preparing the required materials, which must be selected taking into account the type of pipe and roof.
Repairing pipe leaks on the roof
Before answering the question of what and how to fix a leak on the roof near the pipe, you need to decide what material it is made of. It is very important. This is the starting point for repair work.
The chimney duct can be mounted from the following materials:
- bricks;
- metal;
- asbestos.
When eliminating a leak, you need to follow a certain sequence of actions, which can differ significantly for each chimney material. Therefore, the technology for eliminating such defects for each type of pipe should be considered in detail.
Fixing brick chimney leaks
If a pipe made of red brick is leaking on a roof, then to fix the problem you will need the following materials and tools:
- cement grade M 400 or M 500;
- sand, preferably river or sea, but quarry sand is also suitable;
- water;
- Master OK.
How to seal the gap between the pipe and the roof, having all of the above? You must adhere to the following sequence of actions:
- A cement mortar is made from the prepared materials by mixing 3-4 parts of sand and one part of cement;
- the detected leak site is thoroughly cleaned of dirt and remnants of destroyed bricks;
- The prepared mixture is applied using a trowel to the damaged areas.
It is better to repair a roof pipe in sunny, dry weather. This way the cement mortar will harden much faster.
Repairing metal chimney leaks
If a metal chimney is leaking, then to correct the current situation you will need:
- special clamps with a rubber gasket that can be secured to the pipe where the gap occurs. The diameter of the clamp should be approximately equal to the thickness of the pipe. Its width should be slightly larger than the size of the crack;
- in addition, small cracks can be eliminated using cold welding, instructions for use of which can be found on the packaging.
The specified materials for eliminating metal pipe leaks can only be used as a temporary measure. As soon as possible, the damaged section of the chimney must be replaced with a new one.
Repairing asbestos chimney leaks
If water flows through an asbestos pipe, then you can eliminate the leak by performing a number of the following actions:
- First of all, you need to stock up on cotton fabric and “Iron Lead” paint. You can buy such materials at any hardware store;
- then the chimney, namely the damaged area, should be cleaned of dirt and dust;
- the paint is applied in a thick layer;
- fabric is tightly wrapped over it;
- Then the paint and varnish material is reapplied.
For the most part, such repairs are also a temporary measure that allows you to postpone the replacement of the chimney pipe for a certain period. You should not delay replacing a damaged asbestos chimney.
Protection of the smoke channel from precipitation
This is done using caps specially designed for this purpose, which are equipped with the tops of chimneys.
Some head models have built-in deflectors inside: this allows the product not only to perform protective functions, but also to help increase traction. In the same way, you can reduce condensation in the chimney pipe of a gas boiler.
Preventive actions
To reduce the percentage of condensation inside the chimney, carry out the following actions:
- The brick chimney duct is equipped with a metal pipe (the so-called “sleeving”). This makes cleaning the channel from soot much easier. In addition, this seals and insulates it: in this case, condensation occurs in noticeably smaller quantities, and it is removed faster.
- Install a special device for collecting condensate. It is best to do this at the place where the vertical and horizontal parts of the channel intersect: this is where it is most convenient to remove moisture from the gas flow. During maintenance of the condensate collector, it will be necessary to remove accumulated water from it from time to time.
- Use well-dried high-quality fuel.
- Carry out regular cleaning activities. The best time for this is mid-autumn, ahead of the start of the heating season.
- If necessary, repair the chimney.
Even if all the above recommendations are strictly followed, this will not guarantee the complete absence of condensation in the chimney, since this phenomenon will in any case accompany the operation of the furnace equipment. However, significantly reducing the percentage of moisture loss is a completely feasible task: this will increase the efficiency of the system and extend its service life.
Repairing leaks near a pipe
If water flows through the chimney during snow melting or rain, the reason for this is a violation of the tightness in the place where the pipe and the roof are connected. If there is a roof leak near a pipe, there are a number of ways to fix the existing problem:
- apply bitumen tape;
- install rubber cuffs;
- make and install a metal apron.
Related article: How to install a pipe in a bathhouse through the roof
All of the above methods allow you to close the leak, so they should be considered in more detail.
Using bitumen tape
If a chimney leaks due to rain or melting snow, then the simplest and cheapest way to eliminate the leak is to make an apron from bitumen tape. To perform such work you need to use the following materials and tools:
- bitumen tape;
- scissors;
- metal brush;
- gas burner.
The cracks are sealed by taking the following measures:
- first you need to use a metal brush, which is used to clean the roof around the chimney and its outer lower part;
- Remove any remaining dust and dirt with a damp cloth;
- At the junction of the pipe and the roofing material, pieces of bitumen tape are glued. It doesn't matter which side the gaps are on. You should create a full apron around the entire pipe;
- the glued tape is heated with a gas burner, which is pressed as tightly as possible to the roof and pipe;
- to seal the joint more reliably, the tape can be additionally secured with a wooden block or board (this cannot always be done, it all depends on the roofing material).
Bitumen tape is a universal material. It can be used if a pipe or roof made of any materials is leaking. The tape is capable of performing its functions efficiently for 2-3 years (depending on the amount of precipitation and other factors).
Using the rubber cuff
If the roof is leaking near the chimney duct, then this situation can be corrected by using a rubber cuff, which can be purchased at almost any hardware store. It is installed as follows:
- a cutout is made in the upper part of the cuff, the diameter of which is slightly less than the thickness of the pipe;
- the prepared cuff is put on the outer part of the chimney duct and lowered to the roof level;
- To avoid the possibility of repeated leakage, it is necessary to use sealant at the point where the roof comes into contact with the lower part of the cuff.
Some types of cuffs are not easily glued to the roof. Some models can be screwed to the roof with self-tapping screws, but this is only possible in cases where the roof is not made of tiles or slate.
The main disadvantage of the rubber collar is that it cannot be installed on a square or rectangular pipe. What to do in such a situation? Use any other leak repair method described above and below.
Arranging a metal apron
A chimney leak at the junction of the pipe and the roof can be eliminated by installing a metal apron. This is done as follows:
- An apron is made from a thin sheet of tin, the dimensions of which must match the dimensions of the pipe. A similar product can be purchased at a hardware store;
- the upper part of the apron is attached to the pipe and crimped using a clamp. The crimping process must be carried out carefully. Gaps are not allowed;
- The lower part of the apron is installed on the roof and secured with self-tapping screws. To ensure that the damaged area of the roof does not leak, in the future the lower part of the plate should be secured on top of the roofing material, and the upper part should be removed under the sheathing.
At this point, the manufacture and installation of the metal apron can be considered complete. The sealed area will no longer cause problems. For additional sealing, the metal apron can be equipped with a rubber lining, and the contact point between the cone-shaped part and the chimney duct can be sealed with sealant.
A leaking roof near a chimney can be repaired in many ways. Such cracks are closed in 5-10 minutes, but it is worth understanding that such repairs cannot be considered high-quality. The sealed joints between the roof and vertical elements will certainly make themselves felt in a few years. Thus, such local repairs are a temporary measure. It is designed to protect against moisture entering the room until a full roofing repair is completed.
Main reasons
The formation of condensation occurs when smoke cools, which contains water vapor, as well as various chemicals. When too much moisture accumulates on the inner walls, it collects in drops that begin to flow down. If there is severe frost outside, the resulting condensation freezes, and when it thaws, water begins to flow through the passages.
The reason may lie in the following:
- Absence or insufficient thermal insulation of the chimney. If the attic or part of the pipe protruding above the roof freezes, smoke in this place will condense due to a sharp temperature change.
- Incorrect design. Excessively long or narrow passages, a large number of turns or other gross mistakes made at the design stage contribute to the fact that air masses with combustion products pass through the chimney for a long time and have time to cool down in the process.
- Excessively strong or weak cravings. If the draft is weak, then the combustion temperature is low, which means the smoke comes out at a lower temperature. The dew point in this case is located in the smoke removal system, and not outside it. With strong draft, part of the air passes through the pipe, bypassing the combustion chamber or not participating in the combustion process. Moisture in the air also condenses.
The problem can also arise due to a clogged pipe, the use of wet fuel and other factors. In any case, if water is leaking from the chimney, you should not delay solving the problem, as this can lead to dire consequences.