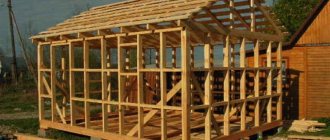
Laying technology
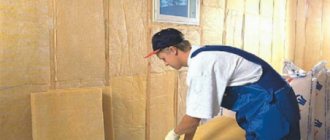
First, the bars are attached to the wall. Later you will need to insert a heat insulator into this sheathing, the thickness of which will be equal to the thickness of the bars. The bars should be as thick as the thermal insulation is expected to be. The vapor barrier is most often aluminum foil. Then the sheathing under the “lining” is installed.
It is best to attach the “lining” itself horizontally, since the condensate formed on the vapor barrier will be able to flow down without obstacles, because the sheathing will be attached vertically.
It is important to measure the actual width of the insulation. The bars need to be filled at a distance of 1 cm less than the width of the insulation. Then the latter will fit tightly, preventing the cold from penetrating.
If the distance is maintained correctly, the insulation holds tightly. To be sure, you can attach it with stainless screws and washers. The tightness of the heat insulator is extremely important. After all, if moisture forms under it, it may lose its properties. All joints must be taped with aluminum tape.
Foil is rightfully considered the best vapor barrier. Its advantage is that it can retain moisture and also reflect heat into the room, which is especially important for a bathhouse. By choosing foil, you can save time on heating the bath. It will become easier to maintain the temperature. And this will reduce the load on the oven.
The vapor barrier strips should overlap by 5 cm, no less. The joints need to be taped with foil tape. The vapor barrier is attached to the bars with staples. The joints are also taped with tape to prevent moisture from getting on the thermal insulation.
When the “pie” is assembled, another sheathing of planks is placed on the protruding bars. It is intended for installation of fastening materials. It is also used for installing the interior decoration of the walls of the bathhouse.
What are the advantages of a frame bath, especially if you order it from us?
Lyshchitsky Valery Ivanovich head of construction and installation works
Relaxing with your family in a bathhouse has long become very popular among city residents. On weekends they go out of town, slowly, with pleasure, heat the bathhouse, prepare towels, soap, shampoos. Then, slowly and tastefully, they wash and warm themselves in the steam room, exposing their hot bodies to the gentle touches of brooms. They splash kvass on the stones and inhale its hot bready aroma. Everything happens with feeling, with taste and arrangement, like a ritual rite.
Then they go out into the fresh air, eat and drink tea. They admire nature, and in this sensual contemplation, they detach themselves from the ant bustle of a large metropolis. The soul opens up to something new, unknown, as if you were born again and for the first time are enthusiastically experiencing this world.
What will you learn about in the article?
- Video about how we build frame baths
- Projects of our baths and author's control of the architect
- What is CODE (Building Codes)
- Foundation
- Grillage
- Frame
- Crossbar and lintels (bridges)
- Ukosina
- "Bridge of Cold"
- Vapor barrier and waterproofing in the “wall pie”
- Facade. Roof
- Interior decoration
Video about how we build frame baths
Such a delightful vacation is available only to those who have their own personal bathhouse. Everyone understands this, so deep down everyone would like to have a personal bathhouse. Modern frame construction technologies have given us all a big pleasant surprise. Now a frame bathhouse is affordable for almost everyone. The price-quality ratio is simply excellent.
Photo 1. Work on the construction and finishing of the bathhouse
Here, a little lower, we will tell you about how we build these amazing frame baths for you, our dear customers. For the convenience of your perception, the text in some moments will go literally point by point.
Projects of our baths and author's control of the architect
Our wise architect approaches all work issues calmly and carefully, studying them thoroughly, down to the smallest detail. Before starting design, he first assessed the issue in its overall strategic context. He wanted each standard bathhouse model to meet the needs of a certain category of people. Through painstaking structural analysis, he arrived at this. Therefore, we have a great variety of projects for various bathhouses.
Photo 2. Bathhouse projects from our architect
Large ones for lovers of noisy companies and small cozy ones for families and those who value privacy. For all categories of customers. Absolutely any person will find among them something of their own that most closely meets their personal needs. To do this, you just need to thoughtfully look through our catalog.
After this, the architect took up tactics, carefully calculating and polishing each of the standard projects like a precious stone. Every line on the drawings, every type of material used was meticulously calculated, and followed his plans and plans.
Photo 3. Bathhouse project PUD-37
He carefully monitors and evaluates the quality of work performed online for each object. Checks the compliance of their design documentation, makes sure that each of the building materials meets sanitary and technical approvals. He keeps track of so many different important nuances that it seems that every bathhouse under construction is like a child for him, who must be raised and properly released into life.
What is CODE (Building Codes)
CODE is a Western set of rules governing the construction of frame houses and structures. In the USA and enlightened Europe, this is practically the builder's bible. On all issues related to the commissioning of a house, local inspectors refer to it as the argument of last resort. If any elements are not made according to the code of the house, they are simply not accepted for operation. The Russian simplified analogue is the well-known SNIP. Ours builds in strict compliance with Code of Code, SNIP and SP standards.
Now we will dwell a little on the technology of building frame baths
Foundation
The topology and relief of our customers’ common land plots, as it turned out after numerous surveys, allow the use of screw piles. We also take into account the weight of our bathhouses; in the project this point has been calculated for each of them. It is necessary to carefully ensure that the screw piles go below the freezing level of the soil, and that their blades, in order to obtain the required load-bearing capacity, rest reliably on dense layers of soil.
Photo 4. Screw pile foundation
A foundation on screw piles is perhaps the best option for a frame bathhouse; unlike MZLF, it does not “float” in the upper layers of the soil and stands securely. Good ventilation of the underground space and convenient access to communications are also undoubted advantages of a foundation on screw piles. Although, of course, this is all a matter of taste, if you want, we can install MZLF for you, including insulation, according to your personal order. We can pour a good deep strip foundation, or make a slab. When working on an individual order, the bathhouse will be initially designed, personally according to your wishes.
Grillage
Next we make a grillage. We construct it from a package of cohesive boards or timber. The timber is dried in a heat chamber. The grillage elements are fastened together with nails. The material used is pine or larch, depending on your wishes.
Photo 5. Making a grillage, erecting walls
All components of the structure must be carefully treated with an antiseptic. The cross-section of the grillage is formed in accordance with the loads on it and the maximum distance between the piles. All this is taken into account in advance with mathematical precision in the standard design of each of our bathhouses.
Frame
We begin to assemble the frame from above. We make it from edged boards and naturally dried timber or dry planed boards. Material pine. We install racks. We make the upper and lower “tiring” of the walls.
Photo 6. Bottom wall trim
The top “strap” is the upper part of the wall, which is laid on top of the racks, holding them together and distributing the load between them.
The lower “strap” also holds the racks together and distributes the load, but it does it from below. It is single, rests on the ceiling, the upper “railing” is also single, since there is a “crossbar” along the entire wall.
Crossbar and lintels (bridges)
A “crossbar” is essentially a beam, the main function of which is to uniformly distribute the load in the structure. It is also placed in door and window openings.
Photo 7. Crossbars and lintels
Jumpers (bridges) are also placed between the posts. In fact, a lintel is a short beam that connects the racks to each other. According to the rules, the jumper must be exactly the same width as the elements being connected. In our situation, when we are talking about walls, these are racks. The jumper distributes the load from one rack to another. They also serve to reduce vibration inside the structure; they absorb part of it with their presence. By achieving additional rigidity, they protect the studs and wall sheathing boards from deformation due to stress or drying out. In buildings higher than three meters, the function of additional lintels is performed by the window sill and the top board of the window opening.
Jumpers are mounted along the entire wall or ceiling from edge to edge.
Ukosina
It is imperative that we install “jibs” strictly according to technology. “Jib” is a board that is placed on its edge and crashes into the top frame of the wall at an angle of 45 to 60 degrees. Its thickness must be at least 150x25. In relation to the racks and the “strap” of the wall, the “jib” should be placed at 90 degrees.
Photo 8. Jib bars in a frame bath
There is a certain relationship in the ratio of its dimensions. The thickness of the “jib” should not exceed a quarter of the thickness of the wall racks, for example, if 150 mm wide racks it is impossible to embed a 50 mm thick jib, but from 35 mm to 25 mm it is quite possible. As calculations and life practice show, this is enough.
The “jib” should fit flush with the posts and “straps”. There are no screws, it is attached only to nails.
For one load-bearing wall, two “jibs” directed in different directions are enough. Attention again.
On one wall, the “jibs” should be in different directions at the corners. Simply put, one is tilted to the left, the second is tilted to the right. In some cases they move in relation to each other in an x-shape.
From the point of view of structural rigidity, it does not matter whether the “jib” comes from the outside of the wall or from the inside, but from the point of view of the future “cold bridge”, it is better to install it on the inside of the wall.
“Jobs” play a very important role in a frame structure; they are necessary to create diagonal rigidity of the wall structure.
"Bridge of Cold"
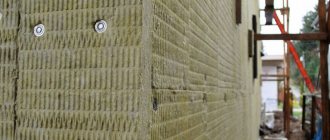
By and large, a “cold bridge” is a through part of a structure (wall, roof, ceiling) that poorly resists heat transfer. That is, the room loses heat through it. We solve this issue with the help of an element of “Finnish technology”, the design of the wall itself and the “insulation pie”. The “cold bridge” is cut off from the outside and from the inside.
Photo 9. Vapor barrier of frame bath walls
Vapor barrier and waterproofing in the “wall pie”
- Firstly, steam and moisture should under no circumstances get on the insulation, otherwise it will completely lose its qualities.
- Secondly, steam and moisture in the process of their circulation are carriers of heat, taking it outside from the room.
Therefore, insulation boards are always covered with a vapor barrier film, and its seams, even if it is overlapped, are carefully taped with a special vapor barrier tape. For insulation, mineral insulation is used; we prefer Rokwool from 150 mm. At your request we can make 200 mm.
Facade. Roof
We finish the facade with planken, block house or imitation timber. The material is mounted on the control sheathing slats, maintaining the ventilation gap.
Photo 10. Finishing the walls of a frame bath
Photo 11. Frame bathhouse facade
Photo 12. Frame bathhouse PUB-13
We make the roof using a rafter system; we use racks, “rafter legs,” and lintels to strengthen it, with variations, if it is single- or double-pitch. We cover it with metal tiles "Monterey" or "TechnoNIKOL". If you wish, we can make flexible or bitumen shingles. We install drainpipes in the standard version “Grand Line”.
Interior decoration
The interior spaces, rest rooms (if there are several of them), dressing room, and wash room are finished with clapboard made of Siberian beauty and Angarsk pine. The steam room, the heart of the bath, with a subtle understanding of the specifics, is decorated with panels of noble cedar. Its subtle, non-intrusive aroma will turn every visit to the steam room into an unforgettable pleasure.
Photo 13. The entrance area is highlighted with buffels and color
If you wish, we can recommend you several types of good stoves: Termofor Vitruvia, Harvia Sound M5, Narvi OU NS 16, Tremofor Geyser 2014. These stoves are among the top 10 best stoves for baths.
Photo 14. Finishing the steam room in the bathhouse
Photo 15. Steam room, shelf devices
If you decide to entrust us with the construction of your bathhouse, you will purchase an excellent frame bathhouse, built entirely using technology that will delight you for many years.
We have created this website “LesoBirzha” for you. Study the projects of our frame baths. Order them please. We will be glad to help you. We work in Moscow, St. Petersburg and the region.
See how we can
08 September 2020235
Construction of a frame bathhouse in combination with exterior finishing
We present to your attention a frame bathhouse built by us in combination with the exterior finishing of a block house (project PUB-13)
Construction of a frame bathhouse in combination with exterior finishing
08 September 2020
235
June 22, 2020278
Assembling a frame house for finishing at the Vyazemskoye community center
The cross frame is especially actively used in the construction of “Finnish houses”, which makes it possible to solve many issues simply and elegantly
Assembling a frame house for finishing at the Vyazemskoye community center
June 22, 2020
278
December 10, 20181341
Private gym - built from scratch
A team of designers, under the direction of the chief architect of the company, Usmanov P.
.
We developed an amazing project for the hall
as a free-standing structure.
The style chosen, taking into account all the buildings on this territory, is completely special, fashionable, modern, but fits so well into the surrounding landscape - BARNHOUSE. Literally translated it means barn, house. Private gym - built from scratch
December 10, 2018
1341
View other works
Steam room insulation
Insulating the steam room is the most problematic step in the process of insulating a bathhouse. The fact is that it is in the steam room that the highest temperature and humidity are present. Under such conditions, substances harmful to health begin to be released from many materials. Therefore, it is extremely important to choose the type of insulation wisely.
In no case should polystyrene foam or polystyrene foam be used as insulation . When heated, these materials release toxic substances. This applies to many materials, even natural ones. Harmless at normal temperatures, they become toxic when heated. Therefore, it is worth studying the characteristics of the material used.
Special foil insulation is perfect for insulating the walls of saunas and baths.
As you can see, insulating the walls of a bathhouse is not a very complicated process. It just requires adherence to a certain sequence and knowledge of the basic nuances. But the result of such work is worth it. You will get a bath and procedures that will be a real pleasure.
Source
The process of creating a wall pie
Stages of insulating a bathhouse from the outside.
The outer covering must be laid on the sheathing, this will create a gap for ventilation (condensation will evaporate rather than accumulate). It is unacceptable to place external finishing directly on the membrane to prevent the insulation from sticking to the finishing and causing it to sag.
After the frame is erected, it is necessary to complete the interior finishing using boards approximately 2-3 centimeters thick. It is best to use wood that will not rot in high humidity, such as linden, aspen, and larch. The selected sheets are nailed to vertical beams. Wooden lining is used for finishing most parts, which also helps to strengthen the entire structure, and not only creates a pleasant appearance.
It is allowed to use special film or parchment as a vapor barrier material. The film is placed with the foil towards the side of the room to allow faster heating. This material is simply necessary for a frame-type bathhouse to avoid moisture or condensation getting on the internal walls.
Insulation is applied to the vapor barrier to provide the required level of thermal insulation. The waterproofing is attached directly to the beams. Next, the external walls are sheathed using DSP or OSB sheets, attaching them to the beams. The outer walls of the bathhouse are sheathed using clapboard, siding, block house, and boards to give the structure the appropriate appearance.
We suggest you read: Is it necessary to register a bathhouse on an individual housing construction site: how to register
Insulation of a bathhouse from the inside: materials
Different rooms in the bathhouse have different requirements; we will focus on the steam room and wash room, the features of which are high temperature and high humidity. Also, the insulation is selected depending on the material of the bath walls.
But, regardless of the material of the walls and the purpose of the room, the insulation must be:
- Non-toxic so as not to cause poisoning when exposed to high temperature;
- Not hygroscopic, so as not to absorb moisture;
- Resistant to high temperatures and steam;
- Non-flammable;
- Maintaining its shape even after several years of extreme use;
- Resistant to fungi and mold;
- Sold at a reasonable price.
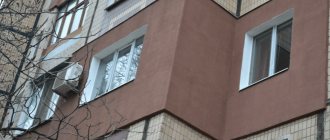
Exterior wall decoration
It doesn’t matter that a frame sauna will be an inexpensive option for a bathhouse, it can be given a very expensive and exclusive appearance, and you don’t have to get by with just painting the walls. Thanks to a large number of modern building materials, you can give the bathhouse walls a decent appearance. The external walls can be finished with thermal panels, facing bricks, vinyl siding, or block house.
We suggest you familiarize yourself with How to fix a cable channel on a concrete wall
What is important here is the imagination of the master, who can make a beautiful and functional room from a frame version of a bathhouse.
Source
Bath insulation
| Insulation | In what room is it used? | Note |
| Natural materials: rolled jute, felt, insulation made from reeds and sawdust, moss, tow, etc. | Dressing room, rest room. | Natural materials ignite at high temperatures, so they are not suitable for steam rooms and washrooms. But materials made from jute and flax are the best inter-crown insulation for a chopped bath. There are excellent modern roll insulation materials made from natural materials, but they are very expensive, so they are practically not used for insulating baths. |
| Mineral insulation. | They can insulate any bathhouse. Most often, slab insulation boards (mats) that are easy to install are used. | They do not rot, last up to 30 years, are fire resistant, and inexpensive. Most Russian baths are insulated with these materials. |
| Polymer materials | FORUMHOUSE craftsmen do not recommend it for insulating a steam room. | Polystyrene foam is an excellent heat insulator, but it is flammable, and at high temperatures it releases substances harmful to humans. You cannot use polystyrene foam in the steam room . Extruded polystyrene foam or penoplex is considered a safe material (it is used to insulate the bathhouse of Russian polar explorers in Antarctica). But FORUMHOUSE experts do not recommend using this material in a steam room. |
| Insulation based on aluminum foil. | It is used in accordance with the manufacturer's recommendations for a specific room. | The principle of operation of such insulation is the effect of a thermos, the reflection of heat from the walls and ceiling due to foil. Some types of foil insulation are produced specifically for steam rooms and other rooms with high temperatures, while others begin to release harmful substances when the temperature rises. Foil in the bathhouse is used as a vapor barrier. |
Rules for building walls and procedures
Frame wall pie with additional insulation.
Before starting the construction of a frame bath, you need to make sure that the wood used in the work is completely ready. It must be well dried. The type of wood can be any; in this matter you can rely on your own preferences. The main thing is not to use birch, which rots very quickly, and all other types of trees are suitable for work. Most often, the choice falls on linden, larch or aspen, which are characterized by low thermal conductivity and long-lasting shape retention.
For external cladding it is better to use pine or larch, and for internal cladding all types of trees will do, but in most cases aspen is used.
After all the work is completed, the outer boards must be coated with an antiseptic, and the inner lining, if possible, must be sanded and then coated with furniture varnish, preferably in two layers. It would also be advisable to use special impregnation, which is necessary for all rooms except the walls in the sink and steam room.
The bottom trim will be stronger if it is made of strong timber; a timber with a cross-section of 10x10 cm is suitable. It will need to be connected in the corners and fastened with nails. The resulting bottom trim must be securely fastened; for this, the corner posts must be installed on steel pins, so they will not move. To create the top trim, you can also use a wooden beam. To obtain a rigid bath frame, it is necessary to place 8 braces in the corners. Intermediate racks are created along the walls using beams.
The simplest and most affordable material for the outer cladding of a bathhouse is considered to be lining (imitation or decorative). The placement of the lining along the external wall is carried out in a horizontal direction, having previously laid down parchment, which will act as waterproofing. The sheets must be laid out overlapping and glued with tape to prevent moisture from penetrating inside.
Return to contents
Insulation of the bathhouse ceiling from the inside
The bathhouse is insulated from the inside in the following order: ceiling - walls - floor. The main part of the heat in the bathhouse is lost through the ceiling, so
This is how an authoritative member of FORUMHOUSE with the nickname KochevniK recommends insulating the ceiling.
We hang at least 10 cm of insulation under the black ceiling. I really don’t recommend basalt wool, glass wool and polystyrene foam in the steam room. The insulation can be hung with lacing. Then foil, gap along the slats and lining.
Regardless of the material of the walls of the bathhouse, the ceiling is insulated in the same way.
Features of insulating walls made of different materials
The technology and sequence of insulation layers remains virtually unchanged for different rooms and types of buildings. Only some parameters can be changed. So, for example, for a steam room the thickness of the insulation is recommended to be twice as thick as for other rooms : this is where it is very important to retain heat for the maximum amount of time.
The thickness of the insulation also differs for buildings made of different materials. A log bathhouse itself retains heat well, and when decorating all rooms except the steam room, you can do without insulation at all, or choose a material of small thickness - if the winters in your region are harsh.
The video below explains why there is no need to additionally insulate the walls of a log bathhouse (the plot of the “Estate” program).
Insulating the walls of a brick bath from the inside
There is practically no difference, except for the fastening methods: it is more difficult to drive nails into a brick wall; you can use dowels.
You can use galvanized profiles instead of wooden blocks, but when purchasing them, pay attention to the fact that they are suitable for use in rooms with high humidity. And the choice of sizes is much more difficult here: there are not many standard sizes, and metal can become a conductor of cold. Insulation of brick walls of a bathhouse from the inside requires a greater thickness of thermal insulation than in a bathhouse made of logs: minimum - 10 cm , but this parameter depends on many factors: wall thickness, external insulation, region, etc.
Insulation of bathhouse walls made of foam blocks
the composition of the “pie” is no different. The whole difficulty is that this material does not hold fastenings well, even special ones. It tolerates excessive loads no better. Therefore, when choosing materials, pay attention to their weight. It should become one of the decisive factors.
The foam block does not hold fastenings well.
The fastening of the sheathing must be done so that the main load falls on the floor and not on the walls. To do this, you can make U-shaped structures that are attached to the floor and ceiling, just fix their position in the walls with a pair of dowels.
Advice!
To further reduce the load on foam concrete walls, you can not fasten the slats tightly to the wall, but make clamps from pieces of galvanized steel that will only hold the slats in a vertical position. The entire load will fall on the floor.
Place the insulation tightly between the slats, and you can fix it so that it does not fall using thread and a stapler (shoot the thread against the slats). A vapor barrier or vapor barrier can also be attached to the planks using staples, but do not forget to overlap the panels, glue and seal the joints with foil tape, and cover the staples with patches.
The last stage of insulating the walls of a bathhouse made of foam blocks is the installation of lathing for interior decoration. This is a similar frame made of U-shaped sections, the load from which is distributed mainly on the floor. This frame is attached to the first one in several places to the bars.
This is only one solution that allows you to insulate the walls of a bathhouse made of foam blocks, but it is simple to implement and quite reliable.
Insulation of a frame bath from the inside
To insulate a frame bath, rolled mineral insulation is most often used.
To insulate the walls of a frame bath from the inside:
- Insulation is placed in the interbeam space of the structure;
- The next layer is vapor barrier (foil);
- Ventilation gap;
- Sheathing.
The photographs below show how KochevniK insulated his frame bathhouse. Insulation – basalt wool.
Insulating a bathhouse from the inside with your own hands: step-by-step instructions.
Foil acts as a vapor barrier, so it is important that there are no even the slightest holes or damage in it, and that all joints are well taped with high-quality tape. The tape is always sold together with foil, and its quality must be checked in the store (glue the tape to the foil and try to tear it off).
Choice of insulation
Experts by a majority of votes recommend the use of slab-type mineral wool “Ecobasalt” as the most convenient, economical and proven material. However, other materials can also be used as insulation, for example:
- Ecowool . Despite a lot of positive qualities, insulation has significant drawbacks, the main of which is the loss of its qualities over time, a high risk of shrinkage with the formation of cavities, and the possibility of prolonged smoldering when exposed to high temperatures.
- Glass wool . Recently, its use has dropped sharply due to the dangers during operation. However, with proper protection of the respiratory organs and eyes, this is quite a decent insulation. absolutely non-flammable and durable.
- Expanded polystyrene, or polystyrene foam . It is light in weight and rigid, convenient for use, and easy to cut and process. Disadvantages - inaccurate fit causes the need for additional use of polyurethane foam, which, in combination with the higher price of polystyrene foam than, for example. for mineral wool, increases the cost of insulation.
- Expanded clay . Relatively cheap, fire-safe material, not afraid of dampness, lightweight, effective. The disadvantage is its flowability, which makes its use on vertical surfaces difficult. Nevertheless, expanded clay is quite suitable and even recommended for insulating the ceiling and floor of a bathhouse.
- Sawdust . Traditional insulation that has been used for centuries. They are used in the form of mixtures with clay, cement, pressed blocks (arbolite), but are not used in their pure form due to flammability and the danger of insects and rodents.
- Clay . Clay does not work as an insulator in its pure form, but it can be used in a mixture with sawdust or shavings, which is why it acquires good properties and can be used. Disadvantage: it tolerates moisture extremely poorly and does not dry out for a long time.
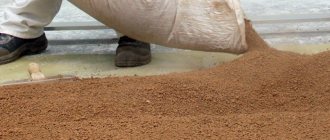
- Liquid insulation . This name may refer to several types of material with different qualities. For baths, polyurethane foam is most often used, produced in liquid form and applied by spraying or pouring into prepared cavities through a technological hole. It has a number of very useful properties: it is light, non-flammable, has antiseptic properties, when applied, it tightly seals the entire space and leaves no gaps. Economical, does not require waterproofing from the outside.
- Foil insulation . One of the methods of insulation is the use of ordinary foil as a heat reflector, mounted on a film base or on a layer of mineral wool. It is used as additional insulation on the outside, or as a cutting layer on the main insulation.
It should be taken into account: the thickness of the walls of a frame bath, despite what was said above in the relevant section, may be less than 10-15 centimeters or more, this depends on the thermal conductivity of the insulation. Some will consider 50 millimeter polystyrene foam sufficient, while others use expanded clay and will need 20 centimeters.
How to install insulation?
Installation of insulation is carried out by placing pieces of material cut to size into the space between the wooden frame elements. The main condition for proper installation is a tight fit of the insulation and the use of additional sealing agents, for example, polyurethane foam.
When using film or foil materials, they should be secured to the surface with a stapler, and the joints should be carefully taped with metal tape. Polyurethane or ecowool is sprayed more often from the outside, and the vapor barrier layer must first be strengthened. Working with expanded clay is simple - pour it into prepared cavities and level it, after which a number of boards are laid on top to protect it from moisture, debris, etc.
Useful videos
Watch the videos where the builder shares many details on insulating a frame bath:
External insulation
Additional insulation is installed on the outside, enhancing the effect of the main layer. In the conditions of the Russian winter, the measure is not at all superfluous, and sometimes it is simply necessary. It is often recommended to use polystyrene foam as an additional layer, as it is a lightweight material with good hydro-repellent properties. You can attach foam sheets with glue or nails to the frame elements. A reinforcing mesh is attached to the polystyrene layer and a layer of screed is applied, after which the finishing coating is applied after drying.
Internal insulation
Insulation of the walls from the inside, in addition to the existing pie, is not required. Above the layer of vapor barrier installed with foil inside the room, lathing and cladding are installed. The cladding material is traditionally pine or aspen lining.
Insulating a bathhouse from the inside with your own hands: log house
Insulating a chopped and well-caulked bathhouse from the inside would be a tragic mistake. This is not only pointless and destructive for the walls, it contradicts the very idea of a chopped bathhouse.
Log houses for baths are made for two reasons:
- To get a classic Russian steam bath, which takes a long time to heat and maintains the required level of heat and humidity for a long time. It is the tree that accumulates heat and moisture and gradually “gives it away”. In this case, the inside of the bathhouse cannot be lined; You will also have to come to terms with the high consumption of firewood.
- For the image. No bathhouse looks as cool in appearance as a chopped one. But I often don’t want to waste time and firewood; I want the bathhouse to be heated in an hour, so insulation, vapor barrier and clapboard cladding are done. The log house works only as an external frame; the meaning of the material is lost. In this case, it is cheaper and more correct to build a frame bathhouse.
It happens that a person gets a ready-made bathhouse from a log house, and for various reasons it can be cold. Such a bathhouse can be insulated, but only from the outside.
The pie looks like this:
- insulation;
- wind protection;
- vertical sheathing to create a ventilation gap;
- outer skin.
And you can put foil on the inside and line it with clapboard, not forgetting about the ventilation gap.
Here's what KochevniK recommends:
- We put foil on the beam and fasten it with a construction stapler;
- We seal ALL joints with foil tape;
- We fill the vertical slats with a thickness of 1-2 cm;
- We fill the lining horizontally, leaving gaps at the top and bottom for air circulation.
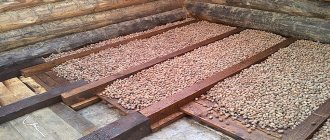
If the ceiling of a chopped bathhouse is made of thick boards, it is not necessary to use insulation, but then the following is poured onto the ceiling in a cold attic:
- ash;
- sand;
- expanded clay (it is preferable that the granules be of different sizes);
- clay coating.
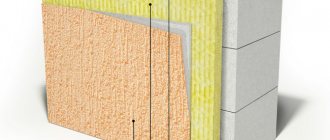
Wall pie of a frame bath
Floor covering installation.
Very often, when we talk about a wall, a picture of brickwork appears in our heads, but nowadays a wall is not just stacked bricks or concrete, but a very complex, multi-layered structure.
The wall can be made in several layers, each of which will consist of a specific building material, combining insulation, bricks and other materials necessary for the work.
An example of a properly made pie would be the following combination of layers:
- Beam with a thickness of at least 150x50 for the frame.
- Mineral insulation, which will be located between the frame racks (you can use rolls or mats of mineral wool).
- OSB board with a minimum thickness of 15 mm.
- Horizontal type lathing.
- Insulation required for horizontal sheathing.
- Vapor barrier (or wind barrier), the use of a multifunctional membrane is acceptable.
- Vertical type lathing.
- Exterior finishing.
- Material for vapor barrier.
- Lining (or drywall) for interior decoration.
Return to contents
Insulation from the inside of a brick bath
Brick is not the most suitable material for building a bathhouse, but if there is a brick factory somewhere nearby, then brick bathhouses begin to grow like mushrooms. Due to the high thermal conductivity of brick, such a bathhouse requires insulation without fail. Insulation is carried out only from the inside, and to make the bathhouse look cool from the outside, decorative jointing is done.
Typically, the pie of an insulated wall of a brick bath looks like this:
- brickwork;
- waterproofing,
- insulation;
- vapor barrier;
- sheathing
Waterproofing between the brickwork and the insulation is optional: if the walls are built correctly and waterproofed from the foundation, they will not become damp. If there is no confidence in the walls, then it is better to do waterproofing.
The insulation on the brick walls of the bathhouse is attached to the frame.
We build a frame on the wall from 100×40 timber with insulation width increments, fill it with insulation, lay a vapor barrier, sew on 20mm slats and cover it with clapboard.
Our user S4sha’s bathhouse is made of half a brick, but it steams just fine even at -30. Its walls are insulated like this:
- mineral wool;
- vapor barrier (in the steam room - foil);
- ventilation gap;
- lining.
Insulation thickness – 50 mm.
Frame house wall pie
A frame house includes layers of walls, of which there are quite a lot; this multilayer structure is called a pie wall. The outer wall has more layers than the inner one. Since they are somewhat different in their structure, each will be discussed separately.
A frame house includes layers of walls, of which there are quite a lot; this multilayer structure is called a pie wall.
Construction of external walls
So they include:
- The first is a frame made of timber. You can use different sizes, but usually in our country we are talking about 150x150 millimeters;
- The insulation is laid next. Various types of insulation are used (they will be discussed in more detail below);
- Next comes fibreboard, a minimum thickness of 15 millimeters is allowed. The principle works here: the thicker, the more reliable; sellers can offer options with a smaller thickness, but you can live in such a house only in hot regions. In cold weather, such walls will not provide the necessary heat and simply will not withstand such loads;
- This layer consists of a horizontal sheathing; it can be made of a plank product or an aluminum profile. What material will be used is not so important, since this layer does not affect the quality of the frame;
- Next comes the insulation again, either mineral wool, expanded polystyrene or polystyrene foam is selected. All options have good qualities;
- The sixth layer is a multifunctional membrane, which is responsible for the para-insulating and windproof function. Essentially it is a thick film, but it copes with its protective functions at the highest level;
- The seventh in order is the vertical sheathing. Has the same types as horizontal;
- Next comes the finishing layer; any finishing material is suitable, except stone, it is too heavy;
- The penultimate layer is again paraisolation;
- Well, the final part is the inner lining. For frame housing, plasterboard or lining is usually used. You can choose imitation timber, siding.
Additionally, cross-insulation can be carried out.
For frame housing, plasterboard or lining is usually used.
Construction of internal walls
The structure of the internal part has fewer layers because the external part is subject to greater harmful atmospheric influences. So, the internal part consists of:
- A frame is placed in the center of the pie;
- The second layer of insulation is laid, which can be made of min. cotton wool, usually used in the production of frames at the factory. But experts say that it is better to choose glass wool; the price is almost the same. Therefore, if the construction is carried out with your own hands, it is better to purchase the second option, it has better thermal insulation, as well as sound insulation;
- The next one is a multifunctional membrane, or a vapor barrier, the second type protects exclusively from vapors, the first also protects from water. Due to the higher quality protection of a multifunctional membrane, it costs more, but the savings can come at a cost, because with such protection you can avoid the appearance of mold and fungi in the house. Isoplat material is also suitable; it is easier to work with;
- The final one is an OSB board, or sometimes plasterboard material is used.
In modules from the factory, sandwich panels are most often used; such partitions are easy to cut out the necessary openings in them.
Experts say that it is better to choose glass wool.
Basic Rules
In addition to the order and materials used to construct the frame, it is worth knowing about some rules. They will help you do everything right and get a reliable, warm home that will last a long time. Basic Rules:
- Before starting construction, it is necessary to prepare a house project; it will make it easier to correctly calculate how much material will be needed and monitor the work;
- Do not use naturally dried wood when work is carried out in one season. Since this material tends to change shape;
- Do not skimp on insulation or diffuse films; poor quality products will have a negative impact on the microclimate in the house; as a result, the house will last less time. This result can be achieved by materials that are not suitable for a specific purpose;
- Thermal resistance is calculated based on average temperature, and the time of year when the house will be used is also taken into account. If the house will not be lived in during cold weather, then there is no need to heavily insulate the house;
- Due to the types of finishing outside and inside the building - if lightweight materials are used, then there will be fewer requirements for the cake;
- Climatic conditions and insulation of a house directly depend on the climate where the house is being built; in warm regions there is no point in heavily insulating the room.
Before starting construction, you need to prepare a house project; it will make it easier to correctly calculate how much material will be needed.
Insulation of a bathhouse made of blocks from the inside
For the construction of a bathhouse, durable and moisture-resistant blocks of expanded clay concrete are preferred. The insulation of such a bathhouse is thought out at the stage of its construction. The most important thing here is to remove the icy mass of concrete from the heating circuit. There is a technology promoted by our user ZYBY, which allows us to solve this problem by constructing a frame wall from boards with an indentation from the walls of the bathhouse. It is suitable for insulating all baths with stone walls.
To ventilate and dry the space between the frame and the walls, several vents are made in the walls of the bathhouse, at the top and at the bottom outside. The vents are closed while people are steaming in the bathhouse; the rest of the time they are open for drying.
Insulation cake for steam rooms and washing rooms using this technology:
- concrete wall with vents;
- insulation on the frame-wall (with an indentation from the concrete wall);
- frame-wall;
- foil;
- finishing with 50th unedged board (aspen, linden or cedar) to get solid wood in the steam room.
With this approach, there is no need to heat the ice walls. And the insulation will dry out between steaming sessions.
But many owners of a block bathhouse insulate it from the inside traditionally:
- concrete wall;
- insulation (attached to the frame);
- foil;
- ventilation gap;
- lining.
Such a bathhouse needs insulation from the outside as well.
Vapor barrier and bath insulation
Bath wall construction with vapor barrier.
Experienced builders recommend using rolled ursa 50 mm thick to insulate walls. It is laid between racks located vertically, with the slats alternately nailed to them. In some places it is possible to nail directly to the outer boards, but this can only be done using special nails that have a rubber washer under the head.
A negative for a frame bath is the formation of moisture in winter, when it is hot in the bath. It is for such moments that a vapor barrier is needed. At the moment, the best option is plastic film, which should be placed under the inner lining.
It is important to note that the steam room will require high-quality vapor barrier lining. A good example of this type of vapor barrier is aluminum foil, vapor barrier film, glassine and other materials. For this room, it is undesirable to use roofing felt or roofing felt because of the specific odor that will be released when heated.
Thus, a wall cake is obtained consisting of the following layers:
- layer of outer lining;
- a layer of glassine;
- insulation layer;
- a layer of polyethylene film;
- layer of inner lining.
It is very important that a small gap of 5 cm thick is formed inside the wall.
Bathroom floor insulation
Precious bath heat also escapes through the floor, so it also needs to be insulated. To insulate the floor in a bathhouse, it is recommended to use expanded clay as the lightest and most environmentally friendly material.
Expanded clay is poured between layers of concrete floor as follows:
- pour the first layer of concrete;
- wait until it hardens completely;
- expanded clay is poured (layer thickness - 10 cm);
- install reinforced grating.
- pour a layer of concrete;
- make a cement-sand screed.
Summarizing
A good bath is a warm bath. And in order for it to warm up well to the required temperature, it is necessary to choose the right thermal insulation and insulate all structural elements.
The bathhouse is also insulated from the inside:
- Windows, doors and all openings - with natural sealants;
- The outer door is made from good natural materials.
At FORUMHOUSE, the issues of insulating a steam room are discussed in detail, and the insulation of the ceiling of a steam room is discussed separately. Find out how to properly insulate a timber bathhouse from the outside. Read our article about insulating the floor in a bathhouse. Get acquainted with the guide to bathhouse constructions of our users and find the answer to any question about arranging a bathhouse. Watch our video on how to build a full-fledged bath complex.
Source