Causes of leaks in the heating system
When solving the problem of how to find a leak in a heating system, it is useful to know the reasons for its occurrence - this will help to quickly and effectively eliminate the malfunction. There are quite a few reasons for depressurization of the heating main, the main ones being:
- Loss of tightness of connections. This is the main cause of leaks that affect all traditional water heating pipelines. They arise as a result of corrosion when using metal pipes, aging of sealing gaskets, and spontaneous unscrewing of threaded connections.
One of the common causes of leaks at joints is the thermal expansion of metals, while during operation of the heating system in a high-temperature operating mode, water does not leak, and after the coolant cools down, the metal of the fittings at the joints narrows and a leak may appear.
- Pipeline damage. If a steel line is used longer than its allotted life, water leaks out as a result of corrosion of the walls of the heating pipes, leading to their thinning. Synthetic materials can be damaged if installed incorrectly or during use. Mechanical damage to pipelines due to freezing, excess pressure or extremely high temperatures is also possible.
- Poor quality installation of the system. Poor welding in steel pipes, improper pressing of fittings into metal-plastic, installation of a line from plumbing fittings and pipes from different manufacturers - these factors often lead to leaks.
- Use of antifreeze. Non-freezing liquids have increased fluidity, their surface tension is less than that of water; if they are poured into the system after using a water coolant, leaks may appear at the joints.
- Poor quality materials. Sometimes heating radiators leak between sections due to poor quality manufacturing; leaks are caused by cheap fittings with short thread lengths or thin walls, defective Mayevsky valves on radiators or ball valves in the system.
- Violation of operating rules. If the heating system is operated incorrectly: a significant excess of pressure or overheating of the coolant, leading to destruction, wear and expansion of the pipeline and gaskets, a leak appears.
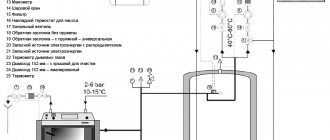
Rice. 2 Connection diagram for heating boilers, radiators and heated floors
Causes of leaks
Before moving on to ways to prevent flooding, let's look at the most common causes of leaks. As with any accident, they can be different and associated with both the human factor and the imperfection of systems.
Statistics show that leaks most often occur due to:
- Plumbing fixtures that have served their purpose . Pipelines and connections, as well as household appliances with additional accessories for them, have a guaranteed period of use. Of course, there is no need to replace your washing machine or dishwasher at the end of its life. However, you need to keep in mind that nothing lasts forever and over time, even the most reliable equipment can fail. You can partially reduce the risk of flooding by checking the connecting elements and replacing worn hoses, gaskets and other parts.
- Use of low quality materials in plumbing . The selection of all system components should be taken as responsibly as possible. Saving on pipes, connecting parts or connections at the expense of reliability is unacceptable. Otherwise, a leak may occur at the most unexpected time and take you by surprise. This often happens, for example, at the beginning of the heating season - pipes that are not adapted to sudden pressure surges simply burst.
- Errors when wiring and connecting plumbing fixtures . An incorrectly connected faucet, heated towel rail, bathtub, toilet, dishwasher or washing machine can cause a serious accident.
- Stray currents . It would seem, where do they come from in the heating and water supply system of an apartment or private house? This may be due, for example, to an insulation breakdown in the electrical wiring that is in direct contact with the pipeline. Stray currents cause electrochemical corrosion in metal pipes and accelerate their destruction.
- Human factor . Theoretically, if all systems are in working order, flooding cannot happen. However, for example, leaving residents on vacation and leaving the apartment unattended for a long period of time with open shut-off valves in the water supply and heating risers is fraught with unpleasant surprises. Especially if you do not have a water leakage monitoring system installed that could automatically turn off the taps in case of emergency.
As a result of one of the floods, water flowed straight out of the sockets with long sparks until the electrical panel was knocked out
You can see from the drips on the wallpaper that the switches were also in the water.
Where can leaks occur?
Pipes, plumbing fittings and appliances (boilers, radiators, expansion tanks) leak as a result of corrosion, aging gaskets or mechanical damage.
When using steel heating pipes, depressurized joints lead to leaks in couplings, drains (battery connection areas), bends, connection points for shut-off valves, heating and measuring instruments, pumping and water heating equipment. Similar problems arise when using a metal-plastic pipeline; in addition to the above, water can flow out after some time through the threaded connections of compression couplings as a result of their self-unscrewing.
Rice. 3 Search devices for detecting leaks in hidden pipelines
How to detect a water leak in a heating system
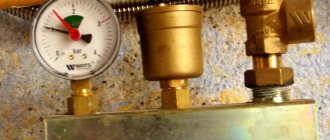
Any heating line in a private home is equipped with a pressure testing device - a pressure gauge, which is used for adjustment and control. Its readings correspond to the pressure in the system and must be stable - any deviation towards a decrease indicates depressurization and a possible coolant leak.
Typically, heating consists of several circuits (heating radiators, heated floors), and installing a pressure gauge in each of them allows you to determine the depressurized area.
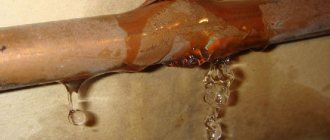
If a leak occurs in an open pipeline located in the house, it can be detected by wet marks on the floor or walls; when using antifreeze, the stains will have a corresponding color.
How to find a leak underground or in a screed
As mentioned above, a pressure gauge allows you to detect a leaking circuit; finding a leak under a layer of earth or screed without special instruments is quite a difficult task. Since most problems occur at pipe joints, you should first open the screed or dig the ground in these places. The second option is to use special instruments (for this you can hire specialists or rent equipment), to detect breakthroughs they use:
- Thermal imagers . Using compact devices, you can immediately find a water leak in the house or underground if the pipeline is shallow. The depressurized area will have the appearance of a thermal blurred spot with an increased temperature at the place where the coolant leaks.
- Moisture meters . High humidity indicates that there is a leak in that area. The method is used only indoors, its effectiveness is low - it can only detect a room with high humidity, and not a specific area.
- Phonendoscope. Acoustic devices that capture sounds are more suitable for identifying external noise sources; with their help, it is very difficult to find a leaking area in the walls or screed.
Rice. 4 Finding leaks using thermal imagers
How to reduce the risk of flooding
Here are some important recommendations that, if followed, will help reduce the likelihood of apartment flooding to a minimum:
- Never attempt to carry out any work on the communal water supply and heating risers. This is collective property, which only the management company has the right to maintain. If it is necessary to repair or relocate risers in the event of a redevelopment project, all measures must be carried out by the operating organization.
- Lay pipes and install plumbing in the apartment only in those places specified by the project. When remodeling, keep in mind that rooms in which water is used (bathroom, kitchen) must be located strictly above similar ones located on the floor below the neighbors.
- Replace the common water supply valve to the apartment with a distribution manifold. This device is equipped with several shut-off valves that allow you to shut off water to each water supply point (dishwasher, faucet, etc.) separately. If you are leaving for a long period of time, close all shut-off valves, and if you do not use any device often, then only them, and open as needed. Don’t skimp on the quality of your taps so that your leakage protection is more reliable.
- If possible, try to install metal connections to plumbing fixtures - copper pipes or corrugated stainless steel pipes. Flexible hoses wear out faster than conventional steel or plastic pipes, are designed for lower pressure and require periodic renewal approximately every 3 to 5 years.
- When making wiring, use only specially designed materials. The heating system should not be constructed with metal-plastic pipes, which may not withstand high temperatures and pressures. Monitor the quality of all connections; if possible, try to make as little as possible. After all, these places are high-risk areas. Remember that threaded connections should not be embedded in walls or hidden in boxes - they must be open for periodic maintenance.
- Install pressure reducers between the apartment wiring and risers. For example, almost all mixers can withstand up to 6 bar. The gearbox can limit it to a slightly smaller amount to prevent damage.
- Use water hammer dampers. This will reduce the likelihood of rupture of heating, hot water and hot water pipelines in the event of a pressure surge in the system.
- Install a water leakage protection system. There are few similar products currently available. Neptune has proven itself best - a water leakage control system that best meets all criteria for quality and reliability.
If the Neptune leakage protection system had been installed in the apartment, such consequences could have been avoided
Repairing and replacing parquet will cost the owners a tidy sum
What immediate measures are taken if a leak occurs?
The appearance of a leak in the heating system requires an immediate response. The first measures depend on the nature of the problem and the location where it occurred.
A leak in a private house can be fixed on your own, but in an apartment you should be careful not to flood the neighbors living below. Another nuance is that during the renovation the entire riser will have to be shut off, which means that all the apartments it connects will be without heat.
You can try to fix a small leak yourself using improvised means. If the problem is serious, then shut off access to the coolant and call specialists.
Hot water splashing in all directions can cause injury, so before turning off the water supply, you must throw a thick blanket over the pipe or radiator. Valves for shutting off hot water can be located directly in the apartment, but most often they are located in the basement of the entrance. You'll have to go down there, find the right tap and turn it off.
We recommend: Do-it-yourself hood over a barbecue in a gazebo: how to make a chimney from metal or brick, distance and height, materials and tools
How can you find a water pipe underground?
Sometimes the question of how to find a broken water pipe underground is not the main, primary question. The reason is the owners’ lack of knowledge about where exactly on the site this communication lies. And in this case, first they need to find out the exact location of the water supply, and only then look for the defect in the route. There are options for solving the problem, even several of them.
- Contact the administrative body - the department of architecture and construction. All received certificates and drawings will provide all the necessary information: information about all communications, the depth of their location, accurate routing with all distances and reference points.
- Invitation of representatives of specialized organizations. This solution is the most logical solution, since professionals who have all the necessary equipment will do the job quickly and flawlessly. Other advantages are the chance to find communications located at great depths, the guarantee provided by the contractor, and the preparation of an accurate plan.
The last possible option is to search on your own. However, in this case, the method directly depends on the material of the pipes. The simplest task is faced by those owners whose pipeline is constructed from metal or metal-plastic products.
Of course, the easiest way out of the situation is to contact a company that provides such services, but even the approximate cost of the work in this case will not please all owners. For an inspection of up to 20 m, you will have to pay about 5,000 thousand rubles, for searching for a pipeline up to 200 m in length - at least the second more.
Search for traditional, metal piping
The first option is a metal detector. However, success will be guaranteed only if the water supply is not too deep: if the distance from the surface is more than 1.5 m, then it will most likely not be possible to find it.
Other types of equipment are designed to locate hot water pipes. This is a thermal imager or non-contact thermometer. The first device allows you to find the pipeline with an accuracy of 10-20 mm. A thermometer is an alternative that will find a hot water supply at a depth of several meters.
The problem of plastic pipes and its solutions
Metal water pipes have a great advantage over plastic products. They can be found relatively easily underground. For plastic competitors, things are a little different.
Difficulty of detection
Polyethylene or polypropylene pipes are characterized by minimal weight, ease of installation, no threat of corrosion, and a long service life. But detecting such hidden communications is quite difficult. Even a shallow laying will not allow you to find them with a metal detector or locator.
To ensure the safety of plastic pipelines when searching for a leak, it is recommended to use markings indicating the location of the route. Otherwise, damage to unmarked pipes will be one of the possible scenarios. The consequence may be the replacement of the old highway with new communication networks, and such repairs will be expensive.
Types of markings
In order not to encounter difficulties when searching for damaged sections of the highway, it is recommended to use one of the following methods while installing the system.
- Marking with metal wire. It is either attached to the pipes or simply laid next to it. The advantage of this solution is the ability to connect a locator generator to the conductor in the future.
- Markers, marking tapes, cords. These devices, called passive, reflect the signal of the metal detector. Such markers are fixed to the pipes with a cable tie, or simply placed in the ground above the water supply. Their detection depth is about 1.5 m.
If we consider the latest devices (tapes, marking cords), they are most often used to protect gas pipelines, communication lines and power cables.
Independent search for water supply
It must be repeated that the choice of method depends only on the material of the pipes.
Metal detector help
If a metal pipeline is laid at a depth of up to 1.5 m, then a metal detector becomes the first suitable device. You can use both professional and amateur equipment. Hydro- and thermal insulation will not interfere with the operation.
Special devices
Pipes can be located using radar, cable locators, radars, tracers, locators, markers or marker tapes. The operating principle is the same in all cases: the devices scan the ground for the presence of induction fields. Methods are active-non-contact, contact and passive.
If they are looking for metal water pipes, then a generator is connected to the system. Plastic routes require a different approach. In this case, a metal cable is inserted into the pipe, at the end of which there is a probe or float. Then it is connected to the generator, after which it remains to catch a stable signal.
Using a Traditional Frame
The popularity of the method and its simplicity does not mean that everyone a priori knows how to handle this elementary device correctly. The essence of the method is that two pieces of wire, bent in an “L” shape, intersect when the researcher stands exactly under the pipeline. When it moves 2-3 meters away from it, the locators also diverge.
In this case, you have to act carefully. Both improvised devices should not be held tightly in your fist. To ensure that the readings are correct, it is recommended to repeat the procedure 5-6 times. Despite the skepticism of many, this “old-fashioned” method works, as evidenced by the reviews of those who use it constantly.
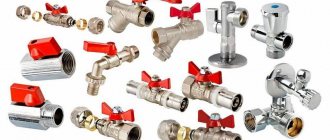
Materials for repairing leaks
The selection of materials for repairing the damaged area is carried out depending on the location of the leak and the temperature of the coolant. All products must withstand both physical and temperature stress. The following materials are used for repairs:
- rubber elastic bandage - used to seal curved areas or fitting locations. The bandage itself is not able to withstand high water pressure in the pipes, so after screwing it on, it is necessary to screw the reinforcement on top or tighten the clamp;
- repair tape - suitable for sealing pipes, withstands pressure up to 35 atmospheres, temperature range from -70 to +370 degrees. The service life of the material is 50 years;
- clamps are metal clamps that can withstand pressures of up to 70 atmospheres and temperatures of more than 100 degrees. The clamps are designed for standard pipe diameters and are used only on straight sections of the pipeline;
- two-component compositions - epoxy resin or cold welding. Good for eliminating leaks in curved areas or in hard-to-reach places. Epoxy resin is best used in combination with binding materials (cloth, bandage, etc.);
- light-curing plastic - a kit that includes liquid plastic and an ultraviolet lamp. Under its radiation, the material polymerizes and hardens. Operates in the temperature range -40 – +150 degrees.
All these materials are suitable for major repairs of depressurization. If there is nothing suitable at hand, then wooden choppers, cement coating, and various adhesive materials are suitable as temporary devices.
Causes of leakage
Today, many water supply networks in our country are in disrepair. This is caused by the lack of quality maintenance and ignoring the need to perform scheduled repairs. It is often impossible to replace a large section of pipeline that has reached the end of its service life. Housing and communal services enterprises, manufacturing companies, owners of office centers, residential cottages, etc. are faced with the problem of high deterioration of water supply systems. Water leaks are possible not only on old pipelines, but also on networks that were laid relatively recently. This may be caused by the use of low-quality materials or installation errors.
Methods for eliminating leaks
Once the leak has been located and you have the necessary tools to fix it, it's time to fix the water leak in your heating system.
When the pipe is leaking
Pipe leaks are most often caused by poor-quality welds. A rubber gasket and clamp solve the problem. The pipe is thoroughly cleaned of paint, sealant is applied to the hole, and a gasket and clamp are placed on top. The bolts are tightened as tightly as possible to prevent future leaks.
In a bent section of pipe, the leak is repaired with epoxy resin or repair tape. The resin is applied only to a dry surface, so you will have to drain the water and systems. If you do not want to free the batteries from the coolant, it is better to choose tape.
- Before gluing, the pipe at the leak site and approximately 8 cm around it is thoroughly cleaned and degreased.
- The tape is soaked in water for 20 seconds.
- The hole in the pipe is wrapped with an acrylic gasket from the repair kit.
- The tape is wound diagonally, starting from the edge of the gasket, forming turns up to the middle of the hole.
- At the time of winding, the tape is pressed well against the surface for about 7 minutes.
- When the material begins to stick to the gloves, it is left to dry completely.
A rubber gasket and a clamp will help solve a leak in a heating pipe.
The time for complete hardening depends on the temperature of the pipe. At 20 degrees this is about half an hour.
When the radiator leaked
The leak could be the joint between the battery sections or the radiator plate. In this case, cold welding will be required. Turn off the water supply, first clean the damaged area, degrease it, and only then apply sealant to the hole and an area of 3-5 cm around it. The weld hardens quickly. After it has completely dried, turn on the heating.
Leaks between sections are more difficult to eliminate. To do this, the radiator is dismantled and the nipple connection is tightened tightly, applying maximum force. Upon completion of the work, the battery is mounted in place and water is supplied to the system.
When it leaks under the locknut
Before starting work, the water must be turned off and drained from the system. The nut is unscrewed, sealed with cloth or a special compound and tightened again. All sealing materials are wound clockwise. At the end of the work, open the riser and check the tightness of the connections. If the leak has not been eliminated, repeat the thread winding.
Preventing leaks in a country house
Owners of private houses eliminate leaks themselves. Depending on the complexity of the breakdown, the damaged element is restored or replaced with a new one. Before starting work, the heating riser is shut off and the system is de-energized.
- Crack in the pipe. When the pressure increases, the pipe may burst at the weld. To eliminate leaks, use homemade or factory-made clamps, rubber seals and bolts. The leak area is cleaned of paint, treated with sealant, wrapped in a rubber gasket and tightened with a clamp.
- Leaking under the locknut. The cause of coolant leakage is improper installation of the locknut, mechanical damage, or corrosion. Before starting work, you need to shut off the riser and drain the water from the system. The nut is removed, inspected for damage and rust, and if necessary, replaced with a new one. The thread is covered with a thick layer of sealant, linen or paint, after which the part is tightened into its original place. The joints are also treated with sealant. After starting the system, you need to check the condition of the locknut. If a leak is detected again, the part is dismantled and the thread on the pipe is increased by 5 turns.
- Battery depressurization. In radiators, cracks form both on the plate itself and at the sectional joints. If the blade is damaged, it is recommended to replace the battery with a new one. To repair joints you will need sandpaper, alcohol and cold welding. The leak area is cleaned of paint, degreased and covered with sealant. The area around the crack is also treated with cold welding within a radius of 3-4 cm.
If a large fistula is detected, the battery is dismantled and the nipples are tightened tightly. The element is installed in place and the heating system is started.
High-quality consumables and equipment, correct installation, as well as timely technical inspection and compliance with operating rules will help prevent leaks and increase the service life of pipelines.
Why do pipes wear out?
For the installation of heating systems in residential buildings and apartments, metal pipes and radiators are most often used. They are highly wear-resistant, have a long service life, and high heat transfer. But even the most wear-resistant structures have a limit of strength and lifespan.
Steel heating radiator
Most often, leaks occur on metal pipes and batteries. Possible causes of wear
:
- Aggressive coolant environment and external factors causing metal corrosion. This process occurs due to condensate entering hard-to-reach and unprotected areas and contributes to the gradual destruction of the walls.
- Factory defects - to protect yourself from purchasing such products, ask the seller for a quality certificate with a Quality Control Department stamp.
- Long service life and mechanical damage. No matter how strong the metal is, it cannot withstand constant increased physical and mechanical loads. The equipment is constantly under high pressure, so it gradually becomes thinner and wears out.
- Incorrect insertion, violation of threaded connections, installation technologies. The most vulnerable places where water leaks most often are welds, joints, threaded connections and the areas around them.
- Violation of the normal operating mode: the cause of a battery breakthrough can be excessive or, conversely, insufficient pressure in the system, as well as a violation of the operating mode.
What other reasons are possible?
Several other reasons deserve mention that will affect the pressure drop in the heating system.
- If the coolant used is leaking at the intersection of pipelines;
- corrosion (places affected by rust);
- poor quality work when installing the heating system;
- the appearance of microcracks on the boiler heat exchanger;
- or a rupture of the membrane of the already mentioned expansion tank;
- failure of the boiler automation (this only happens after a long period of operation).
A malfunction noticed in a timely manner or avoided altogether will provide your home or apartment with the constant necessary heat, which will be provided by uninterrupted and stable pressure in your heating systems
How to fix a leak and solutions
How to repair a leak in a heating pipe depends on where it occurred: at the junction of sections, at the connection of the radiator with the pipe, on the pipe itself. Repairs are carried out in different ways, let's look at the main methods.
The heating pipe is leaking at the junction. Important! If it drips from the pipeline through which hot water is supplied for heating, and this section is under pressure, then the fistula can be eliminated for a very short time. In this case, you will have to call the emergency service and carry out major repairs.
Cold welding
As a rule, it is used at the junction of two battery sections and helps to temporarily close the damaged area. It is made using adhesive-sealant, which can be purchased at a hardware store. It has a special composition that crystallizes when it dries and fills the hole.
Applying “cold welding” to a metal pipe
- thoroughly clean the damaged area from paint and rust using a brush with metal bristles or sandpaper;
- degrease, alcohol, solvent, acetone are suitable for this;
- cut off a piece of sealant, knead with wet hands until smooth;
- press well into the damaged area on the heating radiator and smooth it out;
- until the composition hardens completely, it must be pressed tightly to the surface;
- Curing time is approximately 20-25 minutes, complete polymerization is after 3 hours.
We recommend: Bosch solid fuel boiler: how to choose and buy the right model, bosch solid fuel boiler, protherm beaver
Advice! Be sure to wear protective gloves, as the sealant is a chemically active compound that corrodes the skin.
Cement-plaster cast
If a hole is found on the heating pipe or the junction of the battery sections, you can make a cement-plaster bandage; for this, prepare the following consumables:
- medical bandage, a piece of gauze or thin cotton fabric;
- alabaster (plaster);
- cement;
- bucket or basin with water.
Repairing a leak with a cement bandage
- dilute cement in water, mixing it with gypsum, the consistency should be like that of rich sour cream;
- take strips of fabric or bandage 25-30 cm long, soak in the resulting composition;
- wrap a cloth around the damaged section of the pipe;
- overlays are made until the bandage is strong and tight.
Application of clamp and rubber
If you notice a heating pipe leaking, you can apply a commercial or homemade clamp, as well as a rubber lining, as a temporary measure. If there is a factory-made clamp of a suitable diameter, it must be applied to the leak and secured tightly with a bolt. If you don’t have one on your farm, you’ll have to make the rubber pad yourself.
Advice! A bicycle tire, a thick household glove, a ball, or a rubber boot can serve as consumables.
- cut a rectangle from a piece of rubber that will be 2-3 centimeters wider than the hole, the length should be the same as the diameter of the pipe;
- wrap the cover tightly around the pipe, and secure the edges with wire or metal clips; you can make a wire winding along the entire length of the bandage.
Repairing leaks with rubber and a clamp
Welding Application
If a heating battery (not metal-plastic, but cast iron) is leaking in a house or apartment, welding will help eliminate the defect. It can be used anywhere on the radiator. Therefore, after you have made minor repairs yourself or shut off the water supply to the battery, call the emergency service or a private company that provides hot welding services.
Repairing a metal heating pipe using welding Tip! If you have a compact welding machine on your farm and you know how to use it, you can solve the problem much faster than the experts arrive.
How to fix a leak in a pipe
So, the location of the leak has been identified and you need to make a decision on how to repair the leak in the heating pipe. In this case, the options of placing a cloth or placing a basin are not suitable. Even a minor leak can result in a serious accident. You should also understand that sealing leaks is a temporary measure that only delays mandatory major repairs until a convenient time. Agree that stopping the heating in winter and replacing a section of pipe or connecting unit is not the most pleasant prospect.
Clamp for sealing leaks
A leak found in a pipe can occur in any area, primarily at the joints. Most often you just need to squeeze some knot. Less often, replacing it, which is extremely difficult without the help of a specialist. Cracks in pipe bodies are not as common, but they do happen. Options for how to fix leaking heating pipes:
- wrap a rubber band around the leak.
Then wrap the rubber tightly with wire. At the same time, you need to control the process; it is better not to overpress than to overpress. Too much force can cause even more damage. If you have metal clamps on hand that can be clamped with a screwdriver, they will simplify the task, as they tighten the rubber around the pipe evenly. There are also factory models of clamps with a rubber insert, the best option, since their main purpose is to clean up leaks in the heating system; a narrow profile is always better;
- use two-component adhesives such as cold welding.
The name may differ from one manufacturer to another, but all sellers call it that way. The principle of its operation is that the individual components of cold welding resemble plasticine. Once thoroughly mixed, it will set in minutes. After final hardening, you can process it with a grinder. With this plasticine you need to seal the leak area and smooth it out thoroughly;
- use soaked cloth.
As impregnation, you can use adhesives that are resistant to high temperature and moisture. Cement is also widely used. To do this, you need to wrap the leak area with material soaked in gypsum solution. A cement bandage is applied over the plaster cast; the manufacturing method is similar.
If the heating riser is leaking, call a repairman immediately, and before he arrives, take measures to eliminate or reduce the leak.
Types of sealants
Each of the sealants is good for specific living conditions, but for repairing heating equipment, special sealants for heating systems are better suited
In today's everyday life, a large number of products with sealing properties are used.
Based on their chemical composition, sealants are divided into the following main types:
- acrylic - unstable, do not tolerate temperature changes;
- polyurethane - elastic, have high adhesion to metals, resistant to corrosion and temperature;
- silicone - the most common type of universal sealants, retain elasticity and moisture resistance over a wide temperature range, and are durable.
When sealing leaks in metal elements of a heating system with silicone sealant, it is permissible to use only its neutral variety, but not the acidic one, since the acetic acid contained in the acidic sealant will cause active corrosion of the metal.
The use of adhesive sealant will replace the need to use other methods of sealing threaded connections
Heat-resistant sealant for heating pipes is used for metal and polymer materials. This product properly fulfills its purpose - to prevent the penetration of moisture from damaged elements of the heating system. The sealing substance, which is a viscous mass, hardens quite quickly at the site of application and subsequently withstands high temperatures.
To seal threaded connections in modern heating networks, anaerobic adhesive sealant is used instead of flax tow and FUM tape. The environmental friendliness of such a sealant allows it to be used not only in heating systems, but also in plumbing systems.
Sealant for heating boilers is used to eliminate gaps in places where heat resistance of the material up to 1500°C is required.
Using this product, it is possible to seal cracks in heat exchangers and chimneys of boilers and furnaces. After hardening in the seams between surfaces of different materials (metal, brick, concrete), the substance retains its tightness.
The better liquid sealant for heating repairs
The increased heat resistance of some special sealants makes it possible to use them for the rapid repair of heating boilers
It is not always possible to use external agents to repair heating. What to do, for example, if the location of the leak cannot be detected because the house had hidden pipes and installed a heated floor? Will we really have to break down the walls and open up the floors? No, you don't have to! In such situations, a relatively new method of eliminating leaks is used - by pouring liquid sealant for heating pipes into the system. This sealant is also suitable for radiators when it is not possible to apply a clamp to a leak.
The fundamental difference between liquid sealants for heating systems is their ability to eliminate leaks not by applying to the damaged area from the outside, but directly from the inside.
In an emergency, it is permissible to pour sealant intended for car radiators into the heating system
The essence of this method is that when mixed with a coolant, the sealant remains liquid, and only upon contact with air penetrating into the system does it polymerize. Gradually hardening, the sealant clots are sealed from the inside of the crack exactly in those places where the integrity of the system is compromised.
Several types of liquid sealants for heating are produced, each of which is adapted to special conditions of use, in particular:
- the coolant is water or antifreeze;
- gas or solid fuel boiler;
- heating or water pipes.
You should not try to look for one universal sealant for your home heating system. It is better to purchase a specialized composition for the specific parameters of your heating system.
The most famous among consumers are liquid sealants for heating systems produced by the German company BCG. The use of these products is considered an ideal solution for eliminating hidden coolant leaks. When used correctly, liquid sealant does not pose a danger to heating boilers and does not cause damage to the circulation pump and measuring instruments.
We recommend: Do-it-yourself induction heating boiler: how to build a homemade unit
Sealant for pipes and heating radiators must remain in the system for a long time. Once you add this sealant to your heating system, you can forget about leaks for several years.
Sealants for closed heating systems eliminate pressure losses associated only with leaks in pipes and radiators, but are powerless in cases where the membrane in the expansion tank is damaged.
Leak Diagnosis
A regular sheet of paper will help you verify that there is a leak. To check, you need to turn off the hot water and wait for the coolant in the pipes to cool. With hot coolant, the leakage area will quickly dry out and the problem will not be found. Next, a sheet of paper is passed through the pipes, paying special attention to the joints. Where the paper gets wet and the leak needs to be fixed. This method is acceptable if the breakthrough occurred on a visible section of the highway. It is more difficult to identify it in a hard-to-reach place, in a “warm floor” system or underground.
Each heating system must be equipped with monometers, which will indicate leakage. If the pressure in the system decreases, the readings on the instruments will also deviate downward. It is recommended to install monometers on each circuit and monitor the presence of depressurization on each of them.
Only specialists using special equipment can diagnose leaks underground or in finishing:
- moisture meters - detects leaking pipes in walls or heated floors. Not used for checking underground communications,
- thermal imagers - helps to find a leak if the pipes are hidden shallowly and the coolant is at a high temperature. In the case of cold water and buried communications, the thermal imager will not be able to work,
- acoustic devices - detect leaks by capturing sounds.
Leaks in the heating system can be found using a thermal imager
The most difficult thing to determine is the location of the leak in the “warm floor” system, and especially if it is under the screed. You can find the problem yourself using a simple method, but first you need to understand where the pipes go. To do this, the heating is turned on at maximum temperature, and the floor surface is generously moistened with water. The places where the contour turns are located will dry faster. They are outlined with a marker or pencil, and the area that takes the longest to dry is the intended breakthrough. The problem can only be resolved by disassembling the screed above the floor.
There are special devices on sale that automatically detect water leaks. They are not cheap, but they fully pay for themselves in operation. The device consists of sensors, valves and a control unit. The sensor sends a signal about a leak to the main unit, the valves are activated and shut off the water. Thus, the owner does not have to worry that he will flood his neighbors while he solves the problem of a breakthrough.
Steps to eliminate a leak with liquid sealant
Before you start sealing possible leaks in the heating system, you need to make sure that the expansion tank is in good condition.
The procedure for using liquid sealants to repair your home heating system can seem quite complicated. In some cases, clots of sealing fluid cause partial blockage and impede the movement of the coolant. Therefore, in order not to cause damage to the heating equipment due to your inexperience, it is better to invite a specialist. In any case, you need to study the instructions for using a specific type of sealant for radiators and strictly follow them.
Having decided to use a liquid sealant to fix a problem in the heating system, you need to make sure that:
- the reason for the pressure drop is precisely the leakage of coolant, and is not related to a malfunction of the expansion tank;
- the selected type of sealant for heating systems corresponds to the type of coolant in the system;
- The sealant is suitable for this heating boiler.
German liquid sealant BCG-24 is used to eliminate leaks in heating systems
When using liquid sealant for pipes and radiators, it is important to maintain the correct concentration. On average, its values range from 1:50 to 1:100, but it is advisable to determine the concentration more accurately, since the effectiveness of eliminating leaks can be affected by factors such as:
- coolant leak rate (up to 30 liters per day or more);
- the total volume of water in a given heating system.
If the volume does not exceed 80 liters, 1 liter of sealant will be enough to pour into the heating system. But how can we more accurately calculate the volume of water in the system? You need to calculate how many meters of pipes and what diameter were laid in the house, and then enter this data into one of the online calculators. To the resulting volume of pipelines, you must also add the passport characteristics of the volumes of all radiators and the boiler.
You can drain all the water from the system into a certain container, the volume of which is precisely known, and then fill the system again.
Preparing the heating system
- Dismantle or cut off all filters with taps so that they do not become clogged with a viscous solution of sealant for heating systems;
- Unscrew the Mayevsky valve from one radiator (the first one in the direction of coolant flow) and connect a pump to it (the “Baby” type);
- Start the heating system and let it warm up for an hour to a temperature of 50–60°C at a pressure of at least 1 bar;
- Open all taps on pipelines and radiators to allow sealant to flow freely through them;
- Remove air from the entire system, including the radiators and circulation pump.
If the air is not completely vented, it will begin to react with the sealant and cause it to thicken in places other than where it is needed to eliminate the leak.
Preparing the sealant
- You can also pour liquid sealant into the heating system using a hand pump for pressure testing. Drain about 10 liters of hot water from the system into a large bucket, most of which is used to prepare the sealant solution, and leave a few liters for subsequent flushing of the pump;
- Shake the canister (bottle) with sealant for radiators and heating pipes, then pour its contents into a bucket;
- Rinse the canister thoroughly with hot water so that all remaining sediment gets into the solution being prepared.
Solutions of sealants for heating systems must be prepared immediately before use so that the liquid does not come into contact with atmospheric air for too long.
Pouring sealant
Liquid sealant for heating systems must have time to mix with the coolant before it reaches the boiler, so it is more advisable to pour it into the supply:
- Introduce liquid sealant solution into the system using a pump;
- Pump the remaining hot water through the pump so that absolutely all of the sealant sediment gets into the system;
- Bleed the air from the system again;
- Raise the pressure to 1.2–1.5 bar and maintain the system operating cycle for 7–8 hours at a temperature of 45–60°C. This period is needed for the sealant to completely dissolve in the coolant.
The operation of heating equipment cannot be stopped for several days until the polymerization of the liquid heating sealant is completed.
Reason 2. Air is escaping from the expansion tank
A few months after the start of operation, the pressure in the heating system may drop unpredictably when air leaves the membrane expansion tank. There is a nipple at the top of the tank, which gradually, over the course of perhaps several months, bleeds the air. And it turns out that under the influence of the coolant, all the air is squeezed out and the entire expansion tank is filled with coolant.
This is due to the fact that when the boiler is turned on, the coolant heats up, the pressure in the system quickly begins to increase, and the following happens: when the pressure becomes higher than permissible, the safety valve is activated and relieves the pressure. And when the pressure decreases, you gradually feed it, and this happens more and more often. And a condition imperceptibly occurs in the expansion tank when the entire or almost the entire tank is filled with coolant (water) and there is practically no air in it. Consequently, the pressure rises when the boiler starts operating, and as soon as it rises above the limit, the safety valve, which is precisely designed to protect the system, is activated, and the coolant is discharged. Accordingly, the pressure in the heating system drops.