Can polypropylene pipes be filled with concrete? what conditions are necessary for this
Carrying out major repairs in residential premises of apartment buildings or private houses takes into account the replacement (modernization) of heating system components.
The need is associated with reducing the cost of paying for energy sources for further use and giving the rooms a beautiful appearance. Sometimes owners decide to hide heating pipes under the floor covering or in the walls of the room. Therefore, they are concerned about the possibility of using plastic pipes for these purposes and the question is, can a polymer pipe be filled with concrete? How long does it take to complete the working life of communications placed under the screed?
Hidden pipe arrangement
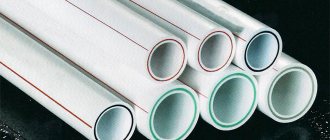
Characteristics and use of PP pipes
To determine the possibility of installing polypropylene pipelines under a screed, it is necessary to refer to their properties.
Let us recall that polypropylene is one of the types of polymer material, the components of which are connected by derivatives of ethylene gas.
The material is resistant to mutual action with aggressive environments and alkaline solutions, while the operating conditions declared by the manufacturer allow a difference in operating temperatures from -10 to +110 degrees.
Advantages of polypropylene:
- the service life under thermal loads without changes in quality and appearance is at least fifty years, and when organizing cold water supply it is twice as long;
- the operating system pressure of water supply or heat supply reaches 20 Bar;
- systematic contact with the water mass of the internal part does not provoke the formation of scale;
- background noise of flowing water is absorbed by the walls of the products;
- propylene has the characteristics of low thermal conductivity, which prevents the appearance of moisture on the outer walls;
- the product weighs little and allows for installation even by one person;
- when using special tools, the products are connected and installed in their regular places in a short time;
- plasticity helps to give the turns given bends;
- After installation of the products, additional maintenance will not be required;
- democratic cost of the product and fasteners.
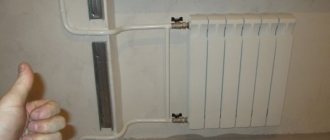
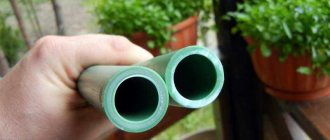
Hot water pipes
In the construction services market there are polypropylene
pipes of various colors. This fact does not determine the characteristics of the material from which they are made, except for black - which helps protect against the influence of ultraviolet radiation. The properties of the product are determined by the markings applied to the surface:
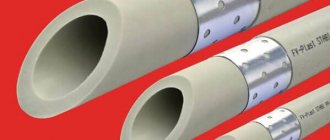
- RRV. The defining characteristic is very high mechanical reliability due to reinforcement technology during manufacturing. Use is recommended for heating communications and water supply, plus under concrete screed.
- RRN. The marking is applied to products of significant diameters; their size makes it possible to use them in ventilation systems, sewage systems, and cold water supply.
- RRK. A much more commonly used brand of polypropylene products. Can be used in cold and hot water supply and heat supply systems. Easily tolerates thermal and mechanical loads.
Cold water pipes
Main! PP pipe price
and elements for profiles differ in each region of the country. Therefore, before purchasing, it is recommended to familiarize yourself with the parameters presented at the points of sale of products and select copies that are of good quality and cost.
Specifics of use
The production technology of PP pipes does not exclude a linear increase in the product when exposed to high temperatures. A good choice of pipe with the required characteristics and installation of supports with the organization of compensators will make it possible to compensate for this minus.
Any system includes branches from the central pipeline, direct connections and the creation of turns at all possible angles, while differences in pipe diameters cannot be excluded.
The solution of these problems is facilitated by the use of connectors, which are divided into the following options:
- flange type;
- crimping device;
- using a threaded fastening connection;
- welded structure.
Connectors made of polypropylene are used for pipe connections made of the same and other materials. A similar result is achieved by placing chrome or brass inserts into the interior, which determine the technical feasibility of connecting to plumbing fixtures and creating transitions.
Connectors
Practice demonstrates that the main causes of ruptures in heating pipes under screeds are gross violations of installation technology and low-quality soldering of connectors at the joints of products.
The soldering process is not difficult for home craftsmen. The device for pipe connections is represented by a benchtop soldering iron with marked nozzles of different diameters.
note
Before industrial soldering, it is proposed to carry out a trial thermal connection of materials on small pieces of pipe and unused connecting elements.
By using combined connectors, it is possible to ensure suitable pressure in all parts of the heating structure at the design stage, while preventing unnecessary costs for using pipes of larger diameter than necessary.
Soldering of PP pipes
Main! PP pipe connection
with external placement of the metal amplifier requires its retraction to the length of immersion in the joined component. Otherwise, all soldered parts should be free of dust. It is recommended to degrease them.
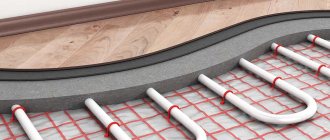
Installation method
Polypropylene pipes for organizing heated floors are included in a separate category Their characteristics allow installation in a concrete screed without the fear that the system will break. The basis for this statement is considered to be the pipe laying technique, in which the joints are located above the floor surface, and only intact pipeline parts are silted with the mixture.
The installation sequence when laying a warm water floor is represented by the following activities:
- It is reasonable to carry out a full calculation of the materials and things that will be required and draw up a diagram for laying PP pipes . When calculating the number of products, take into account the shape of the installation (serpentine, spiral and other suitable for this room).
- The surface of the primary screed is cleaned of debris caused by construction work.
- The waterproofing barrier is gradually laid, then the thermal insulation material is installed.
- A metal mesh is placed as a base over the entire area of the room covered by the heating circuit. Products are specifically secured to it using PVC clamps or metal wire.
- Connect all heating circuits to a pre-formed manifold. They test the system with much higher parameters than the working ones. The temperature is gradually raised to operating temperature.
- After checking, the final screed is poured and the floor covering is laid.
Heated floors under screed
Main! If signs of a pipe break under the screed appear, you can select a local area of the floor surface where the pipe was damaged, using the installation diagram, and open the surface. Dry the damaged area and carry out repair activities.
Installation nuances
If the sewer pipe is installed in the floor, the system does not need to be secured. This is required only in difficult places, where there is a high probability that the pipeline will bend and access will be needed for further work. It is important to remember that polypropylene pipes have a high coefficient of thermal expansion. Thus, when installing such a system, the following recommendations are taken into account:
- If the installed pipeline with a total length exceeds 10 meters, then a compensation coupling is installed on the site. Filling the coupling with a screed is not allowed. An alternative option here is a sand cushion.
- All kinds of components are installed on the pipeline, that is, elbows, tees and other fittings. They are placed in an insulating box or corrugated pipe. If there is too much tension in the system, this will lead to leakage or destruction of both the products and the screed itself. In the worst case, improper installation will ruin the floor covering.
- If you want to install heating pipes made of polypropylene in the floor, then it is better to use a cross-linked type of product. This material is characterized by strength, reliability and resistance to high temperatures. But, it is important to know that in cement floors these products will not hold their shape well, so they are fixed with fasteners, which may be needed in large quantities.
- If the polypropylene line has a diameter of 15 mm, the branches will be 120 cm apart from each other, and this is not the best option if you want to effectively warm the room. Installation of heated floors using such products can only be carried out if the temperature in the home is at least +15 degrees Celsius.
We recommend that you familiarize yourself with: Features of the installation and use of chimneys made from a metal pipe with your own hands
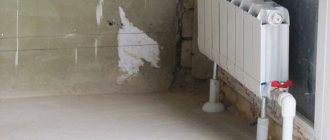
Heating pipes in the floor screed
One of the important tasks that arise during the installation of a home heating system is the correct installation of heating pipes in the floor. This will determine not only the efficiency of heating the room, but also the durability of the system, as well as its proper operation and safety.
You can hide the heating circuit either in a screed or using a floor covering. We choose where exactly to hide them depending on the room and which method is more convenient and requires less labor and financial expenses.
Laying heating pipes under screed
We can hide the outline in the screed. This method is widely used when installing underfloor heating systems. The step-by-step process is as follows:
- We make a rough screed from a mixture of concrete and expanded clay. Expanded clay is a new generation of insulation, which also has a very small mass and helps reduce the load on the foundation and floors;
- After the screed has dried, we coat its surface with bitumen mastic, thus providing waterproofing;
- We put an insulating layer on the waterproofing layer. For this we can use penoplex - a material made from air and foamed polystyrene. Penoplex perfectly withstands compressive loads, has high heat-insulating and noise-insulating properties, is lightweight and can be easily processed using the simplest tools. We treat all joints in the insulating layer with either glue or polyurethane foam. Penoplex slabs with ready-made markings for laying pipes are also sold;
- We lay either dense polyethylene on the penoplex as a vapor barrier, or penofol. Penofol is a modern insulation consisting of foamed polyethylene and foil. This material has high heat-insulating properties, does not allow or absorb moisture, is highly environmentally friendly and non-toxic. The foil serves to reflect thermal radiation back into the room. Therefore, in the case of single-sided penofol, we place it with the metallized side up. It will provide protection to the penoplex and further reduce heat loss. At the joints we glue penofol with aluminum adhesive tape;
- Next, the heating circuit is installed. It can be fixed using special clips and reinforcing mesh. You can use insulation where pipe channels have already been laid. Perforated strips are also used. The process itself is carried out in such a way that a coil of rolled pipe is placed on the floor surface and laid according to a pre-calculated pattern;
- Next, we pour a layer of concrete 30-50 mm thick - this allows us to hide the pipes in the screed;
- After the solution has dried, we can begin installation of the floor covering.
Turning on the “warm floor” system should be done gradually to avoid the appearance of cracks in the screed. For laying under concrete, it is best to use pipes made of cross-linked polyethylene or heated floors made of polypropylene.
Laying a contour under the surface of the floor covering
If the question is where to hide the heating pipes, but for some reason we don’t want to fill them with screed, we can do this with the help of a floor covering.
Let's take a closer look at this process:
- A rough screed is made from a mixture of concrete and expanded clay;
- After the solution has dried, we coat the surface with bitumen mastic and glue foam boards onto it. We remove cracks at the joints by covering them with glue or blowing them out with foam;
- We put either dense polyethylene or penofol on top of the penoplex. We place penofol with the shiny coating facing up. We glue polyethylene at the joints with tape, penofol with adhesive metallized tape;
- We lay the heating circuit, fixing them with clips, paper clips, or use insulation with already marked channels for laying pipes;
- We place logs between the pipes and install the flooring on them.
If we choose this option, then the contour should be made of metal-plastic. Polymer pipes are not suitable in this case, since they can be easily damaged and require mandatory protection in the form of a concrete coating.
Conclusion
Methods for hiding heating pipes under the floor are quite simple and can be done on your own. The choice of method depends on the laying conditions - both of them are equally effective and convenient.
Source: https://mynovostroika.ru/truby_otoplenija_v_stjazhke_pola
Polypropylene pipes in a heated floor system
Polypropylene pipes are known to many, mainly because they are popular for organizing plumbing systems. However, if a “warm floor” system is planned for the home, the use of these products still gives rise to controversy. The main advantage of the material is its affordable cost, the disadvantage is the low level of thermal conductivity when compared with metal-plastic products.
Important! Some craftsmen are worried that pouring polypropylene pipes with concrete is dangerous, which damages both the screed and the products themselves. However, it should be remembered that the operating temperature of the heated floor is +45 degrees Celsius, so the likelihood is minimal.
Some enthusiasts tried to combine heated floors with central water supply. However, current laws prohibit this. In addition, there will be no possibility to regulate the temperature of the coolant - this is where the main difficulties lie. The project, as a rule, is implemented on the basis of an autonomous boiler.
When installing the system, it is important to take into account that heating pipes made of polypropylene have a low thermal conductivity, so you will have to increase the frequency of turns - laying should be at least 10 cm from each other. Filling the pipes with screed is allowed, but it is important that the screed layer is not too large. If possible, the flooring used should have a high thermal conductivity. The best option is porcelain stoneware.
Before installation is carried out, the ceiling is covered with a layer of hydro- and then thermal insulation. In any case, polypropylene products are allowed for use in water and heat supply. Of course, products have limitations, but in order to prevent possible difficulties, you should carefully read them. Every home craftsman will confidently note the affordable cost of polypropylene products and their high performance characteristics.
How to fill sewer pipes into the floor
Walling up a sewer pipe is a way to rationally use space and give the interior a complete aesthetic appearance. But during the installation process, the question arises: is it possible to hide the collector under a layer of concrete so that future accidents will not occur, in places with difficult accessibility.
Restrictions
The wastewater disposal system is carried out in accordance with the requirements and standards of SNiP 2.04.01-85:
- Liquid waste is removed via gravity mains.
- Laying is allowed on technical floors, production and utility rooms, basement floors, specialized technological rooms intended for the installation of communications.
- Hidden devices are allowed above a suspended ceiling, in technological shafts, bathrooms or showers, in structures hidden under a layer of concrete.
- It is forbidden to install sewer pipes in dining areas, children's bedrooms of preschool and school institutions, hospital wards and offices, living rooms, rooms with electrical equipment (panel rooms, transformer rooms), and public halls (reading rooms, libraries, classrooms, etc.).
Causes
The need to fill the indoor collector with concrete is caused by a number of factors:
- replacing an outdated design with a new one;
- sewer pipe repair;
- current repairs of plumbing facilities, kitchens;
- it is possible to raise the floor level without much loss of space;
- It is possible to hide sewer pipes in the floor or walls when constructing a new building or private house.
Installation technology
Polypropylene pipes for organizing heated floors are included in a separate category. Their characteristics allow installation in a concrete screed without fear that the system will break. The basis for this statement is the pipe laying technology, in which the joints are located above the floor surface, and only entire sections of the pipeline are silted with the mixture.
The installation procedure when laying a water-heated floor is represented by the following measures:
- It is advisable to carry out a full calculation of the required material and accessories and draw up a diagram for laying polypropylene pipes. When calculating the number of products, take into account the shape of the installation (serpentine, spiral and other optimal for a given room).
- The surface of the rough screed is cleaned of construction debris.
- The waterproofing layer is laid sequentially, then the thermal insulation material is installed.
- As a base, a metal mesh is laid over the entire area of the room covered by the heating circuit. Products are directly attached to it using plastic clamps or iron wire.
- Connect all heating circuits to a pre-formed manifold. The system is tested with higher than operating parameters. The temperature is raised gradually to operating temperature.
- After checking, the final screed is poured and the floor covering is laid.
Warm floors under screed
Important! If there are signs of a pipe break under the screed, it is necessary to identify a local area of the floor surface where the pipe damage occurred, using the installation diagram, and open the surface. Dry the affected area and carry out repair measures.
The information presented above indicates that the use of polypropylene products when installing individual heating systems is a reasonable and correct decision. Compliance with installation rules and high-quality soldering at the joints of connecting elements ensures a long period of trouble-free operation. The technical characteristics of polypropylene elements, which determine their reliability, make it possible to place communications in wall cavities and under concrete screed.
One of the options for laying polypropylene pipes is presented in the video below.
Video 1. Installation of plastic heating pipes.
Heating pipes in the floor: pros, cons and features
Today, one of the ways of transferring thermal energy that is considered when installing a room heating system is the use of liquid coolants. This could be water, antifreeze, antifreeze. The heated liquid transfers heat to pipes and radiators, which, when heated, increase the air temperature in the room.
Heating pipes are usually installed in the following ways:
- Open method. This includes the classic heating scheme in a house or apartment, which consists of a riser (vertical pipes, their number can reach 8 pieces per entrance in apartment buildings), a heating radiator (the number depends on the area of the room), as well as taps, fittings, pipe fastenings and radiators. The pipeline is located along the walls and connects the riser and radiators.
- Closed method. This involves laying a heating pipeline in the walls or floor. The pipes can be connected either to radiators located above the floor level or located completely below its surface. The closed supply of pipes to radiators is more of an aesthetic nature and does not affect the temperature in the room due to their small area.
Let us dwell on the closed method and consider its advantages and disadvantages.
Positive aspects of closed installation
Uniform heating and economic benefits . These specifications only apply to a radiatorless system that is completely hidden in the floor.
In this case, the heated air rises from the floor . The highest temperature is in the lower part of the room. The area where the person is located is heated, which is economically beneficial in comparison with the classical scheme. As the air rises, it cools down, which is beneficial for the body. It is generally accepted that your feet should be kept warm and your head cold.
Also, in order to save money, you can install a heat meter and pay heating bills according to its readings.
This installation is relevant only for modern buildings in which horizontal distribution of the heating system is used, when pipes disperse from one central riser to apartments.
In buildings with vertical wiring, you will have to install meters on each radiator. In this situation, installation is associated with high costs and is rarely implemented in practice.
The absence of radiators , although slightly, increases the area of the room. Frees up additional space for furniture. The room benefits from its appearance. There is no need to hide risers and pipes running along the walls.
Advice
If only the pipes are hidden in the floor and the radiators remain on the walls, the effect of the closed arrangement will be slightly less.
The floor temperature with completely enclosed installation is always above zero . It is pleasant to walk on it, children can play on the floor without the risk of getting sick. Can be disabled if necessary.
Disadvantages of placing heating pipes in the floor
If you need to make a hole in the floor, for example, to install wooden structures, difficulties may arise. Work must be carried out carefully to avoid damaging the heating pipes. To eliminate such situations, after laying the pipes, a diagram of their location should be drawn up.
Difficulties associated with possible repairs can become an obstacle to laying pipes in the floor.
It is not easy to detect leaks in closed installations . Its first sign is wet spots on the floor. They can go unnoticed under the topcoat for a long time.
Is it possible to hide polypropylene pipes in the wall Construction and repair
Self-installation of plumbing and heating systems is no longer uncommon: with the advent of accessible and inexpensive materials on sale that do not require cutting and joining equipment, many craftsmen take on such work without fear.
Numerous master classes and video lessons are ready to clearly demonstrate all the stages from scratch to putting the system into operation.
And yet, some moments sometimes remain outside the frame: the question of whether polypropylene pipes can be hidden in the wall in order to effectively complete the decorative finish often remains open.
Hidden heating system
Modern technologies make it possible to improve the aesthetic appearance of a room in various ways. The method of placing heating pipes in the room was no exception.
It becomes possible to place them in the wall, thanks to the durability of the material used in their production.
Advantages and disadvantages
It is most convenient to place communications in the wall at the construction stage in a private house according to a previously created drawing. You can hide pipes in the wall in an apartment building if you are planning a major renovation of the premises or the entire building.
By placing the heating in the wall, the room certainly looks more prestigious, and the freed-up space can be decorated.
- heat transfer increases, since building materials have an increased level of heat transfer, unlike air;
- the service life of the polypropylene from which the pipes are made reaches up to 50 years, ensuring the reliability of the design while observing technical standards during their installation;
- the space increases by several centimeters.
However, difficulties must be overcome in obtaining the right to permit changes in the position of communications in the premises or their so-called redevelopment.
- low-quality propylene increases in volume when heated;
- ordering a project to change the location of communications;
- coordination of the project with supervisory authorities. Alteration of engineering systems in an apartment building will require a special permit;
- joints may lose their sealing, which can only be determined using a device that measures water pressure;
- risks associated with preparedness for wall destruction in the event of a possible leak.
A break in the heating system pipes in the wall in the event of a leak will cause water to enter the adjacent lower apartment, since it will not be possible to quickly eliminate the leak.
How to brick up heating pipes in a wall
To disguise the pipes of the heating system in the wall, you need to find out what material the wall is made of, and select the method and sequence of work, as well as the necessary materials.
Before laying heating pipes, it is necessary to test them for strength and visually carefully check for possible damage.
Concrete
In an apartment in a panel apartment building, there are two ways to lay heating system pipes: using grooves - specially created channels for laying heating pipes in them, or creating a false wall.
How to remove heating in a wall in a panel house step by step using grooves:
- You need to start by de-energizing the common building heating riser. You should make sure that the desired riser is turned off;
- The grooves should not be located end to end. The contour should not be infringed. The recess is calculated based on the parameters of the fasteners, their quantity and the layer of prepared insulation;
- directly covering heating pipes with an insulating layer. Insulation is used to prevent condensation;
- Next, they calculate the places for fastening and mark the locations of the fasteners.
The work is carried out with a grinder. It allows you to perform high-quality actions in automatic mode and facilitates wall slitting.
When erecting a false wall, it should be taken into account that the space of the room will decrease.
Brick
Strobes are made in a brick wall in the same way as in a panel wall.
The procedure for laying part of the heating system into a brick wall:
- the depth or width of the channel is determined taking into account the amount of insulation wound on the surface of the pipe;
- after which they are placed in the marked places and secured with clamps pre-fixed with self-tapping screws.
It is necessary to test the system by running water at excess pressure for several days. After making sure that there are no leaks, the wall with communications is covered with mortar and putty.
Heating pipes in the floor screed - what you need to remember when laying them there
Heated floors are not a luxury these days, but an affordable condition for creating comfort and warmth in the home. Creating a special physical microclimate, caring for loved ones, and effectively heating the home - all this is achieved through the installation of heating pipes for floor heating.
Selection of heating pipes
The main criteria for choosing heating pipes in a floor screed are:
- Durability.
- Reliability.
- Strength.
Pipes made of various materials are available on the market: metal-plastic, polyethylene, reinforced concrete or copper.
Each of these designs is suitable for specific cases, but common features are the pipe wall thickness and outer diameter.
Read about choosing pipe sizes for a heating system.
Advice: when choosing pipes installed in a screed, you should opt for products made of metal-plastic or cross-linked polyethylene.
Installation of pipes in a screed: main stages and technology of work
Most often, craftsmen use the wet installation method to install heating pipes. It involves pouring pipes with a seamless floor.
Heating products are fixed to the reinforcing mesh. Be sure to check their tightness. A concrete screed is made on top.
Stage 1: level the surface
A man levels the surface
Before laying pipes, be sure to level the floor as much as possible. A difference of +/- 1 cm is allowed.
Otherwise, level the floor using another layer of concrete screed. Also, before starting installation work, it is worth removing as much dust or construction debris as possible from the floor surface and removing all communication points.
Stage 2: do waterproofing
Before laying pipes, care should be taken to ensure waterproofing. To do this, a thin (0.2 mm) plastic insulation film is laid on the floor.
Structural diagram of waterproofing
If the floor is located above a basement or garage (any cold) room, then you should also pre-lay insulating panels. Thus, heat will not be absorbed by the cold floor and will be distributed with maximum efficiency in the heated room.
Stage 3: laying pipes
For greater uniformity of heat distribution, heating pipes in the floor screed should be laid with the same distance between turns.
It is best to lay products in the form of a “snake” or “spiral”.
Example of “snake” and “snail” installation
The structure is secured with clips, paper clips or on a special mesh with grooves (one-sided locks) that securely fix the laid products.
Features of application
The manufacturing technology of polypropylene pipes does not exclude linear expansion of the product when exposed to high temperatures. Correct selection of pipes with the necessary properties and installation of supports with the organization of compensators will allow you to compensate for this drawback. Any system includes branches from the central pipeline, direct connections and the creation of turns at different angles, while differences in pipe diameters are not excluded. The solution of these problems is simplified by the use of fittings, which are divided into the following types:
- flange type;
- crimping device;
- using a threaded connection;
- welded structure.
Fittings made of polypropylene are used to connect pipes made of the same and other materials. This effect is achieved by placing chrome or brass inserts in the interior, which determine the technical possibility of connecting to plumbing fixtures and creating transitions.
Fitting
Practice shows that the main reasons for ruptures of heating pipes under screeds are gross violations of installation technology and poor-quality soldering of fittings at the joints of products.
The soldering process is not difficult for home craftsmen. The device for connecting pipes is represented by a benchtop soldering iron with marked nozzles of various diameters. Before industrial soldering, it is recommended to carry out a trial thermal connection of materials on small pieces of pipe and unused connecting elements. Using combined fittings, it is possible at the design stage to ensure optimal pressure in all parts of the heating structure, while preventing unnecessary costs for using pipes of larger diameter than necessary.
Advantages and disadvantages
Based on the operation of the underfloor heating system, we can say that all the heat initially enters the concrete screed, which, after heating, transfers it into the room. And it doesn’t matter which option is used in the apartment, electric or water heated floor. But installing pipes in a screed has both its pros and cons, which are worth talking about in more detail before the installation begins.
The advantages include:
- Warm air flows from the floor to the ceiling. Consequently, comfortable conditions for walking are created.
- Warms up the room faster than conventional batteries.
- Uniform heat distribution throughout the room.
- Cost savings due to large heat exchange area.
But we must not forget about the negative manifestation, which most often occurs due to the fact that the technology for pouring screed and laying pipes is not fully followed. There is no access to the pipe circuit, and, therefore, if repairs are necessary, you will have to break the entire screed and remove the floor covering. If the installation is carried out in violation of the requirements, then there is a high probability of leakage to the floors below. And the installation process itself requires certain knowledge. Not everyone will be able to independently arrange pipes for a heated floor system.
Types of pipes
Pipes in floor screed can be used in completely different ways. Basically, the classification distinguishes materials according to the manufacturing method. When it comes to copper pipes, you should immediately prepare a decent amount of money. These pipes are the most expensive. But at the same time, they can be laid into the concrete floor screed under the floor covering without any consequences. The strength of the product is very high and does not allow oxygen to penetrate inside. The surface of copper pipes is not subject to corrosive changes, but such systems are no longer used. Plastic pipes are used everywhere.
It is important to know that it is necessary to control the temperature of the liquid in the pipes and not allow it to rise above 50 degrees.
Vapor-tight plastic is used in polymer pipes. It is based on materials such as polybutylene and polyethylene. They are able to withstand not only internal but also external pressure. In addition, they are also not subject to corrosion. But they definitely lack hardness, as they are easily exposed to external influences, including cutting. For heated floors they are used to a lesser extent, although they have a low price.
When installing polypropylene pipes into a heated floor system, it must have a certain temperature level. The minimum is 15 degrees.
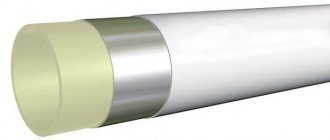
Composite pipes made of metal-plastic have a high level of strength and resistance to corrosion. They differ little in characteristics from copper pipes, but are much cheaper. The pipe contains three layers:
- Internal (polymer). Allows easy transportation of coolant, while protecting against scale and corrosion.
- Medium (aluminum). Withstands high temperatures and also maintains the original shape of the pipe.
- Upper (polymer). Protects aluminum from external mechanical influence.