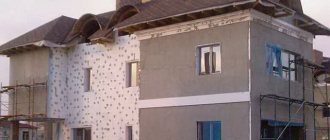
Lathing for siding performs an important function in the design of the facade. With its help, it is possible to recreate a flat surface and ensure air circulation between the wall and the cladding. In addition, the frame allows you to quickly and easily install thermal insulation on the walls.
Installation of siding involves the mandatory construction of sheathing made of beams or metal profiles. Each of them has its own characteristics and area of use.
Why do you need a frame?
Sometimes siding can be installed without constructing sheathing. However, for most buildings it is impossible to do without it. The reason for this:
- Uneven walls on the outside. If you do not install the frame, the finish will deteriorate over time, and the cladding will begin to fall off or sink. It is cheaper to install lathing than to make perfectly smooth walls.
- Shrinkage of the building. This process is observed in every built house. If you do not install a frame when covering the walls with siding, then when it shrinks, the finish will begin to break, warp and lose its original appearance.
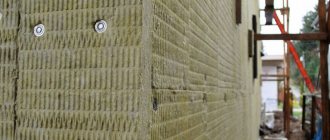
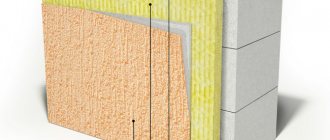
- Thermal insulation. Mineral wool or another type of insulation is installed in the frame holes. With it, the house is reliably protected from cold, dampness, etc.
- Ventilation. There must be a ventilated gap between the insulation and the cladding, otherwise an excess of moisture will lead to mold and rot.
- The lathing evenly distributes the load along the entire perimeter of the building.
If the base of the walls is flat, it is possible to create a ventilation gap in other ways, or the finishing area is small, then you can do without lathing.
You can attach siding without sheathing to OSB, i.e. a wooden board. This can be done using self-tapping screws or nails. Most often, this installation method is carried out on wooden houses.
However, this method is rarely used, and the consequences can be serious. For example, mold on siding, mildew and other problems that will lead to the need for urgent and expensive repairs.
Installation of sheathing under siding
Main stage. The durability and appearance of the facade depend on the quality of its execution. It consists of several substages:
Visual inspection and preparation. Before starting work, the surface of the facade is carefully inspected for foreign protruding objects and damage to the integrity of the load-bearing structure of the wall. Everything unnecessary is removed from the façade. The cracks are expanded and sealed with cement mortar or facade plaster for the base layer.
The surface affected by the fungus is cleaned and treated with an antiseptic. All necessary wiring for façade lighting is installed.
Marking. To mark the vertical and horizontal axes, a laser, water or regular building level is used. The essence of the method does not change. A horizontal line is drawn at the bottom of the wall. It marks the mounting locations of the brackets in 600 mm increments.
Then the outermost line is struck vertically. It marks the installation locations of the brackets in increments of 600–1000 mm.
Using the resulting coordinate grid, using a building level, the installation locations of the remaining brackets are marked.
Installation of brackets. Each fastening element is secured to two anchor dowels or self-tapping screws. First, the bracket is tried on, and the locations for installing the dowels are marked.
Then holes are drilled with a diameter slightly smaller than that of the dowel. After this, a paronite gasket is applied to the wall, a bracket is placed on it, and the dowels are screwed in.
Installation of frame profiles. First of all, the lower horizontal element is mounted, on which the starting bar will be fixed. The profile and brackets are connected to each other using screws or bolts. It all depends on the type of facade suspension system.
After installing the starting profile, vertical posts are mounted. Horizontal connections are not always present in the system of suspended facades for siding.
A galvanized metal frame is the best choice for constructing a ventilated or conventional siding facade. The construction is strong and durable. The siding is more likely to collapse than the metal subsystem.
Similar articles
- Do-it-yourself siding installation: instructions for dummies
Installation of metal
sheathing under siding
to wooden walls is done using self-tapping screws or nails. If you have to work with buildings made of bricks or blocks, then dowels are used, for which you will first have to make the appropriate holes. Read more - How to finish a gable with siding
If
the siding
is mounted vertically, then the profile is horizontal and vice versa.
The amount of windproof film is determined based on the area of the pediment plus an overlap of 100-150 mm at the bottom edge.
Gable
sheathing for siding
. Read more - Tips for covering a house with metal profiles.
The sheathing under
the corrugated sheet is fastened with special self-tapping screws, popularly used
...
Facade
made of metal profiles
.
Thus, we will mark the entire facade even before finishing begins ... siding
for decorating and protecting the facade. Facade board made of WPC. Read more - How to cover a house with siding with your own hands
Do
-it-yourself siding lathing for metal panels should be made
only from metal profiles
.
They are also used in the case of finishing brick and concrete walls. In the case of using vinyl panels attached to a wooden house, sheathing
for... Read more - Pediment made of corrugated sheets: features of selection and installation
Lathing for siding made of metal profiles
.
How to sheathe the gable of a house: choose the material and learn... ... siding
for decorating and protecting the facade. Facade board made of WPC. Features of façade finishing in winter. Read more - How to cover a balcony with siding from the outside with your own hands
Why choose
siding
?
Siding
is a universal finishing material that can be used to cover almost any surface.
...
Sheathing a house
with metal profiles
: from fastening...
Lathing for siding made of metal profiles
.
How to cover a house with siding
with your own hands.
Exterior siding
… Read more
What material to choose for lathing
Wood or metal is used to create sheathing for siding. Each of them has its own operating characteristics, which are worth paying attention to when choosing. For example, it is better not to use wood for the installation of base sheathing, since under the influence of moisture from the ground it will lose its properties.
You can install the structures yourself; here you should follow the rule: if the siding is vertical, then the frame posts must be attached horizontally.
Important! The frame racks are installed at a certain distance, which depends on the weight of the finish.
Particular attention should be paid to corner posts. The correctness of their location determines the evenness of the installation of the corner profile, which affects the quality of the finish and its durability.
As already noted, the sheathing is made of metal profiles or timber. Wood is low cost and easy to install. However, there are much more disadvantages:
- Dampness may appear on wooden products, especially if the finishing is done on the base.
- The timber requires treatment with an antiseptic to extend its service life.
- Wooden structures are subject to severe shrinkage.
- Special storage conditions must be provided.
When choosing a tree, you should consider some features:
- Do not use wood in places with high humidity;
- Do not use too large beams, otherwise the structure may become deformed;
- the timber should not be freshly sawn, otherwise the humidity in it will be increased, which will negatively affect the frame;
- the timber should not be wet or too heavy;
- a bluish, reddish, brown tint indicates decay.
Metal, on the contrary, is less demanding to maintain. Its advantages:
- Small mass.
- Smooth frame surface.
- Not susceptible to the negative effects of mold, mildew, etc.
- Easy to install.
Despite the advantages, the main disadvantage of metal profiles is their high cost. In this case, the profile elements must be galvanized. Otherwise, corrosion of the metal will begin, and its elements will become unusable. The profile is absolutely not suitable for drywall; it is short-lived in outdoor conditions.
Installation of sheathing
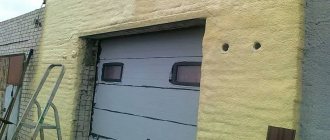
Before installing a frame made of profiles or timber, the walls of the house must be cleaned of dirt and loose fragments. The trims should be removed from windows and doors and all protruding structures should be removed from the surface. Protruding wall irregularities should be knocked down, and depressions and cracks should be sealed with plaster. After this, the facade is treated with an antiseptic compound and primed.
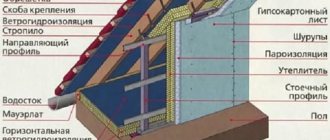
Construction of lathing for an insulated facade
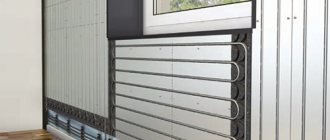
How to properly make the lathing if the facade will be additionally insulated? In this case, you will have to build a 2-layer structure from slats. Insulation will be placed in the sheathing of the first layer, and siding panels will be attached to the counter-lattice mounted perpendicular to it. It is better to attach the first frame to U-shaped hangers: with their help it is easier to build an ideal plane.
Lathing scheme for an insulated facade
The panels for the final cladding of the facade must be positioned horizontally so that precipitation does not fall under them. The siding must be attached to vertical slats, so the profiles of the first layer must be mounted horizontally.
Before installing the starting and finishing profiles, you need to hang a vapor-permeable film on the wall. After this, a strip is attached to the U-shaped hangers in the upper part of the wall. Hangers in the same row should be located no further than 40 cm from each other. They are attached to the wall with dowel nails. The profile is fixed on hangers with self-tapping screws with press washers 9.5 x 3.5 mm. Wooden blocks are fastened with wood screws 3.5 x 30 mm. The correct installation of the starting profile is checked with a level.
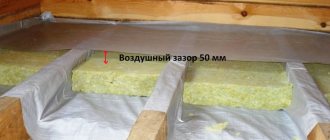
Now U-shaped hangers for the bottom strip are attached to the wall. They are installed according to the building level. The correct installation of the finishing profile is checked with a plumb line. Several threads should be stretched between both strips, which will determine the plane for installing the remaining profiles (bars). The distance between them should not exceed 60 cm. Then insulation is laid between the lathing slats. By the way, its thickness should correspond to the thickness of the first layer of sheathing.
U-shaped suspension
Its second layer is mounted perpendicular to the first. Before installing the profiles, the insulation is covered with a membrane, which is attached to the sheathing with screws, staples or nails. The pitch of the counter-lattice depends on the weight of the siding panels, but it cannot exceed 60 cm. The correct installation of vertical profiles is checked by a level.
Is it necessary to install a counter-lattice? Necessarily! It is this that will provide the gap between the cladding and the insulation necessary for ventilation.
How to make wood sheathing
For a wooden frame, lumber of various sizes is used. If there is no need to install insulation, then 5x5 cm beams are suitable; when using heavy siding, their size should be at least 5x7.5 cm. The height of the structure must be selected based on the size of the facade; for this, the distance from the end of the plinth to the beginning of the roof is measured. You can install such a frame with your own hands.
Material selection
It is necessary to select the material for creating the frame responsibly, because the correct installation of the siding, its reliability and durability depend on it. Usually the size of the timber is selected with a section of 40x40 or 50x50 mm. But others are also suitable, the main thing is that the material is of high quality and durable.
It is important to take into account such material indicators as:
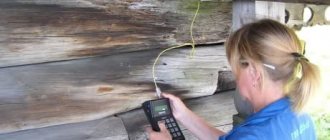
- Moisture level - the wood must be dried so that the sheathing gives minimal shrinkage.
- Evenness - the material should not have chips, unevenness, dark spots, mold, etc.
Important! Preference should be given to durable, moisture-resistant tree species.
Tools
Before starting installation, you need to prepare the following tools:
- plumb line - helps to establish a vertical offset for installing the sheathing;
- nylon rope - used to correctly calculate the vertical and horizontal distance between the posts;
- level;
- marker;
- roulette;
- jigsaw;
- perforator;
- hammer;
- screwdriver
Important! A jigsaw can be replaced with a circular saw.
Installation of timber sheathing
After preparing the walls, you can begin installation of the structure:
- Remove everything unnecessary from the walls of the building: storm drains, stakes, old plaster, etc.
- Measure and mark the distance between the beams. This is done using nylon thread.
- Drill the marked places and secure the bars. A screwdriver is used for this.
- Check with a level that the installation is level.
- From the fixed block, measure the distance to the next one, usually about 50 cm.
- Carry out similar actions.
- Install support bars over the entire surface of the house.
- Prime the walls.
- Prepare the insulation, cut out the required dimensions, and secure it under the support bars with glue.
- Treat existing joints and holes between insulation boards with polyurethane foam. After hardening, trim off any protruding residue.
- For greater reliability, attach the insulation to the wall using dowels.
Important! If mineral wool was used as insulation, then installation of a windproof film will be required.
- Calculate the length of the sheathing protrusion that will be used as ventilation. To do this, use a plumb line and a tape measure. After calculations, racks are installed in the right and left corners of the wall, and a thread is pulled between them.
- Similarly, the sheathing is installed around the entire perimeter of the building.
When everything is prepared, the frame is made, you can begin attaching the siding to the wooden sheathing.
Materials necessary for insulation and creating a frame (subsystem)
1 Materials necessary for insulation and creating a frame (subsystem) 1.1 Calculation of the PP 60*27 profile 1.2 Calculation of thermal insulation 1.3 How to calculate suspensions 1.4 Calculation of fasteners 1.5 Vapor barrier 2 Calculation of metal siding 3 Conclusion Let's start by considering
the main materials that are necessary to create the frame and insulation for the facade. In order to cover a house with block house panels, you will need:
- Profile 60*27 is a metal ceiling profile specifically designed for creating this type of system. The profile length is three meters;
- The suspension is straight, designed for attaching system elements (profiles) to the wall of the house;
- Depending on the material from which the walls are made, self-tapping screws or dowel nails can be used to attach direct hangers;
- Insulation. You can use any one you like, this does not affect the calculation principle;
- A dowel for fastening insulating materials is necessary for fastening the insulation, or instead of it, special plastic washers are used, which are placed under the head of the screw and do not allow it to fall inward;
- Vapor barrier;
- Sharp self-tapping screws with a 13 mm press washer, for attaching hangers to the profile.
Calculation of siding for cladding a house should begin by measuring the area of the walls that need to be covered. To do this, their height and width are measured, after which the area is calculated by multiplying the length of the wall by its height. To get the total area, you need to add up the results of each.
Important: when calculating the net area, from the rough area, i.e., obtained during the initial calculation, you need to subtract the total area of all windows, since material is not consumed on them.
Next, we begin to calculate the required amount of materials to create the frame and insulation.
Calculation of PP profile 60*27
In order to find out how much profile you need, you will need to multiply the net area of the walls by a factor of 2.2. The calculated result is measured in linear meters, but since to purchase a profile you need to know the piece quantity, you can divide the resulting number of linear meters of the profile by the length of one, i.e., by three meters.
Let's look at the calculations of the required number of profiles using a specific example, using numbers for clarity.
So, we have a house façade with a net area of 150 m2. It needs to be covered with a block house, for which a subsystem must first be made. To determine the required quantity of PP profile 60*27, multiply the area by a factor of 2.2. We divide the calculated result by three meters.
150*2,2=330; 330/3=110.
In total, to create a frame for a façade with an area of 150 square meters, you will need 110 PP 60*27 sticks. Knowing the quantity, it is easy to calculate the cost in order to create an approximate estimate, which may also be required.
Calculation of thermal insulation
Thermal insulation is best calculated in cubic meters, since its thickness may vary depending on the region of work or on the wishes of the owner of the house. Thus, in order to find out the amount of insulation, it is necessary to multiply the net area of the walls by the thickness of the material used as thermal insulation. Let's say our walls will be insulated with foam plastic 100 mm thick, but not immediately, but in layers. The thickness of each layer is 50 mm. This means that you need to multiply the net area by 0.05, and the resulting result by 2, and get the required volume of material. The second option is to immediately multiply by 0.1. In this case, it is necessary to remember that there will be two layers, because otherwise, errors may be made when calculating the required number of fasteners.
How to calculate suspensions
According to the frame installation technology, for metal or vinyl siding, the ceiling profile, which is the main load-bearing element of the structure, must be rigidly fixed using direct hangers. The pitch of the hangers on the profile should be no more than 0.6 m. Thus, knowing the required amount of profile for the subsystem, you can calculate the required number of direct hangers.
The length of one profile is known and is three meters; if we take into account the installation recommendations, then to attach each profile, a minimum of six hangers will be required. Now we multiply the number of profiles by 6 and get the required number of direct hangers: 110*6=660. Knowing the cost of each, you can calculate the total amount that needs to be included in the estimate.
Calculation of fasteners
Each direct hanger is installed on the wall and secured with two self-tapping screws or a dowel nail (depending on the material from which the wall is built). Thus, multiplying the total number of hangers by two, we get the number of dowels or screws needed to attach the hangers. Total 660*2 = 1200 pieces. It is better to take fastening materials with a reserve. It is enough to increase the required amount by 5-10%.
This is necessary to compensate for lost and damaged items.
Important: self-tapping screws for attaching hangers to the profile are calculated based on the total area of work. Moreover, when calculating the frame, it is necessary to remember that in the future the siding will be attached using the same screws. Thus, in order not to count twice, you can initially calculate the total required quantity.
For one square meter of facade, 50 sharp self-tapping screws PN 13 mm are required. Knowing the total area, we multiply it by 50 and get the number of fasteners for the siding and frame. 50 pcs*150 m2=7500 pcs.
Vapor barrier
Calculating the vapor barrier is quite simple, since it is measured in square meters. Accordingly, the clean area for the sheathing will be the required amount of vapor barrier. Knowing that a roll of such material contains 60 square meters, it is easy to calculate how much we will need.
Advice: if two rolls are not enough, but three are too many, then you can check with the sellers about the possibility of selling vapor barrier by linear meters. If the seller does not agree to sell in this way, then you need to buy three rolls.
By watching the video below, you can learn how to calculate the amount of siding per house, or more precisely, how the subsystem is calculated. The method described in the video allows you to calculate the volume of materials as accurately as possible. The master clearly demonstrates all the calculations and after viewing there should be no questions left.
How to make metal sheathing for siding
The metal frame is made similarly to the wooden one. There is a slight difference only in the tools used.
Material selection and tools
To work, you will need a metal profile, PP size 60x27x3000 mm. For its fastening, brackets are used, namely, a suspension in the shape of the letter “P”, and dowels for its fastening.
To secure the sheathing to the base, metal guides are used. They are installed strictly horizontally.
Important! The metal profile is cut using a grinder.
Preparing the wall and installing the sheathing
As already noted, the installation of a metal frame is similar to a wooden one. Before starting work, the surface is prepared, old plaster is removed, protruding elements are removed from the wall surface, etc.
Step-by-step instructions for installing the sheathing:
- Places for attaching hangers are outlined.
- Holes are drilled into which the dowels are attached.
- They are equipped with suspensions, the legs of which are bent into a U-shape.
- The distance by which the frame will retreat from the insulation is determined.
- Corner profiles are attached, and a nylon thread is stretched over them.
- The vertical frame posts are being installed.
- The sheathing above the window and door is attached in a horizontal and vertical direction, and connected at right angles. Before they are installed, measurements are taken and the corners are cut at 45 degrees.
- Insulation is attached between the frame. For this it is better to use mineral wool.
- A vapor barrier and wind barrier are attached on top of the wool.
After the preparatory work and installation of the frame, you can begin cladding the facade with siding.
Lathing for basement siding
To cover the base with siding, the frame is installed horizontally. The distance between the racks is about 20-50 cm. If you need to cover a large space (the whole house), then it is better to use a vertical arrangement of the slats. When fastening horizontally, the distance between the elements should be 90 cm, vertically - 40 cm.
For the base it is better to use a metal frame. It is stronger and can withstand heavy loads. In addition, moisture from the ground can spoil the wood, leading to mold, rot and mildew. Although this material is used to construct the frame on the ground floor.
The height of the structure depends on the region of construction. For example, if the ground freezes in winter, then it is better to raise the sheathing 10-15 cm from the ground. In mild climates, it is fixed near the ground.
Lathing for corrugated sheets
In this case, the material is selected depending on the purpose of the building. If it is a fence or gate, then a metal pipe is suitable, if the roof is a wooden beam.
High-quality waterproofing must be installed. If corrugated sheeting is used for roofing, then it is necessary to ensure air ventilation. Therefore, bars (50x50 mm) are attached along the rafters, which create a ventilated gap. Thus, a counter-lattice is created.
The sheathing is then attached to it. To do this, boards or beams are packed horizontally along the eaves. To facilitate the work process, you can stretch a thread around the perimeter, which will serve as a guide.
To fasten the sheathing, construction staples or nails are used for wood, and self-tapping screws for metal. For a concrete surface, dowels will be required.
At the bottom of the roof, on the slope, the main frame board is attached. Its thickness should be greater than the others. The dimensions of the remaining elements depend on the height of the profile sheet and the length of the fasteners that are attached to the outside of the roof.
Wind boards are installed at the ends of the slope, which should be higher than the rest of the frame elements. Further installation is carried out from bottom to top. The bars are attached to the rafters using nails.
Types of lathing and their features
Wooden sheathing for siding
The trim can be mounted on a wall without sheathing if the vertical fencing is strictly level and has no protrusions and depressions. Usually, external insulation is installed along with the panels, so an air gap and frame installation are required. The protective layer gets wet and becomes a conductor of cold without a ventilated gap.
Materials for wall lathing:
- wooden slats;
- metallic profile.
To fasten frame elements to the wall, ES brackets are used, which are used to install a steel system under drywall. Depending on the extension of the lathing, a length of 90, 120 or 150 mm is used; they are mounted under bars and metal. The insulation is fixed with dowels with large caps (mushrooms). The waterproofing is stretched onto slats and secured with a stapler (wood) and self-tapping screws (steel).
Tree
Use bars with a cross section of 50 x 50 mm or install slats measuring 40 x 50 mm. Choose dry wood with a moisture content of no more than 12 - 14%. Various species are used, but coniferous material, which contains resinous substances, is preferable.
Wooden slats are rarely perfectly level, unlike metal elements, so there is a certain difficulty in making a perfect area for the support of the strips. During storage, the bars dry out, so they become bent and twisted; minor deformations interfere with work. For storage, the slats are laid out in an even layer under a canopy and pressed with a load along the entire plane.
The bars are treated with heated drying oil or antiseptics are used against rotting, moisture and the proliferation of bugs. Antipyretics penetrate deeply into the wood body and provide reliable protection. They are applied with a brush or roller.
Metal
Metal frame
Special profiles of the plasterboard finishing system are used. To increase the rigidity of the sheathing frame, transverse jumpers are placed under the metal profile siding.
Use profiles:
- UD type guide strips;
- CD stands;
- connecting elements for racks;
- cross joints for crossbars.
Metal profiles are durable materials; they are often produced with a zinc coating. The configuration involves stiffening ribs; there are bends on the sides for fastening to brackets. Metal is placed on concrete, cinder block, brick, and wooden walls. The thickness of the purlins varies in the range of 0.45 - 0.5 mm.
Connectors are installed if the walls of the house exceed 3 or 4 meters (standard length of profiles). Optimal dimensions allow you to build a frame without waste and use space economically.
Installing trim around windows
To properly make the sheathing around the windows, it is necessary to secure the slopes and ebbs. You should leave a small allowance for their subsequent reversal. The material for the sheathing here is metal or wood.
Before installing the frame, wooden blocks are attached to the slopes, which will hold the finishing profiles. Adjacent planks must be joined at right angles, thus ensuring complete tightness. Lathing is an important element of the building, without which it is difficult to complete the finishing. For siding, a frame made of wood or metal is used. It not only helps to secure the facing material, but also levels the walls, creates a ventilated gap, etc. In order for the work to be quick and the result to be of high quality, it is necessary to choose the right material, tools and fasteners, as well as calculate the distance between the frame elements.