11/09/2017 7433 Pechnik (Moscow) Almost every country and private building needs constant and complete heating. Often, stoves and fireplaces are chosen as heating devices, for which it is simply necessary to install and select a high-quality exhaust system, which a bathhouse or sauna also needs. The sandwich pipe for a chimney is one of the most popular, versatile and sought-after variations, and all sizes of pipes and additional accessories for them can always be found on sale.
Advantages and disadvantages
Listing the positive aspects of a brick chimney, it is worth highlighting it:
- heat capacity and thermal conductivity;
- aesthetics;
- durability;
- low cost.
One can only add to the disadvantages:
- complexity of masonry. To do this, you need to have certain skills in construction, have some free time and strictly follow all technological processes;
- large weight putting a load on the heating device.
If the height of the chimney exceeds 5 m, it is necessary to make its own foundation for it.
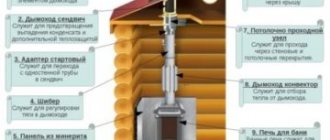
Types of chimney pipes
The chimney pipe serves to transfer smoke and combustion products into the atmosphere; it starts from the inlet pipe of the heating device in the house and ends above the roof ridge with a protective umbrella. In private construction, the following types are mainly used:
- Made of brick. Brick pipe has been used since people began building fireplaces and stoves. The difference between the modern one is the use of special oven-fired, fire-resistant bricks. Due to its heat-accumulating properties, this material retains heat inside the pipe, preventing overheating of the house finishing in contact with its walls. The complex structure of a brick pipe and its significant weight force homeowners to abandon this option. Only experienced stove craftsmen can correctly install chimneys of this type, which increases costs due to the wages of the foreman.
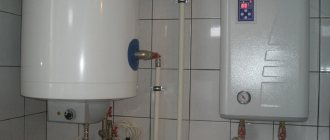
- Made of metal. The sale of metal chimneys has made it easier to create a chimney system in a private home. Additional alloy steel pipes with a thickness of 1 mm or more are lighter and cheaper than their brick counterparts. The device of such a chimney consists of separate modules. Straight modules are used for laying vertical and horizontal sections, and bends and tees are used for rotary sections. Installing a galvanized steel chimney has one drawback, which is that its material has better thermal conductivity compared to brick pipes, so it requires additional insulation. However, installing this type of chimney yourself is much easier; to do everything correctly, you just need to follow the instructions.
- Made of ceramics. The ceramic chimney system combines the strengths of brick and metal chimneys. It has a modular design and low thermal conductivity. The price for such products is higher than for metal pipes, but significantly lower than the cost of brick ones. It is difficult to make a ceramic chimney curved; it is better suited for a vertical system configuration.
Ceramic chimney pipe
The material from which the chimney is made can be selected correctly based on three factors: compliance with the material of the heating device, low thermal conductivity and tightness of the connections.
Brick chimney as an engineering structure
A brick chimney is considered one of the most complex engineering structures. Therefore, special requirements are imposed on its construction: strength, reliability and fire safety. Before installing it, you must carefully study the structure of its main parts.
Essential elements
A classic brick chimney consists of the following main elements:
- head. Its main function is to protect the pipe neck from water flowing from the metal cap. When laying the head, the bricks are moved outward to form a canopy over the lower rows;
- the neck of the pipeline, which is a continuation of the chimney;
- otters. It performs a protection function. Namely, it prevents precipitation from entering the pipe and creates the required level of thermal insulation;
- internal chimney. It is carried out from the ceiling of the furnace to a level located below the ceiling by 4 rows of masonry;
- fluffs. It is installed as the pipe passes through each ceiling. Its main purpose is to protect floors from high temperatures. The walls of the fluff are made quite thick (about 40 cm);
- external chimney. It goes through the attic and reaches roof level.
Basic requirements for constructing a chimney
When building a brick chimney with your own hands, certain requirements are met:
- One chimney is built for one heating device;
- the pipe should not be allowed to intersect with other utilities;
- the passage of the chimney structure through building elements made of non-combustible materials must be at least 25 cm;
- at each stage of construction, the structure is strictly checked for verticality;
- it is necessary to strictly monitor the absence of through gaps or cracks in the masonry.
Chimney calculation
When calculating a chimney, it is important to correctly select its internal cross-section, on which the efficiency of removing hot gases will depend.
The more powerful the heating device, the wider the chimney should be.
The dimensions of the chimney directly depend on which heating device it is connected to. But most often the following types of rectangular section are used:
- Four (when a row of masonry consists of 4 bricks, with a cross-section of 125 × 125 mm). This type is used for small heater stoves.
- Five (when a rectangular chimney is constructed from 5 bricks with a cross-section of 250x125 mm). This type is suitable for fireplaces and medium-sized sauna stoves.
- Six (when a square pipe is laid out from 6 bricks, with a cross-section of 250x250 mm). Such chimneys are suitable for powerful stoves.
When making calculations of the chimney, it is worth taking into account its height, which is calculated relative to the ridge:
- when placing the pipe on a ridge or at a distance of 1.5 m from it, its height must be at least 0.5 m;
- when the chimney passes through the roof at a distance of more than 1.5 m from the ridge, the height of the pipe should be 1.5 m;
- if the distance of the chimney passing through the roof exceeds 3 m, then an angle of 10 degrees is made between the ridge and the upper cut of the pipe.
If you choose the wrong chimney height, this will lead to the formation of turbulence and backdraft in it. And this will contribute to smoke in the room, and a threat to life for residents (as there will be a possibility of carbon monoxide poisoning).
Selecting the installation location and pipe outlet
Pipe placement options
According to professionals, it is best to lead the pipe through the roof through the ridge, since in this place it is perhaps easiest to arrange the junction of the roofing covering to the pipe, and also thanks to this, the formation of snow pockets can be avoided and, therefore, the likelihood of leaks will be reduced to a minimum.
However, the disadvantage in this case is the need to create a roof truss system without installing a load-bearing ridge beam, or to break the beam at the point where the chimney pipe passes and install additional supports in the places where the break occurs.
Another nuance is that for round pipes, manufacturers, as a rule, do not produce components with which it would be possible to pass the pipe through the roof.
Therefore, we can only talk here about chimney pipes of rectangular and square cross-section.
Another successful method of locating a relative roof pipe is to place it near the ridge, on the slope, which will also avoid the formation of a snow bag and, from a technical point of view, will be relatively easy to implement.
The height of the pipe above the roof depending on its location
Where is it not recommended to install a chimney pipe?
The most unfortunate place where a pipe can pass through the roof is the valley - the junction of two slopes that form an internal corner.
It is very difficult to achieve a high-quality connection of the coating to the pipe here, while an additional load on the chimney (including from the point of view of its sealing) will be created by the water flow collected from the adjacent slopes, and in winter a large snow pocket will form above it.
Advice!
In addition, the passage through the roof of the pipe will require complication of the truss structure at the installation site.
Chimney laying
A brick chimney is laid out in the most usual way. Despite this, its importance cannot be underestimated. Since the safety of the people living in the house directly depends on a properly laid chimney. When constructing it, you must follow the advice of stove makers and carry out all work carefully.
When laying out the chimney, special attention is paid to the evenness and neatness of its internal walls. If there are no cracks or irregularities on them, the need for regular cleaning of the pipe is reduced and its draft improves.
When laying a brick chimney, it is necessary to use a sand-clay mortar. To lay its main elements, not a whole brick is used, but parts of it (1/8, 1/4, 1/2 and 3/4).
To reduce waste when cutting bricks, it is better to do this with a grinder with a diamond wheel.
Preparation of the solution
To lay the chimney up to the roof level, a clay-sand mixture is used. It prevents the formation of cracks. It is important to select all the ingredients correctly so that the solution turns out to be high-quality and durable:
- sand is selected with grain sizes from 0.8 to 1 mm, without impurities and debris, and preferably of a uniform color;
- water must be of high quality and free of mineral inclusions;
- the clay is chosen to be of medium fat content, and it requires special preparation when preparing the solution.
Before mixing the solution, the clay is cleaned. It is soaked in a prepared container in water for 48 hours. Next, the clay is thoroughly crushed to obtain a homogeneous mass, similar in consistency to thick sour cream. The solution is mixed until all lumps disappear. Next, the clay is set aside for another day so that it dries a little.
When preparing a clay-sand solution, the ingredients are mixed in a 2:1 ratio. Water is added to it in small portions.
Brick selection criteria
When choosing a brick for arranging a chimney, preference should be given to solid, fired red material.
Sand-lime brick is not able to withstand high temperatures, so it is not used when arranging chimneys.
When choosing a brick, attention is drawn to:
- strict geometry of forms. This will ensure ease of laying;
- uniform color. If the brick on one side has a more saturated color than on the other, this indicates that during the firing process all requirements were not met;
- the sound produced by a material upon impact. If you knock on a brick with a hammer, a ringing sound should be heard;
- size. A brick with dimensions of 250 × 125 × 75 mm is suitable here;
- variety. It is better to choose 1 variety with good density. Its color can be scarlet or deep orange. To save money, some builders use grade 2, which has a paler color (red, pink). But it’s better to refuse grade 3. It is easily deformed under sudden temperature changes. This brick has a dark red color.
When building a chimney with grade 2 brick, it is recommended to additionally insulate the structure.
Arrangement of the internal masonry of the chimney
Laying the internal chimney begins after constructing the stove ceiling and installing the damper. The process of laying the internal chimney is the same as for the stove:
- The prepared mortar is applied to the brick.
- The bricks are laid in a row.
- The material is lightly tapped with a pick.
- Excess solution is removed.
- Each individual row is checked for accuracy and evenness using a building level.
The arrangement of the internal chimney is completed 4 brick heights before the ceiling.
Laying fluff
The chimney flue has wider walls than the rest of the chimney. If the usual wall thickness is 12.5 cm, then when fluffing it increases to 25 cm. The fluffing consists of 2 or 4 rows of masonry, where each brick moves outward by 1/8 of the width relative to the bottom brick. Sometimes it is located only indoors. In this case, it is used to install a metal box filled with thermal insulation materials. And sometimes the fluff passes through the ceiling to the flooring of the attic. In this case, its walls are made thicker, as they must ensure reliable insulation of the ceiling from the heat emanating from the chimney. When laying fluff, a clay-sand mortar is used.
The process of laying it is as follows:
- The first row is laid out from 1/8 bricks. The remaining gaps between the bricks are filled in 1/4 parts.
- The second row is laid out with 1/4 and 1/2 bricks.
- When laying the third tier, 1/2 and 1/4 parts of bricks are used.
- The fourth row is laid out with solid bricks.
Having reached the ceiling, the seams are ligated three rows higher. Next, a small gap of 2-3 centimeters is left between the ceiling and the fluff. This is necessary to prevent the entire structure from putting pressure on the masonry. Mineral wool is placed into the resulting cracks. Next, the masonry continues in the usual manner until the roof itself, with the vertical seams bandaged.
Otter clutch
The arrangement of the otter begins when the chimney is raised above the roof. For its laying, ordinary cement mortar is used. The laying begins from the edge that is located lower along the slope. When laying an otter, small indents are made on each row, equal to 1/8 of the width of the brick. In total, 6 rows are constructed during laying. And then the neck is laid out.
Head masonry
The masonry of the head is laid out in two rows. The first row must be moved by 1/8 of the brick, the second - by 1/2. The chimney cap is constructed to prevent smoke from entering the chimney in the presence of air turbulence.
Incorrectly selected pipe material and incorrect installation
The properties of the pipe material must correspond to the operating conditions. The following materials can be used to make a fireplace chimney:
Brickwork
Traditional and reliable option. It should be noted that the quality of firing solid kiln bricks must be high. This is especially important when connecting a long-burning factory firebox to the chimney. In economy mode, the temperature of the exhaust gases is low, which can cause condensation to form in the pipe. Insufficiently strong and porous bricks will begin to collapse, most quickly above the roof, where the moisture will freeze in winter.
The optimal solution is to install a stainless steel liner inside the brick channel.
Stainless steel pipes
Stainless steel pipes, single and double insulated, are the most popular and affordable type of chimneys today. They do not require the construction of a foundation and are quickly installed. However, the mistake of some developers is choosing a product solely based on price without taking into account the properties of the metal. Not all types of steel are fully suitable for use with fireplace inserts. Heat-resistant (operating temperature 700 ºС and above) brands are AISI 304, AISI 309, AISI 316, AISI 321. Operating temperatures of brands AISI 430, AISI 409 start at 500 ºС. The maximum temperatures that steel can withstand for a short period of time are 200-250 ºC higher.
Exhaust gases in fireplaces with a closed firebox heat up to 200-500 ºС, and in an open fireplace - up to 350-600 ºС. However, these data are valid only until the fireplace is heated in the normal mode, loading no more firewood than required and not exceeding the intensive burning time specified in the instructions. Those who like to “heat up” the fireplace quickly and heat it hotter can easily bring the temperature of the exhaust gases at the entrance to the chimney to 1000 ºС. As they move along the vertical chimney, they cool down noticeably, but the first half a meter or meter can heat up very, very much.
Which pipe to choose for the chimney? The ideal solution is AISI 321 steel. At a relatively reasonable price, it has sufficient heat resistance, is resistant to soot fire, and is acid-resistant. Pipes of this brand are best suited for gas fireplaces. For coal (there are some), it is advisable to use the AISI 309 brand, its heat resistance is higher, but the price is also higher. If the budget is tight, the design of the chimney for the fireplace can be a compromise: the first segment from the firebox, about a meter long, is made of AISI 321 pipe with a thickness of 1 mm; above, less expensive steel is used, for example, AISI 409, the thickness can be reduced to 0.8 mm, if light the fireplace moderately. It must be remembered that such a chimney may not withstand the ignition of soot and you need to monitor the cleanliness of the internal surfaces of the pipes and use high-quality fuel. The grade of stainless steel for the outer shell of the insulated pipe does not matter much, and a thickness of 0.5 mm is sufficient.
It is recommended to connect the insulated chimney to the firebox through an uninsulated section 40-100 cm long, this will prevent it from overheating.
Ceramic chimneys
They fully comply with the requirements for a fireplace, but are quite expensive, so they are not used often.
Enameled air ducts
A few words about enameled air ducts, which sellers often offer for fireplaces. The operating temperature of such pipes does not exceed 500 ºС, the maximum is 650 ºС. Theoretically, they are suitable for closed fireboxes, in which the instructions directly allow the use of chimneys with a temperature limit of 500 ºС. In practice, if the manufacturer’s recommendations are violated and used with powerful fireboxes, the enameled pipe may not withstand the increased thermal load. At best, the coating will melt, at worst, the steel will burn out.
Useful tips
Experienced craftsmen recommend following the basic rules when laying a chimney, for high-quality operation of the system:
- when laying bricks, excess mortar is immediately removed so that it does not get inside the chimney;
- When masonry, special attention is paid to dressing. Since a large number of halves of bricks or their third and fourth parts are used here;
- Do not make the seams in the masonry too thick. The optimal option is considered to be a seam thickness of no more than 5 mm.
Possible problems with the operation of the fireplace pipe
The operation of a fireplace largely depends on the correct installation of the chimney. If insufficient draft occurs, you should check the calculations according to which the chimney was built.
The fireplace pipe is installed incorrectly if:
- smoke enters the room;
- lighting a fireplace takes a long time;
- the fire in the fireplace burns too low;
- The burning intensity of solid fuels varies constantly and depends on weather conditions.
The first step when these problems occur is to ensure proper ventilation in the room. It is necessary to check the tightness of the windows and the intensity of the ventilation, if any. Since the fireplace flame burns most of the oxygen, there must be a constant flow of fresh air into the house. If after checking it turns out that the ventilation in the room is working properly, the cause of poor draft is the incorrect configuration of the fireplace pipe.
The reasons for the chimney not working properly are as follows:
- Insufficient pipe height. The larger the fireplace, the higher the duct must be to provide sufficiently strong draft.
- The pipe design contains bends of more than 45 degrees. It is advisable to make the chimney as straight as possible. If there are still horizontal elements, you should choose the minimum angle of inclination. The vertical part must be at least 5 meters.
- Incorrect calculations. The draft largely depends on the correct cross-section of the chimney.
- External influence. Weather conditions can affect the intensity of draft in the pipe. To prevent this from happening, it is necessary to install a weather vane on the chimney.
The chimney pipe for the fireplace must be installed in accordance with all standards. This will make the fireplace fireproof and also ensure its proper operation.
Common Mistakes
Most often, inexperienced craftsmen make the following mistakes:
- choose low-quality brick;
- allow too thick seams;
- the mortar for masonry is prepared incorrectly;
- incorrectly calculate the height of the pipe;
- do not maintain uniformity when laying;
- do not comply with fire safety requirements.
These errors cause loss of tightness, formation of vortices and poor traction. All this leads to a significant reduction in the performance properties of the chimney.
Installation features
Installing a fireplace and future installation of a chimney is quite a troublesome task for one person, take care of helpers. Let's look at some features that are identical for absolutely any type of duct, regardless of stoves or fireplaces.
So, important installation aspects:
- The distance from the combustion part to the nearest wall is at least 150 mm.
- Calculate the angle of inclination correctly.
- Provide the ability to adjust the combustion level, regardless of the chimney.
- Pipe installation should begin only after measuring all planes.
- Remember to apply a double coat of sealing compound.
- Remember, the upper contour of the next section of pipe must fit into the lower one. This is the only way to achieve protection against moisture ingress.
- Use special clamps and rivets to securely secure the connections.
- Provide for technological expansion depending on temperature; in other words, there needs to be some play at the bottom where the pipe enters the firebox. This will avoid depressurization when heated. You need to use a special adapter.
How much will it cost
It is difficult to say definitively how much it will cost to build a brick chimney. It all depends on various factors. If you turn to stove makers, in addition to the cost of consumables, you will have to pay well for their services. And this will double the cost of the chimney.
If you do the masonry yourself, then the cost of the structure will depend only on the purchased materials (brick, cement).
In conclusion, it is worth noting that laying a brick chimney on your own is a long, labor-intensive and responsible process. There is no point in experimenting here. Having absolutely no skills in construction, it is better to entrust this matter to specialists. Since the life and health of you and your loved ones depends on the proper operation of the chimney.
Dimensions
Calculating the correct dimensions of a chimney largely determines its operation and service life. The diameter of the smoke channel must correspond to the firebox pipe. The cross-section of a closed firebox usually reaches 200 mm, and in the case of a rectangular entrance - 270x140 mm. The open firebox has a diameter of 250 mm. The ratio of the diameter of the chimney in wooden stoves to the firebox is usually taken to be 1: 10. If the cross-section of the pipe is square, then the ratio is reduced to 1: 1.5. The heat transfer in the systems should not be less than 300 kcal per hour of operation. In this case, the pipe cross-section must be taken 140x140 mm.
The height of the chimney depends on the technical characteristics of the material used in installation. The design of the building also affects the size of the pipes. The height of the chimney is directly proportional to the draft force. Craftsmen recommend installing a large chimney, and the height of the structure should not be less than five meters. Otherwise, smoke may begin to form in the room.
Prices for sandwich pipes for chimneys
Buying a sandwich pipe for a chimney is quite simple; this product is not in short supply and is available in specialized stores in an assortment. But, when purchasing these products and other elements for installing a chimney, it is necessary to take into account that a high-quality certified product will last much longer than one made with violations of the process technology. You should purchase fittings for installing smoke exhaust systems directly from the manufacturer or from its official representatives on the market. This guarantees long-term service of the chimney and its reliability. In addition, specialized stores offer a wide range of related products: transitions, caps, capacitors, tees and bends, everything you need for installing a chimney.
In order to judge whether it is expensive or cheap, it is worth assessing the constituent price factors of a sandwich pipe for a stainless steel chimney, as well as the chimney installation work:
Material, it is clear that high-quality stainless steel cannot be cheap, so if the price of the product is low, there is a possibility that low-grade materials, steel, low-quality insulation were used, resulting in burnouts and damage to structural elements; Labor productivity, skilled labor is expensive, no matter whether it is production or installation work, for this reason it is worth being critical of unusually low prices on the market, unskilled labor means poor-quality seams, inaccuracies in size, leaking insulation and poor sealing;
It is clear that the use of cheap labor and low-quality building materials in the construction of a house threatens with alterations.
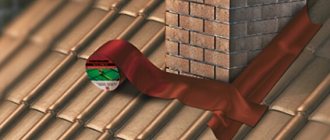
Laying the sandwich on the roof
Briefly about the price analysis, the market for insulated chimney products is represented by three leading manufacturers: NEST, NEST and Ferrum. Their product prices are relatively equal.
| Manufacturer | Product height, L = 1 meter | |||
| Inner diameter | Metal thickness, internal | Protective shell, metal | price, rub. | |
| NEST | 120 | 0.5 AISI 321 | AISI 321 | 1800 |
| NEST | 120 | 0.5 AISI 321 | St.08, galvanized | 1360 |
| "Smirnov" | 120 | 0.5 stainless steel | Stainless steel | 1550 |
| "Smirnov" | 120 | 0.5 stainless steel | Cink Steel | 1100 |
| Ferrum | 120 | 0.5 stainless steel | Stainless steel | 1576 |
| Ferrum | 120 | 0.5 stainless steel | Cink Steel | 1260 |
sandwich pipe
As you can see, prices on the market are approximately equal, and the technical differences between the products of these brands are minimal.
Ready-to-install modules
The cost of installing chimneys made from sandwich pipes depends on the region and the qualifications of the installers.
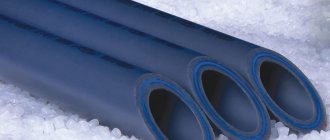
Sandwich pipes and installation materials
Sandwich pipes are reliable, easy-to-use and easy-to-install modular building materials designed for chimney installations. The advantages of such a chimney: ease of installation, low weight, accessibility and reliability, in addition, ease of operation. There is only one drawback - the price.
Installed stainless steel pipe
Design and dimensions
By its design, a chimney is the installation of a vertical channel in the wall, the height of which from the grate to the mouth is at least 5 meters. In this case, a slight vertical deviation is allowed. If the chimney is too high, the draft will be too high and the fuel will burn too quickly, and this will negatively affect the thermal efficiency of the fireplace.
In the case where the chimney design has an elbow, a tee is also installed, otherwise in order to clean the chimney, it will have to be completely disassembled.
Each time, the calculation of the design of the entire device will depend on the specific fireplace and the specific building, and therefore has individual parameters:
- pipe diameter and length;
- height and section of the box;
- fireplace power and instructions from the manufacturer;
- quantity and availability of components;
- mounting methods for the entire device;
- thermal protection and fire cutting;
- use of passages associated with floors and roofs;
- elevation above the roof and location of the head in relation to the ridge of the roof;
- the shape of the mouth in the channel and the location of the channels for smoke and ventilation in the common shaft;
- traction in the channel and some problematic elements of the entire structure, as well as its operating conditions.