Advantages of a sandwich pipe for a chimney
Switching from a brick pipe to a sandwich is a more attractive renovation option than laying out a new brick pipe.
A stainless steel sandwich pipe has a number of advantages over a brick chimney:
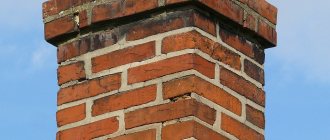
- The round metal pipe heats up quickly and evenly, providing effective draft from the moment the stove is ignited. The same cannot be said about a brick chimney. It warms up more slowly.
- A stainless steel sandwich does not become overgrown with soot. Unlike a brick chimney, a sandwich chimney does not require annual cleaning. The inner surface of the stainless steel pipe is so smooth that soot particles do not linger on it.
- The round cross-section of the sandwich pipe is ideal for unhindered smoke exhaust. In such a pipe, smoke vortices do not form in the corners, as happens in a brick channel.
- Reliable insulation of the inside of the sandwich prevents the formation of condensation. When the fire is rarely fired (for example, in the off-season), the brick condenses moisture, and it takes some time to dry it. At this time, especially in windy weather, some of the smoke enters the room.
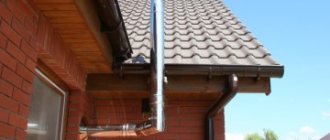
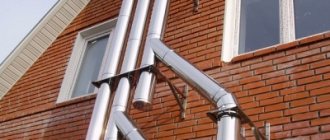
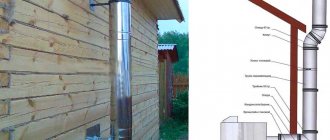
- The metal sandwich is easy to install anywhere. It can be removed not only through the roof, but also through the wall of the house. This expands the possibilities for installing a stove in a non-traditional location.
- Installation of a sandwich pipe without any significant losses is possible in a residential building, without eviction of residents, at any time of the year (if necessary).
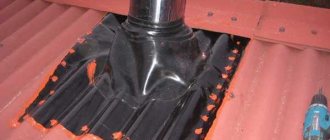
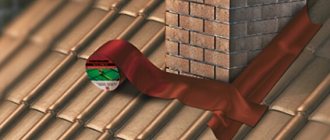
- Installation of a passage through the attic and roof is facilitated by the presence of ready-made parts for the duct and external waterproofing of the pipe.
- A stainless steel chimney is easy to assemble yourself, without the involvement of a qualified stove maker.
We recommend that you read: How to hide different types of pipes in the kitchen - solutions
The disadvantages of a sandwich pipe could be its high cost. However, this is compensated by the ease of installation and the opportunity to save on hired specialists.
Note! The chimney of stoves fired with wood or coal requires high-quality stainless steel at least 1 mm thick. Heat resistance up to 1000 degrees.
Conscientious manufacturers label products accordingly. Before purchasing parts for the transition from a brick pipe to a sandwich, you should carefully study the accompanying documentation.
When is it necessary to extend the chimney?
Sometimes people, wanting to save money, install a short chimney. This is a direct violation of SNiP, since in this case reverse draft often occurs, that is, combustion products penetrate into the room and are not discharged outside. This phenomenon occurs due to the fact that the wind blowing into the chimney has greater force than the combustion products rising upward. In such a situation, the problem can only be solved by lengthening the pipe.
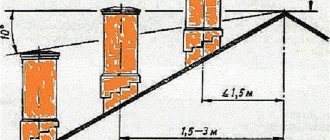
It may also be necessary to lengthen the chimney of a gas boiler in situations where the chimney is not installed correctly on the roof. For example, the following rules are not followed:
Switching to a sandwich pipe - preliminary work
The replacement of a brick pipe with a sandwich is carried out in the area where the chimney exits to the attic.
Preparatory work should be carried out first:
- Dismantle the part of the brick chimney that is planned to be replaced with a sandwich pipe.
- If there was a hog running through the attic, which is found in most old houses, then it should also be dismantled. In this case, the new location of the pipe exit to the roof will shift.
- Seal the old opening in the roof.
- Assess the new pipe outlet location and design the future chimney. Calculate its height and the parts needed for assembly.
- Purchase a sandwich pipe, transition elements, and insulating parts for wiring through the roof.
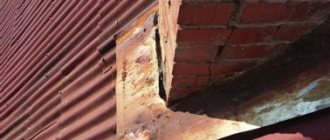
Note! When dismantling a brick channel, special attention should be paid to observing safety precautions.
The site where construction waste is dumped should be fenced off with protective tape. If the outer part is planned to be dropped entirely, then the trajectory of the fall should be calculated. A massive brick structure can cause significant damage to the roof or structures, objects, and plantings located below.
A brick chimney (the part that should be disassembled) consists of a foundation or hog, a trunk (part of the pipe up to the roof), a tin duct for wiring to the roof, and an external part.
The extension part (the section of the brick pipe with the damper located before the wiring through the ceiling) usually does not need to be disassembled.
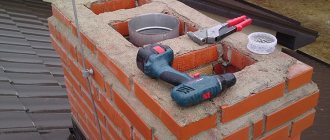
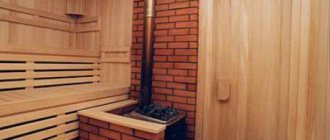
To switch to a sandwich pipe, the brickwork is made from refractory (fireclay) bricks in such a way that the channel gradually narrows to the diameter of the new chimney. The inside of the brick channel should be thoroughly plastered to minimize soot deposition.
We recommend that you read: How to unclog a water pipe yourself?
When installing gas equipment for heating or water heating, a brick chimney needs a liner, that is, installation of a stainless steel metal pipe inside the brick channel. This technique helps to increase the reliability of the chimney, minimize the risk of clogging the channel with soot, and improve draft.
Solving problems yourself
Let's try to make the heating process safe and efficient with our own hands. The most common way to combat soot accumulation in pipes is with a brush and a sinker.
Cleaning the pipe with a brush
First, let's prepare everything you need:
- A hard bristle brush. The diameter of this device is selected taking into account the cross-section of the pipe (from fifty to three hundred millimeters).
- A thin metal cable (can be replaced with a very strong rope or rope).
- Weight for hanging from a brush.
This is what a device for cleaning a chimney pipe looks like
Do not start work if there is strong wind or too much humidity outside. Try to think through and use reliable insurance to protect yourself from unforeseen events.
The ruff is weighted using a sinker, attaching it to the bottom of the device. The brush itself is hung on a cable. All fastenings must be especially reliable, otherwise the structure will fall apart and you will have to perform additional actions - to “fish” them out of the pipe.
First, all inspection holes in the chimney are cleaned, and then they begin to clean the pipe itself. By making a few up and down motions, you can get rid of any soot that will fall from the chimney into the furnace. It is best to have someone else around the stove to signal efficiency and when to stop working.
Cleaning the pipe should be completed when the soot stops falling out.
You can also clean the pipe using improvised means, about which many videos have been made.
Video: cleaning a pipe with improvised means
How to assemble a chimney correctly?
Fire safety rules when installing a chimney require compliance with certain standards. To lay sandwich pipes through wooden structures, high-quality thermal insulation of metal parts from wooden (or any other flammable) parts is required.
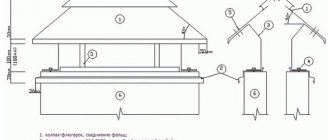
In the case of a finished metal pipe, it is possible to purchase ready-made structures that insulate the roof from the effects of heat (pass-through unit) and precipitation (oblique lining and protective corrugated flange).
Rules for assembling a sandwich part of a chimney:
- The assembly of the structure is carried out from the bottom up.
- Metal parts are inserted into one another according to the principle of socket joints. The joints are sealed with a special non-flammable compound and reinforced with clamps (special clamps).
- There should be no joints in the section where the pipe is routed through the floors. This is a fundamental fire safety rule when assembling a chimney structure.
- If the roof is made of flammable material, it is necessary to install a spark arrestor on the head of the pipe. In any case, a protective cap is required.
- To secure the tall structure, I use tension cables.
General rules for installing a transition:
- The metal part of the pipe can be partially recessed into the brick part using the sleeve principle.
- It is unacceptable to reduce the internal part of the channel or install mechanical barriers (protrusions, fittings) for the passage of combustion products.
- To ensure tightness, use black oven sealant with resistance up to 1500 degrees. If the pipe is not going to be disassembled, then sealant is applied to the inside of the pipe. If the structure (in the future) needs to be disassembled, then only the outer seam is sealed. Later, during disassembly, the sealant is removed by mechanical force (broken).
- To switch from a square to a round cross-section, you definitely need a support platform (square) and a pipe (cylinder). It is better if it is a one-piece design.
We recommend that you read: Sound insulation methods to reduce noise in a sewer riser
There are several options for switching from a brick chimney to a sandwich pipe. Each of them has its own advantages.
Useful information about chimney draft
All residents of country or private city houses are familiar with the concept of chimney draft. Do they know the essence of this term?
If we move a little away from the dry scientific terminology, then draft can be defined as a natural phenomenon in which air moves from one area to another, namely, from an air zone with high pressure to a zone with low pressure. All this happens with the help of a ventilation device - a special channel in the chimney.
Using this process of aerodynamics, humanity began to use fireplaces, stoves, boilers, heating their homes using different types of fuel - coal, firewood, peat, etc.
With good draft, the stove lights up quickly and the room is filled with pleasant warmth.
The following depends on a properly designed and constructed chimney and, accordingly, on good draft:
- quality of room heating;
- reduction in fuel costs;
- safety in buildings with their own heating.
What influences the value
There are three groups of factors that must be taken into account when constructing and inspecting a chimney.
In-house moments
A number of factors indoors can significantly influence the presence/absence of draft and its strength:
- The material from which the building is constructed.
- Average room temperature.
- The maximum volume of air space in the home.
- The number of people permanently staying inside the dwelling.
- The presence of internal sources that additionally consume oxygen (heaters, heaters, stoves, etc.).
- Regular supply of fresh air (airing, ventilation).
External factors
There are other factors that determine the chimney draft, and they are located outside the heated room. We are talking about external temperature, atmospheric pressure, humidity, wind direction. A phenomenon such as changing temperatures during the day can also affect draft - due to the movement of cold and warm layers of air.
Difficulties with traction appear for various reasons, some may simply not be noticed. For example, problems with air outlet through the chimney may arise if the pipe is located much lower than the ridge of the building or tall nearby trees.
Chimney design features
The draft may vary depending on the design characteristics of the chimney:
- height;
- presence of insulation;
- tightness;
- location (internal/external);
- length;
- presence/absence of irregularities or roughness, etc.
It is necessary and possible to control the draft in a room using the “levers” of the first and third factors (intra-house and design). Natural changes, of course, do not depend on humans.
Keeping the draft in the chimney under control is a prerequisite for safe and comfortable living in your own premises. If the draft is very weak, then it is almost impossible to light the stove and heat the home.
With reverse draft, the gases generated as a result of combustion are “thrown” into the living space, and not into the air through the pipe. This is very dangerous for human health and life!
It is impossible not to notice this atypical behavior of smoke
With very strong draft, all the heat is rapidly drawn out through the chimney channels, without having time to warm the heated room to the desired temperature.
Options for connecting a brick chimney to a sandwich pipe
According to fire safety regulations, the connection between a brick chimney and a sandwich duct must be sealed and well insulated. This transition can be mounted using several different devices.
With adapter
The easiest way to install a transition from a brick pipe to an iron pipe is to use a ready-made metal adapter. Its lower part is square, corresponding to the standard dimensions of a brick channel. The top one is round, the diameter of a sandwich. The finished adapter is already filled with a reliable heat insulator and complies with all fire safety rules and requirements.
The square part is installed on a brick section so that the masonry is inside the box. The remaining gaps are filled with building material for masonry
The sandwich pipe is mounted on top, also inserting it inside the adapter. The gap is sealed with sealant and further strengthened with a tightening clamp.
Without adapter
The transition without using a ready-made adapter is carried out by installing a metal platform on the brick part of the chimney. The dimensions of the platform are exactly along the outer edge of the brick channel section.
A hole is cut out in the center of the metal platform equal to the outer diameter of the sandwich pipe into which it is inserted.
The platform should be firmly fixed to the top of the brickwork. To do this, holes are prepared in the metal for self-tapping screws. Holes for dowels are drilled in the brick, symmetrically. Before fastening, the platform is coated with oven sealant and laid on the brick. Secure with self-tapping screws.
How to increase traction with your own hands: homemade devices
Before you start building a deflector yourself, weigh your strengths, review the available materials, and only then get down to business.
Drawings and diagrams
To create a deflector with your own hands, you need to use diagrams and drawings. You can use ready-made ones, which are presented in large quantities on the Internet, or you can do it yourself, relying on data from ready-made diagrams and drawings.
Photo gallery: ready-made diagrams of traction devices
If you decide to test yourself and save money at the same time, arm yourself with measuring instruments to determine the internal diameter of the chimney. Depending on this value, using the table as a guide, you can determine the necessary parameters for the height of the deflector and the width of the diffuser.
With an internal diameter of 120 mm, these parameters are respectively 144/240, for a diameter of 140 mm - 168/280; if the internal cross-section is 200, then 240/400; for a cross section of 400 mm, you will need a deflector height of -480 mm, and a diffuser width of 800 mm.
You can calculate the necessary parameters (for a specific pipe diameter) yourself using simple calculations. To determine the width of the diffuser, the internal diameter of the pipe must be multiplied by 1.2; We consider the width of the umbrella for protection to be -1.7 x d; We find out the total height of the structure if we multiply the size of the internal section by 1.7.
Having received all the dimensions, we make drawings for more accurate cutting. We draw diagrams on a sheet of Whatman paper or on the back of the remaining pieces of wallpaper.
It is best to construct a life-size drawing. So that when cutting, you can simply attach the cut paper parts to the steel sheet and not have to recalculate the data taking into account the scale of the drawing.
We stock up on materials and tools
Everything needs to be prepared in advance so as not to be distracted during work.
To make the deflector we will need:
- galvanized sheet with a thickness of at least half a millimeter, stainless steel can also be used;
- metal scissors;
- drill with different drill bits;
- device for setting rivets;
- hammer;
- pliers;
- clamps, nuts, bolts;
- marker (for transferring the drawing onto a metal sheet).
Preliminary stage
The preparatory work consists not only in drawing out the details of the device, but also in cutting them out and trying them on. All paper elements are fastened with paper clips or a stapler and applied to each other. If everything fits, then you can carefully remove the fasteners and straighten the templates.
Do not be negligent in the process of creating a deflector; try to think about your safety. To avoid injuring your hands and to protect your eyes, use gloves and special glasses prepared in advance.
Let's get started
So, everything is in place, we can get started!
A step-by-step description of the sequence of actions will help you:
- We transfer the parts cut out of paper onto a galvanized sheet. We should get developments of the following elements: cap, diffuser, outer cylinder and stand.
- Using metal scissors, carefully cut out all the components of the deflector. In places where the cuts are made, the metal is bent with pliers to a thickness of half a millimeter and “passed” with a hammer.
- The diffuser, cap and cylinder blanks are rolled up and holes for fastening are drilled (if bolts are used). Connections are made using rivets or bolts; in exceptional cases, welding can be used (semi-automatic).
- To attach the cap we prepare 3-4 strips of metal. The dimensions of the strips are 6 by 20 cm. The strips, folded at the edges and tapped with a hammer, must be bent in the shape of the letter P. On the cap, five centimeters from the edge, drill 3-4 holes and secure the metal strips with bolts.
- The other ends of the galvanized strips must be attached to the diffuser, thereby “looping” the cap and diffuser.
- We insert the resulting structure into the shell.
You can watch the video about how to build a TsAGI deflector with your own hands.
Chimney extension technology
If the chimneys are made of modern materials, stainless steel (double-wall sandwich pipes) or ceramics, for example Schiedel Uni, the chimney extension should be carried out with pipes from these manufacturers, strictly following the work technology recommended by the manufacturers.
Brick chimneys are built up either with brick or stainless steel pipes. Stainless steel is used to extend chimney pipes or one of the channels of a brick shaft to remove combustion products from a heating device (stove, fireplace, gas boiler).
Adapter from brickwork to stainless pipe
When switching from masonry to stainless steel, there are two main issues to consider:
- The cross-section of the chimney must not be narrowed. To do this, it is necessary to calculate the internal cross-sectional area of the existing pipe, multiplying the lengths of the internal surface of the pipe by each other and select the diameter of the round pipe corresponding to the area, calculating it using the formula πR².
- Increasing the height of the chimney should be done with insulated, double-walled pipe sections. Single-wall pipes freeze in cold weather and air pockets form in them, preventing the startup of boilers and the ignition of stoves and fireplaces.
Related article: Selecting siding to match the roof color program
When the pipe height increases above 2 meters, additional fastening elements should be provided.
I encountered a problem with extending the chimney
The situation is this: two asbestos pipes are coming out (outer diameter 180, inner 143), they need to be extended using galvanized ones. There are galvanized pipes of 135 diameter. How can they be combined with asbestos? Some kind of adapters? so that it all holds tightly, because... increase 220 cm
It is not clear what kind of pipes are, but in any case you should not narrow the pipes. I advise you to find a pipe of larger diameter and put it on top, securing it with a clamp
chimney pipes, on the roof they come out touching each other. Everything around is cemented, you can’t move them apart, i.e. putting it on top is a problem
What are the initial conditions? Maybe you can do without building up the chimney.
Initially, everything was fine, then a neighbor’s wall of the second floor appeared nearby (the house is divided in half - one half is one-story, the other was built into two floors). There are chimney pipes on the roof of the one-story half; they are about a meter away from the wall. There are turbulences from the wall and the boiler goes out. That's what the experts said. It needs to be built higher than the ridge of the neighbor's extension. this is 220 cm.
Well, no one will tell you
You have a flue made of two pipes! Put one large pipe on them. Bend it into an oval and put it on. Or order... Just remember, the pipe will start crying. I have an iron pipe, I heat it with gas, I wrapped it on top with polystyrene foam film and foil and secured it with tape with the foil facing outward - protection from the sun and it turned out beautifully. And seal the joint with the asbestos pipe with mortar, even clay will do. You can’t do anything else - it’s winter
It's winter though. Equip existing pipes with clamps to prevent them from flying into the chimney, prepare a clamp for attaching guy wires, make or buy caps, stock up on asbestos sheets and asbestos cord. Secure the clamps with prepared braces, wrap the steel pipes with asbestos and push them into the existing chimney. Secure with stretch marks. Wrap the pipes with Izover, Ursa, etc. Wrap with foil, foil-foil polyethylene foam, etc. Wash three times to complete the job successfully. It is not advisable to combine chimneys. I won’t get into theory, this is on the topic of heating and ventilation.
Related article: Finnish house with a pitched roof projects
In your case, I would do this: I called companies involved in tin production and ordered from them an F180 pipe with flaring on one side up to F184, the length of the flaring is 15-20 centimeters. After which this pipe is put on the asbestos pipe and fixed with self-tapping screws. To reassure yourself that the fastening is secure, you can install guy wires. Use F135 pipes somewhere else, for example, in a bathhouse. Because It’s pointless to even make a sandwich with it (it’s not stainless steel, there’s a big difference with the internal diameter). I don’t recommend sticking them into asbestos pipes, wrapping them with asbestos fiber, because... similar operations are carried out on the ground. Otherwise you will end up with “snot”, and snot and carbon monoxide in the room are a RISK.