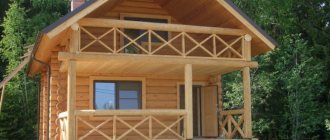
Main characteristics of the material
A metal tile roof is a structure made of steel sheets with a thickness of 0.35 to 0.7 mm (the thicker the sheet, the stiffer and more stable the roof), galvanized on both sides and coated on the outside with a polymer composition (plastisol or polyester). Metal tile sheets usually have a width of 1 m and a length of 1 to 7-8 meters.
Roof covering
Among the advantages of metal tile roofing are::
- low weight (no more than 6 kg per square meter) due to the maximum possible thinning of the steel sheet: from 0.4 mm to 0.7 mm;
- resistance to temperature changes;
- ease of replacement of deformed sheets of material;
- resistance to corrosion;
- long service life (up to 50 years) and reliability;
- relatively low cost of material;
- Huge selection of coating colors (at least 25 different colors and shades).
When choosing a suitable metal tile, it is recommended to pay attention to a material with a thickness of 0.5-0.6 mm, because a sheet with a lighter weight is more likely to deform in the area of the nodes, so you will have to make a replacement. The thickness of metal tile sheets is a very important characteristic, because with increasing strength, the strength indicators of the entire roofing pie also increase. At the same time, the thicker the roofing covering (maximum 1 mm), the more weight the roof has to support, so the rafters will have to be strengthened.
Advantages and disadvantages
Metal tiles are lightweight, which has a positive effect on the construction budget.
As a building material, metal tiles have positive consumer qualities:
- light weight, which allows you to save on the arrangement of the foundation, walls, rafter system;
- ease of installation;
- resistance in any climatic conditions, immunity to precipitation, hail, air temperature and ultraviolet radiation;
- structural strength due to the metal base and stamped profiles, which are stiffening ribs;
- availability of additional elements necessary to complete the roof in a single style and color scheme;
- non-flammability;
- easy adjustment to the desired size using metal scissors, a hacksaw, or a jigsaw;
- the ability to install a roof with a slight angle of inclination - the material can withstand heavy snow loads;
- durability - an average service life of 20 years, and products with a polyurethane coating have a guarantee against rust through for up to 50 years.
You cannot cut tiles with a grinder; under the influence of high temperatures, the coating loses its properties, and it becomes possible for rust to quickly spread.
Additional costs are associated with the purchase of waterproofing.
In addition to the advantages, the material has some disadvantages:
- low sound insulation;
- the need to install hydro- and vapor barriers when installing a warm roof;
- treatment of cut sites with an anti-corrosion compound is required;
- a large amount of waste when arranging a roof of complex shape;
- high thermal conductivity, leading to rapid cooling of rooms in winter and heating in summer.
Care must be taken during transportation as the sheets may be bent or scratched.
Basic installation rules
The construction of a metal tile roof must be carried out in accordance with established rules, the main ones of which are listed below.
The minimum angle of inclination of a conventional metal tile roof is 14 degrees. If a gable roof structure is assumed, then the laying of sheets begins from the lower left corner of the slope, with each subsequent sheet placed on top of the previous one, taking into account the overlap in one wave. If the angle of inclination is less than 14 degrees (which is not entirely correct), then the overlap should be done in two waves.
Roof structure installation
In the case of a hip roof, you need to start the arrangement from the highest part of the structure, and then go down in opposite directions.
The bottom edges of the latest metal tile sheets should protrude above the level of the eaves by at least 3-5 centimeters. In addition, the steel sheets must be hemmed with boards at the bottom and along the edges.
Installation of metal tile roofing is carried out using self-tapping screws with rubberized gaskets, screwed into the waves of sheets along the lower edge in increments of 7-9 pcs/m2.
The ridge must be covered with compacted additional elements. It is correct to use semi-cylindrical parts at the upper ends of the profiles, because due to their shape they are more securely and firmly held on the ridge.
In order to make a roof valley, you will need: firstly, an intermediate structure, and secondly, a gutter element attached to the sheathing using this structure.
Installation of the internal corner of the roof
When installing additional roofing elements, gaps always form that must be sealed. The correct way to do this is with silicone sealant, as well as sealing tapes.
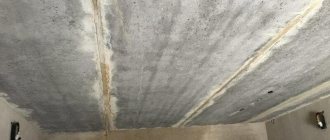
From the inside, in the under-roof space, the metal covering remains very cold, in addition, developers often note the accumulation of condensation. Therefore, in order not to spend money later on replacing damaged material, it is important to correctly assemble the metal tile roof pie, including in advance layers of material that provides high-quality vapor barrier and ventilation.
Calculation of the amount of metal tiles and consumables
In addition to metal tile sheets, the price includes fastening materials and a ridge.
On the Internet you can easily find online calculators for calculating the material and consumables required for installing a warm or cold roof.
Manufacturers make calculations for their material. The geometric full and useful dimensions of the sheets may not be the same for different companies, which leads to the purchase of excess metal tiles or its shortage and the need for additional costs for the delivery of missing elements.
Using school knowledge from a geometry course, it is easy to find out the amount of material needed.
Step-by-step calculations are carried out in the following sequence:
- Calculate the total roof area. The length of the house is multiplied by the length of the slope.
- Based on the usable area of the metal tile, you will find out the required number of sheets.
- Measure the total length of the additional elements to create the ridge and drains.
- Calculate the required number of fasteners. For each square meter, the consumption will be: 6–8 roofing screws that will fasten the sheet and 4–5 for installing drains.
When making calculations, you should take into account possible cuts of the tiles when arranging the ridge and overhangs - the dimensions and stamping of the sheets may not correspond to the roof parameters.
To check your own calculations, you need to make a control layout of the sheets according to the drawings.
It is better to purchase tiles from a local large seller, who will independently calculate the material according to the house drawings. If additional purchases are necessary, there is no need to search for the required material.
Required Tools
In order to cover the roof with metal tiles with your own hands, prepare the following tools:
Fastening the sheet with self-tapping screws
- Drill-driver (it is necessary to have an attachment for a self-tapping screw with a hexagonal head);
- A tool for cutting metal tile sheets (for example, a low-speed circular saw with carbide teeth, an electric jigsaw, a hacksaw for metal, or a special drill attachment designed for cutting metal);
- Measuring rod and tape measure;
- Tracing cord;
- A hammer (in addition to the standard one, you will also need a rubber one, which is used if it is necessary to correct a section of the structure without damaging the protective coating of the metal tile sheet);
- Gun with silicone sealant;
- Marker.
Under no circumstances should you use a grinder with an abrasive wheel to cut metal sheets, as it will irrevocably burn the cut site and all nearby coating.
No protective film or paint that smooths out defects in metal tiles will save you from the corrosion that appears in the areas cut with a grinder. In this case, replacement of the coating cannot be avoided.
Related materials:
Your feedback, comments, questions
Dear visitors! We will periodically answer your questions in the comments as we are busy. In order for us to respond to you promptly (within an hour), you can: call, write a personal message or leave a request for a free consultation by phone.
Comments
Peter 12/14/2015 12:30
0 How to correctly lay metal tiles on a roof with 3 gables
Reply | Reply with quote | Quote
Mikhail the foreman 01/09/2016 21:18
+2 The technology for laying metal tiles does not change depending on the number of gables. In any case, you start with the valley, then the sheets.))
Reply | Reply with quote | Quote
Ilya 12/15/2015 12:31
0 Here’s a question: how to properly make a roof valley?
Reply | Reply with quote | Quote
Mikhail the foreman 01/09/2016 21:16
0 If we are talking about a groove over a pipe, then to drain condensate, a groove is made above a membrane pipe. The base layer and a piece of counter-lattice are cut, a piece of waterproofing with a slope is inserted, glued, and the upper edge is attached to the counter-lattice. If the pipe is wider than 50-60 cm and the distance to the ridge is more than 1500 cm, then a slope is made over the metal tile pipe.
Reply | Reply with quote | Quote
Anton Krasikov 12/16/2015 12:32
0 Tell me how to properly connect the skates on the roof?
Reply | Reply with quote | Quote
Mikhail the foreman 01/09/2016 21:11
-1 The skates overlap and are screwed in with self-tapping screws. It doesn’t matter what shape the skate is.
Reply | Reply with quote | Quote
ANDREY 03/10/2016 11:51
0 Monterey metal roofing with a simple corner ridge. I want to improve ventilation and protect myself from blowing snow. I plan to replace it with a semicircular “large” one with three ktv ridge valves. Questions: won’t the ridge lose its appearance after bending it along the angle of the roof approximately 2x45 degrees in diameter, i.e. in the ridge approx. 90 degrees. And is it necessary to put a seal under the ridge shelves? I wouldn't want to worsen the ventilation.
Reply | Reply with quote | Quote Consultation by phone +7(495) 241-00-59 Answered by Mikhail the foreman moderator
It is better to use a semicircular cone on roofs with an obtuse angle; you cannot mount it on sharp ones. As an option, you can use piece aerators as under-roof ventilation. It is necessary to use seals in the ridge; they prevent snow from blowing in and do not impede ventilation.
Kirill 09.19.2016 11:04
-1 Is a ridge aero element even necessary for metal tiles?
Reply | Reply with quote | Quote Consultation by phone +7(495) 241-00-59 Answered by Mikhail moderator
Of course, with it, under-roof ventilation will be implemented much more efficiently!!
Update list of comments
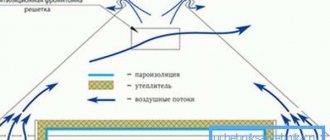
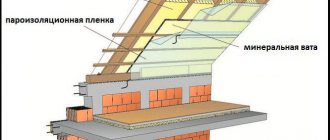
Features and composition of the roofing pie for a warm roof
The key point when constructing a metal roof is a properly equipped insulation pie . Any element of the composition of this pie plays a very important role, so if you ignore its installation, you cannot count on the most comfortable operating conditions for the future roof. Therefore, we will analyze each stage step by step. Please note that the layers of the roofing cake have a clear laying sequence, which absolutely cannot be changed.
Layer order
So, the composition of the cake for a warm roof includes:
- Longitudinal shoulder straps and rafters (this is the roof frame, roofing structure);
- A vapor barrier that lets steam out of the house, but does not let it in from the street. The vapor barrier film is attached to the inside of the sheathing;
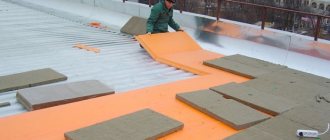
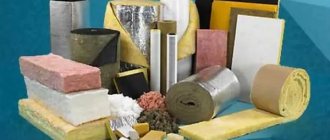
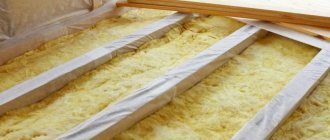
- Thermal insulation material (for example, mineral wool) placed between the joists of the roofing structure (it is necessary to leave space for ventilation between the layers of the cake, because at high humidity the material loses its heat-insulating properties);
- Counter-lattice is a layer of pie, the function of which is to fasten the roofing sheathing. It is attached parallel to the rafters, pressing a layer of waterproofing material;
- Lathing - (bars with a section of 50x50, attached along the slope in increments of 30-35 cm);
- A waterproofing membrane is needed to prevent the penetration of condensate settling inside the roof. The waterproofing is laid in such a way that there is a free space of 4-5 cm between it and the insulation, as well as between it and the coating.
- Metal tiles - laid directly on the sheathing.
Ventilation of the under-roof space
Interior work
When installing a warm roof, after attaching the tiles, begin the interior work:
- insulation is fixed between the rafters;
- nail a vapor barrier membrane;
- they attach the interior finishing - plasterboard, tongue-and-groove boards, wooden lining.
The technology for installing a metal roof is simple. The work can be carried out independently, subject to compliance with technology and safety regulations. The roof is beautiful, durable, and suitable for use in any region.
Features of the roofing pie under a cold roof
The design of a roofing pie for a cold roof is much simpler than for a warm one. In fact, the pie includes only sheathing, sheets of metal tiles and waterproofing .
Roof installation without insulation
First of all, the film must be secured using a construction stapler or small nails. After this, a counter-lattice is placed on top of it, and the screws securing it simultaneously press the waterproofing film.
As in a pie for a warm roof, the waterproofing is attached with some indentation from both the sheathing and the covering material (about 2-3 cm). The indentation is made so that condensate accumulating under the roof flows freely into the gutter. If you do not make an indentation between the waterproofing, but attach it with a tight fit, then the moisture will quickly provoke corrosion of the roof. On top of the waterproofing and counter-lattice, a lathing similar to that used for a warm roof is laid. Installation of a vapor barrier is not required in this case.
The technology of installing metal roofing without insulation in residential buildings is rarely used due to the lack of sound insulation, as in a warm roof.
Ventilation components of walk-through structures
They act as additional sections of metal roofing. Necessary for comfortable installation of air ducts, antennas and other parts. You can note:
- ventilation outlet;
- sewer outlet;
- outlet for antenna electrical cables.
A ventilation outlet is required in each rafter span to ensure good air exchange. But if there is an uninsulated cold triangle under the roof itself, 1 outlet for every 50 square meters of roof will be sufficient. Holes are made in the metal tiles, and then the elements are secured with self-tapping screws to the edges of this gap.
If a silicone-based sealant is not included in the outlet package, then it must be used in addition to everything else. The sewer outlet is combined with a riser. For this purpose, a corrugated pipe is used. On the roof, to install the walk-through part, a piece of metal tile is separated. Following the installation of waterproofing, sealant and sealant, the sewer outlet is installed in the flow-through component. It is secured to the tiles with nails.
To seal the junction of the antenna, chimneys and wires with the roofing material, specific antenna outputs are used. Their top, made of rubber, is removed and arranged to be 20% smaller than the cross-section of the passage pipe, and then placed on it. The base of the antenna output is given the shape of the roof outlet and treated with silicone sealant. Fixed with roofing material nails.
Roof ridge installation
Before laying the ridge strip, you should ensure reliable ventilation of the space under the roof . If it is decided to make point ventilation vents for this purpose, then they must be sealed around the edges to avoid deformation.
Ridge installation
If the ridge is flat, then its strips are mounted with an overlap, and if it has a semicircular shape, then the fixation is made along the lines of the metal-plastic profile.
Ridge roof units with triangular and trapezoidal slopes are arranged by adjusting the ridge strip to the ridge slope, straightening or bending as necessary.
Metal roof ridge installation
A ridge is one of the roofing elements that covers the upper horizontal edge at the junction of the roof slopes. Its purpose is ventilation. It also takes on the main wind load.
note
The ridge element is installed on top of the metal tile sheets upon completion of their installation.
Before we talk about installing the ridge element, let's first talk about the size of the ridge. This, in my opinion, is a very important topic.
Six different ridge shapes are used in construction, each of which is designed for a specific type of roof.
The Finnish company Rannila Steel OY was one of the first to produce metal tiles back in the 60s of the last century. She also developed the standard sizes of additional elements used in the construction of metal tile roofs, in particular, the semicircular ridge.
Nowadays on the construction market you can find semicircular skates of non-standard sizes, which are somewhat narrowed. This design of the ridge is explained by the saving of metal, which allows reducing the price of the additional element.
What advantages do narrow and standard size skates have over each other?
Advantages of a standard size semicircular skate:
1. When installing an additional standard-sized element, a large overlap of the ridge on the roofing material is obtained, which means that the under-roof space is better protected from rain and snow.
2. If a ridge-ridge aero-element is used in roofing work, then due to the sufficient width of the standard additional element it can be completely covered by the ridge. The protruding ends of the aero element from under the narrow ridge do not look aesthetically pleasing.
3. Due to mistakes made, which happen quite often in construction, the gap between the edges of the metal tile sheets at the upper horizontal edge at the junction of the roof slopes is larger than required according to the instructions. In this case, it is more convenient to cover all existing shortcomings with a wide skate.
Advantages of a narrowed semicircular skate:
1. Low price of this additional element, which allows you to save money when purchasing a skate of the required length.
note
I am inclined to believe that the guarantee of an aesthetically pleasing roof and reliable protection when using a standard-sized semicircular ridge is much more significant than the small savings that arise when purchasing a narrow ridge.
The slope of the ridge strips must correspond to the slope of the slopes. Before installation, it needs to be adjusted (bent).
1. To prevent water from getting into the under-roof space and into the attic, the ridge is installed on a sealant or on a waterproofing layer.
2. Place the ridge strip at the junction of the top sheets of both slopes. Laying - starting from the leeward end. The outermost bar should protrude two to three centimeters beyond the end.
3. The next planks are laid with an overlap of 10 centimeters or more.
4. If the ridge is round, the parts are connected in accordance with the stamping lines.
5. Use ridge screws to secure the strips to the sheets at the crest of the wave. The pitch is no more than 80 centimeters, the screws are 4.8 mm by 8 centimeters with sealing washers.
6. Treat the joints with sealant.
7. Install plugs at the ends of the planks.
Valley nodes
In order to properly arrange the roof components made of metal tiles, you need an intermediate structure and a valley element attached to this structure . In addition, the valley needs to be strengthened by strengthening the sheathing with additional floor boards secured between the main beams.
Installation of the valley
The installation of the valley planks is carried out with an overlap of 0.2-0.4 m, moving from the eaves to the ridge. It is necessary to make a side on the bottom bar at the level of the cornice. A seal must be made directly under the ridge and under the last valley strip.
Metal tiles bordering the valley should be correctly cut at a distance of 7-10 cm from the axis on one side and the other.
The valley is attached with self-tapping screws, and if the sheets are cut, then they and the valley must be secured at the points of contact between the metal tile floor and the plane in which the valley strips are fixed:
- on the bar, approximately 30 cm away from the axis;
- on the profile, at the very bottom of the wave, 1.5 centimeters below the stamping.
Sometimes the cut points of the roofing sheets are additionally decorated with special overlays, laid from bottom to top with an overlap of at least 10 cm. In addition to their decorative function, these overlays also reduce the risk of snow blowing under the oblique cuts of the metal tile floor. In addition, thanks to the linings, it is easier for water to roll into the valley.
Structural components of a metal tile roof
The following components are present in the design of a metal tile roof:
- Vapor barrier is a special protective membrane that protects the elements of the rafter system and insulation from wet steam coming upward from warm rooms. The vapor barrier is fixed to the rafters from the inside of the roof using construction stapling (the overlap of individual sheets is at least 100 mm). The joining areas of vapor barrier membranes are glued with specialized double-sided tape;
- Thermal insulation is insulation (most often mineral wool) that is responsible for a comfortable temperature regime on a warm attic floor. Located between the legs of the rafter system.
For reference! Approximately 25% of the heat escapes through the roof. By refusing high-quality thermal insulation, the homeowner heats the street.
- The rafter system is the “base” of the roof, which bears the loads that are subsequently transferred to the load-bearing elements of the lower part of the building;
- Lining - a supporting surface for installing thermal insulation, rough or finishing cladding of the attic;
- Control sheathing is a structure that creates a gap for ventilation and air circulation in the space under the roof. Made from 50mm pieces of wood. by 50 mm, fixed on top of the rafter legs in the same direction;
- The sheathing is the base on which the metal tile sheet is fixed. The structure is represented by boards laid perpendicular to the counter-batten beams. The creation of the sheathing should be carried out after purchasing the metal tiles, since the main geometric qualities (height and wavelength of the plates, working width) may have some differences depending on the country of manufacture, brand, model;
- Wind waterproofing is a special membrane that protects the under-roof space from blowing out insulation and moisture penetration. Fixed to the rafters outside the roof with a top layer above the thermal insulation material
Installation of a metal tile roof begins after deciding whether it should be warm or cold.