Installing a ball valve is a question that residential property owners or installation organizations may face. Today we will tell you about the installation features, as well as which option is better to choose for installation.
The Armashop company offers a large selection of a wide variety of ball valve options for purchase. Before choosing a specific one, we recommend that you read this article.
What to look for when purchasing
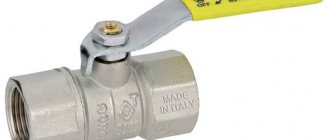
Before installing a ball valve, you must take into account a number of indicators that will indicate its quality. This includes weight (if it is suspiciously light, then it makes sense to think about it), labeling (must meet all standards and requirements). Do not forget to read the passport, where it will be written in detail about what materials the product is made of.
|
Installation features
Before installation, you need to know a number of rules that are strictly recommended to be followed to avoid problems in the future. We make the following recommendations:
- Installation of ball valves is allowed in any position and in any direction, but it must be taken into account that the body should not be subject to loads, and the threads should not rest against the end of the pipe.
- If there is a collapsible body, then you must take into account that you will need the ability to assemble and disassemble the structure.
- Welding work is not permitted near the device.
- After you have completed the installation process, you must check everything carefully and carry out a trial run (hydraulic test).
- It is not allowed to move the ball after welding.
- To seal the threaded connection, you can use Teflon tape or flax. Or special gaskets for flange connections.
- Do not forget that before installation you must carefully check the pipes for dirt in them.
- Installation of a ball valve on a metal pipe should be carried out when you are sure that the pipeline already has the necessary support points and will accurately withstand the loads.
Before installation
Before installing a ball valve, we recommend that you carefully ensure that you are installing it on clean pipes, and after installation you will not have problems with the pipeline not being able to withstand the load.
Be sure to drain all water from the pipeline. We have highlighted this as a separate item despite what was mentioned earlier, as it is important for your safety!
Installation of faucets in the kitchen and bathroom
Installation of a kitchen faucet
If there is a need to replace the faucet in the kitchen, it is also not difficult to cope with this task yourself. When choosing a faucet, pay attention to the presence of the necessary gaskets, without which it is impossible to prevent water leakage.
To install the crane you will need:
- adjustable wrench;
- fum tape for winding the pipe;
- gaskets included;
- couplings (if necessary).
Before replacing the faucet, turn off the water supply using the existing taps on the riser pipes, then open the water supply on the old faucet to make sure the water supply is turned off. Next, the old mixer is dismantled with careful movements using a wrench or an adjustable wrench. In the exposed areas of the faucet, old gaskets and rust on the threads are removed using an ordinary piece of cloth.
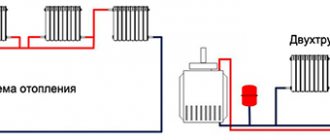
Installing a faucet over a bathtub
The bathroom faucet can be connected directly to the pipe. Insert the kitchen faucet into the hole in the sink, having first put on the o-ring that separates the faucet from the sink. The bottom of the sink should be protected by a large rubber gasket and retaining ring, which are secured with a wrench.
Two connecting hoses with nuts on the mixer are connected to the corresponding cold and hot water supply pipes. First, the threads on the pipes should be wrapped with a special fum tape to create a tightness and prevent leaks, and then screw the nut.
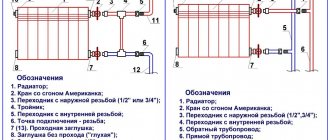
Connection diagram for the faucet to the bathroom
The water tap in the bathroom is attached with a key to the pipe using an adjustable coupling on a rubber gasket.
After completion of the work, the system is checked. To do this, turn on the taps on the riser, and then slowly open the water tap in the kitchen (or bathroom) without much pressure. It is worth observing the flow of water from the tap for some time to make sure that there is no water leakage in all connecting places.
Mixer with three outlets
Following the instructions, it is not so difficult to connect the tap to the pipe.
Source
How to install a coupling ball valve?
This type has a threaded connection, which allows installation. This allows this option to have smaller dimensions. In the case of a threaded connection, you do not need to use additional elements. Installing such a ball product is not very difficult. All you need is desire, a set of keys and seals.
The main advantages of these structures are that they are characterized by a long service life, low weight, and ease of installation. Even a person who has no special knowledge can handle it.
A significant advantage of coupling ball valves is the installation dimensions, which vary from 4 to 27 cm. And also a small diameter - from ¼ to 4 inches. This allows them to be installed not only in private premises (in most cases), but also in enterprises.
It is recommended to familiarize yourself with the design before installation. This includes: body, ball mechanism, rod, butterfly valve or lever, seals.
Installation of coupling ball valves is carried out as follows:
- Determine a place that you have easy access to and where you can work in peace and have access to opening and closing the handle without problems.
- Stop the water supply by turning it off beforehand and make sure there is no residue left.
- Check the integrity of the pipes. Additionally, wipe them with a special product that will degrease the structure.
- Make sure that no parts are damaged when attaching;
- Remember that sealing is extremely important. To do this, use a sealant (Teflon tape\linen).
- Lubricate the joint with oil.
- Do a test run and check for bubbles and leaks.
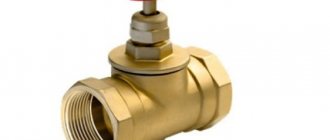
Installation of flange valve
This design differs in that it is attached to flanges. This type is extremely popular because of its versatility and is used mainly in housing and communal services and on industrial pipelines from DN 15. The advantage is the ease of dismantling, and flange connections are famous for their reliability. Installation can be carried out on both horizontal and vertical pipelines, which will allow you not to worry about where to place the valve.
It must be remembered that such cranes are heavy, and you should worry in advance about the load they will put on the pipes.
Before you properly install a ball valve on a pipe, you need to remember a number of features.
First, make sure in advance that you have wafer gaskets, as well as a wrench and bolts nearby. If there are no flanges on the pipeline, then flanges and a welding machine are still needed to weld them.
Installation:
- Check the product for damage. Inspect the position of the ball valve - it should be open.
- Select the location where the flanged valve will be placed. Before installing the ball valve on the pipe, make sure that the handle lever can be fully rotated at this location.
- Weld flanges on both ends of the pipeline.
- Attach the faucet to the flanges with several bolts.
- Place special wafer gaskets.
- Insert bolts into the remaining holes.
- Tighten the bolts diagonally.
Important to remember! The flanges must not be skewed, otherwise this may cause damage. The valve, flanges and piping must be completely aligned.
Do not forget about the preliminary procedures before installation - remove dirt and remaining water from the pipe.
What you need for installation
A flanged valve is more demanding on the availability of tools than a coupling valve. You should have with you a set of wrenches, cleaning tools, the faucet itself, as well as bolts and nuts. The number of bolted connections depends on the diameter of the product being installed. You can specify the required number of fasteners when purchasing a flanged valve from our managers.
How to install a ball valve with your own hands?
This article will look at how to properly install a ball valve on water and heating pipes.
But first you need to learn about all the pros and cons that a ball valve has. Ball valve advantages
Currently, ball valves are the most common, as they are very convenient and practical, and one of the main advantages of ball valves, compared to old traditional valves, is the absence of the need to change the gasket, because the design and principle of operation of a ball valve is completely different.
Inside the ball valve there is a metal ball, which in one position is open and does not interfere with the movement of water, and when turned 90 degrees it completely blocks the flow of water.
Disadvantages of ball valves
But such cranes also have disadvantages. If the water quality is very poor, the ball may become slagged. If the tap is not turned on for a long time, especially if it is used with hot water, then problems may arise with closing it, and sometimes even this becomes impossible. Therefore, it is necessary to turn it at least once every two months in order to knock off all the salt deposits that have formed on it.
If the water flowing through the faucet contains rust, then when opening and closing the faucet, its surface may be damaged by sand and scale, which will cause the faucet to begin to etch when closed. A leak may also occur from under the seal on faucets of average quality, this especially often happens on heating and hot water. Of course, the faucet can be tightened, but it happens that the nut that tightens the seal begins to rotate together with the lever and the faucet does not stop leaking. And on some models there is no seal at all, and if a leak occurs, you can simply throw it out and install a new valve in its place.
The ball valve also has one more disadvantage - it cannot be installed in a room in which the temperature can drop below 0 degrees, since it can simply burst if the water freezes.
How to properly install a ball valve?
The sequence of necessary actions when installing a ball valve on a pipe:
1. If you are going to replace an old faucet with a new one, then first you need to remove the old one, thoroughly clean the threads of flax and then try to screw on the new faucet. It often happens that after removing the old faucet, it turns out that several turns have simply rotted and, therefore, it is necessary to trim the threads. When screwing the tap onto a pipe, there must be at least four turns on it.
2. If, after removing the old tap, it is clear that the thread is in normal condition, then you can safely screw on a new tap, which must be screwed on at least four turns. But first you need to drive the thread with a die.
3. If, when checking, the faucet without flax can be screwed on by 4-5 turns, then you need to wind the flax and finally screw the faucet onto the pipe by 4-5 turns.
4. When installing heating or plumbing, you must first mark the place where the faucet will be installed, then cut the pipe in this place, cut a thread on it and screw the faucet 4-5 turns.
If there is a centralized heating supply and high pressure in the system, it is necessary to use taps made by Bugatti, as they have proven themselves very well. And there is no need to install taps without a seal, since if a leak occurs, it cannot be repaired.
Ball valves can be of several types:
- Internal thread on both sides;
- External thread on both sides;
- On one side it is internal, and on the other it is external;
- On the one hand, domestic, and on the other, American.
You need to be careful and buy what you need.
- How to install a lock on an electrical panel with your own hands? Finally, my site was connected to the power grid. Until the house is built, electricity metering is installed...
- Replacing an socket with your own hands Replacing an socket is necessary in cases when the old one stops performing its functions or is simply broken.…
- Decorating doors with your own hands Decorating interior doors with your own hands: ideas You are not going to spend a large amount, but want to refresh...
- How to install a door with your own hands? Video instructions for installing a door I would like to offer you several training videos on how to install doors yourself. Thanks to the video...
Installation of welded ball valves
Installing such a crane has both its advantages and disadvantages. As the name suggests, proper installation of this type of ball valve involves welding. These cranes are of average weight, and have a rather significant drawback: the difficulty of repairing and dismantling if they break down.
The advantages include an all-welded body and reliable tightness of the connection.
Experts recommend using electric welding for convenience.
When purchasing a welding valve, you will find pipes with which such a valve is welded.
Installation:
- Make sure there is no debris or water in the pipes.
- Use a damp cloth or other means available to you to cool the case. The housing temperature should not exceed 90 °C.
- In order to position the fabric correctly, it is recommended to use a clamp clamp.
- Decide on the position. If it is horizontal, then open the tap. If it is vertical, then first open the ball (when welding the upper end), and then close it (when welding the lower end, so that there is no backdraft).
- Do not turn the ball until the tap has cooled completely.
In order to install a welding ball valve, you will need a welding machine (electric or gas), a mount, and the valve itself.
Ball valve advantages
Currently, ball valves are the most common, as they are very convenient and practical, and one of the main advantages of ball valves, compared to old traditional valves, is the absence of the need to change the gasket, because the design and principle of operation of a ball valve is completely different.
Inside the ball valve there is a metal ball, which in one position is open and does not interfere with the movement of water, and when turned 90 degrees it completely blocks the flow of water.
Common mistakes
When working with any fastenings, you must follow the rules, otherwise mistakes may occur that will not lead to the best consequences. This includes:
- The most common mistake is initially choosing the wrong ball valve. It is necessary to take into account pressure and other factors that may affect operation. Before installation and purchase, it is recommended to read the instructions for the product.
- Violation of installation rules (for example, skewed flanges, which we mentioned earlier) can lead to the fact that the crane will not cope with its task.
Remember that installing a ball valve is not a difficult task, but only if you follow all the tips in the instructions.
|