Classification of heating systems
Heating systems are classified depending on the connection method.
According to existing principles of differentiation, three structural variations are distinguished:
.
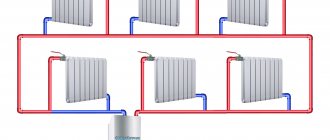
- Single pipe system. The installation assumes that the coolant is sent through one pipe (in a sequential manner) to each of the radiators, and after cooling it is sent back to the boiler tank. This type of heating system is considered the least complicated from an installation point of view and is often found in residential buildings. However, the design also has an important disadvantage: each subsequent battery receives an increasingly cold thermal fluid, which is why the rooms can be heated unevenly and insufficiently. Another disadvantage is the impossibility of making local repairs to a specific radiator: if repairs are necessary, the entire riser will have to be disconnected.
- Two-pipe system. Such heating systems are more intricate: the coolant is directed to each battery separately (parallel connection principle), through one pipeline structure. This ensures a uniform level of heating in all places where the equipment was connected. Water, the temperature of which has dropped, is sent to a special return pipe and heated again in the boiler equipment. The repair, installation and dismantling procedures are simplified.
- Collector system. The most intricate type, which we will not analyze in detail: collector-type heating systems are extremely rare, and their installation and connection is a separate issue that requires a separate article. Installation can only be carried out by professionals who are familiar with all the intricacies first-hand.
Features of steel radiators
As a rule, when it comes to purchasing heating batteries, in most cases the advantages and disadvantages of steel panels are discussed:
- They are best suited for closed heating systems, but they are not hopeless for centralized heating if they match it in such parameters as pressure and Ph of the coolant.
- Installing steel heating radiators does not cause problems even for people who are not knowledgeable in this matter.
- Steel radiators, depending on the type, are suitable for single-pipe and double-pipe heating systems, which expands their scope of use.
- They weigh little, so mounts for steel radiators do not require additional reinforcement or complex installation.
- As a rule, most panel battery models have the option of side and bottom connections, which allows owners to choose which method is preferable for them.
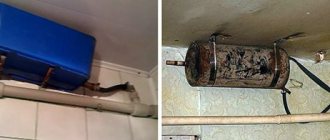
- These heating systems have a small volume for coolant, which significantly saves money during their operation.
The quality of steel panel heating radiators does not depend on the country of manufacture, but on the composition of the steel used in their production.
Separation of heating batteries by materials
There are several subtypes of radiators, classified primarily by materials (the level of heat transfer and service life depend on the material).
Highlight:
- Sectional aluminum. The most classic option is aluminum radiators, made of light alloy (a combination of aluminum and silicon) in the form of ribbed sections. Usually they undergo a painting procedure with a thermally stable polymer composition, which is not affected in any way by the coolant passing through the pipes.
- Bimetallic. They are divided into two subtypes: sectional and monolithic, although visually they are practically no different. Characterized by good heat transfer. Sectional bimetallic radiators are common; Inside the silumin sections there is a special frame made of steel pipes.
- Cast iron. Considered an outdated option, they are often found in old Soviet-built houses; Such heating systems are exclusively sectional.
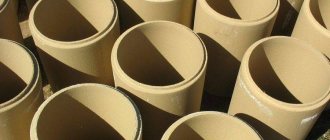
- Steel. They are made from stamped steel by welding (panel) or casting (tubular).
Preparing components for installing batteries
To ensure that installing heating radiators in a private home does not cause problems, you need to stock up on a set of materials and tools. You will need elements of shut-off valves (taps, taps, dampers and thermostats), adapters, brackets with angles and bypasses. It is best to purchase all these parts in accordance with a pre-designed heating system project.
It is important to consider the way in which the heating will be installed. The possibility of hidden pipe laying should not be overlooked - if the walls are sheathed with plasterboard or decorative plastic, then the pipes must be immediately laid in niches, leaving only the edges outside that are necessary for connecting the external elements of the system. Hidden installation makes it possible to avoid damage to the wall covering.
Pipes can be connected either by welding or by threading. Welding seams are reliable and ideal for difficult situations (for example, in old houses where pipe threading is not possible). In turn, a threaded connection requires less labor, but parts assembled in this way do not withstand mechanical loads and vibration well. However, modern heating systems are very often made of plastic products, which do not even require welding.
Choosing a location and general tips for installing heating radiators
Before you start thinking about installing a radiator, it is important to understand the location of the batteries. Typically, heating devices are mounted under windows, as a result of which the heat flow prevents the penetration of cold into the room (in winter, coming from the window opening). The width of the equipment should be about seventy-five percent of the width of the window opening, since in this case the glass will not “sweat.”
It is important to take into account some norms, deviation from which is not recommended:
- Radiator equipment should be located exactly in the middle of the window opening; The maximum error is two centimeters.
- Do not mount devices too low or too high. The optimal distance from the floor to the beginning of the structure is ten centimeters (the recommended range is from eight to twelve centimeters).
- It is important that there is a gap of at least ten centimeters between the window sill and the radiator unit.
- There should be a gap of at least two centimeters (and preferably no more than five) between the wall and the rear wall of the radiator.
If you follow these simple installation recommendations, normal circulation of air masses will be ensured; Accordingly, it will be possible to achieve uniform heating of the room.
Heating radiator connection diagrams
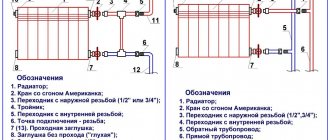
There are several ways to connect a heating system to the pipes of a house. There are three techniques: saddle, one-sided, diagonal. When it comes to installing radiators with low connections, there are no special problems. The manufacturer independently determines the location of the supply and return pipeline structures: you just need to follow the instructions. Let's analyze ways to connect batteries sideways.
One way connection
Connecting batteries using a one-way method is possible in the case of single-pipe and two-pipe heating systems. In the vast majority of residential premises, the heating system includes pipes made of metal. To ensure fixation, you will need two ball valves, two tees and two bends with external threads at each end. The components are connected in strict accordance with the diagram. In the case of a system with one pipe, you will need to install a jumper that allows you to shut off the flow of coolant to the battery in an emergency situation. You cannot install the tap on the bypass, since circulation of the coolant through the riser will become impossible.
Often, installation of devices involves the use of a welding method: the bypass jumper is welded. In the case of two-pipe systems, they do without a bypass at all. Then the coolant supply pipe will be connected to the upper collector, and the return pipe to the lower outlet. However, installation of taps will always be required. The joints can be made airtight by using linen winding, which is coated with a specialized substance (a paste used when installing plumbing fixtures). You cannot make a mistake with the amount of winding, since “overkill” can cause small cracks to appear on the body part of the articulated products; It is unnecessary to talk about the consequences of such deformations. You also need to be extremely careful when connecting elements, since rough mechanical action sometimes leads to damage.
Diagonal connection
If we are talking about diagonal connection of heating equipment, with lower wiring the procedure will be relatively simple. The structure of the system assumes that the coolant circulating through the system will pass into the upper entrance on one side; it will come out from the opposite side from below. It is the diagonal connection that allows you to obtain the best heat transfer rates. Another advantage is the appearance of the system: it looks quite nice, which distinguishes it from its single-pipe counterpart with a vertical riser. Note that connecting a battery to a one-pipe system requires installing a bypass.
Saddle connection
The most rarely used method of connecting devices is the saddle connection. This scheme is aimed at systems with lower adjustable pipeline structures, and is also used for hidden connections. Installation on a single-pipe system can occur either with or without a bypass jumper. However, in the absence of a jumper, it will be necessary to install cranes, due to which it will be possible to dismantle the equipment in an emergency. The method of saddle connection of devices with vertical wiring is considered ineffective: heat losses can reach fifteen percent.
Battery installation technology
To summarize, we can say that heating radiators in a wooden house are installed using the following technology:
- Marking and installation of holders;
- Installation of components on the radiator;
- Installation of an air vent (there are automatic and manual devices);
- Installation of adapters (performed if there is a need to connect pipes of different diameters);
- Installation of shut-off and control valves;
- Hanging radiators on brackets;
- Connecting radiators in accordance with the selected circuit and the characteristics of the materials used;
- Test run of the system or pressure testing (the latter is an increase in pressure in the system in order to check the circuit for leaks).
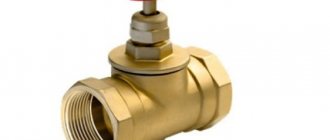
Heating radiator fittings
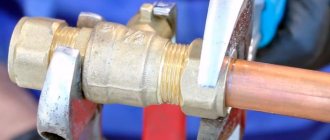
In order to start and block the coolant, special shut-off and control valves are used, which are worth dwelling on separately. Similar functions can be performed by a balancing valve, a ball valve (the most common case), a thermostatic valve element; in the case of lower pipe supply - a special headset. A nuance: when installing heating radiators, taps with American fittings (straight, angular) are used, since the joint with a union nut makes it possible to instantly dismantle the device without emptying the heating network.
Installing fittings for radiators is a fairly delicate procedure. Nuances:
- When connecting a heating device to a central heating system, install two ball valves (a balancing valve is not required). An alternative option is to install a valve with a thermal head in the supply line, which allows you to automatically adjust the heating level.
- When it comes to connecting heating radiators in a private house, a ball valve is usually installed at the inlet, and a balancing valve at the outlet. To regulate the flow automatically, install a thermal head instead of the inlet valve.
- If we are talking about the bottom connection, you will need a special headset that has a built-in balancing valve. There are separate models that require the installation of a thermal regulator.
- When installing radiators in a multi-story residential building, it is important to provide a bypass that will ensure the flow of water through the riser.
- The last radiator in the heating network of a country house is equipped with two shut-off valves (there is no need for balancing).
Recommendations and tips
In conclusion, I would like to give a few recommendations that may be useful.
- Installation of piping systems should be carried out taking into account the fact that tension fittings cannot be laid in the floor and walls. If this occurs, a small amount of free space must be left to accommodate the connections.
- Radiators should be within 70% of the window width. Panel radiators can ensure that this condition is met. Changing the thickness of the device allows you to change its overall dimensions, and choosing the best option is not difficult
- Installation of smoke removal systems should not pass through rooms with long-term occupancy. With an external chimney, it should be taken into account that the distance from it to the windows of residential premises must be at least 800 mm
- When using non-freezing antifreeze liquids as a coolant, sectional radiators cannot be installed. After a certain time, nipple connections may leak
- Using a room thermostat with an on-timer allows you to save up to 40% of the energy spent on heating
There are still a huge number of subtleties and nuances. If you do not have experience, knowledge, or working skills, then it is better to entrust the installation of heating systems to a trusted Contractor. The usual cost of work is estimated at 30-40% of the price of equipment and materials.
The best option is to conclude an Agreement with a company that will carry out all the work on a turnkey basis - develop a scheme or carry out a project, complete the equipment and install it. Practice shows that the installation of turnkey heating systems helps the Customer save significantly. It is necessary to pay attention to the fact that all materials and work are provided with a Guarantee.
Read other articles on this topic
| Basic rules for the location of radiators when heating a private house | How to heat a private house |
| Installation of a heating system in a private house | Heating a private house from metal-plastic pipes |
| Water heating in a private house | Heating a private house with underfloor heating |
| Heating and water supply of a country house: description of installation technology | Heating the house with liquefied gas |
| Features of heating a country house with electricity | Heating options for a frame house |
| Combined heating system for a private house | How to heat your home without gas |
| Heating your home is the most economical way | Heating a private house with a heat pump - pros and cons |
| Gas consumption for heating a private house - consumption calculation | Heating project for a private house |
| Autonomous heating of a private house | Heating diagram for a two-story house |
| Heating a private house with convectors | Heating a private house with forced circulation |
| About heating schemes for a private house with a gas boiler | Heating wiring diagrams from a boiler in a private house |
| How to save on heating a country house | Heating a private house with electricity |
| Do-it-yourself heating of a private house made of polypropylene | Infrared heating of houses |
| Heating system for a private house using a warm baseboard | Heating system for a private house with natural circulation |
| The best heating for a private home | Country house heating system |
| Heating distribution for a two-story house | Collector heating system for a private house |
Services on this topic
| Heating design | Turnkey solid fuel heating |
| Turnkey gas heating | Turnkey heating |
| Heating in a turnkey wooden house | Turnkey water heated floor |
| Installation of water heated floor | Heating a two-story house |
| Heating installation in a cottage | Heating a country house: options and prices |
| Heating installation | Heating installation in a private house |
| Installation of plumbing and heating engineering systems | Diesel heating of a country house |
| Autonomous heating on a turnkey basis | Air heating of a country house |
| Prices for heating installation in a private house | Design and installation of heating systems |
| Water heating in a private house | Electric heating of a country house: options and prices |
| Heating in a townhouse | Gas heating design |
| Heating design cost | Heating calculator for a private house |
| Installation of water heated floors in a private house | Price for installing a water heated floor |
| Installation of water heated floors on a wooden floor |
Mounting devices: nuances
Let's consider the most traditional options for fastening heating equipment (radiators) using hooks, dowels and brackets. Typically, devices are installed on walls; To ensure the hook is fixed on a vertical plane, you will need to create a special hole, insert a dowel made of polymer materials, and then screw in the fastener. This structure makes it possible to regulate the distance from the radiator that provides heating to the wall surface - you just need to screw or unscrew the hook.
A factor that requires attention is understanding the load distribution of the devices on the hooks. The weight of the equipment falls mainly on the upper fasteners, while the lower ones perform the function of fixing the batteries in the required position. In order to avoid obstacles to hanging, it is better to place the lower fastening element at a distance of approximately one centimeter from the level of the lower outlet of the heating device.
In the case of using brackets, the algorithm will be different. Before proceeding with the installation of the radiator, it is laid along the surface of the wall; Mark the places where the brackets will be located. Afterwards, the radiator device is put aside and brackets are applied; The points of its attachment are marked. Holes are made in these places where dowels need to be inserted. Subsequently, the bracket is fixed using screw elements. After all fasteners have been supplied, the device is mounted in place.
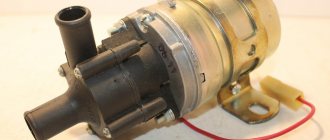
Installation of brackets can be done in different ways. If the heating system has a circulation pump, the radiator must be positioned strictly horizontally. In the case of radiators built into heating systems with natural pressure of the working fluid (coolant), you will need to make a slope of one percent along the flow of water. If the angle is too large, you will experience stagnation during operation.
Installation of fittings and connection of the radiator to the system
As a result, we have two taps installed that should fit perfectly into the battery. The faucet consists of two parts, we glued one, and the second, with a nut, should be screwed to the battery. Now is the time to unscrew the nut and screw a small part of the tap into the hole in the radiator. Don't forget about the sealant.
The threads should be tightened the same unless you intentionally need to adjust something. You can tighten it using pliers, they are specifically designed for this, not as usual, but by inserting closed pliers into the hole in the tube. They will catch on the edges.
We wait 5 minutes until the sealant dries and put the radiator in place. Everything must match.
We tighten the nut, the wrench is quite tricky so you have to use a gas one.
Now all that remains is to screw in the Mayevsky tap on the other side of the battery from above,
And at the bottom there is a plug.
In the end it turns out like this.
Thus, we install all the radiators in the house. If the radiator is different from Type 11, then the distance from the wall to the center of the radiator is greater. Pay attention to this and do not cut right away.
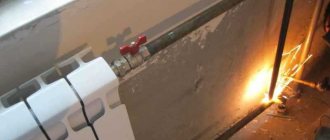
After everything is installed, it is necessary to test the system. You can do this with a well pump, it produces about 6 atm, and inspecting leaks at this time gives an adrenaline rush that I don’t know how to measure))))
During pressure testing, nothing leaked either from under the plaster or from the threaded connections. I hope everything works out for you too.