Why do you need an outlet in the bathroom?
The standard layout of most apartments involves installing sockets outside. Although this option is safe, its operation creates inconvenience. When using electrical appliances, the power cord will lie on the threshold and interfere with closing the bathroom door.
With the advent of moisture-proof electrical installation products (plugs, sockets, switches), it is possible to use the achievements of civilization with greater comfort. A block of sockets installed in the bathroom provides simultaneous connection of various household appliances and appliances:
- Washing machine;
- Electric shavers;
- Hairdryer;
- Built-in lighting switches;
- Hydromassage system;
- Electric water heater.
A closed door reliably separates the rooms, there are no drafts. You can comfortably take water treatments in privacy. The sound of a hairdryer, a washing machine running or running water will not disturb the other inhabitants of the apartment.
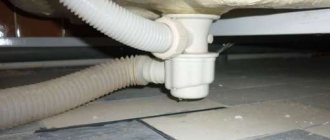
Socket for washing machine in bathroom
Socket block located behind the machines
Socket with protective cover
Socket above the washing machine in a niche
Washing machine with socket in wall recess
Is it possible to install a socket in the bathroom?
In buildings built back in Soviet times, there was almost no provision for installing sockets in bathrooms. The main reason was weak wiring, small area of premises, lack of electrical appliances that required connection. All available switching means - sockets and switches - were installed outside, not far from the door.
This connection scheme created certain inconveniences, since all electrical appliances had to be connected from the outside, and the door to the bathroom did not close. Many owners were forced to use extension cords, which is strictly prohibited by the requirements and provisions of the PUE.
Modern apartments are distinguished by large areas for furniture and a bathroom, especially where the bathroom is combined with a toilet. Additional internal space has appeared, where, in addition to small household appliances, it is possible to place powerful equipment - washing machines, boilers, heated towel rails and other types of electrical installations. Many rooms are equipped with underfloor heating systems that require a separate connection.
Before installing sockets in the bathroom, you should determine their exact number, in accordance with the planned connection of consumers. Among them, a division should be made into equipment that is constantly connected to the network and devices that are used only occasionally. Devices that are constantly connected to the network can be connected not to an outlet, but through a terminal block directly to the home electrical panel.
Moisture protection: what type of outlet can be used
A marking consisting of the Latin letters IP (an abbreviation of an international standard) and two numbers characterizing the ability to withstand external penetrations is applied to the body of the product. The first number indicates the dust resistance class of the outlet and is often omitted. The second (from 0 to characterizes the degree of protection from moisture.
Class 8 housings are designed for operation of the electrical unit when completely immersed in water to a depth of more than 1 m. Group zero has the least protection. For installation in a bathroom, it is recommended to use products of class IP 4 (protection against splashes and drops in all directions).
It is advisable to install sockets in the bathroom that are equipped with a hinged spring-loaded cover. When not in use, it covers the inside, preventing the plug hole and ground contact from getting wet.
Socket with spring-loaded cover
Safety requirements allow the use of an installation block with a lower class. However, in this case, open installation is unacceptable. The installation of sockets must be carried out inside a protective casing that has the required degree of tightness.
Choosing the right sockets for baths and toilets
The ideal choice when arranging a bathroom power supply system would be moisture-resistant sockets for the bathroom. The waterproof level is indicated by the letters IP, as well as a number. For bathrooms, sockets numbered 5-6 are suitable. At the same time, sockets with numbers 6-8 have full protection, including from direct jets of water.
If the numbers cannot convince you, and you are still worried about the safety of your household and are thinking about the optimal height of sockets in the bathroom to prevent water and moisture from getting on them, then models equipped with additional sealed covers are suitable for you.
It is worth noting to doubters that waterproof sockets for the bathroom are characterized by maximum resistance to water and moisture. They do not short circuit and eliminate the possibility of electric shock to a person even if they are exposed to water for a long time. Therefore, such bath sockets are a truly successful solution, guaranteeing not only convenience, but also safety of use in rooms with high humidity.
Professional electricians strongly discourage saving on sockets and switches. You should give preference only to high-quality models from the world's leading manufacturers with an impeccable reputation.
Selecting a zone for socket placement
Installing a washing machine and connecting it to the electrical network in a damp room has its own nuances. Even an inexperienced person understands that installing an outlet near a washbasin or shower is not the best solution. Sooner or later a tragedy may happen. Regulatory documentation regulates the division of bathrooms and toilets into several electrical safety zones:
- 0 - located inside or in close proximity to sources of splashes and water (sinks, bathtubs, showers);
- 1 - includes areas above and below the zero zone;
- 2 - is within 0.6 m from the boundaries of zone 1;
- 3 - applies to all areas at a distance of 2.4 m from the boundaries of zone 2.
Dimensions of zones in the bathroom
The requirements of regulatory documentation allow the placement of sockets only in zone 3.
Where are sockets allowed?
After the bathroom room is conditionally divided into several zones, you can calculate how many sockets there should be and choose a place to place sockets for electrical equipment. At the same time, you must comply with the rules and regulations established for each site.
The zero zone, as already noted, is not intended for the installation of any devices. The exception is devices used directly in the bath. They operate on a voltage no higher than 12 V, and the placement of supply step-down transformers is carried out outside the boundaries of this area.
In the first zone you can install a shower and an instantaneous water heater. It is also possible to install an individual electric shower equipped with a pump with high-quality waterproofing. The wires connecting these devices also pass here.
In zone 2, the location of all devices permitted in zone 1 is allowed. In the same area, lighting and water heating devices with a protection class of at least 2, equipped with basic and additional insulation, are installed. In all listed zones, from 0 to 2, distribution boxes and controls are prohibited.
The third zone is considered the most remote from dangerous places. Firstly, they must be connected through an RCD with an operating current of up to 30 mA. If a group line is used, the trigger current is set to 10 mA. The second condition or option is to connect sockets using an isolation transformer, but in practice this method is used very rarely. The distance from the socket to the pipeline must be at least 50 cm, and from the shower door - 60 cm or more.
Choosing a location for installation
High humidity and temperature in the room create favorable conditions for the formation of condensation on the surface of the walls. This process will be most intense on the wall adjacent to the staircase. Moreover, a pattern will be observed: the closer to the floor, the more condensation, and, accordingly, the damper the wall. Therefore, if possible, the height of the installation point on the internal partitions should be about 1.3 m.
The distance between the outlet and the gas pipeline is clearly regulated. The minimum value is 0.5 m. Ideally, the distance to conductive communications (plumbing, heating) should be such as to prevent the possibility of simultaneously grasping the metal pipe and the socket block with your hands when turning on or off an electrical appliance.
Another requirement that it is advisable to comply with when choosing a place to install sockets: ease of use. How much free space there should be is not standardized. The main thing is that when connecting the power cord of electrical appliances, you do not have to perform a series of acrobatic sketches every time.
Installation of sockets in the room can be done on an open section of the wall. Installed furniture and washing machines should not create obstacles when connecting or disconnecting the plug.
Block with switch and sockets on the bathroom wall
Socket in the bathroom near the doorway
Sockets with a cover to protect against moisture in the bathroom
Block of two sockets on the bathroom wall
In wet areas, certain electrical safety requirements must be observed. What kind of premises are these? Well, as for the housing stock, the first thing is the bathroom, showers, sanitary facilities. Here you can’t just pick up and hang any lamp or install a socket wherever you want.
Bathroom areas – normative references
I think we've come to grips with the fact that an outlet in the bathroom is a must. And there will be no disputes here. Now let's talk about installation requirements. Many “masters” will say, well, what are the requirements, they put the socket where the customer pointed his finger and that’s it. I want to say one thing: if you come across such workers, drive them away with a filthy broom. A normal electrician will say no “here” or “here”. In rooms with high humidity, things are not so simple. Here the socket is not placed closer to the mirror, because it is so convenient to use a hairdryer or razor.
The main document that regulates the location of sockets in the bathroom and shower rooms is the handbook for all electricians - PUE. Chapter 7.1.47 spells out all the requirements concerning our issue. Also, Chapter 7.1.47 is based on GOST R 50571.11-96, which states that any bathroom or shower room is divided into zones (areas).
And one of the main requirements for the location of sockets in the bathroom is compliance with the dimensions of these zones. Depending on the zone number, one or another equipment may be installed in it.
The specified GOST R 50571.11-96 states that there are four types of zones: - zone 0; - zone 1; - zone 2; - zone 3.
Now let's look at what these zones are and what they are limited to.
Zone 0 includes the inside of the bathtub or shower tray. Roughly speaking, this is the space (place) where a person is when he washes. Bathroom top view (horizontal section):
Zone 1 includes the outer vertical plane of the bathtub or shower tray. If this is a shower room without a tray, then zone 1 will be limited to a vertical plane with a distance of up to 0.6 m from the shower spray.
Bathroom with a fixed partition (horizontal section).
Zone 2 includes the outer vertical plane of zone 1, as well as a vertical plane parallel to it with an interval of 0.6 m. If you estimate on your fingers, you get the boundaries of zone 2 = zone 1 ÷ 0.6 m.
Shower with tray (horizontal section).
Shower with a tray and a stationary partition (horizontal section).
Zone 3 is a space in the form of a vertical plane of zone 2, as well as a vertical plane parallel to it at a distance of 2.4 m. Let’s simplify what is described for understanding, we get the boundaries (space) of zone 3 = zone 2 ÷ 2.4 m.
Shower without tray (horizontal section).
Shower without a tray but with a partition (horizontal section).
Another important point is that friends of zones 1, 2 and 3 are limited not only to vertical planes, but also to horizontal planes (each). The height of the horizontal plane is 2.25 m from the surface of the finished floor. That is, it turns out that each zone operates up to a height of 2.25 m from the floor (although it is unlikely that anyone would want to place sockets in the bathroom at a height above 2.25 m).
Requirements for the location of outlets in bathrooms
In the previous section, we familiarized ourselves with the rules and realized that in order to comply with safety requirements in bathrooms and shower rooms, we need to take into account the size of the area when placing electrical equipment.
Now let’s look at what can be placed and in which zones, or rather, let’s find the answer to our question, where can sockets be placed in the bathroom? In the zero zone “zone 0”, according to the rules, it is prohibited to place any electrical appliances except those intended for use in the bathtub itself. These electrical appliances must be designed for a voltage other than 12 V. Moreover, the power sources from which the step-down transformers are powered must be located outside the specified zones.
In the first zone “zone 1” only water heaters are allowed to be installed.
In the second zone “zone 2” it is allowed to install water heaters and lamps with protection class II. In short, there are four protection classes for lamps: 0, 1, 2 and 3. The second class of protection is provided by luminaires that use double insulation (in addition to the main one) for safety.
In zones 0, 1, 2, the installation of distribution boxes and control devices is prohibited.
Today, underfloor heating systems are very popular for heating rooms. According to the above GOST, it is allowed to install heating elements for heating in all zones, provided that they are covered with a metal mesh, which is connected to the EPS (potential equalization system). In the third zone “zone 3” it is allowed to install plug sockets. But the conditions for their installation are as follows: 1) they must be connected either through an isolation transformer, 2) or through a residual current device (RCD) with a leakage current of no more than 30 mA. Therefore, the socket in the bathroom can only be installed in zones 3 and the above conditions. In my opinion, few people use separating transformers to connect outlet lines, so the most popular means is an RCD (RCBO).
The figure shows a stationary shower stall manufactured at the factory. According to the rules, all switches and sockets must be located at least 60 cm from the cabin door handle.
It is prohibited to lay electrical wiring in metal corrugation (sleeves) in bathrooms and shower rooms. In zones 0, 1, 2, only those parts of the electrical wiring should be laid that supply power to devices installed in the corresponding zones. The installation of electrical equipment in damp rooms is limited not only to “zones”, it is also necessary to take into account the degree of protection (ip) of this equipment. That is, not every socket or switch can be installed in zone 3. The rules on this matter say that for installation in zone 3, electrical equipment must at least have a degree of protection IPX1 (for public areas IPX5). For zone 0 - IPX7, for zone 1 - IPX5, for zone 2 - IPX4. The first digit in the code is X (dust protection) - for wet rooms this parameter is not so important, so it can be ignored. The second digit of code 1 is protection against vertically falling drops of water. Also, an important requirement for installing sockets is the presence of an additional potential equalization system, to which all grounding conductors and all parts of electrical equipment that must be grounded in zones 1, 2, 3 must be connected.
Let me give you a few examples of incorrect placement of sockets in the bathroom. In this photo, the socket with the switch is located right next to the sink. The distance to the sink should be at least 60 cm.
Here's another example: a double socket is installed incorrectly. The distance from the washbasin to the socket is 30 cm, and this is incorrect (it is prohibited to install such devices in zone 1).
One more very important note. Pay attention to the outlet. What unusual did you notice? Correctly a socket without a grounding contact. Gross violation of the rules...
Another example of what not to do. The socket is located unacceptably close to the washbasin. Black humor, but for some this may be the last wash...
In this photo it may seem that everything was done correctly (the distance from the washbasin to the outlet is clearly more than 60 cm), but it is still installed in zone 1, and according to the rules this is prohibited.
Which outlet should I put in the bathroom?
Let's summarize this article. It turns out that sockets in the bathroom must have at least a degree of protection IPX1. For safety reasons, I recommend installing waterproof sockets with a protective cover with a degree of protection of IPX4. Additional protection will not hurt, especially since the difference in cost is not so significant.
I propose to highlight three basic installation rules for yourself:
1) the socket line in the bathroom must be connected through an RCD (RCBO) with a leakage current of no more than 30 mA;
2) all sockets must be installed in “zone - 3”;
3) the socket must be waterproof, with a degree of protection of at least IPX1 (IP21, IP44).
Source link https://electricvdome.ru/rozetki-i-vukluchateli/rozetka-v-vannoj-komnate.html
Electrical safety requirements (RCD and grounding)
A mandatory requirement is the use of RCD (residual current device) circuit breakers. They ensure that power switches operate in cases where there is a danger to humans:
- Leakage on the body;
- Short circuit;
- Touching live parts.
The main parameter by which an RCD is selected is the leakage current value. It is measured in µA and its value is indicated on the device body. The maximum triggering threshold of the RCD should be no more than 30 μA.
Washing machine power supply installation diagram
You can use a switch rated for 10 µA. It provides an increased level of safety, but imposes more stringent requirements on the insulation resistance of live parts. Most often, more sensitive switches are used on newly laid lines to avoid too frequent false alarms.
Connecting RCD circuit breakers to the supply line must be done outside the bathroom. Most often, the unit is installed in the entrance electrical panel of the apartment. A necessary condition for the effective functioning of the security system is the use of a cable with a separate grounding conductor. Through it, potentials are equalized to a safe level. The connection can be made to the corresponding contacts in the input panel. Grounding to metal pipelines or building fittings is not allowed.
Which wire to choose: material and design
Wiring in the bathroom is done using a three-core, double-insulated electrical cable. Each conductor has its own color marking, which makes switching easier:
- Blue (cyan) – “zero”;
- Brown – “phase”;
- Yellow-green – “earth”.
The purpose of the wire cores is determined by color
How to connect wire cores
When purchasing, preference should be given to copper cable. It has many advantages compared to aluminum:
- More flexible, it is more convenient to connect it to the contacts of sockets and switches;
- Less susceptible to oxidation at contact points;
- With the same cross-section, it can withstand a greater load;
- Provides less contact resistance when connected to outlets and circuit breakers.
Copper cables are characterized by different core designs. They can consist of either one thick or a bundle of thin twisted wires. In terms of their electrical characteristics (resistance, load capacity, insulation class), both types are almost identical.
The only downside to stranded copper is the need to solder the mounting ends. This is necessary to ensure a more reliable connection when connected to an outlet. A cable with single-wire conductors does not require such an operation, but it is more difficult to work with, since it is more rigid.
Installation of wiring and selection of cable cross-section
According to the requirements of regulatory documentation, wiring in the bathroom must be done in a closed way. To do this, a channel is cut into the wall and a power cable is laid. Then a plaster leveling layer and decorative finishing with tiles or plastic panels are performed.
Less labor-intensive is open installation, which involves laying an electrical cable over the surface. In this case, it is necessary to use protective corrugation or cable channels.
For any installation scheme, wiring in zone 0 is unacceptable.
When wiring, pay attention to the cross-section of the power cable. Its value depends on the power of simultaneously connected devices. The required numbers are usually indicated in technical data sheets or directly on the nameplate.
Cable selection depending on load
To connect a washing machine, the cross-sectional area of the copper cable must be at least 2.5 mm2. If you simultaneously plan to connect other powerful electrical appliances (water heater, heated floor) to the same line, then it is advisable to increase the cross-section of the conductor by 1.5-2 times. This must be done to prevent overheating of the cable and melting of the insulation. The amount of reserve depends on how many and what devices will operate simultaneously.
How to install
With the exception of the need to use waterproof devices, installing such an outlet in the bathroom is no different from the standard installation procedure. If closed electrical wiring will be used, then you need to calculate in advance where and how to make the sockets. At these points, holes are drilled for the socket boxes and grooves are cut into them in the wall where the wiring will be laid.
Since the bathroom is always tiled, the wires are laid in the resulting hole and its location is carefully measured. When the tile is laid, a hole is drilled in it from which the wire is removed and a socket is installed in this place.
If the finishing work has already been completed, but you need to add another outlet in the bathroom, then an open type of electrical wiring is used, which is laid in a plastic corrugated pipe or cable channel. The sockets themselves are screwed with dowels, to secure which holes are pre-drilled in the tile.
Work options
You should start installing an outlet in the bathroom after the walls in the room have been finished with tiles or decorative plastic panels. To have an idea of the installation process, you can consider three possible options:
- Installation of overhead socket;
- Built-in installation;
- Use of a protective enclosure (standard electrical panel).
The socket body usually indicates the maximum current load that it can withstand. The passport of the washing machine and its nameplate reflect similar data. If a contact block designed for a lower current is used, then there is a very high probability of its overheating and partial melting. The socket for the washing machine must withstand a load of 16 A.
The socket packaging contains technical specifications
Before installation begins, preparatory work must be done in the room. An electrical power cable must be laid in advance at the installation site and an installation section must be routed out. The free end is stripped of insulation to the required length, and each core is covered with solder. Subsequently, the tinned areas will be fixed in the contact block of the socket.
Sufficient length of wire must be used. By not installing junction boxes or using connecting terminals for splicing, the labor intensity of the work will be significantly reduced. For all three installation options, the rules for performing electrical wiring, connecting an RCD and choosing an installation location are the same. Differences will only appear when mounting the installation products.
Surface-mounted waterproof socket
The technology most often used, due to its simplicity, involves external installation. There is no need to use any additional devices. The socket block is disassembled and the position of the mounting holes is marked on the wall surface. The verticality of the marking must be controlled using a building level.
Surface-mounted waterproof socket
Holes in the wall are made using a drill. To do this, use a diamond-coated crown or a drill for tiles, and when covering with plastic panels, use wood or metal. For the main material of partitions (brick or concrete), a hammer drill is best suited.
The body is attached to the wall surface using dowel nails. To prevent condensation from seeping through, the fasteners are treated with a small amount of sealant. Then a contact block with the mounting end connected to it is installed in the mounting protrusions. Next, all that remains is to put the housing cover back and secure it with screws.
Installation
Installation of sockets in the bathroom from scratch should be done based on the recommendations:
- Before installation, the line is equipped with a separate automatic switch for emergency shutdown;
- each socket has a separate connection with a separate wire;
- the socket is equipped with a grounding cable and a cover;
- the device should be located no closer than 60 cm from water sources;
- installation is carried out without repair, so the socket must be equipped with a separate cable, which is connected to the distribution panel via an automatic machine.
The following tools will be required for installation:
- indicator for measuring voltage;
- Phillips screwdriver;
- knife or special tool for removing insulation;
- level;
- drill;
- pliers.
Then the installation process begins. Conventionally, it is divided into 4 main stages:
- Drilling holes into which dowels are installed. They are needed to secure the device.
- Then prepare the wiring. The tips are cleaned from the insulating layer using a knife or a special cleaning tool.
- Afterwards, the bolts are installed in the prepared holes. Then they connect it to the socket and attach it in a box to the wall with dowels. Moisture-resistant devices are equipped with ready-made holes, which are equipped with rubber plugs. They are where the wiring is connected before connecting to the electrical network.
- The final step is to install the housing in the designated place and supply electricity.
If a built-in socket is installed, then at the first stage you need to make a hole in the wall along the diameter of the box.
After which it needs to be installed on a plasterboard wall using special screws and the wires connected. Installation of an additional outlet is carried out according to a similar algorithm, but with a slight difference. There are 2 ways to connect the cable:
- laying a new electrical cable line from the panel, installing a separate circuit breaker;
- installation of a transformer, in this case grounding is carried out from the nearest electrical point.
The remaining steps are the same as for the initial installation. When installing additional equipment, it is necessary to make additional holes in the facing coating; for this purpose, specially designed drills and crowns are used.
Hidden installation
In this option, the main difficulty lies in preparing the landing nest. It is necessary to drill or gouge out a recess into which the socket block will be installed. A brick wall can easily be drilled with a diamond-coated crown. Reinforced concrete panels are very difficult; in addition, you have to use a hammer drill.
The socket box is installed in the resulting blind hole. For reliability, fixation is carried out using alabaster solution or dowel nails. The further installation process is quite simple and does not present any difficulties:
- The decorative upper part of the housing is removed from the built-in socket;
- The mounting end of the cable is connected to the contacts;
- The socket is installed in its place;
- By rotating the mounting screw, the contact block is fixed by wedging the fastening tabs;
- The top cover of the housing is installed and secured with screws.
Installing a hidden socket