Home / Boilers
Back
Published: 06/04/2020
Reading time: 5 min
0
1804
The word “boiler” has become widely known; today it is almost difficult to find an apartment or house that does not have such a water heating device.
Installing a boiler in an apartment has become relevant not only in houses where there is no central heating supply, but also in those where there are hot water supply networks. An unpretentious, compact boiler has become a reliable source of hot water supply for millions of Russian citizens.
- 1 Norms and rules for installing a boiler in an apartment
- 2 Required tools and materials
- 3 Select the location for installing the water heater
- 4 Installation instructions for the boiler 4.1 Mounting to the wall
- 4.2 Connection to water supply
- 4.3 How to connect to power supply
Installation
Installing an Ariston water heater with your own hands is not difficult if you carefully read the instructions and follow its instructions. Of course, you can invite specialists who will do everything quickly and efficiently. The only “but” is the price of this service. For example, in Moscow it ranges from $100. Meanwhile, having minimal skills in working with plumbing, you can cope with this task in just 2-3 hours. Considering that you will spend some money on supplies, the net savings will be approximately $60.
Water heater connection diagram.
When assessing the pros and cons of installing a water heater with your own hands, take into account the risk of flooding your neighbors below; if something goes wrong, balance your strengths. The advantages of solving this problem yourself include:
- saving time and money;
- acquiring the skills you will need while operating the water heater.
Access to the storage water heater (boiler) must be absolutely free, and the wall for mounting must be strong, capable of supporting double weight (for a unit capacity of 50 liters, calculate the load of 100 kg). Determine the condition of your electrical wiring: is it capable of handling the significant additional load? For example, for a 2000 W water heater the copper wire cross-section should be 2.5 mm². Keep in mind that if there are old water pipes in the apartment, sometimes you have to first replace them and only then connect the boiler. Find out what amperage your electric meter is designed for. If it is less than 40 A, you will have to replace it too.
Installation diagram
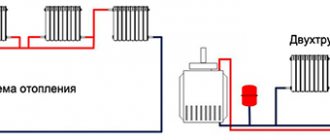
The next important point in installing a water heating tank is connecting it to the water pipes. There are a lot of video lessons on this topic on the Internet. But you can also use these instructions. The figure shows the installation diagram of the water heater.
The liner is done as follows:
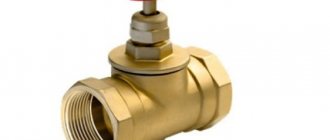
- Red arrows show the movement of hot water, and green arrows show cold water when installing an electric unit. Shut-off valves (4 and 5) must be installed on the outlet from the risers (2 and 3).
- The valve (4) is used to shut off the water supply to the boiler, for example, if repairs to the unit or preventative descaling are required.
- Tap number 5 shuts off the main hot water supply if heated water from the device is used.
- Next, while continuing to install the boiler, you need to install tees (6 and 7) into the pipes going to the apartment, from which the wiring will go to the device.
- It is recommended to install valves (8 and 9) on the outlet to the device. They will be useful during preventative maintenance of the unit, so as not to disconnect the main wiring. Also, from these taps the supply of pipes (10 and 11) to the nozzles of the device begins. You can use metal-plastic pipes, flexible hoses or polypropylene pipes.
- A safety valve (12) must be installed on the cold water supply. This element protects the unit from exposure to excess pressure. If excess pressure forms in the tank of the device, with the help of the opened safety valve, the water will be discharged into the sewer or a special container through the drain tube (13).
- Another tee is installed above the safety valve, and a valve (14) is connected to it. Using this tap, you can drain the water from the device if necessary. It is recommended to install the same tee with a valve on the hot water pipe, in front of the boiler pipe. It serves as an air suction for quickly draining liquid from the device. Must be closed in working order.
How to install a water heater with your own hands in a dacha if there is no centralized water supply? To ensure normal operation of an electric water heater, you will need to install a water storage tank. Usually it is located on the roof, but this is not important. The main thing is that the height of the storage tank above the unit is at least 2 meters.
Water heater “Ariston”
It is very important to prepare in advance all the tools and consumables for the work. Before starting installation, make sure you have the following tools:
Tools for installing a storage water heater.
- roulette;
- hammer drill with drill;
- adjustable wrench;
- spanners;
- wire cutters;
- pliers;
- two types of screwdrivers.
Consumables:
- Unipack type paste or FUM tape;
- tow;
- 3 shut-off valves;
- 3 tees;
- 2 connecting flexible hoses (if not included);
- metal-plastic pipe of the required length.
- if it is necessary to replace the wiring - a three-wire wire, a socket or a circuit breaker.
To install a storage electric heater, you will need a 32-40 A circuit breaker and a PVS 3X6 -3X8 cable.
Tools required for work
During work you may need tools such as:
- a hammer drill with a drilling function or an electric drill;
- hammer;
- building level;
- roulette;
- pliers;
- spanners;
- grinder, if you have to make a metal frame;
- pencil for marking.
You will also need fasteners suitable for each specific wall. If you plan to make the structure yourself, then prepare special studs with nuts, wide washers, a profile pipe, and sheet metal with a thickness of 4 mm.
Video on the topic:
Did you manage to solve your problem using the recommendations from the article?
Yes!
56%
No. More answers required. I'll ask in the comments now.
28%
Partially. There are still questions. I'll write in the comments now.
16%
Voted: 25
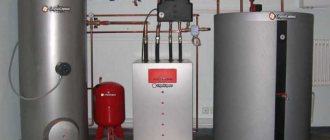
Boiler installation
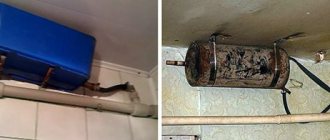
Storage water heaters heat water for a certain time in special tanks from 10 to 150 liters or more. In small city apartments, boilers of 50 or 80 liters are most often installed. Fastening to a weak wall (for example, plasterboard) is excluded. There is no fundamental difference in installing a small or large tank, except that the larger the unit, the more powerful the fastening elements should be.
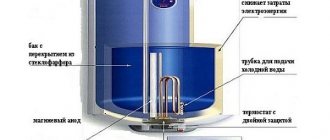
Scheme of a storage water heater.
Break the work into several stages. The main and most important stage is attaching the boiler to the wall. If the container is horizontal, it is advisable to attach it higher, under the ceiling, if vertical - at the level of the person’s head or chest. The floors under the boiler must be waterproofed in case of leakage.
You need to work carefully, avoiding scratches and damage to the outer surface of the unit from tools. It should also be borne in mind that the electronic control unit of the boiler does not have an autonomous power supply; if there is any failure in the power supply, the settings will be lost and a restart will be required.
Use bolts, hooks, and screws with a diameter of at least 10 mm. Using a tape measure and level, mark the fastening locations. Make sure that all points on the back of the unit intended for installation are engaged and do not allow distortions. Drill holes with a drill, then attach brackets and holders to them on which the boiler is hung.
Types of water heaters
Before you start work, you should familiarize yourself with the structure of the water heating tank. There are several types of structures, the characteristic features of which are:
- electric - heating occurs by connecting to the electrical network;
- gas - they work by connecting to a gas main and require a separate chimney;
- with indirect heating - have a heat exchanger powered by its own heating system. Such devices can be either wall-mounted or floor-mounted.
All models are equipped with storage tanks. And if an empty tank does not seem too heavy, then a filled one becomes an unbearable burden.
Therefore, it is so important that the wall on which you plan to install the boiler is strong and reliable. In addition to weight, the overall dimensions, as well as the structural features of the tank, are of great importance
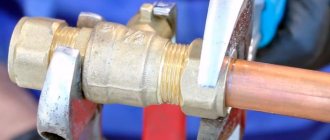
Connection to the water supply system
Hoses and other connection elements used for connection to the water supply must withstand a temperature of at least 80°C and the design pressure.
Table for determining the volume of a water heater.
Avoid directly joining two different metals, such as steel (in water pipes) and copper. Use a dielectric adapter.
Connect the water supply to the boiler through shut-off valves and then through flexible wiring. The cold water inlet pipe is marked with a blue mark. A valve must be mounted on it to relieve excess pressure in the system.
You can also install a tee valve with a drain valve attached to it in front of the shut-off valve. When carrying out repairs or maintenance, this will make it possible to quickly drain the water from the boiler. Seal the places of threaded connections with tow or FUM tape. Attach a flexible line to the outlet pipe that directs the heated water. After connecting, open the water and check the system for leaks, then connect to the power supply.
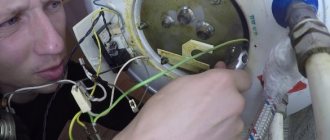
- Connect the power supply wires of the Ariston water heater to the screw terminals of the thermostat.
- When connecting, observe the phases - L, A or P1 - phase wire, N, B or P2 - neutral.
- Connect the ground wire to the clamp on the water heater body.
- Connect the test lamp terminals to the contacts.
- Press the thermostat button.
- Close the lid.
- Before connecting to the network, check that the boiler is filled with water.
The electrical wire must be hidden in a corrugated material made of non-flammable material or in the wall. Installation of the boiler requires grounding, which cannot be done to metal objects or pipes: for example, water supply, sewerage, etc.
Installation work
Choose a place to install the storage heater as close as possible to the water taps and electrical panel. The water heater should not take up useful space. After checking the strength, markings are drawn on the wall, holes are drilled, plastic dowels are driven in, or a homemade shield is mounted.
At the back of the boiler there is a mounting plate with eyes. An anchor is inserted into the holes and screwed into a plastic dowel. If hooks were used, then the boiler is simply hung with eyes. When using studs, the mounting plate is pressed with nuts.
Upon completion of the installation work, connect the outlet pipes to the water supply, try to fill the tank with water and check how securely it is fastened.
Beginning of work
Before starting work, you should once again make sure that the flange is strictly in the center. If it is slightly off to the side, install it correctly (loosen or tighten). After filling the tank with cold water, open the hot water outlet valve on the boiler to allow excess air to escape, then close it.
When the heating pressure is turned on, the light on the body of the water heater should light up. Sometimes the cold water hose heats up during operation. In some Ariston models, the temperature can be adjusted with a special knob connected to the thermostat using a screw. Economy mode is indicated on the unit with the letter “E”.
In the event of an unexpected breakdown or malfunction of the new water heater, you can contact a warranty repair workshop in your city. The usual warranty period for an Ariston boiler is 1-2 years, depending on the model (the same as for a Termex, Bosch or Nova Tech water heater). If before the expiration of this time you tried to open and repair the unit yourself, then most likely you will be denied free warranty service. Keep the warranty card issued by the store until the end of the warranty period.
Storage water heater from - the unit is quite simple to operate and reliable. If you strictly follow the instructions during installation and during further use, it will serve you faithfully for many years.
Instantaneous water heater
Pros:
- Compactness. The device does not require much space; it may include a shower head and mixer, which allows you to save on purchase.
- Fast water heating. The instantaneous appliance requires a maximum of 1 minute to start dispensing warm water.
- Possibility to obtain hot water in any volume. Consumers can use as much water as they need without any restrictions.
- Affordable price. The device is relatively inexpensive and is bought by families with low incomes.
Minuses:
- High electricity consumption and therefore quite expensive to operate.
- There are additional requirements for wiring and metering, as well as for installing the machine.
Performance limitations. Only budget devices with low power that heat water for the bathroom have this disadvantage. When you need hot water in the kitchen, then you will need to make wiring and buy a device of more impressive dimensions.
Ariston water heater repair
Ariston water heaters are reliable household appliances, but they are also susceptible to some malfunctions. The most common are the appearance of scale on the heating element, failures in the electronic control unit and low pressure when supplying water to the tank.
For repairs, it is preferable to use the services of professionals. Guidance and advice on these issues can be obtained from KVANTA+.
How to identify a malfunction
To carry out repair work, the user must notice a malfunction in the operation of the water heater in time. Ariston boilers are often equipped with an electronic display on which messages appear in the event of equipment failures.
Direct signs of a malfunction may be:
- the machine is triggered when the boiler is turned on - this indicates a malfunction of the heating element;
- heating water above the maximum permissible temperature - this indicates a failure of the thermostat;
- heating of water below the required values - this may indicate contamination of the heating element, the appearance of scale;
- drips in the lower part of the tank and on its walls;
- breakdown of the information display, which most often does not cause significant disruptions in the overall functionality of the device, but can reduce comfort during its use.
An indirect sign can be considered extraneous noise during operation of the electric heater.
- Author: Maria Sukhorukikh
Rate this article:
- 5
- 4
- 3
- 2
- 1
(0 votes, average: 0 out of 5)
Share with your friends!
Installation
The easiest way to install a floor model. To do this, you just need to choose a suitable place in the room. If the floor is uneven, you must first make a level screed or lay tiles.
Installation of wall models occurs in several stages:
- We mark places for fasteners. To do this, measure the distance between the holes for the hooks at the back of the water heater. We make marks on the wall with a marker, additionally using a level to ensure that the body hangs level.
- Holes for fastenings are drilled using a hammer drill. These can be either anchors or dowels with hooks. Depending on the weight of the device, the diameter of the fasteners is selected. For small boilers of 15 liters, 10 mm anchors are suitable, for devices of 30 liters - 12 mm.
- Anchors are hammered in or dowels are inserted and hooks are screwed in. The case is hung on the wall.
Electrical connection
The scheme is also thought out in detail here. To connect less powerful models, you can use moisture-resistant sockets; powerful devices are connected with a separate cable, which is output to the machine.
It is important to use three-core copper wires with a cross-section of at least 2.5 mm. Additionally, for safety reasons, an RCD is installed on the cable to protect users from breakdowns. Remove the protective plastic cover from the bottom of the water heater and connect the wire in accordance with the markings on the device.
Next, the cable is led out in plastic boxes to the electrical panel and placed on the machine with the corresponding current rating. At the very end, the functionality of the connected Ariston boiler is checked. The taps open and the electricity turns on.
We invite you to watch a video about installing a water heater:
Ariston water heaters are popular in the world market. This is due to the high quality of the products and long service life, if the technical requirements are met both during the installation of the equipment and during its operation.
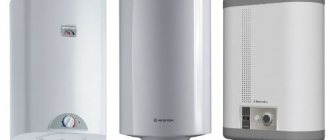
Popular models of Ariston water heaters.
Main parameters of boilers
Next, you need to decide on the main parameters of the boiler:
- Volume of the tank. The calculation is made taking into account the number of family members. Below is the table.
- Power consumption. The rate of water heating will depend on this parameter. But excess power will overload the wiring. Therefore, the optimal indicator would be 2-2.5 kW.
- Case type and size. Since you cannot change the position of the boiler yourself, when purchasing you need to immediately decide on it. It can be horizontal and vertical. Vertical ones are the most economical, have high performance and low price. Horizontal boilers heat water quickly enough, but do not achieve high productivity. Now you should focus on the shape of the boiler. Previously, the cylindrical shape was very popular. The design and operation of these water heaters are simple, but they are larger in size rather than “flat” in shape. “Flat” shaped boilers are compact, but their price is much higher and they have welding seams, which reduce the strength of the device and increase the area of corrosion.
- Internal casing coating. Enameled tanks are considered cheaper than all existing ones. But they should be used only with the condition that an anode rod is installed inside to collect scale. However, the enamel is quite unstable to temperature changes, so if the device overheats, the coating may crack. The cost of boilers with stainless tanks is much higher, but they are resistant to changes in temperature, chemical composition and water hardness. There is also a modern coating - porcelain glass. It is environmentally friendly, does not corrode and has an antibacterial effect.
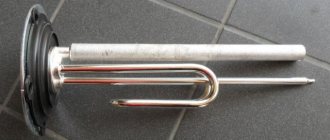
- Type of electric heater. There are two types: with a “dry” or “wet” heating element. “Dry” heating elements do not come into contact with water. They are in a sealed capsule, durable and easy to replace. “Wet” heating elements are in contact with water in the water heater. They are more efficient, but are susceptible to corrosion and scale.
- Type of display and control unit. Cheap models have dial thermometers and mechanical thermostats. Expensive models have a built-in digital or touch panel. There are also models with a remote control.
- Firm. Your choice should be made from well-known brands. Boilers from German manufacturers are recommended. They use their own parts. There are also high-quality products from Turkish and Italian manufacturers. But the boilers use inexpensive parts made in China.
Selecting a water heater is the main step. But it is very important to install it correctly, otherwise even the most expensive boiler of the best quality may break on the first day. Therefore, we will consider the issue of placing the boiler, select a suitable location and prepare all the necessary materials and tools.