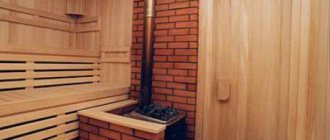
At a certain stage of building a steam room or sauna in a country house, you will need to choose a heating method and equipment for heating the room. There are not many options, installing electric heating elements, building a brick stove or installing a boiler in a bathhouse with your own hands. The difference between them is quite significant, so before buying equipment, it makes sense to figure out whether the option of installing a boiler in a bathhouse is better or worse than traditional stoves.
The use of a water boiler is economically justified; in addition to a bathhouse, the device will easily provide heat for a summer kitchen and a country house
Why install a boiler in a bathhouse?
The advantages of using a boiler heating method can be described in one phrase - the comfort level of visiting a bathhouse is an order of magnitude higher than when installing a traditional wood-burning stove. A more complete list of the advantages of using a boiler is as follows:
- Installing a boiler makes it possible to provide hot water not only to the showers or washing compartments of the bathhouse, but also to the summer kitchen or guest house;
- Correctly installing a boiler in a bathhouse with your own hands is no more difficult, and in some ways even simpler than wood-burning stoves. The efficiency of boiler heating is 30-40% higher, while the room is completely free of carbon monoxide and the smell of hot metal;
- A water boiler warms up a bathhouse better and faster; drying a sauna or Russian steam room takes a maximum of 1-1.5 hours, while a wood-burning stove takes at least 3-4 hours to dry the interior.
Another plus is that the continuous combustion process in the boiler furnace makes the process of visiting a sauna or Russian bath much more comfortable. There is no particular need to constantly add firewood, close or open the valve and constantly clean the grate and chimney.
In practice, a water boiler lasts several times longer than artisanal stoves with water heating tanks and built-in heat exchangers
Important! Another huge plus that almost all owners of modern Russian steam rooms forget about is the high safety and fault tolerance of the equipment.
It is no secret that most emergencies and fires are associated with stove heating in a bathhouse, so installing a boiler will be an excellent argument in a dispute with a fire inspector.
The disadvantages include the high cost of installation and the rather strict conditions imposed on the premises and auxiliary services. Therefore, before installing a boiler in a bathhouse, familiarize yourself with the basic requirements of GOST and SNiP.
Building a boiler yourself
There is nothing special or complicated about building a boiler for a sauna with your own hands. Before starting work, you need to prepare special tools and materials, and if there are instructions, study them carefully.
Material
The correct installation of the boiler in the bathhouse depends on the material that will be used in the process.
- When installing boiler equipment, professionals usually choose metal barrels with a volume of up to 200 liters for its base. To do this, you can use a small piece of thick pipe, up to 1 meter long and 51 centimeters in diameter.
Advice! Do not install the sauna boiler very close to wooden walls to avoid fire.
Homemade boiler diagram
- Such an installation can heat a room with a volume of up to 15 cubic meters, which is an area of 3 x 3 square meters. First you need to prepare a “grinder” with metal circles and a home welding machine.
Welding supports to the boiler
For the sauna boiler we will use a pipe as a body. The main task is to weld 3 supports parallel to the ground.
Instructions:
- The lower level is needed to install the bottom of the oven.
- The height of the second level is calculated from the size of the blower door, which will be built into the stove.
- The third support, according to the boiler diagram, should be placed approximately 20 cm from the top of the pipe.
You will also need a metal circle for the bottom of the oven, at least 4 mm thick. From a metal circle you can make a lid with a thickness of 5 mm and also with a cut-out opening to strengthen the chimney ring for a bathhouse.
Place the supports for the partitions exclusively next to each other. Then cut a hole for the box, in which the blower and oven doors will be mounted, on the side of the pipe, everything needs to start from the very bottom. The depth of the box is determined by the thickness of the wall.
Also make a partition inside the box; it will be needed to separate the combustion and ash compartments in a homemade sauna boiler.
Boiler screen
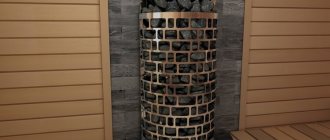
First of all, weld the box, then insert the bottom, grate and top cover into the body. Then, when installing indoors, do it in such a way that the housing passing through the wall neatly goes outside or into the furnace room. Next, we place the chimney on the top cover and lay stones; the boiler is usually mounted on a foundation prepared for the sauna stove.
Finally, build a screen for the boiler. The screen is made in different ways, and brick is used for this. You can completely cover the boiler with bricks or make one wall of bricks.
How to properly install a boiler in a bathhouse
In any case, you will need to plan a separate room for the installation of boiler equipment. The problem is not even fire safety or ease of use. Under a modern boiler, it is better not to install hacky and semi-handicrafts in a bathhouse, this is for a garage or workshop at most, installation will be required:
- Ventilation systems;
- Storage tank with water;
- Pump and electrical wiring with protection and grounding;
- Connecting the boiler power supply system.
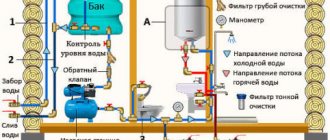
All of the above does not fit well with the humid and hot atmosphere of a bathhouse, so the best solution would be to install boiler equipment in an extension or in a combined summer kitchen area. The water heating system of the bathhouse must be checked for leaks with an excess pressure of 1.8 At.
Safe installation rules
General requirements for the installation of boiler equipment are set out in SNiP-II-35-76 - Boiler installations. For gas wall-mounted boilers, SP -41-104-2000 is used. In any case, for gas equipment you will need to make a connection project, even if you plan to use propane in cylinders.
For oil and pellet options, the device is simply installed on a brick base lined with a metal sheet. In this case, the bathhouse will only need to be additionally equipped with storage for liquid or solid fuel.
For gas boiler
For gas boiler equipment, the requirements are the most stringent. Firstly, the part of the bathhouse where the boiler will be located must be built from fireproof materials, brick or cinder block. Secondly, the room for installation of the heating apparatus must be lined from the inside with mineral materials with a fire flow resistance limit of EI45.
The room must be equipped with a natural ventilation system, separate from the chimney. The height of the pipe on the roof of the bathhouse must be at least 1 m above the level of the ridge. The chimney should be no more than 3 m long, no more than three pipe turning points are allowed.
For fuel oil or oil boiler equipment
For boilers operating on liquid fuel, the best solution would be to install the device outside the bathhouse. Often a canopy is used for these purposes; part of the adjacent wall of the bathhouse must be sheathed with sheet metal, and a fire shield with sand and a fire extinguisher will need to be mounted next to the tank for oil or boiler fuel.
Water boiler for heating the sauna during working out
Important! Oil boilers during testing are capable of operating at any air temperature, but in severe frost it is difficult to start them, so the fuel in the tank must be heated with hot water or an electric heater.
It is also possible to install the boiler indoors, but during the operation of the burner, the smell of diesel fumes accumulates inside the bath, so it is better to install the heater outside the heated space.
For solid fuel boiler
Boilers using pellets or wood are mounted on a heat-resistant, fireproof base with a thickness of at least 50 mm. The requirements for arranging the premises and installing a chimney are no different from gas floor-standing boilers.
The wood-burning boiler is easy to install and operate; it only requires a stove made of fireproof material; firewood can be stored here
Step-by-step instructions for the correct installation of a heater stove in a bathhouse.
A home handyman will need to complete the work in several stages:
- arrangement of a foundation or non-combustible base;
- installation of a heater;
- outlet of the chimney pipe to the roof;
- arrangement of protective screens.
Let's analyze each operation in detail.
Furnace foundation equipment.
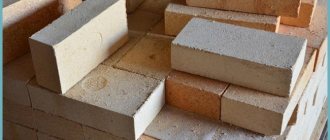
In this question, you need to know the approximate mass of the heating device, water heater and the mass of the stones. If the stove is made of brick, for the calculation you will need to calculate the number of bricks using the ordering scheme, multiply by the mass of a separate block. In this case, the number of ceramic and refractory fireclay bricks must be taken into account.
If the structure weighs less than 700 kg, it will not need to be equipped with a separate foundation. It will be enough to lay several rows of building bricks on a solid base, which is attached to the joists.
Let us take a closer look at the base equipment option for a steel furnace weighing less than 700 kg:
- Having measured the dimensions of the heater, add 100-150 mm to the size, so that you don’t have to chop bricks;
- mark the contours of the slab in the selected area, drill holes in the corners for the passage of the electric jigsaw blade;
- Having adjusted the cutting depth, cut an opening in the floor. Here it is important to remove all the nails and not damage the joists;
- a sheet of fiberboard is laid on the logs and 2 rows of bricks are laid out in a continuous layer on the cement-sand mortar;
- the minimum height above the floor level is 120 mm, so you will have to use a thick layer of mortar or lay the first row on the edge. Grouting is done on a fresh, not hardened layer, but you can do without it by simply plastering the base.
Now the base must be given time to settle and harden the solution, and only after that can you begin to install the heating device.
Location of the boiler in the bath
For the installation of liquid fuel heating equipment, you will need a room with an area of at least 4 m2, a volume of 8 cubic meters and a ceiling height of 2.5 m and above. The door to the boiler room of the bathhouse is made separately; it is better to make an entrance from the street, always on the leeward side. Installation in an attached room to a bathhouse is allowed, provided that the boiler room has its own supply and exhaust ventilation circuit and an opening window.
The furnace compartment of a bathhouse cannot be installed in basements or niches with a lower floor level of more than 1 m. It is believed that if heavy carbon monoxide or propane leaks, such an arrangement can lead to the accumulation and explosion of the gas-air mixture.
Gas boilers can be installed in the attic or in the niches of the roof space of the bathhouse if there is cladding made of refractory materials. Gas heating devices with a closed combustion chamber can even be installed inside a rest room.
For a boiler operating on solid fuel, installation in a dressing room is allowed, subject to the minimum distances from combustible and flammable objects. For rooms and partitions lined with fireproof thermal insulation, it will be sufficient to maintain a distance of 0.6 m.
How to pour a foundation for a stove in a bathhouse?
If the stove weighs more than 700 kg, it places a serious load on the wooden floor structure. Without a foundation, over time the floor and stove will deform. Therefore, when building a foundation for a bathhouse, you need to pour it under the heating unit. It is better to entrust the construction of bathhouses, country houses and garden houses to professionals.
The foundation for a stove in a bathhouse without a foundation, the floor in the bathhouse deforms over time
Concrete foundations must be at the same depth, below the soil freezing level. A distance of at least 5 cm must be provided between them. This guarantees the integrity of one of them if the second begins to collapse under the influence of soil deformation.
Technology for creating a base for a metal structure:
- A pit is dug 50 cm deep. Its width and length should be slightly larger than the dimensions of the base of the metal furnace (by 10-15 cm).
- The bottom is filled 30 cm from the ground with crushed stone.
- A cement-sand mortar 1:4 is prepared.
- A mixture of several centimeters (5-10) is poured on top of the crushed stone.
- The frozen layer is waterproofed with roofing felt.
- Knead the solution with proportions 1:2.5:4 (cement, sand, gravel).
- The mixture is poured onto the remaining part of the foundation.
- The building level is used to check horizontal evenness. If there is a flaw, it is smoothed out until the solution hardens.
- The foundation is constructed 30-40 cm below the floor. If the stove is installed at floor level, then brickwork with a height of 3-4 bricks is carried out over the entire area of the foundation.
Construction of a foundation for a brick kiln is a more labor-intensive process, since it must withstand loads 4 times greater. Stages of its construction:
- A pit is dug, the depth of which is at least 70 cm, and the width is 20 cm larger than the dimensions of the future furnace.
- The bottom is lined with sand 15 cm thick, spilled with water and compacted.
- The next layer is rubble material (broken bricks and stones).
- Sand is poured onto the second layer so that all the holes between the stones are covered with it, and the sand itself covers the rubble by 2-3 cm.
- This is followed by a layer of crushed stone 10 cm thick. All layers are carefully compacted.
- The next stage is the installation of wooden formwork, rising 15 cm above the ground and corresponding to the size of the oven.
- Steel rods with a diameter of 12 mm (screed) are laid inside.
- Concrete mortar is poured over the screed to the edges of the formwork.
- After the foundation hardens, the wooden formwork is knocked down. The walls of the concrete structure are coated with tar 3 times.
Distance from the boiler to the wall of the bathhouse
For gas equipment there are additional restrictions. For example, the distance from the body of a wall-mounted boiler to the opposite wall should be at least 1 m.
Important! Before installing a boiler in a bathhouse with your own hands, you need to know exactly the dimensions of the finished room with the lining of the walls, floor and ceiling.
The entrance to the room with the boiler should be located on the opposite wall, at a distance of at least 2 m. The width of the doorway is chosen to be at least 0.8 m, and between the lower edge of the door and the threshold a supply window with a height of at least 20 cm is left, through which air is taken in from the interior of the bathhouse.
Step-by-step algorithm for installing a sauna stove
The main requirement when installing a stove is fire safety.
Before you begin installation work, you need to draw up a project taking into account the fire safety of the structure. You will need:
- select non-combustible finishing materials;
- choose cladding for wooden buildings - thermal insulation and steel sheets;
- leave a gap of 110-125 cm between the stove body and the wall surface;
- lay the thermal insulation coating so that 50-80 cm remains.
Supporting structures, shelves and partitions are located 110 cm from the stove.
Features of choosing a place
It is worth installing a finished stove in a sauna or bathhouse so that the heating of the waiting room and steam room is of high quality, and operation is comfortable. In this case, a person must move freely around the steam room.
You can install a heating device:
- In the steam room. The owner controls the fuel combustion process and can add fuel. The disadvantage of this zone is the cost of arranging ventilation and the availability of space in the room for firewood. For year-round use of the bathhouse, you will need a second stove.
- In the dressing room or bathhouse. The unit will heat two rooms, and the steam room will become larger. A good ventilation system is organized for the dressing room.
- With the firebox moved towards the street. The stove will not burn oxygen, but it will not be possible to control the combustion from the room. Under the remote firebox you will need to demolish the wall and make a non-combustible portal.
Firebox on the street
Oven in the steam room
Stove in the dressing room
After choosing a location, you will need to refer to SNiP 41-01-2003, which indicates the location of the stove in relation to all areas of the room:
- between the steel body and the wall – 38 cm;
- from the unit to the wooden wall – 50 cm;
- from the fuel channel outlet point to the door – 25 cm;
- the presence of a non-combustible wall 12.5 cm thick;
- from the ceiling with thermal insulation – 80 cm, without insulating protection – 1.2 m;
- from the firebox door to the wall – 1.25 m;
- from the load-bearing wall to the front wall of the modification with an external firebox - 3 cm.
Installing a sauna stove in a niche is prohibited.
Nuances of preparing the base
Base for a sauna stove
The equipment of the floor for the stove depends on the material of the sauna and the weight of the product. The concrete surface does not need to be reinforced, but for comfortable cleaning, you can decorate the stove area with fireclay bricks, tiles or porcelain stoneware.
If the room has wooden flooring, the following is required:
- make a special podium - a separate foundation, taking into account the weight of the metal product, protective screen, filled tank and chimney;
- bring the pedestal 15-20 cm beyond the line of the metal stove;
- select the depth of the base according to the depth of the main foundation;
- do not connect the structure to the load-bearing foundation so that the structure has normal shrinkage.
When preparing the base, a concrete solution of 1 part cement, water, 3 parts sand is used. Initially, a pit is dug, then formwork is installed, reinforcing mesh is laid and concrete dough is poured. After hardening, the structure is covered with double waterproofing, and then the brick is laid in two rows. As a result, the foundation will be 20 cm smaller than the finished floor.
Preparatory work for walls
Wall protection
Installation of the stove in a bathhouse made of non-combustible materials or installation 50 cm from a flammable surface does not require wall preparation. For a stove with a remote firebox type, you will need a portal. You can protect walls from exposure to fire and hot metal as follows:
- applying plaster to a metal mesh in a layer of 2.5 cm;
- installation of a special stainless steel screen with further installation of non-combustible materials;
- porcelain stoneware or stone cladding on a non-combustible surface to a layer of 1 cm;
- additional treatment - the log house is coated with a fire-retardant agent, finished with volcanic stone and soapstone.
It is allowed to use ready-made protective screens in the bathhouse. The reflective covering is located with ventilation gaps of 2-3 cm. Sheets of fire-resistant material are fixed with ceramic bushings. Fire-resistant gypsum board is mounted on a profile or glue, superizol - on glue or disc dowels.
A protective brick frame can be erected on 2-3 sides of the stove. It will prevent the impact of the hot stove on the flammable wall, accumulate heat and maintain the temperature in the steam room. The installation scheme is implemented step by step:
- The choice of material is red, clinker, bassoon or fireclay bricks arranged in half a brick.
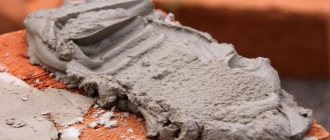
- Preparation of mortar - cement or fireclay clay.
- Maintain a distance to the wall surface of 5-15 cm.
- Maintain the height of the structure - 20 cm more than the heating unit.
- Organization of vents (holes) or combustion valves for normal circulation of air masses.
The optimal thickness of a brick screen is 120 mm.
Assembling the heating device
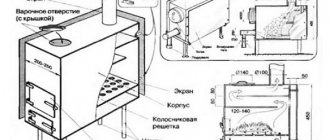
Basic elements of the furnace
The step-by-step algorithm for assembling the furnace is usually indicated by the manufacturer's instructions. For example, Vesuvius models with an external firebox are difficult to install, but easier to operate. In general, the assembly of units is carried out according to the general principle:
- Installation of the stove taking into account the distance to the ceiling (120 cm) and walls (32 cm). For modifications with asbestos-steel protection, it is allowed to reduce the distance to 26 cm.
- Installing a mounted tank on the air duct nozzle. The volume of the tank is selected according to the number of family members at the rate of 10 liters per person.
- Installation of heat exchange equipment. The heat exchanger is positioned so that the bottom of the tank is above the top fitting.
- Pipeline organization. The pipes are fixed at an angle of 30 degrees. To eliminate the risk of water freezing, a drain tap is built in.
- Fastening a straight chimney 5 m long (from the mouth to the grate). The chimney duct should rise 50 cm above the roofing or ridge and be 150 cm away from the parapet.
To protect the roof from fire, you can install a spark arrester.
First heating
The stove is heated outside with a preliminary inspection of the body, grate, door, and heat exchanger for damage and ease of opening. The firebox is performed like this:
- Install the unit on a level surface.
- Connecting the temporary heating system to the heat exchanger and filling it with water.
- Fastening a temporary chimney to a height of 2 m.
- Place ½ volume of wood in the firebox and light the fire.
- Burning support for 1 hour.
- Periodic stacking of firewood.
During the combustion process, the quality of the stones is simultaneously checked. An unpleasant odor indicates the presence of sulfur compounds in the material. It is not recommended to use it in steam rooms and baths.
Chimney installation
Chimney installation diagram
A Finnish sauna or bathhouse can be equipped with ceramic, brick, single-wall metal or sandwich channels for smoke removal. For independent installation, a sandwich pipe in the form of two tubes made of acid-resistant steel with internal thermal insulation is suitable.
During installation work, follow the instructions:
- Mark the hole for the cutting pipe made of stainless steel and dismantle the ceiling along the line.
- Apply fire-resistant impregnation to the frame.
- Secure the cutting pipe with self-tapping screws and fill the gap with a heat insulator to a layer of more than 7.5 mm. There should be a blockage of 13 cm from the pipe to the beam, and 38 cm from the chimney to the wall.
- Attach a single-wall pipe to the stove pipe, apply welding or mastic along the seam, and install a damper.
- Attach the adapter to the sandwich chimney.
- Install the remaining parts on the brackets so that the joints do not fall inside the groove.
The deflector is installed after cutting the roof.
How to install a boiler in a bathhouse with your own hands
Installing a solid fuel boiler apparatus is not particularly difficult; anyone who has installed a conventional metal stove or heater at least once in a bathhouse can easily cope with the task. You only need to follow basic fire safety rules:
- The solid fuel boiler must be installed in a bathhouse on a concrete or brick platform;
- The installation of a chimney for small bathhouses is carried out with a vertical pipe through the ceiling; for buildings one and a half stories high and above, the outlet is mounted using a transition unit through the wall;
- The floor in the boiler room of the bathhouse is covered with metal sheets or tiles.
If the room is planned to be heated with pellets or coal, then you will need to make storage outside the boiler room. Firewood can be stored on a special rack inside the bathhouse, but always at a distance of at least 120 cm from the boiler.
What to do with installing a gas boiler
Installing a gas heater is not as difficult as it might seem at first glance; the main thing is to know the basic requirements and instructions on how to properly install a boiler in a bathhouse.
Wall-mounted version of a gas heater for a bath
The first thing you will need to take care of:
- Buy a boiler with a certificate of conformity and permission to operate. This means that it is better to buy the device from an authorized dealer; buying on the market can cause serious problems;
- Completion of a project for installing a boiler in a bathhouse, it can be done by a specialized company or the Gorgaz service department;
- Bringing the gas main to the installation site and piping the boiler.
Important! All installation work related to gas distribution is carried out by UGH mechanics; you can install the boiler and assemble the heating circuit with your own hands. Only a gas inspector can connect the boiler to gas, unseal and start the device.
The wiring diagram looks complicated, but in practice it is quite possible to solder it with your own hands
Installing a sauna stove on a wooden floor
An integral part of any steam room is a sauna stove. In order for the use to be safe and not cause a fire, the installation must be carried out correctly to ensure the protection of wooden structures.
Preparatory stage
First, you need to decide which stove will be installed in the bathhouse on a wooden floor. They come in several types:
- brick - used to warm the steam room and adjacent rooms. Tanks are often installed to heat water in the bathhouse;
- metal with a firebox on the street or from the dressing room - in the second case, it heats the steam room and a little - the dressing room. Also has a water heating function;
- metal with a firebox inside the steam room - only the steam room is heated.
The stoves are equipped with a fuel channel, which allows installation inside walls and partitions for maximum heating of all available rooms.
Choosing a place to install the stove
A classic bathhouse consists of a dressing room, a steam room and a shower room. A rest room can be equipped.
There are no special requirements for brick structures. This is due to the fact that brick is a reliable fire barrier and can withstand high temperatures. Despite this, installation must be carried out with a distance of at least 26 cm from combustible structures.
Installation of metal fireboxes is much simpler, which makes them an ideal option for baths. On the website https://kaminupechi.com.ua/pechi_dlja_bani/ sauna stoves in a metal casing are presented in a fairly wide range, which will allow you to choose the right unit just for you. True, in this case it is necessary to fulfill certain fire safety requirements (see figure).
The location of the stove in the bathhouse should be as convenient and safe as possible, which will allow free movement around the steam room without the risk of getting burned. When installing, it must be taken into account that the distance between the firebox doors and the wall must be at least 25 cm. Built-in stoves are acceptable if the structure is made of fire-resistant material and covered with tiles or similar material 1.5-2 m in height. Areas in contact with the chimney must be covered with non-combustible insulation. To save space, the stove is usually installed in a corner.
When installing a wood stove, it is worth remembering that it burns oxygen, so if the firebox is located inside, ventilation is required in the steam room. To prevent steam from leaving the room, it is made in the floor.
For a small steam room, an excellent option would be one with a firebox outside, in which the stove would be flush against the wall. In addition, in this case there is no need to leave space for firewood.
If installation occurs in the middle of the wall, benches and shelves are installed on the sides, thereby increasing the permissible number of people who can be in the steam room at the same time.
Oven base
The heater is installed in a bathhouse on a prepared base.
Furnaces weighing up to 400 kg are allowed to be installed without building a separate foundation. To avoid unpleasant situations and the possibility of destruction of the floor, it is best to pour a reinforced concrete base at the stage of building the foundation.
The concrete base is prepared as follows:
- a recess is dug according to the required parameters, then the sheathing is installed in it;
- a reinforcing mesh is laid into the sheathing to strengthen the foundation;
- concrete is poured, the ratio of cement to sand is 1:3;
- after hardening, the concrete is covered with a double layer of waterproofing;
- Refractory bricks are placed on top in 2 rows.
The stove in the bathhouse must be placed in accordance with all norms and rules. The gap between the structure and flammable objects must be at least 12.5 cm.
Installation of the base takes place in several stages:
- marking the steam room floor;
- if the heater doors go beyond the steam room, a hole is knocked out in the wall, with a gap of 30-50 cm - the distance between the wood and the metal of the firebox;
- Laying a fireproof board using self-tapping screws, which will protect the wood from fire;
- Refractory bricks are laid on top of the sheet using mortar. The base must be perfectly level; when working, it is advisable to use a building level;
- After the solution has dried, heat-resistant glue is applied to the steel sheet prepared to size. After everything is laid on a concrete base, the evenness of the structure must be checked;
- A sheet of metal, approximately 40 cm, is placed in front of the stove. This is done for safety reasons in case coals from the firebox fall outside.
Protecting the walls in the steam room
The walls near the stove are protected by a sheet of metal, which is laid on a sheet of roofing material or asbestos. It is also permissible to use ceramic tiles, bricks, and stones. All these materials will provide the appropriate level of thermal insulation.
In addition, metal sauna stoves must be equipped with a protective screen that will prevent remote and contact burns.
Quite often, protective screens are made of brick. It is worth remembering that this design is unacceptable for a wooden floor, which is associated with a large load. In this case, there must be a foundation along the outer perimeter of the screen, or another method must be used.
Almost all sauna stoves have a chimney, which poses a danger to wooden structures due to high temperatures and sparks inside. Therefore, all places in the floors and roofs through which pipes pass are tightly covered with heat-insulating material.
As you can see, installing a steel stove in a bathhouse with a wooden floor is the simplest way to equip the room with a convenient and easy-to-use heater. In this case, it is important to properly implement all the rules, as well as carry out installation in accordance with all standards and requirements. Fire retardant materials must be of adequate quality to ensure their strength and durability. Installing a stove in a bathhouse on a wooden floor can be done independently, however, if there are doubts or lack of knowledge in this matter, as well as uncertainty, it is better to entrust the work to an experienced craftsman in order to avoid further problems.
Required Tools
For bathhouse needs, they usually purchase double-circuit gas boilers with a closed combustion chamber. They are easier to install, and in addition, do not require the use of a carbon monoxide indicator. Such sensors are required for boiler equipment with an open chamber or with air intake from the dressing room or boiler room.
The sensors are very capricious in operation, they are easily triggered by cigarette smoke and even fried potatoes, so it is still better to buy closed models for a bathhouse.
To install the boiler you will need:
- Hammer with ring drill and drill;
- A set of anchor bolts or hooks, this fastener is often included with boiler equipment;
- Template for marking the wall.
Simultaneously with the installation of the boiler, the heating system is being installed, so you will need a soldering iron for polypropylene pipes, registers, taps and shut-off valves.
Preparation of the base and walls
The amount of preparatory work depends directly on the material of the walls and floor. If the flooring in the boiler room is made of ceramic tiles, and the walls are plastered or even lined with sheets of heat-resistant cardboard, then no additional preparation is required.
It’s another matter if the boiler is installed on the walls of a log bath. In this case, a wooden board is stuffed under the body and asbestos cardboard or vermiculite board is laid. The body remains cold even during prolonged operation at maximum load, but the combustion chamber may burn out if the automation is incorrectly adjusted, and then fire-resistant protection will save the wooden frame of the sauna from fire.
Thermal screens
How to install a stove in a bathhouse on a wooden floor and protect wooden partitions from high temperatures? For steel and cast iron units, the following types of screens are used:
- Fire protection will protect the tree from fire and charring. The material is mounted on the wall surface, in some cases through thermal insulation inserts. They lay out a brick covering or line it with natural stone or ceramic tiles. Another option is to install iron sheets on the partitions and ceiling. It is recommended to use stainless steel, which is attached to the boards with a heat-resistant gasket, or basalt cardboard can be laid on top of the layer.
Brick barriers can be laid on the sides of the stove Source bg.decoratex.biz
- Protective types protect users from various burns of contact and remote origin. In this option, the firebox itself is lined, with the obligatory arrangement of an air gap of 3-7 cm. The thickness of the finishing material is half a brick, but some builders make masonry using a quarter of a whole brick. When installing the stove, the iron screen is also attached at a certain distance from the body.
A wooden wall and floor can be protected by metal shields Source banya-ili-sauna.ru
- A floor heat shield made of steel sheet will protect boards located near the heating device. It is recommended to use a sheet measuring 70x50 cm; it is attached along the front part of the firebox, while a layer of heat-insulating building material is laid between the wooden floor and the metal. Basalt or asbestos cardboard is suitable.
In addition to its protective qualities, the screen will give the furnace unit a complete appearance.
Important! The fireproof structure is made from asbestos-containing panels or steel sheets. Fireproof devices in 90% of options are made of brick, which is not suitable for wooden flooring due to its heavy weight. Therefore, in this option, you will need to remove the boards and pour a foundation base of a size that is equal to the perimeter of the screen.
Installation of the structure
First of all, a template is laid out at the housing installation site, on which fastening points and marks are marked for the correct installation of water pipes and gas lines. You just need to transfer the markings to the wall.
Next, a hole is drilled in the wall, initially with a drill if the bathhouse box is made of brick or cinder block, or immediately with a ring drill for ordinary frame and log buildings.
As a result, a through hole with a diameter of 100-120 mm is obtained in the wall for the installation of a coaxial chimney. Using the template, the drilling locations for the fasteners are once again specified and anchor hooks are installed on which the boiler body will be suspended.
It is already possible to install the boiler in the bathhouse, but often it is mounted on the wall last. The rather bulky case interferes with the installation of communications, so only the back wall is left on the wall and they are engaged in laying heating pipes, plumbing and hot water lines.
The design with a closed combustion chamber uses a coaxial chimney with fan pressurization, so there are practically no problems with starting in winter
Lastly, install the power supply system and RCD devices.
By the time the casing is connected with a gas pipe, the boiler with a heating and hot water system must be completely ready for operation.
Step-by-step instructions for installing protective screens on walls and heaters.
Let's look at the option of installing a stove with a remote firebox:
1. On the surface of the wall, mark the passage of the combustion compartment extension. The groove should be 200-300 mm larger than the natural dimensions of the part. Holes are drilled in the corners with a large drill and a cavity is cut out along the marking line.
2. At the place where the chimney passes through the roof structure, a groove is made for installing a coupling through passage. You can lead the pipe directly through the wall to the street, but this is not always possible or convenient.
3. Separate parts of the stove are placed in the marked places and the holes in the wall and roof are adjusted. Then they mark the attachment points of the firebox and the chimney coupling, and drill them with a thin drill to insert the screws.
4. The stove is set according to the level, and the receiving part of the remote firebox with the door is secured in the rest room with self-tapping screws. The individual parts are fastened together. The hole in the partition is lined with ceramic or simple bricks and the remaining space up to the metal is filled with a layer of thermal insulation. It is not recommended to use asbestos boards - when heated and high humidity, the material releases harmful substances to human health.
5. Using wood screws, fix the sheathing on the surface of the walls and partitions, fill the free spaces with basalt wool and attach protective screens with a mirrored outer surface or lay simple ceramic tiles. The mirror surface will reflect heat and promote rapid heating of the steam room. But you can simply line the walls with bricks, tiles, fiber boards and other materials - the main thing is that they are not afraid of dampness.
Important! When building a brick heater, work is carried out according to the scheme - order, but a minimum distance from the walls of 40 mm is required. This helps to ventilate surfaces and does not cause deformation of wooden parts.
How to install a boiler in a bathhouse: video
For a modern bathhouse, the use of water heating makes it possible to increase the level of comfort several times when compared with the stove option. The most “heavy” part of the estimate relates to gas installation, but it is not necessary to choose schemes with a central gas supply. Many gas boilers can operate on propane cylinders; perhaps the video will help you choose the appropriate model.
And the materials presented in will help you understand the basic requirements for installing equipment.