0
8905
09.01.2014
Waterproofing the floor before the screed is necessary for two reasons: firstly, it prevents the penetration of moisture vapor from the basement or from the lower floor into the concrete screed, and secondly, it protects the floor slabs from possible water leaks in wet rooms. It is especially important to carry out high-quality waterproofing of the floor before screeding on the first floor of a private house that does not have a basement. Water vapor and capillary moisture rising from the ground often have an acidic or alkaline environment; they actively interact with the components of concrete, and after just a few years the screed can become covered with a network of cracks and begin to collapse.
The essence and initial stage of installing a waterproofing layer
The safety of most materials included in the construction of floor coverings depends on how well the waterproofing is done. Particular attention should be paid to those cases when waterproofing the floor in a wooden house is carried out, since wood does not tolerate moisture well.
Also, the effectiveness of thermal insulation materials and the safety of various coatings from the formation of fungus or mold on them depend on the quality of waterproofing. Naturally, such formations will not be visible in the photo and during visual inspection, but in the end they will manifest themselves as various odors, dampness inside the room, etc.
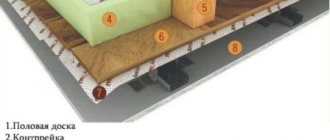
Frame houses have a rather complex floor structure, so before laying waterproofing materials it is necessary to carry out preparatory work.
We are talking about the following stages:
- Creation of high-quality foundation insulation.
- Arrangement of effective ventilation of the floor structure.
- Laying a high-quality hydro- and vapor barrier layer on the first floor of the house.
When choosing a waterproofing material, the following features must be taken into account:
- the use of fire hazardous materials in combination with wooden floors is unacceptable;
- the material must be of such dimensions that there is a ventilation gap between the rough base and the floor covering;
- Only insulators made of water-repellent materials can be laid on a rough concrete floor: roofing felt, polyethylene, etc.;
- If you are waterproofing floor joists or wooden flooring, then it is best to use liquid water-repellent mixtures with an antiseptic effect.
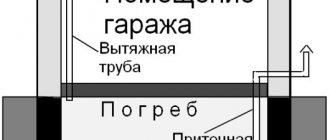
When laying waterproofing, it is necessary to carry out maximum treatment in the rooms under which the ground floor is located: basement, ground floor or bathhouse.
The maximum impact of moisture is in the basement. In this case, first of all, waterproofing is installed on the ground floor in order to maximally protect the first floor of the house from moisture penetration with subsequent negative effects on the floors.
Selection of insulating materials
The building materials market offers a wide range of waterproofing for floor coverings, which differ depending on the method of application and area of use.
Let's take a closer look at the main types of waterproofing materials.
Rolled waterproofing materials
The basis of roll waterproofing is fiberglass or a mixture of polyester resins.
This type of material is sold in rolls and differs in the type of filling and method of fastening. The final layer combining the fillings is bitumen
Such coatings include hydroisol, isoplast, roofing material and the like.
Depending on the method of fastening, there are the following types of roll insulation:
- Adhesive . Attached using bitumen mastic or synthetic resin based adhesive. There are also self-adhesive options. The base must be well prepared. It is considered a simple option, as it does not require special skills.
- Weldable . The base is polyester or fiberglass. Using a gas burner or a heat gun, the bottom layer of insulation (bitumen) is melted and then installed. This method is not advisable to use in enclosed spaces, as bitumen vapors are toxic.
- Mechanically installed . The basis for this type is sand with a fine fraction or roofing felt. Fixed with self-tapping screws. This option is labor-intensive and not reliable enough.
The main reason for choosing roll-type waterproofing materials is the relatively low cost. Another advantage of roll coatings is the ability to immediately carry out further repair work.
The disadvantages include difficulty in installation in a small area, for example, in a bathroom.
It is also worth noting that during the installation of rolled waterproofing, seams are formed, which in the future may compromise the tightness of the protective coating.
Coating materials for waterproofing
Today, coating materials are the most popular materials for waterproofing, and in terms of their effectiveness they are replacing even rolled materials.
Ready-made liquid mastics are applied in several layers and completely cover the concrete surface, thereby effectively plugging all microcracks
After applying the mastic, a film is formed, which will serve as a protective barrier against unwanted moisture. Mastic materials for floor waterproofing are made on the basis of bitumen, acrylic and synthetic resins.
Depending on the constituent components and operational characteristics, there are several types of coating materials:
- Polymer cement mastics . They contain cement, fine quartz sand and polymer additives. The material has high adhesion and durability. The disadvantage is the drying time of the finished surface.
- Bitumen . Depending on the method of application, there are hot and cold application mastics. The latter option is better suited for waterproofing the floor in an apartment, since bitumen does not require heating to 160-180 °C, unlike hot-applied mastic.
- Polymerbitumen . Basically, compositions are produced based on the modification of bitumen with latex, polyurethane or acrylic. The materials have great strength along with high adhesion. They have a higher cost than previous types of mastics.
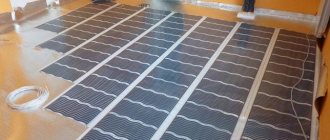
- Acrylic . Compared to bitumen materials, they are much more environmentally friendly and odorless. Suitable for underfloor heating systems. Their main disadvantage is their high cost.
Ready-made mastics and dry mixtures are available on the market. It is enough to dilute the latter with water according to the manufacturer’s instructions.
Dry mixtures for waterproofing, as a rule, are cheaper than ready-made liquid mastics, but a little more time will be spent preparing the mixture
When choosing a suitable mastic, it is necessary to take into account not only the price of the material, but also the indicated consumption per 1 m2. Often, inexpensive mastics are more viscous, which increases the material consumption declared by the manufacturer.
Penetrating compositions
The action of penetrating mixtures, so-called “impregnations,” is based on penetration into the structure of the concrete base and the ability to react with it.
After application, the mixture hardens, forming crystals inside the concrete that fill all the pores. Due to this, the base acquires a strong monolithic structure that is not susceptible to moisture.
Before applying impregnation, the concrete surface must be moistened. In addition, before using impregnation, preliminary application of a primer is not required, which will significantly reduce the cost of materials.
It should be noted that impregnation is not used on surfaces made of foam concrete, aerated concrete and brick, since the desired chemical reaction will not occur. The main disadvantage of the application is the high cost of materials.
Selection of waterproofing materials
It is necessary to select high-quality waterproofing materials taking into account the following factors:
- Humidity conditions in the room.
- Presence of underground levels.
- Type of subfloor (wooden, concrete).
- The type of insulators used (for the rough base or finishing coating).
There are situations when hydro- and vapor barrier materials must be selected based on what kind of heat insulator is used. There are varieties of it that lose their effectiveness when interacting with moisture. Accordingly, the thermal insulation layer made of such material must be reliably protected from moisture.
One of the following materials can be used as waterproofing:
- paints;
- mastics;
- insulating fills;
- backfill;
- roll
It is necessary to decide before purchasing all the advantages and disadvantages of the above materials, and therefore each of the above options will be considered further.
How to waterproof a floor with your own hands - step-by-step instructions!
To preserve the integrity of finishing materials and other structural elements of the floor, it is waterproofed. The absence of moisture on protected objects will prevent the development of fungus and corrosion on them, and will help increase their service life.
How to waterproof a floor
Important features of floor waterproofing
If the home is located in an old house where renovations have been carried out several times, then the most successful solution would be to dismantle the entire floor covering down to the concrete screed or base. If the floor is equipped with wooden floors, and they were installed a long time ago, then only an expert can determine the need to dismantle them, since they can be decrepit, which can make the new renovation short-lived.
Removing the floor
The floor must be leveled. To create a smooth base, a special repair compound is used, and sometimes self-leveling mixtures are used. There is no need to use expensive waterproofing materials to seal irregularities and small cracks. However, the floor should be as level as possible so that the owners have the opportunity to use floor coverings sold in rolls, or quickly install the floor using a polymer self-leveling composition.
Moisture-repellent mastics
Treatment of the rough base will not provide guaranteed protection from moisture if the process steps of applying the selected material or composition were not followed. It is best to entrust the work of laying heat, hydro and vapor barrier layers to professionals. Naturally, you can carry out such work yourself. Then, after high-quality processing, you can apply a moisture-repellent mastic.
This composition is a liquid solution that receives its main positive qualities after hardening. We are talking about increased strength, resistance to moisture and low temperatures. The composition is applied exclusively for laying finishing materials. If you are waterproofing a wooden floor in a private house, it is recommended to use glassine-based mastics.
Types of waterproofing for wooden floors
A wide range of materials have been created for waterproofing, differing in chemical composition and method of application. Which of them are used for finishing wooden structures?
Waterproofing a bathroom floor under tiles
Table. Types of waterproofing for wooden floors.
| Type of waterproofing | Brief technical specifications |
| Coating | One or several layers of material with a total thickness of up to 3 mm are applied to the surface of the wooden floor. Coating waterproofing is made from modified bitumen or synthetic resins. Application is allowed only at positive temperatures of the base and ambient air; surfaces must be clean and dry. |
| Pasting | Universal type, characterized by the highest reliability. Waterproofing can be applied to a self-adhesive layer or special mastics. The main requirement is that the floor must be smooth and dry. In some cases, two layers of glued waterproofing are used. For wooden floors it is considered the best option - it protects cracks from moisture penetration. |
| Painting room | It ranks last in terms of reliability. It is made on the basis of polymer fillers of special paints. Can be one- or two-component. Sometimes used as a finishing floor covering in living rooms and kitchens. |
Professional builders recommend using laminated (roll) waterproofing to seal floors made of natural boards. Floors made of plywood, OSB and chipboard can be finished with all types of the above materials.
Important! Before waterproofing wooden floors, they must be treated with antiseptics. The specific brand does not matter, they all perform their functions very effectively.
Antiseptics – protection against microorganisms
Insulating fills
These compositions not only have good moisture-proofing characteristics, but also make it possible to level out residual unevenness in the base. In their production, bits and asphalt concrete are used.
Filling is performed as follows:
- First, the subfloor is cleaned.
- Any small cracks, chips and other defects are repaired with putty.
- Then the surface is treated with several layers of soil mixture.
- The filling composition itself is also applied in 2-3 layers. The order should be maintained, i.e. After the first application, you must wait until the layer dries and then apply the next one.
- It is necessary to distribute the mixture evenly over the floor using a roller with needles.
- The total thickness of the poured layer should be about 2.5 centimeters.
Such waterproofing can only be carried out over floors with concrete screed. Floating cannot be done on “floating” floors, since the poured layer will crack when the surface vibrates. As a result, the surface coating is also deformed, which will look terrible in the photo and during visual inspection. The floors will have to be restored immediately, since they will no longer be usable.
Instructions for waterproofing the floor
Waterproofing a wooden floor can be carried out using different technologies:
- on the ground (in private houses);
- rough wooden floor (in houses and apartments).
In turn, the subfloor can be protected from moisture in different ways, depending on the waterproofing materials used.
Waterproofing a wooden floor on the ground
In private construction, waterproofing wooden floors on the ground is popular. The step-by-step algorithm for performing this technology is as follows:
- a hole about 40-50 cm deep is selected in the ground under the house;
- the bottom of the excavation is carefully leveled and then compacted manually or using a vibrating plate;
The soil is compacted with a vibrating plate.
- a layer of sand 10 cm thick is poured (in case of high soil waters, sand filling is made up to 20 cm), leveled, and then compacted;
- the sand is filled with quarry gravel of coarse or medium fraction or expanded clay (if you want to simultaneously insulate the bottom of the building) up to 20 cm thick;
- gravel (expanded clay) is leveled with a rake;
- a layer of sand 10 cm thick is poured on top, leveled, compacted with a vibrating plate or manually;
- the sand is spilled with water and compacted again (when using expanded clay, only the top layer of sand is wetted with water);
- the sand dries naturally. In wet weather, it is covered with plastic film if expanded clay is used;
Attention: three layers are poured in any case, regardless of the method of waterproofing.
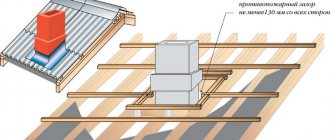
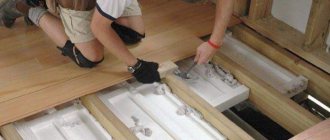
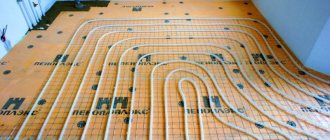
Important: recently the top layer of sand has been replaced with Penoplex, laid on a sand cushion (see photo), which increases the cost of work, but improves the thermal insulation of the floor below. Otherwise, all operations are performed in the same order.
- Rolled waterproofing materials are laid over the dried sand, overlapping the walls (by 20-25 cm). The joints are glued with bitumen mastic;
- A polyethylene film is laid on top of the waterproofing. Also overlapped and overlapping the walls. The joints of the film are glued either with tape or with a hot iron through paper;
- reinforcement mesh is laid;
- the screed is poured.
For reference: the given technology is the simplest and cheapest. There are other options for soil waterproofing. But they are more expensive, both financially and in terms of labor intensity.
Waterproofing the subfloor
Protecting the wood of a wooden floor from moisture consists of preparatory work and, in fact, waterproofing.
Preparatory work
Preparatory work begins with removing dust and dirt from the surface of the subfloor. After this, the work is performed in the following sequence:
- an audit of the joists, cranial bars and boards is carried out, during which damage, mold and mildew are identified;
- Wood damaged by fungus and mold is removed. Attempts to remove damaged areas with a plane followed by treatment with antiseptics do not help in most cases. In practice, mold and mildew inexplicably reappear after a few years in the same places;
- rotten floor elements are replaced;
- the loose boards are additionally fastened with self-tapping screws to the skull block;
- fallen knots and cracks are sealed with wood mastic or a mixture of PVA glue and sawdust;
- the resulting construction waste is removed;
- the wood is impregnated with antiseptics and fire retardants (there are compositions containing both components);
- the base of the plank floor and walls 20-25 cm high are treated with a special primer for wood (the process of absorption of liquid waterproofing components, such as bitumen mastic, by the tree is prevented). It is advisable to buy a ready-to-use primer.
Bitumen primer.
The primer is applied with a roller or paint brush. The joints between the floor and the walls are treated especially carefully, since this is where in most cases water breaks down during flooding. The bottom of the walls to a height of 10-15 cm is also coated with primer. When waterproofing a wooden floor in a bathroom, the walls are also primed in wet areas (see fig.)
Walls are primed in wet areas.
If the primer is quickly absorbed into the wood, then experts recommend re-treating such areas.
- after the primer has dried, which can last up to 10 hours (you can check it with a cotton pad - it should remain clean after contact with the floor), self-adhesive tape with waterproofing properties is used to glue the joints of the floor to the wall, the seams between the boards, and the cracks treated with mastic;
- places where utility lines pass are sealed with liquid rubber or rubber liners and also sealed with tape.
Attention: for roll waterproofing, joints, seams and cracks are not sealed with self-adhesive film.
Preparatory work is carried out in the same sequence in a private house, apartment, cottage or garage.
Waterproofing with roll materials
Waterproofing a wooden floor with rolled materials is carried out in the following sequence:
- The rolled material is cut into strips of length equal to the size of the room in which the waterproofing work will be carried out, plus an approach to the walls of 10-15 cm on each side. When calculating the number of strips, it is necessary to take into account overlapping laying;
- the cut sheets are rolled out (can be stacked on top of each other in the corridor) and left overnight in this state (the tension on the surface of the material that arose while it was in the roll is removed);
- waterproofing mastic is applied to the floor and the bottom of the walls with a roller or mat - it serves as an adhesive for roll insulation if the adhesive is not applied to it at the factory;
- after 5-6 hours, a second layer of mastic is applied, perpendicular to the strokes of the first layer;
- using a tape measure, find the middle of the rolled strip, where you place a mark with a marker;
- the canvases are twisted at both ends, so that both rolls meet exactly in the middle;
- find the middle of the room (the mark on the roll should be exactly in the middle of the room);
- first, one part of the strip is rolled out (one roll);
- In order for the waterproofing material to fit tightly to the boards, it is rolled with a wallpaper roller or forcefully ironed with your hands. If such a procedure is not done in a timely manner, air pockets may form that will have to be punctured (experts really don’t see problems with punctures, believing that they heal over time);
- roll out the second part of the roll;
- The second canvas is laid in the same way, but only overlaps the first by 10-15 cm. The seams are glued with mastic;
- After laying the waterproofing material throughout the room, the side joints of the floor and the wall are glued. To do this, a strip of waterproofing 30-40 cm wide is cut out and glued to the floor (about 10 cm) and the wall (the rest) using mastic (experienced specialists immediately place the roll on the side wall, which is more reliable, but very difficult and inconvenient to implement).
Attention: roll waterproofing is best suited for showers, baths, balconies and kitchens.
Waterproofing with painting materials
The cheapest type of waterproofing is water-repellent paints based on polymers and bitumen. True, their service life does not exceed 7 years. Apply 2-3 layers to sanded and dried boards with ordinary paint brushes. Each subsequent layer is applied to the previous one, completely dry. Optimal use: under linoleum or as a finishing touch for kitchen flooring.
Waterproofing with coating materials
Before starting work, prepare a coating solution. To do this, dilute the dry mixture in a container in a 1:1 ratio with water and stir thoroughly until it becomes medium-fat sour cream. The resulting composition is used to treat the floor and bottom of the walls (10-15 cm above the floor level). Use a roller on smooth surfaces, and a paint brush in hard-to-reach places. Insulation is applied in 2 layers. The second layer is applied after 4-6 hours perpendicular to the first. After this, the floor is dried for 24 hours.
Waterproofing with mastics
There is nothing complicated in the guide to waterproofing a wooden floor with mastics:
- with a brush, mastic is applied to the joints of the floor and walls, as well as in places where utility lines pass;
- A special waterproofing tape is glued onto the applied insulation (at the junctions of the walls and the floor). During installation, it is necessary to eliminate kinks, folds and air pockets;
The joints between the floor and the walls are taped.
- another layer of insulation is applied to the pasted tape;
The tape is covered with a layer of mastic.
- the same actions are performed in places where communications pass;
The pipe passages are sealed with waterproofing tape and then treated with mastic.
- The mastic is applied with a roller to a flat surface.
Experts recommend treating the floor in two layers.
Waterproofing with impregnations
Impregnations are most effective when waterproofing wooden floors in bathhouses, washrooms, steam rooms, showers, and also in steam saunas, since here the wood itself is protected not from water leaks, but from moisture. Therefore, the waterproofing technology is different: wood (boards, joists, bars) ready for floor installation is placed in a special bath with an impregnating composition for 24 hours. In all other impregnation options, the bottom of the floor remains unprotected and quickly rots.
Backfill insulators
Bulk materials are usually represented by a mixture of bentonite and water-repellent granules. In fact, it is an alternative to insulating wool. This coating has a minimal level of moisture absorption and excellent thermal insulation characteristics. Sometimes loose insulation is used not only for protection against moisture, but also as insulation.
You should be aware of the following nuances before starting work on backfilling the insulator:
- Preliminary finishing of the subfloor is carried out only with bentonites filled with water. Such a connection will lead to the formation of a kind of liquid, water-resistant gel-like layer.
- The resulting moisture-repellent material is poured over the rough base.
- Hardening occurs within a few days.
The advantage of this technology is that the material can also be poured into wooden houses between the joists at the base. The thickness of the layer can correspond to the level of the log.
General tips for applying waterproofing to wood floors
Strict adherence to the recommended waterproofing technology for wooden floors guarantees high-quality protection. Before performing work directly, you should perform the following steps.
- Make an audit of the condition of wooden floors . Carefully inspect the wooden floor; any damaged lumber should be replaced with new ones. It is strictly forbidden to waterproof boards that show signs of damage by putrefactive bacteria.
- Seal large gaps. Keep in mind that only roll materials can protect the floor from water getting into the cracks. Painting and coating waterproofing does not protect the cracks in the boards.
Large gaps need to be sealed
- If necessary, level the floor surfaces . Pasted waterproofing can only be applied to flat surfaces. Particular attention should be paid to the smoothness of the boards. Sudden changes in height, the presence of large chips and other irregularities can damage the integrity of the roll coverings. If damage is discovered during coating, correction of the problem is possible. If damage to the waterproofing layer occurs after the premises have been used, it will be impossible to detect the problem in a timely manner. As a result, moisture affects wooden elements, including load-bearing ones, for a long time. Replacing floor beams or wooden joists is complex, expensive and time-consuming construction work.
- Carefully study the manufacturer’s instructions for using waterproofing materials. Recommendations are based on numerous laboratory tests and studies of the physical and performance characteristics of materials. Before being put into production, the material is tested in situ, during which optimal technologies are developed. You should not think that any master is smarter than high-class specialists and can independently change the technology at his own discretion.
Adhesive waterproofing of wooden floors
- Wooden structures must be able to get rid of excess moisture through natural evaporation . If this is not possible, then the operating conditions of lumber will deteriorate significantly. You should remember this and waterproof wooden floors only when absolutely necessary. If the upper surfaces of the floor are waterproofed, then a set of measures should be taken to increase the efficiency of underground ventilation.
Such general requirements indicate that waterproofing should be used only as a last resort and if no other methods of solving the problem exist.
Pasted waterproofing
Roll insulators
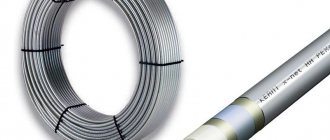
The most durable and hard materials with a low degree of moisture absorption are usually sold in roll form. The basis of such material is: bitumen, glass fiber or fabric, polyethylene. Modern manufacturers replace bitumen with synthetic materials to eliminate the unpleasant odor of the coating.
The installation method determined the formation of the following types of rolled waterproofing materials:
- Self-adhesive. They are pre-equipped with an adhesive layer, so they are simply laid on a prepared rough base.
- Requiring warming up. Heating such a material makes it more plastic and increases its adhesion to the base, i.e. it can be glued without the use of auxiliary means.
- Used in combination with an adhesive mixture.
Features of vapor barrier in a frame house
The vapor barrier layer is not a simple film, but an entire system for protecting insulation from excess moisture. The problem is that wet insulation loses its positive qualities. This can only be avoided by laying a high-quality vapor barrier layer that will protect the floors from moisture condensation in their thickness. When thinking about how to insulate the floor in a wooden house from below, take these nuances into account.
The vapor barrier material has a special membrane through which moisture can circulate and does not condense on the inside of the layers laid in the floor “pie”. When laying, it is important to follow the main rule: the front part should be directed towards the room. Inverted material will have the opposite effect: moisture will condense even more, which will lead to the immediate formation of fungi and mold.