A water floor is a type of heated floor, along with an electric one. Its widespread use is explained by the desire for comfort, because walking on a warm surface is much more pleasant. Sometimes this is simply a necessity, for example, if the coating is too cold due to the characteristics of the materials. The design has a structure in the form of a curved pipe for hot water. This heating system reduces the need for general heating. The temperature can be adjusted over a wide range, so that in case of heat, for example, you can make the floor slightly warm, rather than turning it off completely. In winter, the hot surface cannot cope with the function of heating the room, and the air in the middle part of the room will not warm up. Due to some disadvantages and operational features, private homes have become the main option for installing water heated floors. This type of heating is very useful for families with small children. In addition, it has long been used in baths, bathrooms and kitchens.
Peculiarities
The main distinguishing feature of a water floor is a curved pipe through which hot water flows. In this case, the temperature of the coating will also depend on the thermal conductivity of the materials. In multi-apartment buildings, installing such heating is difficult due to the danger of leaks. Heating systems cannot be embedded into central heating and hot water supply lines. You can make a structure in an apartment if you have an autonomous gas boiler and if the housing itself is located on the ground floor, and the levels below are not occupied by residential premises. It is recommended to replace the boiler with a special one for a water floor. In apartment buildings, the floor heating structure must contain a “floating screed” made of concrete. If the ceilings are made using old technologies, then it will not be possible to install such heating there. In houses with an unheated basement, additional thermal insulation of the subfloor will be required.
Advantages and disadvantages
Water-heated floors use energy efficiently. Heated floors increase comfort and ensure uniform heat distribution. Location under the floor covering is a safe option, since the likelihood of damage to the system becomes low, and the residents themselves will be protected from injuries and burns. Hidden heating is combined with facing materials easier than other options. The device is covered with tiles, laminate or linoleum. Before finishing, the chemical composition of the materials is checked. Connecting a water floor is possible both to the main heating system and to a separate one. Heated floors also have several disadvantages. Pressure drops occur in central heating. The installation itself takes a lot of time due to the multi-layer installation. To eliminate leaks, you will have to open the coating and damage its appearance.
A water floor is not able to maintain the desired temperature throughout the entire room!
Advantages of heated floors
A well-installed heating system can bring comfort to your home, creating favorable living conditions and an ideal temperature field. The advantages of heated floors include:
- accessibility - selection of materials and installation method can be carried out in any price category;
- comfort – installation of a floor heating system helps create proper circulation of warm flows;
- safety – the coating is absolutely safe to use;
- hygiene - unlike standard heating systems, a large number of dust and dirt particles do not rise upward from heated floors along with heated air;
- profitability - double savings when using heated floors include waste-free installation of materials and conservation of resources while uniformly heating the space;
- strength – with proper installation work, water floors are a strong and durable system with a long service life;
- self-regulation - heating the air to a certain temperature, the heated floor continues to maintain the set mode without intervention from the user.
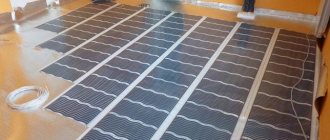
Warm water floor
As practice shows, it is possible to insulate floors by installing a water system in any living space where heat loss does not exceed 69-80 W/m². For buildings with an indicator of 80 to 102 W/m², the installation of a water floor is accompanied by the laying of a top concrete covering.
Where to use: room requirements
Installation of a warm water floor is possible in rooms with completed plastering work. Windows and door panels are required. Sewerage, electrical communications, and water supply connection points must be prepared. The heating system is mounted on a clean, flat surface. The functionality of the base waterproofing should be checked before starting work. The level of the floor covering is also pre-marked. Installing a water system will not cause difficulties in houses with autonomous heating. A room in an apartment building will only be equipped with heated floors after an appropriate examination. A conclusion will be required regarding the potential negative impact on building services. You will need floor wiring and a heat meter for the apartment. On the ground floor, a warm water floor is connected to a return riser.
Rules for installing a collector group
In all of the above methods of installing a heated water floor, it is necessary to install a cabinet for the collectors, which is purchased ready-made on the construction market. After the manifold cabinet has been successfully installed, the supply and return pipes are inserted into it. The first comes from the boiler and, accordingly, is filled with hot water. The second pipe, designed to perform the exact opposite function, is responsible for collecting water that has passed through the heating system and has already transferred part of the thermal energy to the coating. The cooled water is sent back to the boiler for subsequent heating. The process begins again in a circle. Water circulation is ensured by a pump built into the system.
To install the collector box, try to choose a place on the wall located as close to the center of the room as possible. The installation of this cabinet is most often carried out in close proximity to the floor
In this case, shut-off valves are installed on each pipe (both supply and return), which allow you to disconnect the system from the general heating network for repairs or in order to save money. The plastic pipe and metal shut-off valve are connected using a compression fitting. Next, a manifold is connected to the valve, installing an air vent on one side and a drain valve on the other. You can simply install a plug, but this is less functional. After assembling the manifold cabinet, perform all other work described above in each system.
Water floor installation
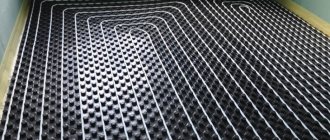
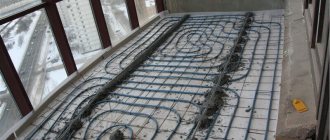
It depends on the materials used. However, all water floors have similar communication systems. As a rule, they consist of several branches - contours. They are assembled in a distribution cabinet, where they carry out control. Each circuit consists of a segment through which water enters the room and a “return” segment. On the floor, the system is arranged in several layers. Substrate requirements vary depending on the material used. To enhance the effect of the system, the circuit is finished with insulation. This is especially important in cold regions. The tubes are fixed on a reinforced mesh or groove system. Then lay the screed. If it is made of concrete, then a damper tape is installed around the perimeter of the room. A backing made of cardboard or foamed polyethylene is placed above. The top layer, the finishing coating, is usually made of laminate, parquet or tile.
Technology for laying water heated floors
The installation of a water floor consists of four stages: project development, preparation of the base, laying the circuit and connecting the system to the collector. At each stage, it is necessary to follow the instructions as accurately as possible so as not to make mistakes that will cause you to have to redo everything all over again.
Heating system design
First, you should carefully consider where the distribution unit will be located. Experts recommend placing it in the central part of the building so that the length of the pipes between the heating circuits and collectors is minimal. This promotes thermoregulation in rooms and makes the system more balanced.
Distribution node
To connect the system, several different schemes with serial or parallel mixing are used. The simplest scheme involves supplying water from the boiler to the mixing unit, then through the supply manifold to the heating circuit of the heated floor. This is a sequential type of mixing.
Serial connection type
The mixing unit in this case includes a bypass, a bypass valve and a pump.
The bypass valve allows, if necessary, to shut off the heat supply from the boiler to the pipes. Most often, for such mixing units, thermostatic valves with an applied sensor are used, which is attached to the supply pipe.
Scheme with a 3-way water floor valve
This connection scheme has one drawback: when the circuits are turned off, the pump has nothing to pump. The problem can be solved by the presence of a second bypass of lower capacity, which is installed between the return and supply manifolds.
With the parallel type of mixing, the pump is installed between the collectors, and the mixing unit, located between the boiler and the collector system, consists of a bypass and a bypass valve.
Parallel connection
Now you need to choose the best option for laying out the circuit, taking into account cold zones - areas under windows and doors, external walls. In these places, it is advisable to reduce the laying step; in addition, it is here that the pipe from the collector should pass first so that the water does not have time to cool. In the center of the room, the recommended pipe pitch is 20-30 cm; in “cold” zones it is 10-15 cm. The pitch multiplicity should be the same in all rooms to ensure uniform heat distribution in the house.
Calculation of a heated floor system
When installing a pipe, 2 layout patterns are used - spiral (snail) and serpentine (snake). The first method is used for medium and large premises - from 10 m2. The spiral layout simplifies the installation of a rigid pipe and allows you to lay the contour with a small pitch without much effort. If the room is less than 10 m2, it is much more convenient to use a serpentine layout. This method is considered simpler, but it has a couple of significant disadvantages:
- due to the fact that half of the flooring is located above the return line, a temperature difference is felt in different corners of the room;
- if it is necessary to lay out with small pitches, the risk of pipe damage due to bending increases.
To prevent such damage, provision should be made for laying wide loops on the folds. All this is displayed on paper - the layout diagram, the pitch between the pipes, the radius of the bends and the distance to the walls. Such a drawing will allow you to more accurately calculate materials, mark problem areas in advance, and select the optimal step in each zone.
Methods for installing a warm water floor
Approximate plan of a heated floor system indicating some data
A small example of a project - a pipe laying plan, which indicates the laying step and the required amount of heat
Preparing the base
The subfloor should be as level as possible: if the differences in height are greater than ½ of the pipe cross-section, air pockets form in the circuit and the heating efficiency decreases. Therefore, you first need to inspect the screed, check its flatness with a level or rule, and level it if necessary. For further preparation, you must wait until the surface is completely dry.
A clean and dry screed is primed, and when the soil is dry, it is covered with plastic film, extending onto the walls. The film strips, laid overlapping, are taped at the joints to eliminate the risk of moisture during the operation of the floor. Next, a layer of heat-insulating material is laid.
Advice. If the screed is made on the ground or there are heated rooms below, foil polystyrene in rolls can be used as insulation. If there is a cold basement under the ceilings, extruded polystyrene foam in slabs is more suitable for thermal insulation.
The insulation is laid in an even, continuous layer, with the foil facing up, and the strips at the joints must be secured with construction tape. The edges of the insulation extend onto the walls by approximately 5-10 cm. Provided that the insulation is thermally insulated with polystyrene foam boards, a damper tape is attached around the perimeter of the room.
Here, instead of insulation, it was more convenient to make a screed from polystyrene foam balls. This is how they hid the pipes of the central vacuum cleaner and heating
Laying foam boards in a checkerboard pattern
In this way you can hide part of the wiring in the subfloor
Layout and connection of the circuit
To install a heated floor you will need:
- pipe (it is best to use PEX pipes made of cross-linked polyethylene);
- plastic clips for fixing the pipe;
- dowel-nails;
- drill;
- tape measure and marker;
- hammer.
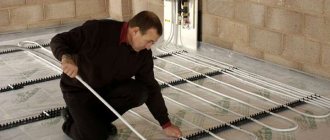
Step 1. The layout diagram is transferred from paper to the floor. The lines are drawn directly along the insulation, strictly observing the layout step. The markings should be as detailed as on paper, with all the twists and turns. In addition to the lines for the contour, the lines for laying the incoming and outgoing pipes to the collector itself must be marked.
Step 2. Plastic clips are attached along the markings in increments of 50-70 cm. To do this, drill holes in the base directly through the insulation, insert dowels, then screw the clips with self-tapping screws. While working, pay attention to the location of the clips - they should all be unfolded equally, with the cutout along the line.
Step 3. Start laying the pipe. First, its end is brought out to the distribution unit and connected to the supply manifold. There is no need to fasten it tightly, the main thing is to fix it so that the pipe does not fall. After this, they begin to lay out the outline itself according to the markings on the floor. The pipe from the collector is fixed around the perimeter of the room, on the first line from the wall. Having completed the first circle, one line is passed, that is, the pipe is laid in a spiral in increments of 40 cm and so on until the center of the room. This will supply hot water.
Template for laying pipes near the wall
A simple pattern very quickly and clearly allows you to maintain the required pipe laying step
Pipe laying
Fixation of pipes is carried out with anchor brackets
Step 4. Lay the return line. Having reached the center line, the pipe is bent, a loop is made and then the pipe is fastened in the reverse order. The end of the pipe is brought to the return manifold, the required length for connection is measured, and cut off. The circuits are installed in the same way in other rooms, with separate pipe leads to the distribution unit. You can make several circuits with one pipe if the rooms are small.
Pipe bender for faster and safer pipe bending
If the pipe passes through a room in transit, then it must be insulated
Advice. For effective heating, the length of the pipe in one circuit should not exceed 90 m. If you need to lay a longer pipe, it is worth dividing it into 2 or 3 circuits, otherwise the water will quickly cool and the energy consumption of the boiler will increase.
Step 5. Now you need to check the system for leaks. Having turned off the tap in front of the mixing unit, pump up the pressure to 6 atmospheres with a pump and carefully inspect the pipe along the entire circuit. It is necessary to ensure that the pressure on the pressure gauge is stable and there are no leaks in the circuit.
Step 6. The contour is closed with a screed. This can be a semi-dry mixture or a traditional cement-sand screed, but it is not recommended to use concrete with crushed stone or gravel. The solution is evenly distributed over the floor, the minimum layer thickness is 30 mm.
Laying reinforcing mesh
If you have high-density foam and sufficient thickness of the screed, then perhaps the mesh will be unnecessary
Important! When filling the screed, the pressure in the circuit should remain within 6 bar, and after 3 days it can be reduced to operating values. Heat cannot be supplied to the pipes until the screed is completely dry, that is, about 22-28 days.
Part of the floor poured with concrete
Step 7. When the surface is dry and hardened, you can begin setting up the equipment. The optimal temperature is set for each circuit by adjusting the taps on the supply manifold. If necessary, you can install a temperature sensor.
There are other options for laying out contours. For example, a reinforcing mesh is mounted on top of the insulation, and the pipe is tied to the mesh with plastic clamps or wire. There are also special polystyrene foam boards for water floors, equipped with bosses, between which the pipe is attached. Instead of screed, tile adhesive can be used, depending on the type of floor covering.
Thermal insulation mats with bosses for heated floors Knauf Therm 0.72 sq.m
This is what laying pipes on mats with bosses looks like
Types of heated water floor designs
A warm water floor is made from:
- concrete;
- wood;
- polystyrene.
You should set your priorities correctly: take into account the permissible load and the required heating qualities. Concrete retains and distributes heat better and reliably protects against mechanical damage. A dry floor, in turn, is easier to manufacture. It is characterized by a higher level of aesthetics and better possibilities for renovation. A polystyrene structure, for example, can be placed on a concrete or wooden base. The light weight of the material makes it more versatile than concrete. Because of its lightness, polystyrene is used in houses of any type: frame, panel, etc. Wooden structures are in demand among owners of wooden houses with the same interior. Timber systems consist of a base layer of slats and a topcoat (often in the form of large slabs). Warm water floors made of wood are durable, environmentally friendly and take up little space.
Concrete structure
This system involves covering the pipe with light or heavy concrete. This type of heated floor is not suitable for rooms with weak ceilings and serious load requirements. The concrete structure is placed on the rough surface of the first floor (in the absence of a basement), a monolith or a surface made of floor slabs. An important advantage of concrete is the uniform distribution of heat throughout the entire surface. The material is characterized by inertia: it takes a long time to warm up, but at the same time it cools down slowly. The installation process will be labor-intensive, because in addition to multi-layers, the installation of a floating screed - semi-dry or wet - is also difficult. However, this is compensated by the reliability of the design. Correct installation and careful filling after several checks will provide the system with high-quality protection from mechanical stress.
Dry design
A dry water floor (floor structure) is installed if raising the floor is not provided for by the design solution. Weak overlap is another reason to choose this type of flooring. The dry structure weighs 25-30 kg/m², which is about 10 times less than 50 mm high concrete. Sometimes a dry floor is laid due to the difficulty of delivering concrete to the site. This design has many benefits in general. The material usually used is polystyrene or wood, and since there is no need for drying, you can save at least a few days. The layer height rarely exceeds 60 mm, and sometimes is slightly more than 30 mm. Assembly does not take much effort and is characterized by simplicity in technical terms. A dry water floor can easily withstand temperature changes and provides high-quality sound insulation. Among other things, the system can be installed temporarily, with the possibility of dismantling and reassembling in another room.
Lightweight wooden construction
Wooden systems include slatted and modular. In the second type of construction, the pipe is laid in cut grooves, and not between planks. Grooves are formed in chipboards. Installation is possible on old coating, but it is still better to install the system on logs. The locking fastening will ensure the continuity of the coating. To create a modular system, fewer calculations are required, so the work is completed faster, although the technology itself is similar to assembling a rack structure. The last supporting layer consists of slats made of moisture-resistant plywood, MDF, chipboard or boards. In this case, elements with a thickness of more than 2 cm and a humidity of up to 10% are used. The difference between the pitch of the heating pipe and the width of the slats should be 20 mm. The supporting surface must be cleaned before installation. It is permissible to leave no more than two irregularities per 1 m².
Laying electric heated floors: options
Electric floor heating can be done using various heating elements. This can be a heating cable, cable mats and film with strips of carbon paste. All this is electric underfloor heating. But the methods of its installation are different. And quite strongly. In this regard, the optimal option for each floor covering is different. And the installation of an electric heated floor will be different each time.
Each heater has its own technology for laying heated floors
But every electric heated floor has something in common. This is a thermostat and temperature sensor. These two components help maintain a constant temperature of the floor underfoot. Is it possible to do without them? Yes. But you will have to control the heating “manually” and also turn the heating on and off using knobs.
In addition to the fact that this is not economical and inconvenient (you will not be able to maintain heating at the same level), it also threatens the rapid failure of the system. All electric heaters cannot tolerate prolonged temperature rises above a certain value. Everyone knows this. And sooner or later you will forget to turn off the heating and the warm floor will burn out. So the presence of a thermostat and temperature sensor can be said to be mandatory. Even if these are additional costs at the installation stage. But there are savings during operation.
Heating cable
Cable heated floors, like water heated floors, are laid in a screed. And in the same way, you need to choose a laying scheme. The difference is that the temperature of the heating cable is the same throughout. In this regard, they usually keep it simple and put in a snake. In order to better heat external walls, the installation step of electric heated floors near cold walls is made smaller.
There are three types of heating cable
Determine the cable length and laying pitch
The pitch of laying the heating cable is determined based on how many meters need to be laid in the room. And this depends on the required heating power and the thermal power of one meter of cable.
For example, you need to get 3500 W of heat from a heated floor. One meter can produce from 5 W to 150 W. Let an inexpensive heating cable for a warm floor be selected and it gives 45 W/m. To get 3500 W, we need (3500 W/m / 45 W = 77.7777 m) about 78 meters.
The step of laying an electric heated floor from a heating cable is determined by its thermal power and the required amount of heat
Let's round up - you need to lay 80 meters of cable. Next, based on the size of the room, we develop a laying scheme, calculating the step. It doesn't have to be the same. For example, along external walls or windows, the floor can be laid more often, along the rest of the area with a larger distance between the turns. But the distance cannot be too wide - thermal “banding” will be clearly felt. Therefore, the cable laying step under the tile is usually 10-15 cm, and the cable power is selected as needed.
One piece of advice: it is better to take some reserve in terms of power (and length). Then the cable will not operate at maximum power even in the coldest weather, and this will have a positive effect on its service life.
Installation features
When using a resistive cable, remember that it should not overheat. That is, it is not placed under large furniture or interior items. A self-regulating cable is more reliable in this regard - it itself lowers its temperature when the threshold value is exceeded. But the resistive one is more reliable in operation. The self-regulating matrix often fails.
We place the heating cable only where there is no furniture or carpets.
During installation, the heating cable is also tied to a mesh, after which it is filled with concrete or cement-sand mortar. The filled heated floor is left to “ripen”. The minimum period is 24 days. You don’t have to wait until the tiles are fully cured before laying the tiles. This type of flooring is not afraid of high humidity, so you can start laying tiles or porcelain stoneware in about two weeks. During this time, the screed will gain about 70% strength. All others require a dry base and waiting until “completely dry” is necessary.
Advantages and disadvantages
The disadvantages of floor heating using a heating cable are high operating costs, large weight and long installation time. High costs are a common disadvantage of electric heating. But in the case of a cable heated floor, one must also take into account its large mass. At the beginning of the season, while the concrete is warming up, costs will be high. Therefore, it makes sense to use cable heated floors only in permanent residences. Otherwise, you will have to reheat the entire mass again each time. And while the concrete warms up, it will be cold.
The weight is slightly less than that of a water heated floor. But it's still big. And it should be taken into account when laying the foundation and calculating the floors. If such a load was not provided for, before starting work it is necessary to calculate whether the foundation and ceiling will withstand such an increase in load.
The technology for laying heated floors from cables involves laying them in a screed
With a long installation time, everything is also clear - it takes time for the cement to acquire the required strength. This must be taken into account when developing a work plan and timing.
Advantages of a cable heated floor: it is quite reliable, does not depend on the presence of heating (but depends on the availability of electricity). In general, this method of floor heating is used for soft floor coverings, such as linoleum and carpet. Under tiles and laminate there are other floor heating elements that are installed much faster.
Cable mats are an ideal option for tiles
A cable mat is the same heating cable that is attached to a polymer mesh in the form of a snake. It can also be laid in a screed. The gain is in the speed of installation, the loss is in price. The price includes the price of the mesh and cable installation on it. The advantages and disadvantages are the same as those of a conventional heating cable.
This is what a cable mat looks like. This type of electric heated floor is ideal under tiles
How to lay a heated floor from cable mats: installation features
This type of floor heating is more popular when laying tiles and porcelain stoneware. The mesh cable can be laid directly into the tile adhesive. And immediately lay the tiles on top. This is an ideal option for this type of flooring. The glue does not dry as long as the concrete gains strength.
Simply attach to the base and lay the tiles using tile adhesive for heated floors
In addition, there is often no need to carry out preliminary preparation of the base. Mats can be placed on old tiles or concrete floors.
Laying heating mats on wooden floors
But if you have an old wooden floor, laying an electric heated floor in the form of cable mats requires preparation. The best thing to do is to first remove the old floor and fill in the leveling screed. Then you can make a water or cable floor. You can level a wooden base for a warm electric floor using sheet materials - moisture-resistant plywood, OSB or gypsum fiber board.
One of the options for preparing the base for laying heated floors in a house with wooden floors
On this base you can already lay a cable mat and tiles on top. This is the least expensive way to install tiles on a wood floor and add underfloor heating. But the tile adhesive must be special - for unstable bases. It has some degree of elasticity even after drying. This makes it possible to compensate for the dimensions of the wooden base. The grout for the joints should also be elastic after drying. Otherwise, there will be cracks between the tiles and moisture will seep in, which is not good for the wood.
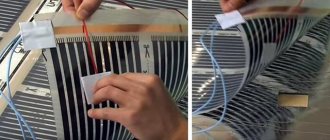
Infrared film (carbon heated floor)
Carbon infrared electric heated floor - two layers of vinyl film, between which strips of carbon paste are rolled up. The strips are connected using copper and silver bars. Voltage is applied to the tires and distributed through strips of carbon paste, which emits heat in the infrared range.
How to lay a heated floor made of carbon film
Infrared heated floors are sold in the form of film rolls of various widths. The minimum is 20 cm, the maximum is 100 cm. The length of the film is cut along special lines located every 25 cm.
How to lay and what to use with
Infrared film heated floors are laid on any flat base. Even on old parquet or wooden floors. Only if it is smooth, without distortions, depressions and protrusions. It just lays out on the floor. Any more or less rigid covering can be placed on top. Laminate, parquet or engineered wood is ideal. They are simply placed on film. In the case of laminate, laying heated floors and coverings in one room takes several hours.
If you want to heat a laminate floor, there is no better option than carbon film
With linoleum or carpet, it is better to lay sheet material on the infrared film, and then have a soft coating on it. This method is less efficient in terms of heating. Sheet materials have low thermal conductivity and take away some of the heat. Such a warm floor can only be used to increase comfort. As the main heating, it will clearly not be enough. You cannot install a heater that is too powerful, and a “normal” heater will not be enough due to losses.
Is it possible to lay film electric heated floors under tiles? Only special types - with holes for glue exit. But this option is far from the best. The adhesion of the tiles to the base will be very low. On an unstable floor, the tiles will rise, begin to “bounce”, then the heating will stop working as the tires break. If you want to make electric heating of a tile floor, it is better to use cable mats or cable.
Advantages and disadvantages of infrared film flooring
The advantages of film heated flooring include its small thickness. To improve thermal insulation, a substrate is placed under the film. The pair - substrate and film heater - can be at least 5 mm thick. Small thickness is not only about saving the height of the premises. This is also a quick heating of the coating to a given temperature. But only on condition that the floor under the heating film is well insulated.
Connection diagram of the heating film to the thermostat
The next plus is the speed of installation. This property is evident with laminate and parquet/engineered boards. Another one is reliability. If one or more carbon strips fail, the rest continue to heat up.
There are also disadvantages. Firstly, it is conditionally compatible with soft floor coverings and floor tiles. Secondly, before laying a heated carbon film floor, you need to level the base. Potholes and protrusions are not allowed. And the floor is usually far from level. So “quick installation” is only if the base is already leveled.
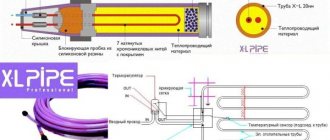
Choosing a pipe for a warm water floor
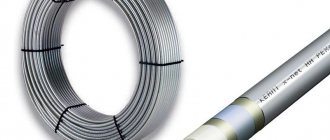
Most significant aspects depend on the material used. Copper pipes conduct heat well. They heat up quickly and transfer thermal energy to the floor. However, the price of such products is higher than other options on the market. Polypropylene products, like copper pipes, are used only when other solutions are unavailable. And the main reason is the complex installation. Installation will require a lot of fittings of different shapes, and the stability of the system will be lower when compared with other materials. Metal-plastic pipes perform well according to most criteria. They do not clog inside, warm up quickly and are flexible enough that fixing does not cause problems. Threaded or press fittings are used as fastening elements. Recently, cross-linked polyethylene pipes have gained popularity. Their installation does not require special skills. The main advantage of the material is increased strength.
Design Features
No more than 90-100 meters of pipe should be allocated to one circuit. Otherwise, the water in the return stroke will lose too much heat. For one circuit, the optimal length is considered to be 70-80 m. In addition, the longer the length, the stronger the resistance. All heated rooms should be divided into circuits of approximately the same length. Calculations are carried out using a specialized calculator. The pipe pitch near the walls is selected in accordance with the temperature behind these walls. Standard interval values are in the range of 10–30 cm. It is permissible to go beyond these limits, but if it is exceeded, alternating areas with noticeably different temperatures will appear. Creating gaps shorter than 10 cm can lead to problems with tube bending. In the warm water floor calculator you will need to enter data such as the type of floor covering, water supply temperature and treatment temperature.
Other information for calculation in the calculator:
- pipe pitch;
- its variety;
- thickness of the screed above the contour.
Methods for laying the contour
The pipes of the heating structure vary in design: they can look like a snake, a snail, etc. The quality of heat distribution in the room, including across the floor itself, depends on the option of laying the circuit. As a result of movement through the pipes, the liquid cools, so it is important to establish ideal circulation. For the same reason, the system is installed starting from the walls, moving towards the exit or center. The most common configurations are in the form of a snail shell, a snake, and a combination. The twisting tube can have single or double/triple bends. The figures are formed in straight lines near three walls and only next to one they make the transition to the desired figure. If we are talking about a snake, then one of the sides will be wavy. Lines of repeating bends are formed, as a rule, along the diagonals of the room. The water supply is organized so that in each of the larger turns that are closer to the walls, the water temperature is approximately 1 °C higher.
Insulation - type and thickness
The ideal thickness of the thermal insulation layer depends on the structure of the material. In the case of mineral wool, 50 mm is enough, but for bulk insulation you will need up to 150 mm. Another popular option is foam. Mineral wool is good for its ability to organize moisture exchange equally well and keep the temperature at a constant level. High humidity itself poses a problem for mineral wool. A material oversaturated with moisture will not be able to properly perform its thermal insulation function. Bulk insulation is a budget material. But in some situations it will not be possible to lay out a sufficient layer of such thermal protection. Polystyrene foam is not suitable in some cases, because it is not capable of conducting steam. Moisture accumulated on the insulation will become a breeding ground for mold and mildew. For wooden floors, foam is not an acceptable option.
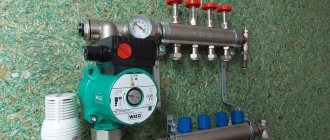
Selecting a collector-mixing unit
An important element of the heating system. All loops and branches converge here. The hot and cold flows are immediately mixed to a predetermined temperature. In the collector-mixing unit (distribution cabinet) there are valves to regulate the volume of water in the circuits and, accordingly, its temperature, as well as the same indicator in the entire system. To make the right choice, you need to consider 3 main nuances. The number of valves must match the number of water supply and drainage lines. Five circuits of the water system will require 10 valves. The second aspect is management. Preference is given to adjustable valves. They provide the ability to separately configure branches. This is important not only because the rooms need different temperatures, but also because of the uneven distribution of heat between them, especially at different distances from the node. It is advisable to acquire a system with a valve to eliminate air bubbles.
Tips for installation work
After installing the floor circuits and before installing the screed, the structure is checked for proper operation and any leaks. In this case, verification is performed using different methods.
The system is tested using special equipment and an air mixture is pumped into it. During the process, the pressure rises to 4 bar. This method helps to detect even the slightest leak.
Device system
The test is also performed by filling the system with liquid under a certain pressure. Moreover, in half an hour its value should not decrease by more than 0.6 MPa. After a couple of hours, it should not drop by more than 0.02 MPa at a constant temperature of the internal liquid.
When connecting the system to the boiler equipment, a variety of manifolds are used. The system starts pumping equipment and automatic mechanisms to control various parameters.
Application of circulation pump
Installation diagrams for water heated floors in a private house are developed in accordance with the calculated energy consumption and its losses through the enclosing structures. It is worth considering that the total load depends on the insulation methods, wall material and thickness, as well as on the floors and on the number of door and window openings. It is recommended to install circulation pumps in each circuit to balance the underfloor heating. Also, when designing door and window openings, it is necessary to take into account the height of the floor covering structure.
Comfort and coziness of the design
Choosing a suitable installation system helps create coziness and comfort of heated floors. The advantage of this equipment is the ability to keep the installation at low power throughout the year. In this case, you can turn off most of the circuits. The launch is carried out when cold weather sets in.
This system provides endless possibilities of modern technologies to create comfortable conditions and a homely atmosphere.
Calculations and correct pipe distribution
As for the diameter of the pipes, the 2-centimeter options are the most widespread. The maximum distance between the turns is 30 cm, the minimum is 10. It is recommended to maintain the same interval between the pipe and the walls - 20 cm. Near walls with windows, the distance between the rows is made smaller. Laying begins from the side of the short wall, and for this, about 15 tubes are taken to create a straight pipe base. The distance from the collector to the turns of the pipeline cannot be made less than 40 cm. Each circuit of the heating system within the rooms should have a length of 40 m, but preferably no more than 100. In large rooms, you should not invest in this indicator, but simply form 2 or more circuits, ideally - the same length. Exceeding the limit of 100 m is still permissible: 120 m is considered the maximum for 18 mm cross-linked polyethylene pipes, 125 m for plastic pipes with a diameter of 2 cm.
Selecting a heating boiler and pump
Types of boilers for water heated floors:
- solid fuel;
- diesel;
- pellet
As for boilers, you should choose a long-burning model. Heating problems can be avoided by using options with a buffer tank. Diesel boilers are usually more expensive, but in terms of efficiency they are no better than solid fuel ones. Pellet models are slightly inferior to others in power. Using a water floor without a pump is a bad decision, because a minimal deviation from the norms can lead to leaks. An exception is possible in case of operation with hot water supply or central heating. The choice of pump lies between wet and dry type models. The first option is characterized by contact with the coolant. It is suitable for private properties, but is designed only for short contours. Dry type pumps are very noisy, but have high performance and are used in large multi-story buildings.
Among all types of boilers, the least justified option is diesel.
Features of installation technology
Installing a heated floor is an excellent solution for rooms larger than 20 square meters. meters. In small rooms it is difficult to install water lines, so it is recommended to install electrical structures in them.
Traditionally, installation diagrams for water heated floors in a private house are designed using screeds. This is necessary due to the increased load from which the pipeline system must be protected. In addition, the pipes must be in contact with the screed, which functions as a heated surface.
Screed for heated floors
Water lines are mounted using a special mesh, fastening sheets made of polystyrene foam or plates with grooves. The prepared base is covered with a waterproofing film. During installation, a reinforcing mesh is placed on the heat-insulating layer, on top of which the pipeline is mounted. Before proceeding with the installation of pipes, it is necessary to calculate the equipment to ensure the required heat transfer taking into account losses. The pipeline to the frame is mounted using clamps. A reinforced screed is also installed on top of the highways.
Reinforcing mesh
Helpful information! In apartments with many residents, it is prohibited to install such a structure using centralized heating. When installing a separate heat source, special permission is required.
Related article:
Which warm floor under tiles is better? From this publication you will learn about the nuances of using TP under tiles, the subtleties of installation, the pros and cons of different types of floors.
Self-installation of a warm water floor
The work includes several stages:
- Preparing the floor.
- Laying thermal insulation (insulation).
- Installation of reinforcing mesh.
- Pipeline installation.
- Hydraulic tests.
- Filling the screed.
- Start the heating system.
First of all, prepare the floor. The concrete base should be treated more carefully, as well as the base for filling with concrete. An important aspect is the thermal insulation device. The quality of insulation directly depends on its price. At the same time, you should not excessively sacrifice the height of the room for the sake of a thick layer of thermal insulation. A metal mesh is installed under a pipe or screed, but it happens that two layers or none are used. The key decision to be made at the next stage is the pipe configuration. Basically they choose between “snail” and “snake”. There is no point in making the drawing symmetrical, because areas of the room require different amounts of heat. The pipe is assembled, bent, laid and fixed. There may be several circuits in one room. The preparation of the water floor is completed by laying the screed. Concrete is most often used, less often polystyrene and other materials are used. In the end, all that remains is to put the system into working condition, but the first checks are carried out before installing the beacons and pouring the screed.
Floor preparation
If the base is concrete, then it is cleared of reinforcement and irregularities. Foil thermal insulation is laid on top. The effect of it can be enhanced by using dense polystyrene panels placed under foil. This compaction is not done if it is important to avoid loss of height in the room. Special waterproofing materials or ordinary polyethylene film act as waterproofing for the water system cake. The rolls are laid overlapping, with about a 20-centimeter margin. A damper tape is glued (or fixed) to the floor around the perimeter. It can be cut from thermal insulation. Ready-made bases are also sold on the market, which replace foil, reinforcing mesh and pipe fastenings. The technology of heated wood floors is used mainly on the second floors and above. Preparing the floor is no different: there should be no debris left and no more than two small uneven spots per 1 m². A special wooden base with channels is used.
Laying insulation
The main task is to fix the joints with special adhesive tape. Typically, polypropylene foam insulation, polystyrene foam, or some other material is used. In this case, the optimal thickness is 5 cm. During installation, this figure is usually increased to 10 cm. In order to retain additional heat, a heat reflector made of film is placed on top. Use aluminum foil, foam rubber, penofol. The floor structure includes different levels. The first one can be a concrete base. For example, polystyrene foam is placed on top. Next, the heating system pipe is placed. Six meters of length will cost relatively inexpensively, about 200 rubles. A concrete screed is installed on top of the tubular device. At the very end, the finishing coating is attached. Typical finishes for hydronic flooring are laminate and tile.
Pipe installation
After forming the base and insulation, you can begin assembling and installing the pipe. Depending on the shape of the room and the wishes of the owners, the type of pattern (snail, snake) and its specific version, most convenient for the room, are selected. Most craftsmen consider a spiral with a concentric structure to be the most universal solution. When laying, take into account the thickness of the floor covering, walls and pipe diameter. The optimal length of the tube for one room is approximately 80-100 m. On the street side, the rows are usually placed more densely. Even ordinary water pipes are used as a material. The tubes are connected into one using adapters. If metal-plastic options are used, the metal surface is removed three centimeters from the beginning of the pipe. The connection to the thermal insulation is carried out using fastening units. The latter not only make installation easier, but also ensure correct placement.
Installation of reinforcing mesh
Reinforcing mesh is used for high-quality pipe fastening. A layer of reinforcement is placed on top of the thermal insulation, and all sections are fastened with wire. The cells are formed in accordance with the planned pipeline pitch. The pipe itself is then installed on this grid. To protect against various loads, another reinforcing mesh is laid on the contour. It also reinforces the concrete screed, preventing cracking and maintaining its solidity. If the solution is mixed from high-quality concrete, then a metal mesh will not be needed. Sometimes it can be replaced altogether, for example, with fiber. Theoretically, you can do without reinforcing mesh under the pipeline, but then you will need clips, and it will be uncomfortable to walk on the floor while placing the beacons. If there are large uneven spots on the subfloor, it is either leveled with concrete or expansion joints are created.
Reinforcement should be done at a temperature not lower than +20 °C.
Filling the system and hydraulic testing
Before pouring the screed, the system is tested - pressure testing. First, the floor pipeline is filled with water, and then the rest of the heating system, including the section with radiators and boiler. There are alternative testing options - using air or antifreeze. In the second case, all water must be drained from the system. Before filling the water system, open all taps and valves that are moved to this position to enter the operating state: automatic air vents, three-way valve, circuit valves. Filling a closed system begins with opening the combs and valves. You will hear air moving through the car vents. When it stops being removed through the air vents, you need to turn on the circulation pump. When all the air has left the system, the flow meters and valves are closed and one circuit is pumped until the sound of bubbles appears. The open system is filled through the drain hose at the bottom of the heating structure. Before this, the heated floor is filled through taps on the manifold.
Installation of beacons
Beacons are used for several purposes: for screeding and leveling the floor. First, dowels are fixed on opposite walls along a pre-prepared line of the upper boundary of the screed. A strong cord is installed between them. Next, the metal profile is set so that its top matches the level of the lace. Beacons are placed half a meter from the walls and at a distance less than that used for leveling the screed. Beacons should be securely fastened. For this purpose, self-tapping screws are screwed to the ceiling - near the profile. It, in turn, should not sag between the fasteners. If necessary, add a few more supports. Next, they use knitting wire - the slats are screwed to the hardware, achieving the most rigid fastening. To prevent the screed from deforming, tape is laid on all walls below.
Screed - pouring mortar
It is permissible to fill the floor with solution only after checking the correct operation of the heating system. If, after increasing pressure in the pipes, they do not begin to leak and have not expanded significantly, then you should start filling. The floor must be poured at one time, the exception is if the floor in the room is located on several levels. It is desirable that the room be warm, and at sub-zero temperatures such work should not be carried out in principle. Filling begins from the far corner and ends near the exit. The mixture is poured between the beacons and leveled, without bringing the layer above the level of the marks. For the top concrete screed, it is recommended to leave a strip up to 15 cm wide around the perimeter. This gap will be in the gap between the wall and the pipe. A water floor can be used even before the screed has completely dried, but such a need will not arise until the surface is ready.
Some nuances about improving the quality of the screed:
- To eliminate excess air in the screed, it is recommended to make small holes, because under the mass of the solution it is difficult for air voids to break out to the surface.
- During the first week after pouring, the surface is moistened with a spray bottle several times a day, otherwise the concrete will dry out rather than harden.
Starting the heating system
First, the circulation possibilities inside the pipeline and in the system as a whole are checked. The mixing valve lever is then moved to the position corresponding to the minimum temperature. After this, the circulation pump of the floor water supply is started. At the same time, the boiler pump (boiler) is switched off. Manual air vents periodically release accumulated air. Circulation must occur in all branches, so it is checked using flow meters. The circuit may extend from the manifold to the bathroom on the next level, so that in the absence of a tie-in, removing air from it becomes difficult. In this case, block the remaining branches and turn on the pump to maximum. Tap pressure is also used. The supply tap to the distribution cabinet is closed and the drain valve on the return unit is sharply opened. All air is gradually removed, after which the configured system is started. To work with heating, please read the detailed instructions.
Installation of heated floors on a concrete base
After calculating the heated floor and drawing up a laying plan, we purchase materials, equipment, tools and begin installing the system.
The assembly of heated floors is carried out on concrete, polystyrene slabs laid on a concrete base and a wooden frame mounted on a concrete base.
Installation is carried out according to design diagrams, where the heat source with the distribution manifold, the heated rooms and the number of heating circuits in these rooms are determined.
Warm floor distribution manifold
The collector distributes water flows along the circuits.
The collector, which distributes the hot water flow according to the heated water floor circuits, is installed in the technical room or in the distribution cabinet, into which hot water is supplied from the heat source.
The manifold is made in the form of two stainless steel cylinders, welded on both sides. One of the cylinders, through welded pipes, receives heat from the source and distributes hot water over the heating circuits, the other cylinder collects cooled water from the circuits and returns it to the heat source.
The process of circulating water through the heating circuits is carried out using a circulation pump, valves, valves and a thermostat of the manifold group.
In addition to distribution functions, the underfloor heating manifold regulates the temperature of the water supplied to the heating circuits through a thermostatic valve, and, using an electric drive and valves of the manifold group, regulates the pressure of hot water flows in the heating circuits.
If the heat source is central heating, then a circulation pump in the collector group is not required.
Water heated floor connection diagram
Concrete floor
It is advisable to lay heated floors on a flat surface.
Before assembling the heated floor, we level the concrete base using a self-leveling floor. If the surface of the concrete base has defects that cannot be eliminated with a self-leveling floor, we perform a concrete screed. Using the dried screed, we begin assembling the heated floors according to the project diagram.
- We install edge insulation from damper tape around the perimeter of the floor and attach it to the walls of the room. The height of the tape covers the thickness of the heated floor kit, which includes a layer of insulation, coolant hoses and a reinforced screed.
- We lay a foil backing on the concrete base to retain heat from the water floor in the insulation and concrete screed, and to protect the insulation from concrete moisture. The substrate is laid with a layer of foil towards the floor covering, the joints of the rows of the substrate are connected with foil tape.
- Insulation boards 50 mm thick are installed on the laid insulation. The rows of insulation are laid offset so that the joints of the slabs do not coincide and create a single dense flooring. The panel layer is covered with a vapor barrier film.
- A reinforcing mesh with a cage of 10 by 10 cm or 15 by 15 cm is mounted on the insulation boards. The mesh is fixed on stop brackets installed 50 cm apart over the entire floor area. The height stops are designed for the installation of two grids: under the heated water floor and above it.
- We begin the installation of the pipe by connecting it to the outlet pipe of the collector, and then, along the mounted grid, we lay the water floor according to the design diagram, securing it to the grid with tightening clamps. We fix the pipes with a slight slack, taking into account the change in pipe size due to fluctuations in coolant temperature. When laying a pipe according to the snail pattern, we take into account the reverse movement of the pipe in order to maintain a distance between the pipes of 10 or 15 cm. According to this pattern, heating of the floor near the walls is more intense. If one circuit is not enough for a room, we divide the floor area into two circuits with the same length of coolant pipes, which we first take into account in the project. After laying the pipe, connect the second end to the inlet pipe of the manifold group.
- We install a second reinforced mesh above the laid coolant pipe to give the poured screed strength so that the screed does not crack during operation of the floor.
- Before pouring the screed, we test the installed water floor for tightness and performance, performing pressure testing of the system using air. We supply air to the system using an air compressor and create a pressure of 4 bar for the entire test period. If the seal is broken, air leaves the system and the pressure drops.
The screed is poured only after checking the underfloor heating system for leaks - If during testing the air pressure in the underfloor heating system does not change, it means that the installation was carried out professionally. In addition to the air test, we perform a hydraulic test with hot water. To do this, we supply hot water to the system and turn on the floor for several hours; with high-quality installation, the pressure in the system decreases by 0.03 MPa per hour. We begin the concrete screed after installing all floor contours and general testing of the system.
- Before pouring the concrete screed, the floor contour is filled with cold water under pressure to prevent deformation of the pipes. The screed is filled with concrete, not lower than grade M300. The thickness of the concrete layer above the surface of the second reinforced mesh is 3 - 5 cm, and the total thickness of the concrete screed is 7 - 10 cm. The surface of the screed is leveled with a vibration rack along the installed beacons, removing air from the concrete layer and preparing the surface of the screed for laying the floor covering.
- We begin installation of the floor covering a month after the screed has completely dried and the concrete has cured. Drying of the concrete mixture occurs naturally at positive temperatures.
- If the floor area exceeds 30 m2 or one side of the room is more than 8 m long, to prevent the concrete screed from cracking, shrinkage expansion joints are used. For more information on how to make a water floor screed with your own hands, watch this video:
In a large room, seams are made between the contours, passing through the pipes only at the transition points from the comb to the contour. In places where there is an expansion joint, a protective corrugation is put on the pipes, and the reinforcing mesh is cut. The shrinkage seam is made 10 mm wide, the seam is closed with silicone sealant.
The warm water floor is put into operation after the concrete screed has completely cured. Drying the screed with a warm floor is strictly prohibited.
Polystyrene mats for heated floors
Polystyrene slabs are becoming increasingly popular.
The scheme for laying a warm water floor on a base made of polystyrene slabs is less complicated and is carried out without a concrete screed. The procedure is the same as installing a water floor on concrete.
Waterproofing in the form of polyethylene film or foil backing is laid on the concrete base. The slabs are laid on the film, creating a flooring in which aluminum plates with a groove for installing a water-heated floor are mounted.
It is convenient to lay the water circuit in the cellular structure
Aluminum plates are laid according to the design scheme, laying out the contour of the heated floor. The pipes laid in the grooves of the aluminum plates are connected to the distribution manifold and fixed to the plates with tightening clamps.
Plates on polystyrene flooring cover 80% of the total area and, when heated by the coolant system, are able to additionally evenly heat the floor covering.
After laying the pipes, the underfloor heating system is tested for leaks, similar to the test when installed on concrete. Polystyrene panels with a water floor system are then covered with two layers of gypsum fiber sheet, which has high viscosity and strength. The floor covering is installed on the laid GVL flooring. For more information on how to lay the contour on the mats, watch this video:
Unlike polystyrene slabs, special polystyrene foam mats on which a cellular structure is cast are used for installing a water floor. The cells allow pipes to be laid without additional plates according to various patterns, taking into account the design spacing between pipes. After installing the heated floor, the water floor mats are filled with cement screed or covered with gypsum fiber sheets.
Installing a water heated floor on polystyrene foam mats allows you to reduce costs compared to installing the system on concrete and retain heat in the floor covering.
Wooden slabs for heated floors
There is no need to install insulation under a wooden base.
Installation according to the water floor scheme is also carried out on a wooden base in the form of a modular product made of chipboard with aluminum plates. Grooves for pipes are pressed into the plates. The procedure for assembling the floor repeats the installation using polystyrene boards, but taking into account the low thermal conductivity of chipboard, insulation is not installed under them.
The grooves for laying water floor pipes are made on a wooden base in the form of a frame made of slats, into which aluminum plates are mounted.
The pipes are laid in the grooves of aluminum plates located between the slats. Then the flooring with pipes is covered with a flooring made of gypsum fiber sheets, on which the floor covering is assembled.
I install such floors in wooden houses with beamed floors.