Film heated floors are one of the easiest floor heating methods to install. It is quite possible to install and connect a film floor yourself, following simple instructions. It can be used as the only source of heating the room, however, in this case, the economic efficiency may be lower than that of a water-heated floor.
Do-it-yourself warm film floor
Application area
Film flooring can be installed in any room
Film heated floors can be used in absolutely any room. It can be installed in the bathroom under tiles, as well as under any other types of finished flooring in the kitchen, living room, dining room, hallway, nursery and bedroom. Very often, warm film flooring is used for renovations at socially significant facilities: schools, kindergartens, nurseries and hospital wards.
And even on the ceiling
Design and principle of operation
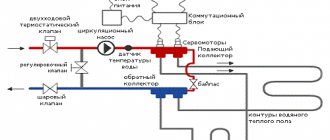
Warm film flooring is a fairly simple design. The heating element in the device is a carbon mixture, which is located in the form of strips between a welded heat-resistant film. Electric current flows through copper wires. Each conductor connecting the carbon tapes is covered with a protective sheath.
A special feature of the film floor heating system is the parallel connection. Thanks to this, a failed individual heating element of the structure does not in any way affect the work process of the entire equipment.
Installation of heated film floor
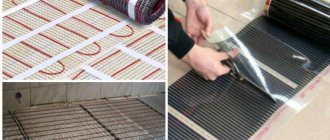
They produce film rolls 50 meters long, while the width of the floor heating product can range from 50 centimeters to 1 meter. The carbon mixture, which emits infrared radiation, can be located between the layers of film in the form of strips, and in more expensive models the carbon heater is a continuous sheet.
The film that forms the basis of the infrared heated floor is made of strong polypropylene, which does not change shape when heated to 120 degrees. In this case, the thickness of the material, depending on the model, can range from 0.23 to 0.47 millimeters.
They produce film rolls 50 meters long, while their width can range from 50 centimeters to 1 meter
A film-type heating system is used for all finishing floor coverings. Installation is carried out on a rough base. No screed is required after installation. The facing material is laid directly on the film.
An important point in installing this type of heated floors is the low energy consumption. On average, a film heating system consumes 25 to 35 watts per hour.
Features of installation of film heated floors
The main feature of installing a film floor is that it does not require careful preparation of the base. It can be installed even after the repair has been completely completed. If the floor in the room is fairly level and does not have sharp changes in height in the form of joints of boards or slabs, protruding nail heads or paint sagging, then it is enough to cover it with one layer of heat-insulating material. After that, strips of thermal film and a temperature sensor are mounted on the floor. All this is connected to the electrical network through a thermostat. After checking its functionality, the heated floor is covered with a protective material, on top of which the finishing coating is laid.
Film flooring can be mounted on any flat surface
Operating principle and advantages of such a system
The system of underfloor heating itself is far from new. Until recently, two types of construction were widely used: water and electric floors. In the first case, hot water circulating in pipes laid under the floor covering was used as a coolant. In the second, the room was heated by an electric cable, also laid under the floor.
Each of them is not easy enough to install and has significant drawbacks, which cannot be said about the new infrared heating floor system. Its main difference is in the use of infrared radiation for heating, which allows you to heat objects in the room, from which the heat spreads into the air.
An infrared heating floor is the best solution for heating the house, but no underfloor heating system can replace full-fledged heating!
The basis for the radiation is a special carbon paste sealed inside a polyester film. Therefore, the system is also called infrared carbon heated floor. The operating principle of the design is quite simple: voltage is supplied to the emitters through copper conductors, which activates them. Silver plating prevents the joints of current-carrying contacts from burning. The system is connected to the electrical network via a thermostat. Infrared heating floors have many advantages:
- Low energy consumption due to the very high thermal conductivity of carbon. Energy costs are significantly lower than when heating a room using other methods.
- Possibility of installation under almost any known finishing coating, even under a suspended ceiling. Can be mounted on vertical, inclined at any angle and horizontal surfaces.
- Easy to install. No mandatory installation in tile adhesive or screed is required. If necessary, installation of infrared film heated floors can be done independently without any problems.
- High reliability, which is ensured by parallel connection of elements. If a section of the heating strip is damaged, the rest continue to function properly.
- Possibility of quick dismantling and re-installation, which is especially convenient when moving or any redevelopment of the premises.
- Maximum safety for humans.
The principle of operation of film heated floors
Heating is carried out due to infrared thermal radiation emitted by graphite coating under the influence of electric current. Unlike traditional electric heated floors, this heating method does not require a heat-accumulating screed or special floor preparation. The floor covering itself, be it carpet, laminate or linoleum, will accumulate and release heat.
Almost none of the heating devices common today creates a level of comfort comparable to film heated floors.
Application
The minimum area that must be covered by the heating system is 70% of the total floor area. However, in places with cold climates in winter, these floors are connected and used only as additional heating. In these situations, they experience increased stress, which they simply cannot cope with.
Sometimes infrared floors serve as emergency heating in case of failure of the central heating system during severe frosts. Film heating, powered from the electrical network, is quite capable of maintaining the temperature level in the room close to comfortable and preventing hypothermia of the people living here.
Infrared systems can be installed not only on floors, but also on other surfaces - ceilings or walls. They are ideal for bathrooms where they only turn on when needed. To do this, electric heated floors are laid under the tiles, after which the tiled floors will be constantly warm, and the air in the room will reach the set temperature.
What consequences can result from errors when installing film heated floors?
A common mistake during installation is incorrect connection of film strips to each other; the connection must be strictly parallel. With a series connection, heating will be ineffective, and with other errors in the connection, a short circuit may occur.
Infrared heating film is mounted strictly parallel
Cutting the film is allowed only in places designated by the manufacturer. If you cut the film in another place, a break will appear in the electrical circuit and the floor will not heat up.
How to cut film heated floors
Insufficiently thorough cleaning of the floor and preparation of the surface can lead to subsequent physical damage to the tape in places of contact with solid particles of debris or chafing in places with a sharp difference in height. Damage to the tape will turn off the heating of part of the floor or the entire floor. It is extremely important to connect the heated floor through a separate residual current circuit breaker. This ensures timely shutdown of power to the floor in the event of a break or short circuit in the circuit. Ignoring this rule may result in fire or electric shock.
Another common mistake is incorrect location of the temperature sensor. If the area of the floor under which the sensor is located is additionally cooled, for example, due to its close location to the balcony door, or, conversely, heats up due to direct sunlight through the window, the thermostat may receive incorrect data on the floor temperature and increase or decrease heating unnecessarily.
Electricity consumption of film heated floors
What type of heater is best to use?
We have already looked at the types of electric heated floors, which can be represented by a thermomat, infrared film or heating cable. All three options are suitable for laying a heating system, but it is best to use an infrared film coating.
This is due to the following advantages of the material:
During installation, you can do without a screed, which will save time, money and, most importantly, the height of the ceiling.
The infrared system can be put into operation within 1-2 days after installation.
At the same time, the screed hardens in about 4 weeks. A heated film floor under linoleum can be easily installed with your own hands, and this can be done even after a major overhaul, since this type of work is “clean”.
As you can see, the advantage of this version of the system speaks for itself, so we strongly recommend using it at home. The only negative is that the infrared coating is afraid of water, so installation in wet rooms is prohibited. In addition, linoleum itself begins to rot in a humid environment, which immediately prevents its use in the bathroom, bathhouse, and damp rooms.
Advantages and disadvantages of film heated floors
The advantages of this heating method are:
- low cost of a set of materials. You only need to buy film, a thermostat and connecting wires. No need to spend money on an expensive screed;
- ease of installation. Preparing the floor, laying out and attaching the film is quite easy. No special knowledge is required for this;
- speed of installation. The film is spread out and connected in just a few hours and this can be done even alone;
- film heated floor can be the only source of heating. This allows you to avoid heating radiators.
Advantages and disadvantages of film heated floors
The disadvantages of film heated floors include:
- relatively high energy consumption. If a film heated floor is used as the only heating method, then in a room measuring 20 m2 the floor will consume about 1.5 kW/h;
- quick cooling of the floor. Since heat accumulates only in the top layer of the coating, when the heating is turned off, the floor cools down quite quickly;
- dependence on the operation of electrical networks. In the event of a planned or emergency power outage, the heating is also turned off. In some cases, combined with the rapid cooling of the floor, this can become a problem.
Stage 5
Connecting heating strips to each other. For this, special wires with a cross section of 1.5 mm2 are used. If the total power of the heating strips is more than 3.5 kW, then you will need a set of wires with a cross-section of 2.5 mm2. The length of the wires starts from 8 m. In ready-made film flooring kits, everything is already provided: the number of wires, their length and cross-section. When purchasing film for cutting, all additional materials must be purchased separately, including connecting wires.
When connecting heating strips with a power of up to 3.5 kW, you will need an additional set of wires KEEPLY PS-1.5x16, where 1.5 is the wire cross-section, 16 is the length in meters. For strip power up to 4.4 kW - an additional set of wires KEEPLY PS-2.5x16.
Choosing a film heated floor
Film heated floor
The main criterion for choosing a film is its power. All manufacturers offer two types of film: with a power of 150 W/m2 and 220 W/m2. The first option can be used if the warm floor is not the only source of heating in the room, but is needed only for comfort. If other heating options are not provided, then you should choose a film with a power of 220 W/m2.
Film power calculation
Choosing a heated floor kit
Soft copper wires should be used to connect the sheets. The choice of cross-section depends on the final power of the entire heated floor and usually ranges from 1.5 to 2.5 mm2.
Calculation of wire cross-section
Energy consumption calculation
It is better to use the thermostat exactly the model recommended by the film manufacturer; it is important to ensure that the permissible current of the thermostat is greater than the current consumed by the floor.
Differential automatic
Be sure to connect the heated floor through a residual current circuit breaker with a leakage current setting of 10 mA.
Warm floor CALEO GOLD with self-regulating effect
Warm floor CALEO GOLD with self-regulating effect
| Index | Meaning | Dimension |
| Specific power consumption | 170 | W/m2 |
| Width of thermal film CALEO GOLD | 50 | cm |
| Maximum length of one strip of thermal film | 10 | linear m |
| Melting point of thermal film | 130 | °C |
| IR heating wavelength | 5-20 | µm |
| The share of IR rays in the total spectrum | 9,40 | % |
| Anti-spark mesh | + | — |
| CALEO GOLD 170 W. Price | 1647-32939 (for sets from 170-0.5-1.0 to 170-0.5-20.0) | rub. |
| CALEO GOLD 230 W. Price | 1729-34586 (for sets from 230-0.5-1.0 to 230-0.5-20.0) | rub. |
Installation procedure
Calculate the heating system in order to correctly select the power of the infrared film and its size in accordance with the usable area of the room. Prepare the surface - remove the old coating and if the floor is uneven, pour a small screed to level the surface.
After the solution has hardened (which may not be necessary), lay heat-insulating material over the entire surface.
It is best to use extruded polystyrene foam. Glue a heat-reflecting layer on top of the polystyrene, which will increase the efficiency of the system. You can “kill two birds with one stone” by covering the surface with penofol (shown in the photo), which is both a heat-insulating and heat-reflecting layer.
Cut the film into suitable pieces. This must be done in specially marked places (indicated by the manufacturer). Install an infrared heated floor under linoleum.
Please note that it is prohibited to overlap the film. Another requirement is that material cannot be laid under furniture. Also, do not forget that the film covering must be laid at a distance of at least 30 cm from other types of heaters to prevent overheating of the system.
According to the diagram, connect the thermostat and temperature sensor to the film and check the operation of the system by connecting it to the power supply. If everything is correct, lay a layer of plywood over the film coating, which will additionally protect the material from mechanical damage.
Lay linoleum on plywood over the entire area of the room with the heating on. After this, make a trim and leave everything as is for 2-3 days. When this period has passed, you can trim the edges again (if necessary) and proceed to gluing the material to the plywood.
Set the thermostat to a setting of no more than 30 degrees, at which point the installation of the film heated floor under linoleum is completed!
That's the whole procedure for laying a heated film floor under linoleum with your own hands! As you can see, there is nothing complicated and you can do everything yourself, without calling a specialist. Finally, I would like to note once again that an infrared heater is still better than an electric one (heating cable and thermomat), so use this particular installation technology in your home!
Installation of infrared heated floor
Non-traditional heating systems have recently been widely used in modern construction.
They can significantly reduce energy consumption, which has a significant impact on saving the family budget.
Such innovative solutions include film infrared heating of the room. We will tell you how to properly install an infrared heated floor.
Preparing the base
The base should be cleaned and dust free
First, you need to provide a place to connect the heated floor, and make a recess in the wall to install the thermostat and place the wiring.
After this, you need to thoroughly sweep the floor. The surface must be clean and level; it is unacceptable to leave even small lumps of dirt, protruding nail heads or other irregularities. There should be no sharp differences in height on the floor of more than 3 mm, for example, at the junction of boards or slabs.
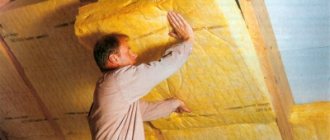
After this, the entire floor must be covered with thermal insulation material. It is best to use the type of thermal insulation recommended by the film manufacturer. The edges of the material must be secured with tape so that it does not move during further work. The thickness of the thermal insulation must be at least 3 mm.
Thermal insulation layer
What is a warm film floor
Warm infrared film floors are a heat-resistant polyethylene film in which strips of carbon paste are packed. In turn, the paste is connected by copper bars, which are also soldered into the film.
The entire structure is called IR thermal film. If a current of a certain strength and frequency is supplied through the tires, the carbon elements begin to emit infrared radiation with a wavelength of 5 to 20 microns.
It does not cause heating of the surrounding air and drying it out, as traditional radiators and heaters do. Infrared rays heat surrounding objects - flooring, walls, ceilings, furniture.
It is important to know! It should not be confused with electromagnetic radiation, which has a harmful effect on the human body, animals and plants.
This heating system has virtually no side effects and is environmentally friendly. Scientists from around the world have proven the beneficial effects of infrared rays on living organisms and humans in general.
Infrared heated floor technical characteristics have the following:
The energy consumption of an infrared heated floor directly depends on its area and mode of operation.
On the modern market, many manufacturers present their options for warm film floors. They all have approximately the same characteristics. So which infrared heated floor is best for you to decide.
The thickness of the thermal film is 0.4 mm, which allows it to be installed under any floor covering - ceramic tiles, laminate, parquet boards, linoleum and carpet. In addition, this film can be installed on walls and ceilings. In this case, heating will occur throughout the entire volume of the room.
Of course, installing infrared heated floors under one or another coating has its own characteristics. For example, to lay a film floor under carpet or linoleum, plywood should be laid on the heating strips.
Laying film heated floors
Tools for work
Laying schemes
Film cutting options
Installation diagram
Indoor installation diagram (including furniture)
First, decide on the floor area that needs to be heated. The film must not be placed under heavy furniture and appliances, such as cabinets, chests of drawers, a refrigerator or a washing machine. The distance from the edge of the film to the place where such furniture will stand should be 20 cm. The same distance should remain to the walls. Mark the boundaries of the future location of the film using a marker or bright tape.
The film is fixed with tape
Lay the film along the long side of the room, this will reduce the number of electrical connections in the entire system. Usually the manufacturer somehow marks the top of the film; if there are no marks, then the film is double-sided and can be laid on either side. The film must be cut strictly along the cut line drawn by the manufacturer.
It is important that there is a distance of at least 5 mm between the rows of film. Overlapping and contact of different sheets of film with each other is not allowed. To prevent the film from moving, it must be secured with double-sided tape.
When the entire floor is covered, you can start connecting.
Laying a film floor under tiles with your own hands
At the initial stage, preparatory work is carried out. The surface is cleared of debris and leveled. The thickness of the heated floor can reach up to 1.5 cm. An approximate sequential layer of materials to be laid is as follows:
- heat-reflecting substrate – 2-3 mm;
- infrared film – 0.4-0.5 mm;
- painting mesh – up to 2 mm;
- a layer of concrete mortar (or tile adhesive).
You immediately need to decide:
- location of the thermostat;
- effective distribution of film under the tiles.
Installation of a heated floor begins with laying a heat-reflecting substrate. The best option would be to use strips whose size is 0.6 m. If you purchase wide material, it should be cut.
An infrared film is placed on top of the substrate. There are the following requirements when performing this work:
- Do not place stationary furniture on the film (this may lead to system burnout);
- the film should cover up to 70% of the area in the room;
- the presence of a distance from the walls at the level of 10-12 cm;
- the film is not installed overlapping.
It is more advisable to distribute the film along the maximum length of the room. The marked heating material is cut off. It is recommended to cut pieces of film in places where there is no graphite layer. If you still need to cut it along the graphite layer, then this place is subsequently insulated with adhesive tape or tape. The film is attached to the substrate using tape.
Next you need to start connecting the film floor
Particular attention is paid to the correct installation of the thermostat and temperature sensor. It’s worth mentioning right away that one thermostat can normally “serve” a room with an area of 12-15 m². It is installed next to the supplied wiring
It is installed next to the supplied wiring.
The cable is secured to the film using copper clamps. The degree of reliability of connections is checked using the halves of the clamps, which must be in contact with each other. Bituminous tape and silicone sealant are used to insulate the clamps.
While the sealant dries, the thermostat is installed. When using an overhead device, the cable is routed outside the wall and placed in a plastic box. If the thermostat is built-in, then a hole is hollowed out in the wall for it and grooves are made for the cable.
The temperature sensor is mounted under the film. To do this, a groove is made in the base, and the sensor itself is placed in a corrugated tube. The sensor wire is laid so that it is located directly under the tile.
The thermostat is securely attached to the wall and connected to an electrical cable. Foil tape is glued obliquely to the film. To ground the floor, one of its ends is connected to a wire.
By testing the heating system, its functionality is checked. All sections should heat up within 5-8 minutes. Using a tester, the places of film cuts and joints are checked.
Next, laying the heated floor is performed in the following sequence:
- holes are made;
- dowels are inserted into them;
- the painting mesh is attached with self-tapping screws;
- a thin and uniform primary concrete screed is created;
- the screed dries completely;
- a final check of the functioning of the heated floor is carried out;
- a fixing screed is applied;
- After it dries, tiles are laid.
Screwing in the screws when attaching the painting mesh should be done very carefully. They can damage the surface of the film or contacts, which will cause a break in the electrical circuit. After final fixation of the mesh, it is necessary to test the heated floor.
When laying film flooring, it is prohibited:
- carry out work at high humidity and air temperature below 0ºС;
- use nails as fasteners;
- connect the film without grounding;
- bend it at an angle of 90º over an area up to 5 cm long;
- install the film in close proximity to other heating devices.
To avoid mechanical damage to the film, it is recommended to carry out installation work in soft shoes. You can use infrared heated floors after about a month, when the concrete base under the tiles has completely dried.
Video on installing a film floor:
Connecting film heated floors
First you need to connect all the rows of film together. To connect, use only the clamps that came with the film. Using other clamps or improvised materials may be dangerous. All strips of film must be connected in parallel; carefully study the connection diagram in the instructions for the film. Usually manufacturers depict it very clearly.
To save wires, you should connect those sides of the rows that are closer to the thermostat. The contacts in the places where the film is cut on the opposite side of the row must be insulated with special overlays, which are included in the heated floor kit.
Connecting contacts and wires
Connecting wires and contacts
Contact crimping
The next step is to install the thermal sensor, it should be located in the center of the thermal film strip, but not too far from the thermostat. To prevent a protrusion from forming at the sensor installation site, it is necessary to cut a recess for it in the heat-insulating substrate.
A thermostat of this power is connected to 18 square meters of film (no more)
Connecting the thermostat
Connecting the thermostat
The display shows the operating mode
The final step will be to connect the thermal film and temperature sensor to the temperature controller and connect the entire system to the electrical network via a differential circuit breaker.
After the connection is completed, the heated floor must be checked in operation. Turn the heat up to full and wait a few minutes. Make sure that the floor is heated and there are no unpleasant odors of burnt plastic, as well as sparking or clicking noises.
If the heated floor has successfully passed the test, you can begin laying the protective material and finishing coating.
Connecting film floor plates to each other
In the consumer market for heating systems, film floors have become in demand. They represent one of the many options for heating rooms. The reason for the sharp increase in the popularity of these products is due to the fact that they are inexpensive, easy to assemble, reliable and safe to use. This is especially important for houses and apartments.
This heated floor operates from a standard 220 V network. The films are connected in a parallel circuit. Connections are described in the instructions for use.
In addition to thermal film, the package includes:
- Bituminous paper.
- Clamps for connecting film and network.
- Wires having a cross-section sufficient to supply the required current.
Bitumen insulation is required to cover tire cuts and open electrical contacts not used when the heater is connected to the network. The main thing is to prevent the formation of bubbles filled with air between the insulation and the tire.
The advantage of bitumen insulation is that when connected to the network, it heats up and takes on the shape of the insulated connection. This ensures maximum sealing of the joint.
A contact clip is installed at each connection point between the wires and the copper bus. Installation is carried out as follows - one side should go inside the film, the second half should remain outside, on top of the copper strip. Then crimping is performed; pliers are used for this operation. At the end of this operation, the film strips are secured with tape. This allows you to prevent their mixing when continuing further work.
The ends of the wires are connected to the clips by crimping. Each connection must be covered with bitumen paper.
Laying the finishing coating
Laying the finishing coating
The big advantage of a film heated floor is that it does not require filling with a screed. If the finishing coating is laminate or parquet, then it is enough to protect the heating elements with plastic film or a soundproofing substrate.
If the finishing coating is soft, for example, linoleum or carpet, then a layer of plywood or fiberboard should be placed on top of the thermal film. It will protect the film in case of damage to the finish coating.
Another undoubted advantage is that, if desired, you can easily dismantle the film heated floor system, for example, when moving. To do this, you just need to perform all the above steps in reverse order.
What coatings is it suitable for?
Infrared heated floors go well with virtually any type of floor covering. The film is ideal for laminate (if you use the right laminate classes), linoleum, cork, carpet, parquet. Such a heating system can also be installed under tiles, but for heating ceramics, the best option would be to use a cable heated floor. According to experts, film structures are absolutely safe when laid on a wooden base. In this case, there is a minimal likelihood of the material igniting.
The film is heated to a temperature of +50 degrees, these indicators are quite safe for wood and other surfaces. Infrared heated floors go well with linoleum, but the material in question must be laid on a pre-leveled hard surface, such as sheets of plywood or fiberboard. Next, a special heat-reflecting substrate and finishing coating are installed. A good finishing option is the use of laminate. Laminated panels are also laid on top of the substrate; they are resistant to high humidity and sudden temperature changes.
How to choose linoleum for an apartment that would also be suitable for heated floors, read the link.
Another option for flooring for film flooring is tile. Such products have high thermal conductivity, which ultimately improves the efficiency of the heating system. To increase comfort, heated floors are installed in rooms such as the kitchen, bathroom and corridor.
Details
Advantages and disadvantages
Infrared warm film flooring under laminate, like all other heating devices, has negative and positive sides. Those who have already purchased such equipment highlight many advantages of the material:
- The floor is heated evenly, which is extremely beneficial for laminate flooring.
- Infrared heated floors can be installed even in a room with a high level of humidity.
- You can install it even in open areas - balconies, verandas and gazebos.
- Even uneven surfaces do not affect the installation of equipment and will not create additional difficulties.
- Warm film floors can be laid several times, and therefore can be installed when moving, i.e. lay in a new place.
- Parallel conductor bonding makes the system very reliable.
- Low level of IR radiation.
- Not affecting changes in floor height.
But it is worth highlighting the tangible disadvantages of infrared heated floors, which include the following:
- For large rooms, electricity consumption can be quite large - it is always worth making proper calculations.
- If there is no electricity in the house, then the infrared floor will not work either - there is a big risk for those who have regular interruptions during the cold season.
- Those floors that have poor temperature control and also heat up furniture too much have become of less quality.
In general, it is worth having an infrared electric floor connected so that the system will work smoothly in the future. When purchasing equipment, it is extremely important to weigh all the advantages and disadvantages, and only then make a full decision. The connection of such a floor must be consistent and competent, and therefore if you do not have knowledge in this area, then it is better to entrust the work to specialists.
Problems with the floor
Illiterate selection and installation of a warm film type can lead to difficulties in use and interruptions in the system in the future. This may be due to the poor quality of the purchased material, improper care, or poor installation. The main thing is that before purchasing you study all the problems that may arise so that you are immediately ready to solve them.
Drying speed
The problem of rapid cooling of an infrared heated film floor after installation occurs when the electricity is often cut off. Because of this, heat quickly leaves the film, and therefore, when installing, a heat-insulating substrate is usually laid between the subfloor and the heating element. It does not allow heat to escape, but on the contrary, it will retain it.
Thermal regulator is not working well
All devices for heating floor coverings use special thermal regulators. They are important for automatically turning on and off IR heated floors. The device itself monitors when it is important to stop and resume the heat supply using specialized sensors. But in the event of a sudden and emergency power outage, problems with such equipment may arise. In certain models, thermal controllers cannot continue this operation themselves because the automatic system has stopped working. To prevent this from happening, it is best to choose floor heating devices with batteries in the thermostat.
The film under the linoleum is deteriorating
How to lay a warm film infrared floor? It's easy, and it can be done even under linoleum. But certain models of such floor coverings are very flexible and thin, and can also lead to failure of the device. Heavy pieces of furniture that will be installed on the surface, or children who are always jumping - all mechanical impacts can lead to deformation of the infrared film. It is for this reason that it is recommended to choose the densest coating that ensures the safety and reliability of the IR floor. If it is not possible to buy dense materials, then it is better to lay out the existing linoleum in 2 layers.
How to choose
A wise choice will determine how long the service life will be and whether it will be subject to mechanical damage. It is necessary to take into account not just the properties of the future floor covering, but also the room characteristics. It is worth considering the following aspects:
- The film should not contain foreign particles, stains or debris.
- You cannot buy film that delaminates.
- It is also extremely important to check the quality of the material and smooth rolled edges before purchasing.
- Make sure that the carbon layer is evenly printed.
- It is worth being able to distinguish between different types of materials - transparent for perfect gluing and matte to achieve a high level of thermal insulation.
- It is worth carefully examining the quality of insulation in the electrical wiring of a warm core floor.
It is also worth paying attention to the integrity of the infrared warm floor. If there is any damage to the material, then it is better not to buy it, because there is a high degree of probability that this heated floor can fail immediately after installation.
Installation
Laying infrared film heated floors with your own hands is done strictly according to the algorithm. This is important not only for the correct operation of the system, but also for personal safety. To get started, you should buy the following materials and tools:
- Insulating materials.
- Additional electrical cables and wires.
- Scotch.
- Thermostat.
- Pliers.
- Screwdriver.
For each type of flooring, separate installation instructions are provided. Subfloors should be prepared and, if possible, leveled. In certain cases, it is impossible to do without filling the screed to make the surface smoother and also to remove all slopes. Next, insulation is carried out, grounding is provided, and then the rest of the work is carried out. So, let's look at how to install an infrared floor for wood and tile flooring.
Tiled
Infrared film flooring under tiles also begins at the preparation stage. To begin with, the surface of the subfloors should be thoroughly cleaned of debris and dust. Afterwards it is worth installing the substrate so that the heat does not escape into the ceiling. Next, it is important to lay out a specialized mesh fabric and lay out the infrared floor itself. The elements must be fastened with specialized tape. Before connecting the warm infrared floor, you should definitely check all connections and wires, and the connection is made using terminals, and the wires are clamped to them using pliers. It is extremely important to isolate the fastening points with special tape, and then pour the self-leveling floor. After this, you can directly install the tiles. Watch the video tutorial to see how to install heated floors under tiles.
Wood effect
Infrared heated floors are often installed under wood flooring. The main thing is that it is strong enough to maintain film integrity, and also comply with installation rules and fire safety precautions. At the preparation stage, it is recommended to level the subfloors so that the infrared film lies perfectly flat on the surface.
Afterwards, the film is cut into individual components, and also laid in even sections over the total area. Due to the excellent heat retention properties of wood, additional thermal insulation is usually not needed. Afterwards, it is extremely important to install a water barrier that will not allow moisture to enter the system so that it does not fail. After all the work has been completed, the warm infrared floors are connected to a special thermostat. If the room is too large, then it is better to use several devices to avoid short circuits. After this, the installation process is considered complete. This video clearly shows how to install heated floors inside a wood house.
Connection diagram for heating elements
If you cut the film diagonally, it will be damaged. The cut points are located approximately every 18 cm. The heating film should not be closer to the wall than 10 cm.
The heating film strips are laid on the substrate one next to the other with a gap of at least 5 mm, but not more than 1 cm. The heating element cannot be bent at an angle of 90 degrees or more, as it will fail.
The places where the thermal film is cut, where the conductive busbars are cut, must be insulated with strips of bitumen insulation, which is supplied with the heated floor. To install the contact, insert it exactly in the middle of the end of the conductive busbar and press firmly with pliers.
Current-carrying wires are stripped to 5-10 mm with a sharp knife and clamped with pliers in the contact terminal. After this, the entire contact is isolated with a piece of bitumen insulation.
The connection of infrared heated floors (heating strips) is carried out in parallel with copper stranded wires with a cross-section of at least 1.5 mm2. In order for the automatic floor heating thermostat to work correctly, it is necessary to install a temperature sensor.
To do this, at a distance of 20-25 cm from the wall on which the thermostat will be installed, a puncher is used to make a groove 1-2 cm deep. A temperature sensor is placed in it under the heating film.
Note! The sensor must be placed on a heat-insulating substrate. Otherwise it will not show the true floor temperature.
After this, the thermostat is installed and connected. When it is fully installed and connected, the functionality of the IR warm film floor is checked.
All thermal films should heat up when turned on. Only after checking the functionality can you begin laying the laminate on the heating elements. A video on installing infrared heated floors can be viewed in this article.
Installation of film heated floors
1Installation of a heated floor system
The rules for selecting and installing an electric heated floor differ significantly from the selection and installation of a water heated floor.
1. Selecting a heated floor kit
The recommended temperature is 20-21oC for the room and 24-26oC for the floor. The desired temperature for the room is set by the thermostat.
For comfortable heating, the installed power for the entire area should be at least 80 W/sq. m, with the main one - 140 W/m2.
2. Determine the area and configuration of the surface on which you will lay the heated floor.
When installing a heated floor with your own hands, lay the thermal film only on the free area, i.e. on the area that is not occupied by furniture and appliances (refrigerator, stove, kitchen wall, washing machine, wardrobe, etc.). When installing heating, heated floors should be laid on 75-80% of the total area. Can only be installed in areas that need to be heated.
3. Lay down heat-reflecting material.
4. Place sheets of thermal film on heat-reflective material
Cut the thermal film into strips of the size you need.
The cutting line is marked on the thermal film (cut space) and is located every 17.4 cm. It is prohibited to cut the film along other lines. Install the contact clamps onto the strip.
The contact clip is installed on the copper strip (the smooth side of the clip should be inside the thermal film, the other side should be outside on the copper strip).
Clamp the contact clamp with pliers or a special tool. Make sure the clamp is tight and there is no sparking. Insulate the cut lines of the copper strip located at the end of the strip of thermal film, for which use short bitumen insulation from the bag.
For example, on the thermal film, contact clamps are already installed at the beginning of the strip and insulation is installed at the end of the strip. Lay out the pieces of thermal film over the area of your room so that the copper conductor is at the bottom (turned towards the heat-reflecting material). The front side of the thermal film will be the side where the carbon semiconductor strip is longer, that is, the copper conductor will be at the bottom.
The thermal film is unwound on a clean, dry and flat place. It is advisable to lay the thermal film along the length of the room, avoiding damage to it; in this case, there will be more solid strips and fewer connection points for installation wires. Thermal film strips must be secured with tape to the reflective material to prevent it from shifting during further installation of the floor covering.
5. Install the thermostat
The regulator can be installed permanently, as an electrical outlet for hidden or external wiring, or connected to an existing outlet using a cord.
6. Lay out the installation wires and determine where to strip the insulation.
7. Connect the thermal film to the wire
8. Isolate connections
Each strip of thermal film includes 5 pieces of insulation. Use 2 pieces for each connection.
One piece is attached to the outside, the other covers the inside of the thermal film and the tip with the wire. The fifth section is used to insulate the copper busbar. Thus, we obtain electrical insulation and waterproofing of the connection.
9. Connect the connecting wires to the thermostat.
10. Install and connect the floor sensor to the thermostat. The floor sensor is installed under the thermal film closer to the thermostat and is attached to the black strip of the film using tape. To level the floor under the finishing coating, make grooves (recesses) in the heat-reflective coating under the floor sensor and the wire connections.
11. Connect the thermostat to the electrical network.
12. Test the heating system.
13. Lay the finishing floor covering.
14. Installation of the heated floor is complete, turn it on and enjoy the warmth.
The heat-reflecting material is laid on the prepared and leveled floor surface. Then the sheets of material are secured with tape. After the surface is prepared, thermal film can be laid directly on it.