Tasks of screeding heated floors
To figure out how to make a screed for a heated floor, let’s define its tasks more precisely. First of all, remember that ties are fundamentally divided into tied and floating. The floating screed is not connected either to the base of the floor or to the walls of the room. If, relatively speaking, you look at a floating screed, then it is a separate, often concrete slab in the room that performs its tasks.
It is worth noting that a floating screed is the priority type of screed in the construction of a concrete heated floor.
The tasks of a floating heated floor screed include:
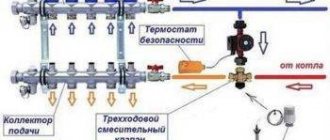
- Holding pipes or underfloor heating cables;
- Be a heat exchanger between the floor heating system and the room, ensuring uniform heating of the floor surface;
- Take on the power load of operating the premises.
It is to solve these problems that specific requirements for installing heated floor screed are aimed.
Perform power calculations for heating cables
When calculating thermal power for a cable system, the purpose of this heat supply method is taken into account. If the heating cable for a heated floor is planned to be used to provide auxiliary heating for a property, then 110-140 W will be required for each “square” of area. When the system is the main one, in this case 150 W or more is needed.
In addition, you should know the size of the area where the cable will be laid out. It should not pass under furniture, plumbing fixtures or objects located low above the floor surface. This is especially true for resistive cables, which are at risk of overheating, but for self-regulating wires there is no danger.
By subtracting the area of these zones, you can find out the actual heat supply area and the power of the entire underfloor heating system, for which the heating area is multiplied by the norm for one square meter.
Next, you should calculate the length of the floor heating cable: in the passport for this product, manufacturers indicate the power of one meter. The required footage is determined by dividing the total power by the cable capacity. For example, the result of calculations was 93 meters.
You need to purchase several bays, the total length of which is close to the calculated value. It should be remembered: if there are extra meters of cable left, they cannot be cut off, since there are couplings at their ends, secured using special equipment.
You can make something similar yourself, but the service life instead of 10 - 20 years will be several years, and sometimes months. Therefore, the cable is laid along its entire length.
Requirements for a heated floor screed
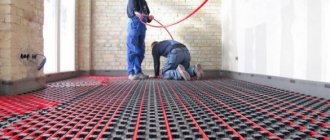
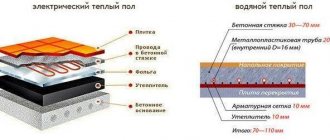
This is the time to remember about the types of heated floors. Fundamentally, there are two types of underfloor heating: water and electric. In a water heated floor, heat is transferred to the screed from the water circulating through the system. In an electric heated floor, heat is obtained from heating special heating cables laid in the floor.
Note: When we talk about heated floor screed, we mean only water heated floors and cable electric heated floors.
Covering electric heated mats with screed is not required. Also, a screed is not required for TP (warm floor) flooring systems used in wooden houses and in houses with floors on joists.
Types of water heated floors
The design of the water floor is divided into two types: concrete and flooring. The concrete system involves pouring a screed. The flooring system is used without pouring and can be installed in wooden houses. The key element is an aluminum or galvanized plate with a recess in the middle. The pipe fits securely into the groove, and the side wings dissipate heat instead of a screed.
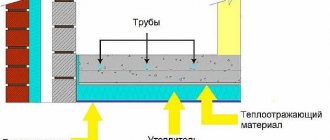
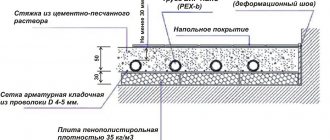
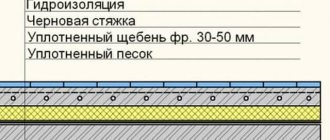
In general, your floor pie will be multi-layered:
- Subfloor, concrete or wood.
- Waterproofing. This includes the installation of a damper tape, which will protect the joints of the walls with the base and provide a technological gap.
- A layer of thermal insulation.
- Water floor design.
- Concrete screed, if necessary.
- Clean floor covering.
Forming the right pie
It should be noted that the word “screed” refers to a concrete layer. The arrangement is carried out using two methods:
- Using a cement-sand mixture M150 or another similar one, to which PVA glue is added in the following proportions - 1 kg = 1 bag;
- The second method is to use ready-made mixtures specially produced for the described system, which are found in a wide variety in construction stores.
As a rule, the system is mounted directly on the old coating, but a heat insulator is placed on top - a foil plug or polystyrene foam. A heat-insulating layer must be present when installing a heated floor, and it does not matter what it will be, water or electric. There are two installation options:
- Vertical - along the walls at the base of the floor. The thermal insulation material here can be a special damper tape or polystyrene sheets (15–20 cm wide, 1 cm thick);
- Horizontal - on top of the concrete base, next to the vertical insulation. Thermal insulation material is selected with a thickness of 2 cm, resistant to temperature influences and quite durable.
The system, if desired, is installed in the bathroom or any other room with a high level of moisture. But in this case, it will be necessary to lay an additional waterproofing layer on top of the thermal insulation. This is necessary to prevent moisture from penetrating into the lower part of the floor. This is especially true for apartments, which will prevent possible problems with neighbors.
Next, heating mats, cables or other selected systems are installed. Finishing work - arrangement of concrete screed. The output is a finished “pie”, where concrete is laid on top of a relatively soft material.
Of course, such a design cannot be strong enough. Therefore, a hole is made for every square meter of thermal insulation area. Another nuance is that 10–15 cm of free space is left along the entire perimeter of the floor. This is done so that the upper tie rests against the lower one, which is convenient if work is carried out in cramped conditions. By the way, the thermal insulation included in the system acts as sound insulation.
The system itself may vary in functionality and features, but the recommended thickness of the screed for an electric heated floor is 3–5 cm. This is enough for the system not only to warm up quickly, but also effectively after it is started (warm areas will not alternate with cold ones ).
Important! If, due to circumstances, it is necessary to equip a screed with a thickness of less than 3 cm, a universal plasticizer is additionally added to the solution. For 100 kg of dry mixture, 1 liter of substance is added. As an alternative, self-leveling mixtures are also used. As a result, the screed becomes more elastic.
Laying heated floors
The best way to install an electric heated floor depends on the type of heating elements. For any underfloor heating, it is important to ensure that the heating elements do not touch the insulation. To do this, they are separated from it by reinforcing mesh.
Cabling
The location of the thermostat is selected. It is mounted at a height of more than 30 cm from the floor. If the device is a hidden type, grooves are made in the wall for it, as well as for the power and temperature sensor wires. Thermostats are not installed in places with high humidity. They are taken to adjacent rooms.
Mounting tape is attached to the base at intervals of 50-100 cm and at a distance of 30 cm from the walls. Markings are made on the floor, taking into account the distances from the furniture. The distance from the walls is 10 cm, and from pipes and radiators - 15 cm. Then the heating cable is connected to the power cable using a coupling, and then attached to the mounting tape.
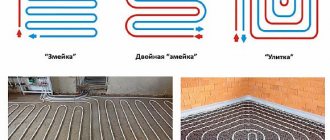
The power cable is routed through a groove prepared in the wall to the thermostat, and the heating cable is laid according to the diagram. In this case, the radius at the bends should not be less than 5 cm. The bends are made smooth, without unnecessary tension. Fixation is done with staples or mounting tape. Contacting or crossing of turns is not allowed. The convergence should not be less than 8 cm. All indents are strictly observed according to the scheme, which is developed in advance.
Laying cable heated floors with indentations
The temperature sensor fits freely inside the corrugated pipe along with the supply wires. The corrugation at one end is hermetically sealed with a plug to prevent cement mortar from getting inside. The pipe with the temperature sensor is located between the turns of the cable at a distance of at least 50 cm from the wall and is placed in the prepared groove, after which the wires are connected to the thermostat.
After installation and connections, the electrical resistance of the heating cable and sensor is checked. The values must differ from the passport values by less than 10%.
The grooves are sealed with mortar or putty, and after hardening, the functionality of the heated floor system is checked.
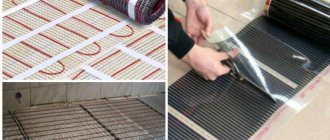
Laying the heating mat
Heating mats are easier to install because the cable is already attached to a mesh base, which only needs to be spread on the base. At turning points, the mesh is carefully cut without compromising the integrity of the cable. Where obstacles are located, the mesh is removed and the cable is laid maintaining a distance of 6-8 cm from adjacent turns.
Rotating the heating mat during installation
An important advantage of the heating mat is its small thickness, which makes it possible to pour a thin screed or lay heating elements in a layer of tile adhesive. Then the thickness of the fill will be only 8-10 cm, which will allow you not to take up excess space in the room.
Combining cable heated floors with coatings
Most often, electric cable heated flooring is used for laying under ceramic tiles, but it can also be installed under the following types of floor coverings:
- Laminate;
- Linoleum;
- Wooden floor.
Any tile can be selected and installed. And when combined with other coatings, it is necessary to provide special layers of insulation or choose a coating with markings indicating the possibility of combination with underfloor heating systems.
Cable underfloor heating can be laid under almost any floor covering
Resistive cable floors should not be covered with carpets. The self-regulating version of the electric floor does not have this drawback.
What is the thickness of the screed above the electric floor?
Experts' opinions on this matter may vary. Therefore, it is best to refer to the recommendations of underfloor heating manufacturers. According to the instructions given in the operating instructions, the minimum layer of screed should be 4-5 cm.
But the thickness may vary depending on several factors:
- Cable thickness.
- Floor type.
- Screed mortar used.
Thus, heating mats are laid out on the floor surface, after which they are immediately covered with floor covering. The cable in mats is attached to a reinforcing mesh. The design allows you to lay tiles using an adhesive composition without a screed.
The larger the volume of the cable, the greater the thickness of the concrete screed. To determine the minimum parameters, you should refer to the operating instructions. The minimum thickness of the screed over a warm electric floor cannot be less than 4 cm for cement mortar and 2 cm for special leveling mixtures.
The total height of the screed for an electric heated floor is from 5 to 8 cm. Provided that the installation is carried out on a flat base, the thickness of the cake can be reduced to 4 cm. Heating mats together with the floor covering reduce the height of the room by no more than 2 cm.
Compositions and types of screed
A concrete screed for an electric heated floor will turn out to be of high quality if you select the correct proportions of materials and mix them thoroughly.
Cement and sand alone are not enough to prepare a screed. It requires plasticizers and additives that increase the plasticity and uniformity of the mass.
Dry screed
Advantages of dry screed over wet screed:
- no special equipment is required: mixers, containers for solution, etc.;
- less effort is spent on delivering the material;
- speed of work completion (in 1-2 days);
- there is no need to wait for the screed to mature;
- the possibility of stage-by-stage installation of heated floors divided into zones;
- absence of dirt and excess moisture;
- low specific gravity of the screed;
- the floor acquires sound absorption and thermal insulation properties without the use of special materials, the price of which is sometimes high;
- the possibility of laying communications in the thickness of the material;
- the surface is smooth and ready for finishing floor coverings.
With all the advantages, the coating is quite light and durable. It will not withstand the load from an interior partition made of gypsum boards or bricks, but frame structures made of plasterboard can be installed on it.
Dry screed is not used in the following cases:
- if there is a slope in the room;
- in the presence of large dynamic loads (vibration effects or high intensity of human flow);
- in rooms with high humidity or the possibility of water spills on the floor;
- in cramped spaces where it is not possible to compact and level the composition efficiently.
When preparing dry screed, the following materials are used:
- Waterproofing film.
- Damper tape around the perimeter to compensate for temperature deformation.
- Dry backfill made of fine gravel, expanded clay, slag pumice, perlite. Instead, high-density insulation boards can be used, for example, extruded polystyrene foam, etc.
- The top layer is sheets of moisture-resistant plywood, asbestos cement, chipboard, OSB. They are also used for large thicknesses. The best option is to use waterproof gypsum fiber sheets that are suitable for any floor finish.
Manufacturers of building materials produce special complete and balanced dry floor systems. A whole line of Knayf dry screeds is produced for different types of premises. Among them, two-layer gypsum fiber boards with the possibility of assembly with locks are popular. For housing, “Vega” compositions are produced based on small expanded clay screenings in bags and other components.
When using industrial waste, for example, solid expanded clay or slag, for dry screed, the fraction size should not exceed 5 mm. Otherwise, the floor will begin to sag and creak.
The thickness of the backfill must be more than 30 mm, otherwise the required quality cannot be achieved. If the upper limit is higher than 60 mm, intermediate spacer sheets will be required. The top of the screed is additionally covered with a sheet covering, the thickness of which is about 20 mm.
The base for backfilling must be level.
Semi-dry screed
The screed is a cement-sand mixture with the addition of fiber fiber and plasticizers, but with a low water content. A distinctive feature is the large layer thickness of 70-100 mm. If the thickness is less, the layer may crack.
The advantages of semi-dry screed are its heat and sound insulation properties due to its porous structure.
The disadvantage is the need to use construction equipment, but in small rooms the screed can be laid manually.
The ratio of components, which include cement, sand and water, is 1:3:0.4, respectively. Fiber fiber is added to them in an amount of 600-800 g/m3.
The screed is laid using beacons, similar to the wet method. A special machine is used for grouting, which can be rented. It is difficult to compact the screed manually.
Seal semi-dry screed
Wet screed
A screed is a layer of mortar or concrete applied to the surface of the base.
It is laid in several layers, the functions of which differ:
- Leveling the base. The first layer is always used for uneven surfaces. It is necessary even when a dry screed is placed on top.
- A layer on top of thermal insulation for laying heating elements. If the cable touches the insulation, it may overheat at this point.
- The third layer covers the heated floor, evens out the temperature field and holds the floor covering in place. It is often combined with a second layer, if the thermal insulation is covered with a waterproofing film on top.
In all cases, it is advisable to reinforce the layers to prevent them from cracking and maintain the integrity of the heated floor. At the same time, the thickness of the floor increases significantly, which leads to a decrease in the height of the premises. It can be reduced through the use of leveling compounds.
The classic screed is cement-sand. But the composition is not limited to just two components. Plasticizers are added to it, as well as crushed stone or expanded clay. A mixture of 3 parts sand, 1 part cement and PVA glue, added in an amount of 1 kg per bag of cement, works well.
Cement-sand screed for heated floors
When using ready-made mixtures, high quality screed is achieved. Each composition has its own preparation instructions.
Any heated floor must be installed on a flat surface. To obtain a level base, a regular cement-sand mortar is used, and leveling compounds are most often placed under the finishing coating. Their cost is high, but the filling is perfect.
The thickness of the tie depends on the diameter of the cable and is 3-5 cm. If it is made smaller, the required strength of the slab and uniform heating will not be ensured.
When cracks appear in the screed, the reliability of the heated floor decreases sharply. Due to the violation of the integrity of the layer, the heating of the floor becomes uneven. Areas with high temperatures appear, as a result of which the cable overheats and its service life is reduced.
The technology for laying the screed must be performed correctly. The strength of the cement takes 4 weeks; no work can be carried out during this period. It is important to ensure uniform fixation of the layer. To do this, cover it with film and keep the surface damp.
The main screed is installed after leveling the base and laying the cable. First, a damper tape 10 cm wide is rolled out along the perimeter of the walls from below and secured with tape in places adjacent to the subfloor. It is also placed in places of transition to other rooms.
Screed composition
The classic screed is a cement-sand mixture.
When preparing the solution, the recommended proportions must be observed. This is a mandatory rule if you need to get a strong coating. But it is not always possible to achieve high quality using sand and cement alone. Plasticizers are often used for this. These are special additives that increase the quality characteristics of the solution. Thanks to them, homogeneity of the composition, the necessary plasticity and rapid removal of liquid are achieved.
If we consider the mixture from the side of the presence of liquid, then screeds can be divided into several types:
- Dry type of mixture . This mixture does not contain water. Expanded clay from small fractions is used as a filler. To avoid damaging the heated floor, fiberboard is laid on it. But this installation method is rarely used to cover heating elements.
- Semi-dry type of mixture . When choosing such a screed, you need to use a minimum of water. Often the quality of the composition is increased by adding fiber fiber. Installation of heated floors under this type of screed is carried out only for infrared heating and heating cables.
- Liquid type of mixture . This is the most common type of concrete mix. It ensures maximum homogeneity of the base. This is achieved by completely filling all voids in the screed.
The cement-sand mixture performs several functions. First of all, it is used to protect heating from excessive mechanical load. The screed plays the role of a heat accumulator. First, the heating elements generate energy, which is transferred to the concrete surface. Next, the heat enters the room, warming the air. Therefore, a concrete screed is a kind of distribution heat exchanger.
Electric heated floor in a screed: how much cable is needed
The main parameters of the cable, thanks to which the required quantity can be calculated, are the length and the pitch between adjacent loops. These are two values that are calculated based on the laying area S. Other quantities:
- Qs is the amount of thermal energy for heating;
- Qkb - specific thermal power per 1 m of cable length (specific thermal power must be indicated in the technical documentation).
S is calculated after measuring, calculating and summing up the areas of the sections where the cable will be laid. The required cable length is calculated by the formula: L = S × Qs / Qkb. After calculating the length, you can determine the distance between the parallel loops and the cable laying pitch - N = 100 × S / L. where S is the area, L is the cable length.
By the way! When calculating the required amount of cable, it is important to understand that it cannot be laid under stationary pieces of furniture. You also need to leave 50 cm from furniture and walls, and 100 cm from heating devices (convector, heating risers, radiators).
If the subfloor is cold and the heating system is installed as the main one, then the cable should ideally cover 70-75% of the total area of the room. The cable is sold in standard lengths with already installed couplings (connection and end). This means that it is enough to select the optimal cable length for a particular model range. If the room is too large, then the estimated length may be higher. You can also divide the base of the floor in half and make your own cable calculations for each part, taking into account the area of the room, equipping each circuit with its own thermostat during installation.
Reference! Before installing a cable heated floor under the tiles, it is recommended to make the necessary accurate calculations. First, draw a diagram of the cable layout, then, to scale and on the basis, do the laying.
Calculation of the required power of an electric heated floor
Calculations of the required power of a cable floor for a specific room are made taking into account the presence of a heating system. Given that heated floors are only an auxiliary heating system, 100-140 W are required to heat 1 m2. If a cable floor is the only way to heat a room, then its power should be at least 150 W per m2.
Table of recommended power of electric underfloor heating installed per 1 m2 of area with additional heating
To make the final calculation, you need to multiply the area required for heating by the given power. At the same time, the heating area does not need to include the spaces occupied by pieces of furniture.
Laying area - the area of the room minus the area occupied by furniture or other household items.
In order to reduce the required power consumption, it is necessary to carry out high-quality thermal insulation of the floor.
Electric heated floor screed: step-by-step installation instructions
The electrical system is installed layer by layer. First, an electrical cable is laid along the floor, then a layer of waterproofing using a coating composition or rolled material. The concrete screed will expand when heated, so last of all, tape material (damper) is laid around the entire perimeter of the room. Step-by-step steps for laying heated cable floors under tiles:
- We cut out a socket for mounting the socket box in the selected area. Why use a special crown to make a hole with a distance from the floor of 300mm. The nest should not be covered by nearby large household appliances and furniture. Typically the thermostat is mounted near the light switch.
- We cut the groove for laying the corrugated tube and installation wires with a rectangular cross-section of 20 × 20 mm, starting from the finished socket and down to the floor level.
- We fix 3 clamps in the groove in order to collect the tube and wires into one solid bundle.
- We clean the surface of the rough base from debris and dust to create good adhesion with the future screed after pouring the solution.
- We lay rolled foil insulation directly with the foil side facing out over the entire floor area for additional thermal insulation and reflection of heat flow.
- We lay the insulation sheets and adjacent strips tightly butt to each other.
- We glue the resulting seam with metallized tape.
- We lay out the mounting tapes on the floor. We fix it with self-tapping screws, but maintaining a distance between adjacent parallel strips of 500-1000 mm. If there is a layer of waterproofing near the surface of the floor base, it is not recommended to screw in screws or drill holes for dowels. It is better to cover the floor with fiberglass reinforcing mesh, which will serve as additional reinforcement for the screed and make it easier to lay out and tie up cables.
- We begin laying out the cable according to the diagram. We fix the connecting couplings. The first fixation is with mounting film, preventing the tension from intersecting with the rest of the cable. The cold end of the cable should reach the thermostat. Moreover, it can be placed along the wall, laid between the wall and foil insulation.
- We lay the cable loops according to the drawings and the calculated pitch so that the bendable antennae or special fastenings on the mounting strips ensure reliable fixation.
- We fix the cable in the area of the end coupling.
- We insert the temperature sensor with the signal wire into the corrugated tube. The head of the temperature sensor must reach the end of the tube corrugation.
- We close the holes in the tube with a cap to prevent concrete mortar from getting inside during subsequent work.
- We install the tube with the temperature sensor approximately in the middle between the turns of the heating cable and secure it.
- We lay a vertical groove, starting from the corner between the floor and the wall. The distance of the sensor from the wall should be approximately 500 mm.
- We place the installation cold end of the cable in the groove. You can also place wires for power supply there.
- We seal the groove with a putty mixture or cement-sand mortar.
- We check the conductivity of the circuit and the resistance levels of the laid cable, which must fully comply with the passport data.
- We connect the installation conductors of the heating cable to the terminals, according to the thermostat . Next - to the 220V network. The main thing is to tin the cleaned ends of the insulation cable before switching.
- We check the system in operation before cutting windows (50x200 mm) between the turns of the cable in the foil insulation.
- To ensure contact of the future screed with the base, we glue the joints of the floor and walls with elastic damper tape along the entire perimeter of the room.
- We install a system of profile metal beacons.
- Fill the top of the laid cable with concrete mortar. We distribute and level, preventing the formation of air cavities that can reduce the efficiency of the heated floor or lead to overheating of the cable.
- We wait for the screed to harden and gain strength, keeping it for about 7 days, moistening with water after 3-4 days and covering with plastic wrap.
- After about a week, you can begin priming the surface and laying ceramic tiles.
Feature of a floor without screed
Based on practice, electric heated floors without screed are real. When installing the cable, grooves up to 2 cm deep are made in the base where the wires will run. All that is required is pouring a solution that contains fiberglass or installing a tile floor.
Heating elements do not require screed if the work is carried out using special mats or infrared strips. This is the simplest option, down to the usual laying of the material and connecting the system to an outlet. Of course, the procedure is somewhat more complicated, but still simpler when compared with arranging a screed.
Final pouring of the screed
Before final pouring of the solution, you need to make sure that the cables are working properly. To do this, take a tester and measure the resistance. This parameter must match the data in the passport. Permissible deviation is maximum 10%.
When everything is in order with the heating elements, you can start pouring the screed. If thermal insulation was not installed, and the installation was carried out directly on the subfloor, then the height of the solution can be 3 centimeters.
If there is insulation, the concrete layer must be at least 6 centimeters. Only with such a thickness of the screed is it possible to ensure the required rigidity of the floor covering. The height can be made smaller provided that hard finishing materials are laid - parquet boards, laminate, etc.
After leveling the concrete layer, it is left for at least 4 weeks. Only then do they begin to connect the cables to the thermostat. It has clamps to which the heating conductors are first connected, and then the power wires. The electric heated floor is ready and all that remains is to install the floor covering.
To lay a cable for a heated floor with your own hands, you need to have the appropriate knowledge and skills, otherwise the best solution would be to contact specialists who provide this type of service.
Which screed to choose for pouring
In addition to the traditional sand-cement composition, there are other types of screed recommended for pouring heated floors.
Each of the existing options has its own advantages:
- Wet screed. For preparation, take cement, sand and plasticizer. Be sure to add fiber fiber to avoid the appearance of cracks and deformation during the drying process and during operation. The advantage of the solution is that you can make it yourself. The components are inexpensive, which somewhat reduces the final cost of the work. The disadvantage of a wet screed is that the floor takes a long time to dry (28 days), there is a high probability of cracks, and the inability to make a perfectly level base.
- Semi-dry screed method. A small amount of water is used for production. Ready-made mixtures are popular. But if necessary, you can prepare the solution yourself, based on the calculation: river sand 120-140 l/fiber fiber 130g/cement 1 m/water 14-17 l. /plasticizer 0.5 l. The advantage of the semi-dry composition is the complete absence of cracks in the screed after drying. There is no need for additional leveling of the floors after drying.
- Dry method. The composition of the screed mortar may vary depending on the manufacturer, but most often fine perlite or quartz sand, fine-grained slag, etc. are used. The advantages of the dry method include: quick installation and drying. Further work can begin after 12 hours.
The tie must be done carefully to prevent possible damage to the cable. The rupture of protective insulation or conductive conductor during floor pouring is the most common cause of floor failure.
How to reinforce the screed
In order for the installation of the heating cable into the screed to be successful, it is imperative to prevent deformation and cracking of the floor during the drying process. Cracks cause the appearance of cold zones and uneven distribution of heat over the entire surface of the slab.
What methods of screed reinforcement exist?
- Additives. When preparing the solution, it is important to use fiberglass. This is a special additive based on polypropylene. After adding fiber fiber to the solution, the strength characteristics increase several times: resistance to mechanical damage, cracking, settling and spreading of the mixture. At the same time, frost resistance and fire resistance increases.
- Reinforcing mesh. Recommendations for pouring screeds for heated floors indicate the need to use a plastic reinforcing layer. The manufacturer additionally provides special stands to raise the mesh above the floor.
In large rooms, cracking of the floor may occur due to the lack of compensation pockets. Therefore, a mandatory measure is to install a compensating damper tape along the walls, as well as between sections of the slab.
How to pour screed correctly
The technology for pouring screeds for electric heated floors is practically no different from that used when installing a conventional cement base. After completing the preparatory work and laying out the cable for further installation in the concrete screed, proceed to the following steps:
- Display of beacons. The surface must be extremely flat. In this regard, the step between the beacons is no more than 0.8 m. Although you can find recommendations that the distance between the beacon level should depend on the length of the rule, practice shows that the longer the step, the more irregularities appear during the stretching of the solution. Initially, we place the beacons along the edges of the room, so that there is 10-15 cm left to the wall running parallel to the plank. The fishing line is stretched, the rest of the guides are positioned under it. If the recommendations are followed, the result is a perfectly flat surface, leveled along the beacons, even when using ordinary cement-sand mortar.
- Filling the screed. After the solution used to attach the beacons has dried, you can begin pouring the screed. If the floor thickness exceeds 5 cm, the work is carried out in several stages. First, apply the first layer of 2-3 cm. A day later, the second, finishing layer is pulled along the beacons. It is important to ensure that the rule does not scrape excess solution from the surface and that pits do not form after drying.
- Drying the solution. Care should be taken to ensure that the room is not exposed to direct sunlight. The screed is covered with film and watered at regular intervals during the first 5-7 days.
Warm floors built into the screed can be turned on no earlier than 28 days after pouring the solution. According to SNiP, at the same time you can begin laying the flooring.
How to make an electric heated floor without screed
It is possible to lay the underfloor heating cable without a screed. The following two methods are popular:
- Grooving screeds for underfloor heating cables. Grooves about 2 cm deep are cut into the slab or concrete screed. To prevent a lot of dust, use a special tool with dust collection bags. The cable is laid in grooves. The top is laid with a mortar with the addition of fiberglass or an adhesive composition for tiles.
- Laying heating mats - this method is also popular due to the ease of installation work. The design of the mats is quite simple. To connect, you need to spread them over the surface and plug them into a power outlet.
Many nuances and features that must be taken into account when installing an electric heated floor in a screed lead to the fact that more and more buyers prefer heating mats.
Requirements for the screed
A number of requirements are set for the concrete mixture, although there is no regulatory documentation. The installer must adhere to the following rules:
- Installing heated floors under a screed involves using a flat surface. If there is a slight slope, it should be removed with a self-leveling mixture. If this recommendation is not followed, then electric heating will not evenly warm the coating, and, accordingly, the room.
- The thickness of concrete when pouring heating elements should not exceed 5 cm. An optimal layer of screed will allow the heating device to quickly warm up the surface. Moreover, this thickness is sufficient to ensure high strength of the coating.
- Before continuing to work with the structure, you need to wait until the screed has completely dried. Cement mortars gain strength within 4 weeks. During this period, you should refrain from any work indoors.
- The installer must use only high-quality materials and tools. The correct approach will prevent the appearance of cracks. They should be feared for two reasons: lack of uniform heating of the plane; the appearance of local areas with overheating.
Risk of cracks
When using the traditional wet type of screed, it is very important to prevent cracks from occurring. Their appearance can lead to many negative consequences:
- It will become impossible to uniformly warm the room, which will negate the advantages of a modern heating system;
- uneven heating of floor areas will lead to overheating of individual thermal elements and their subsequent failure;
- The finishing floor covering may be damaged.
To prevent the occurrence of cracks when making screeds with your own hands, you must:
- correctly observe the proportions of the solution, as well as the drying mode;
- use plasticizers to increase the elasticity of the composition;
- strengthen the structure with reinforcement or reinforcing mesh;
- install a damper between the wall and the screed.
Damper tape or low-density foam can be used as a damper. Its main task is to compensate for the expansion and contraction of the material as a result of temperature changes.