Warm floors have long won the palm from floor radiators and bulky heating systems. The main difficulty in laying coatings lies in the correct design of pipe placement and the optimally chosen step.
Step of laying a water heated floor
- 5.1 Video - Warm floor "Valtek". Installation instructions
- 6.1 Video - Step of laying a water-heated floor
Advantages of heated floors
A well-installed heating system can bring comfort to your home, creating favorable living conditions and an ideal temperature field. The advantages of heated floors include:
- accessibility - selection of materials and installation method can be carried out in any price category;
- comfort – installation of a floor heating system helps create proper circulation of warm flows;
- safety – the coating is absolutely safe to use;
- hygiene - unlike standard heating systems, a large number of dust and dirt particles do not rise upward from heated floors along with heated air;
- profitability - double savings when using heated floors include waste-free installation of materials and conservation of resources while uniformly heating the space;
- strength – with proper installation work, water floors are a strong and durable system with a long service life;
- self-regulation - heating the air to a certain temperature, the heated floor continues to maintain the set mode without intervention from the user.
Warm water floor
As practice shows, it is possible to insulate floors by installing a water system in any living space where heat loss does not exceed 69-80 W/m². For buildings with an indicator of 80 to 102 W/m², the installation of a water floor is accompanied by the laying of a top concrete covering.
Laying a warm water floor
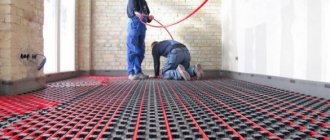
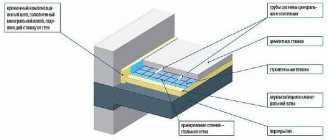
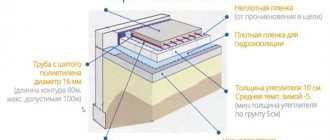
Most often, when laying a warm water floor, concrete pouring is used. With this method, the pipeline will be located in cement mortar, which in turn will contribute to high-quality fastening of the pipes and their protection. Installation of heated floors is carried out in several stages.
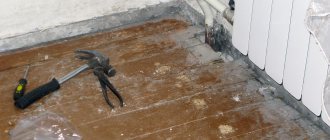
Preparation of the red floor
If the base of the room has an uneven surface, holes or cracks, then it must be carefully leveled. To do this, after removing debris, dirt and dust, a concrete screed is poured.
Laying waterproofing
Many people at this stage of installing a heated floor make the mistake of considering waterproofing to be an unimportant element in the design. However, according to the recommendations of experienced specialists, a waterproofing layer must be installed, since it plays an important role in protecting the insulation from the concrete screed.
Installation of insulation
Insulation is one of the important stages in laying a warm water floor, since it is what prevents heat loss, which is spent on the ground under the building and in the basement. The most common insulation materials are:
- EPPS. This expanded polystyrene is valued for its noise-insulating and moisture-resistant properties, low thermal conductivity and long service life.
- PPP. These profile mats are very easy to use. They have special protrusions on the surface for attaching pipes, so you can significantly save time during installation. But it is worth noting here that they have a very high price.
The thickness of insulation for laying a warm water floor should be determined by the type of base of the room and the weather conditions of the region.
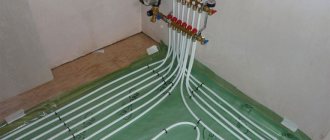
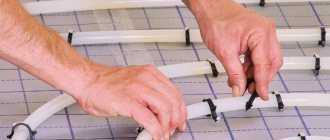
Pipe laying
Before you begin laying the pipeline, you must use a marker to apply a diagram of the direction of the pipes to the base of the prepared room, taking into account their pitch, thickness and angles of rotation.
The sequence of laying the contours is carried out in the following order:
- 10 meters of pipeline are unrolled from the bay.
- A corrugation with a fitting is put on the end of the pipe and connected to the manifold.
- According to the marked diagram, the pipe is simultaneously unwound, laid and fixed.
- Having gone all the way, the pipe is brought to the collector.
- Having noted the distance, the pipe is cut and connected to the collector.
This installation principle is suitable for all types of water heating system circuits. Along with this work, you can simultaneously attach a damper tape, which will prevent deformation of the screed and walls.
Pouring cement mortar
Before you start pouring a concrete screed, you need to check the operation of water-heated floors and the presence of air in the pipes. After all the pressure testing of the system has been checked, beacons are installed based on the height of the floor and the screed is poured. The quality of the screed will depend on the concrete mixture. It should include:
- reinforced fiber;
- plasticizers.
In this case, the screed will be movable when drying, and after drying it will have high strength.
Pipe selection
An important point in installing heated floors is the choice of pipes. Therefore, it is best to give preference to products from a manufacturer that provides a guarantee for its product for more than 30 years and undertakes to pay compensation or fully reimburse the cost of the material in case of defects, malfunctions or other problems.
| Name | Size. Size numbers - outer diameter, wall thickness of a metal-plastic pipe | price, rub. The price shown is per linear meter |
| METAL-PLASTIC (METAL-POLYMER) PIPE VALTEC PEX-AL-PEX | 16 X 2.0 mm, 100 m 16 X 2.0 mm, 200 m | 55 |
| METAL-PLASTIC (METAL-POLYMER) PIPE VALTEC PEX-AL-PEX | 20 x 2.0 mm, 100 m | 83 |
| METAL-PLASTIC (METAL-POLYMER) PIPE VALTEC PEX-AL-PEX | 26 x 3.0 mm, 50 m | 145 |
| METAL-PLASTIC (METAL-POLYMER) PIPE VALTEC PEX-AL-PEX | 32 x 3.0 mm, 50 m | 215 |
| METAL-PLASTIC (METAL-POLYMER) PIPE VALTEC PEX-AL-PEX | 40 x 3.5 mm, 25 m | 575 |
| PEX-EVOH XL POLYETHYLENE PIPE | 16 x 2.0 mm, 200 m 16 x 2.0 mm, 100 m | 50 |
| PEX-EVOH XL POLYETHYLENE PIPE | 20 x 2.0 mm, 100 m | 69 |
Pipe for underfloor heating UPONOR
During installation, pipe bending can vary from 45 to 90°C, which can complicate the process of laying the material. The following requirements apply to the heating main:
- strength;
- wear resistance;
- durability;
- sufficient heat transfer;
- low thermal expansion rate;
- neutral to water;
- ability to withstand temperatures up to 120°C.
Laying a metal-plastic pipe
The most popular materials for coolants:
- metal-plastic;
- polyethylene.
Important point! The “ideal” pipe is not subject to cracks and can be installed at ambient temperatures from +5°C and above; it combines a small outer diameter, which can range from 9 to 22 mm, and a sufficient internal cross-section, providing good throughput, since the large cross-section partially relieves the load on the hydraulic pump.
Polyethylene underfloor heating pipes
How to calculate the distance between underfloor heating pipes: formula, installation diagram + do-it-yourself installation
The most comfortable and most economical way to heat your home is to install heated floors. This method retains a significant amount of heat - up to 20-30% with a ceiling height of about 2.5 m and up to 50% with higher ceilings (3.5 m and above). But a water heated floor is a rather complex engineering system; its design requires certain knowledge.
I welcome my regular reader and bring to his attention an article about what is the optimal distance between underfloor heating pipes and what factors it depends on.
There are many advantages to heating a house using underfloor heating:
- The entire room is heated, and in the most physiologically comfortable way - it’s warmer downstairs, cooler at head level.
- There is no strong convection, heat does not rise to the ceiling and is not wasted, so this heating is more economical.
- Dust and dirt do not collect on heating devices.
- Devices and communications do not take up space, curtains and furniture do not block the heated floor structure and do not interfere with its operation.
But comfortable heating is achieved only with proper installation and adjustment of the heating system. One of the main factors determining the power of a heated floor is the distance between the heating pipes.
Material consumption
The amount of material required directly depends on the choice of the method of arrangement and pitch of pipes within one circuit.
The design of the installation scheme for materials is carried out so that the heating circuit covers the maximum area, taking into account a distance from the walls of 25-30 cm. At the same time, areas of the floor on which heavy furniture and bulky objects are expected to be placed, a fireplace, a bathtub, large household appliances, kitchens and living rooms sets, built-in wardrobes, etc. not heated.
pipe for heated floor
Calculation of a heated floor system
Surfaces over 40 m² are equipped with at least two working circuits, often using the “double snake” pipe arrangement method.
To calculate the approximate length of the material you need to use the formula:
D=S/M˟k
Where:
- D – pipe length;
- S – heated floor surface;
- M – step;
- k is a reserve indicator located in the range of 1.1-1.4.
| Pitch, mm | Pipe consumption per 1 m², m |
| 100-120 | 10-10,5 |
| 150-180 | 6,7-7,2 |
| 200-220 | 5,0-6,1 |
| 250-270 | 4,0-4,8 |
| 300-350 | 3,4-3,9 |
Heated floor mats equipped with bosses will help you accurately measure the laying step
The permissible length of the coolant is directly dependent on the outer diameter:
- for a pipe with a cross-section of 20 mm, the maximum length is 120-125 m;
- a diameter of 18-19 mm determines the length of the heating main 120-122 m;
- 16-17 mm pipe allows a maximum contour of 100-102 m.
If the pipe length exceeds the recommended value, then there is a possibility of obstructed water circulation, which means poor performance of a certain section of the circuit. In this case, it is recommended to lay two heating mains instead of one.
Regardless of the chosen installation scheme, the pipe section in the heating circuit must be solid, without overlaps, joints or damage. Since in an unforeseen situation it will be impossible to turn off part of the system, and dismantling the floor covering in order to find and eliminate leaks and problems will be labor-intensive and costly.
Video - How to calculate a warm water floor
How to correctly calculate before installation?
To calculate the pipe pitch, take into account the following parameters:
- Coverage area . The space that is not occupied by built-in furniture, kitchen appliances, a bathtub or shower stall and other objects under which it makes no sense to heat the floor is calculated.
- The coolant temperature is usually from 30 to 60 degrees. It should also be taken into account that the floor screed or the coating laid on top of it leads to heat absorption, so the base itself usually does not warm up above 35 degrees.
- Type of coverage . Some of them (for example, parquet) do not tolerate too high temperatures, so the step must be taken less frequently.
- Heat dissipation power . The smaller the step, the higher it is. It is necessary to calculate the heat transfer power, taking into account the required temperature in the room and heat loss when heating the room (on external walls, windows, front door, door to a loggia or balcony, etc.).
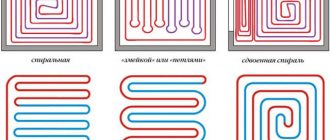
Installation methods must be taken into account. Basic:
- Snail (spiral, shell) . The tube is laid along the walls with a large pitch, then brought closer to the center of the room, and spread in the opposite direction so that the output pipe passes between the turns of the input spiral.
- Double helix . The room is divided into two zones, each of which has its own spiral contour.
- Snake . Here the pipe is simply laid so that it runs in a zigzag (more precisely, a snake) from entrance to exit. The easiest way to plan, but also the most ineffective heating method: the last steps of the snake will be too cold.
- Double snake . It is similar to a regular one, but the return part is laid parallel to the input part.
When calculating the step, you need to consider the following:
- When using a spiral or double helix, it must be taken into account that half of the pipes in the circuit will be return. Therefore, we must proceed from the fact that those pipes that go directly from the entrance will be seriously heated.
- With a snake, the shorter the distance, the better.
- With a double snake, the calculation will be the same as with a spiral.
Pipe laying options
The consumption of materials and the amount of heat in the room depend on the installation method. There are three main methods for placing pipes on the floor:
- "snake";
- "snail";
- combined.
Pipe laying options
Snake laying is easy to design and install, which makes it widely used. The serpentine pipe arrangement is ideal for rooms with low heat loss and industrial facilities that require year-round heating.
Snake pipe laying
But such a scheme for placing heat sources can lead to temperature changes in different areas of the floor, which will affect the degree of comfort and the possibility of individual zones exceeding the permissible SNiP values, according to which the temperature maximum for heated floor coverings in places where people are constantly present is +25°C, periodically + 32°C. To reduce the effect of uneven heating during design, a number of restrictions are imposed on the inlets and outlets of heating fluid circuits:
- the maximum temperature difference is no more than 5 °C, the method cannot compensate for larger values;
- The maximum power of the heating system is 80 W/m².
Laying heated floor pipes in a “snail” pattern
A more complex arrangement of coolants is the “snail” method, sometimes called a spiral or “shell”. Despite the more labor-intensive execution and the required accuracy of design calculations, this method is characterized by a uniform distribution of the temperature field over the entire surface of the floor. This is achieved by alternately placing forward and return pipes. Temperature equalization is carried out using a surface concrete screed, the recommended thickness of which is 3-5 cm, or aluminum plates placed on top of the coolant. Installation with a “shell” helps to eliminate the temperature gap from 10 to 25°C and uniformly distribute the temperature over the entire area.
Pipe laying option
The combined method is a combination of different laying methods over large areas. Significant surfaces of the coating are divided into zones in which insulation materials are installed according to the location of the site - pipes are placed in a snake pattern near windows, entrance doors and external walls, and along.
water heated floor
Snail or snake - which is better?
The “snake” installation method is more complicated due to the need to bend the pipes 180 degrees.
When installing water heating pipes, one of the two most common patterns is used – snail or snake.
Laying a heated floor with a snail is considered simpler. You can install this circuit yourself without involving specialists. When laying underfloor heating tubes, energy losses are smoothed out and there is no temperature zebra crossing.
The snake is less efficient - the coolant is supplied from one side, and as you move away from the mixing unit, the temperature decreases noticeably - the opposite half of the room is heated noticeably worse. You can lay the pipes in a double snake, which will partially smooth out heat loss. The downside of the snake is the difficulty of installation due to bending the pipes by 180°, plus high labor intensity.
The snake is not placed in sanitary premises, where it is necessary to bypass various appliances and plumbing.
Choosing the optimal step
After selecting the material and method of pipe placement, you need to determine the distance between adjacent turns of the circuit. It does not depend on the type of placement of coolants, but is directly proportional to the diameter of the pipes. For large sections, too small a pitch is unacceptable, just as for pipes with a small diameter, a large pitch is unacceptable. The consequences may be overheating or thermal voids, which will no longer characterize the heated floor as a single heating system.
Video - Warm floor "Valtek". Installation instructions
A correctly selected step affects the thermal load of the circuit, uniform heating of the entire floor surface and the correct operation of the entire system.
- Depending on the diameter of the pipe, the pitch can range from 50 mm to 450 mm. But the preferred values are 150, 200, 250 and 300 mm.
It is important to remember that when increasing the coolant installation step, it is necessary to increase the temperature of the water supplied to the system, this will increase the productivity of the heating system.
- The spacing of coolants depends on the type and purpose of the room, as well as on the numerical indicator of the calculated heat load. The optimal pitch for a heating load of 48-50 W/m² is 300 mm.
- For a system load of 80 W/m² or more, the pitch value is 150 mm. This indicator is optimal for bathrooms and toilets, where the floor temperature must be constant according to strict requirements.
- When installing heated floors in rooms with a large area and high ceilings, the coolant laying step is taken to be 200 or 250 mm.
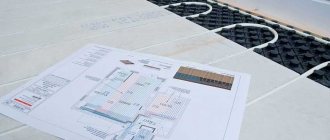
Warm water floor installation project
In addition to a constant step, builders often resort to the technique of variable placement of pipes on the floor covering. It consists of more frequent placement of coolants in a certain area. Most often, this technique is used along the line of external walls, windows and entrance doors - maximum heat loss is noted in these areas. The value of the increased pitch is determined as 60-65% of the normal value, the optimal value is 150 or 200 mm with an outer pipe diameter of 20-22 mm. The number of rows is determined during the laying process, and the calculated safety factor is 1.5.
Schemes for enhanced heating of external walls
Variable and combined laying steps are practiced in external and peripheral rooms due to the urgent need for additional heating and large heat losses; in all internal rooms the usual method of placing coolants is used.
The process of laying underfloor heating pipes is carried out in strict accordance with the project
Water circuit installation diagrams
Schematically, laying pipes for arranging a liquid circuit can be done in one of the following ways:
Coil. The method of laying such a contour is the simplest and is performed in loops. This option will be optimal for a room divided into zones with different purposes, for which it will be convenient to use different temperature conditions.
The first loop is installed around the perimeter of the room, then a single snake is inserted inside. Thus, a maximally heated coolant will circulate in one half of the room, while a cooled one will circulate in the other, and accordingly the temperature will be different.
The coil turns can be spaced evenly, but the bends of the water circuits in this case will have strong creases.
Double coil. In this case, the supply and return circuits are located next to each other throughout the room.
Angle coil. It is used exclusively for corner rooms where there are two external walls.
The advantages of the serpentine shape include simple planning and installation. Disadvantages: temperature changes in one room, pipe bends are quite sharp, so you cannot use a small pitch - this can cause a pipe break.
Snail. Using this arrangement, supply and return pipes are installed throughout the room. They are placed parallel to each other and installed starting from the perimeter of the walls and moving to the center of the room.
The supply line in the middle of the room ends in a loop. Next, parallel to it, a return line is installed, which is laid from the center of the room and along its perimeter, moving towards the collector.
The presence of an external wall in the room may require double laying of pipes along it.
The advantages of this method include: uniform heating of the room; due to smooth bends, the system has little hydraulic resistance, and savings in consumables can reach 15% compared to the serpentine method. However, there are also disadvantages - complex design and installation.
Installation nuances
In order for the flooring to turn out to be of high quality, craftsmen advise adhering to a number of rules.
- It is not recommended to adjust the approved pipe layout directly during the installation process.
- Heat transfer fluids must not be subjected to mechanical stretching, deformation or heating.
- The pipes are cut before connecting them to the hydraulic pump.
- Careful placement and connection of all components guarantees the tightness of the heating system as a whole.
- It is not recommended to step on it while laying the coolant.
For ease of pipe laying, you can use a lined foil backing
Selecting pipes and determining the optimal step for laying the flooring yourself is not so difficult. The main thing is to remember that all manipulations are aimed at creating a comfortable and cozy home environment.