Purpose and functions
Thermostatic or balancing valve is installed on the nodes of the pipeline transporting the hot working fluid.
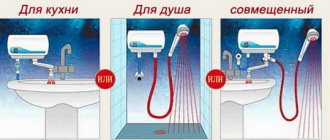
This type of pipeline fittings allows you to regulate the pressure and temperature of liquids or gases flowing from the main line to heat exchange or distribution devices. The use of a regulating element ensures convenient water intake in kitchens and bathrooms, ease of control of the space heating system and makes the operation of heating and water supply systems energy efficient, reducing the cost of the working environment. In water supply systems, a balancing valve is used to adjust the parameters of water supplied from a tap or shower. Typically, the control element in private households is installed on faucets in bathrooms and kitchens, and in public spaces - in bathrooms. Here the thermal valve regulates the process of mixing cold and hot water in the required proportion.
In heating networks, the thermoelement maintains the temperature balance in heating circuits and heat exchangers. It is usually installed at the entrance to the radiator, register or horizontal heat exchange circuit - warm floor or warm baseboard, in order to be able to adjust the temperature of the coolant. The heating level of the energy carrier is regulated by the heating apparatus, and the heating of the heat exchangers is regulated by adjusting the pressure of the working medium, which is why a thermostatic valve is needed.
Advantages and disadvantages of a thermostatic mixer
In the kitchen, this mixer is not always appropriate and convenient. This is due to the frequent need to use only cold water for cooking. In such cases, the problem is solved by installing a special tap for drinking water with a filter.
A bathroom faucet with a thermostat is a convenient, necessary thing and has no drawbacks from a technical point of view. The main disadvantages are the higher price and possible additional hassle during installation. However, they are more than offset by the advantages:
- safety: any likelihood of any unpleasant sensations when taking a shower, and most importantly, burns, is eliminated. This is important in a house where old people and children live. This is convenient when arranging showers and cramped bathtubs, when even jumping away from the hot jet will not be possible.
- efficiency: the mechanism does not need to be adjusted each time, passing streams of water until the desired pressure and temperature are found. In addition, the device is initially configured for water saving mode.
- convenience and comfort: one press of the lever turns the water on and off, using two hands, which is important when washing yourself, and when caring for children, and when performing any other multifunctional actions in the bathroom.
Thermostatic electronic mixer with touch sensors
Where is the best place to install the thermostat?
A thermostat can be equipped with a kitchen sink, sink, and bidet. In the kitchen, a thermostat is not necessary - the water temperature has to be constantly changed. It is not recommended to frequently reconfigure the thermocouple. It is most important to use a thermostat in a bath/shower or in a shower stall. Especially when there are outlets from the same supply pipe to the shower, washing machine and kitchen. And if the washing machine or dishwasher turns on the cold water intake and the pressure in the pipe drops, the thermostat will respond to the temperature change and equalize the flow ratio.
Thermostats are produced in different modifications. The thermostat model for the shower cabin is distinguished by the absence of a spout.
Photo: Roca Shower thermostat: model AquaHeat SS3 (RUB 11,042).
The best thermostats for an incubator
Another relevant area where heating devices and temperature controllers are needed is incubators. If regulators are not used, both overheating and hypothermia can be dangerous for the embryos. Therefore, manufacturers improve each new model, increasing the accuracy of work. Based on expert assessments and feedback from specialists, leaders were identified.
TRT-1000
Most often, such a thermostat is used for the Layer incubator, where it maintains a certain air temperature in the thermostat. For synchronous accurate operation, a temperature sensor is located next to the thermometer; the heater can be plugged into a power outlet. At this stage, you can set the minimum and maximum temperature thresholds. The TRT-1000 model provides 2 levels of adjustment, heater power from 20 to 1000 W, operating temperature 20-60 °C. At the same time, the accuracy of the thermal controller is 0.2 °C.
Advantages
- Simple controls;
- Accurate determination of the current temperature;
- Low price;
- Long service life;
- Light indication.
Flaws
- Lack of overheating protection;
- Sometimes there are crafts.
Despite its simple design and lack of innovative options, the TRT-1000 is quite in demand in farming and households. It performs its main task; it determines the current operating mode of heating equipment with an accuracy of 0.2 °C. The main thing is to find an original production, since there are a lot of crafts on the market.
Terneo EG
The most popular model for high-precision maintenance of the desired climate in incubators. The case is made of durable plastic, there is an audible alarm to notify you of any changes. To protect the device from children, the manufacturer has installed a screen lock option. The optimal temperature limits are 34-39 °C, the maximum deviation is only 0.015 °C. The load power does not exceed 500 W. Thanks to the PID algorithm, the device can adapt to the operating conditions of any incubator. There are only 3 buttons to set the mode.
Advantages
- Stable body;
- Protection against overheating, children;
- Sound signal;
- Easy installation;
- High accuracy of temperature determination.
Flaws
Rustic design.
For the money, this is a good offer from a Ukrainian manufacturer. It can be used not only in the household, but also in combination with household appliances. Users did not identify any significant shortcomings, except that the design is somewhat simple.
Thermal valve design and existing types
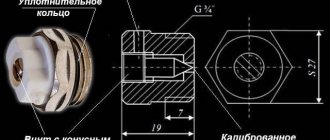
The thermostat valve is similar in structure to a conventional valve. The valve design includes a seat and a shut-off cone, with the help of which the amount of coolant is regulated. Due to the amount of coolant flowing through the battery over a certain period of time, the temperature of the radiator is regulated.
Sectional view of thermostatic valve
There is one-pipe and two-pipe heating system wiring, and certain models of regulators are installed on each system. It is impossible to confuse the models, especially since the manufacturer must indicate in the passport which heating system the thermostat is intended for. If you install the wrong control element, the radiator will not work. Valves for single-pipe systems can be installed in systems with natural coolant circulation. Naturally, the installation of such devices leads to an increase in hydraulic resistance, but in general, the system will function.
There is an arrow on the thermostat body indicating the direction of movement of the coolant, so during installation it is necessary to take this property of thermostats into account.
How the thermostatic head works
Watch this video on YouTube
Manufacturing materials
The device body can be made of various corrosion-resistant construction materials. Therefore, thermostats are manufactured:
- Made of bronze, followed by chrome or nickel plating.
- Made of brass, plated with a layer of nickel.
- Made from stainless steel.
Naturally, the most reliable and durable cases are made of stainless steel, but the prices for such devices are too high, so they are inaccessible to a wide range of consumers. Bronze and brass cases have almost the same service life, but it mainly depends on the quality of the alloy. As a rule, well-known manufacturers take the production of their products seriously. It should be noted that there are a sufficient number of unknown manufacturers on the market for such products, so it is quite possible to purchase a low-quality product. Despite this, every manufacturer tries to become famous, so they monitor the quality of their products. In any case, you need to determine the presence of an arrow on the body, which may be evidence of the quality of the thermostat.
Execution options
There are several options for connecting radiators to the heating system, so thermostats are available in two types: straight (pass-through) and angular. The type of design that is most suitable for a specific heating system is selected.
Straight (way through) valve and angle
| Name/Company | For which system | Du, mm | Housing material | Operating pressure | Price |
| Danfos, angular RA-G, adjustable | single-pipe | 15 mm, 20 mm | Nickel plated brass | 10 bar | 25-32 $ |
| Danfos, direct RA-G with customizability | single-pipe | 20 mm, 25 mm | Nickel plated brass | 10 bar | 32 — 45 $ |
| Danfos, angular RA-N, adjustable | two-pipe | 15 mm, 20 mm. 25 mm | Nickel plated brass | 10 bar | 30 — 40 $ |
| Danfos, direct RA-N with customizability | two-pipe | 15 mm, 20 mm. 25 mm | Nickel plated brass | 10 bar | 20 — 50 $ |
| BROEN, direct fixed tuning | two-pipe | 15 mm, 20 mm | Nickel plated brass | 10 bar | 8-15 $ |
| BROEN, direct fixed tuning | two-pipe | 15 mm, 20 mm | Nickel plated brass | 10 bar | 8-15 $ |
| BROEN, corner, adjustable | two-pipe | 15 mm, 20 mm | Nickel plated brass | 10 bar | 10-17 $ |
| BROEN, corner, adjustable | two-pipe | 15 mm, 20 mm | Nickel plated brass | 10 bar | 10-17 $ |
| BROEN, direct fixed tuning | single-pipe | 15 mm, 20 mm | Nickel plated brass | 10 bar | 19-23 $ |
| BROEN, fixed angle | single-pipe | 15 mm, 20 mm | Nickel plated brass | 10 bar | 19-22 $ |
| OVENTROP, axial | 1/2″ | Nickel plated brass, enamel plated | 10 bar | 140 $ |
Thermal heating valve - purpose
Thermostatic valve for heating systems is designed to automatically open and close the radiator inlet. When a certain room temperature is reached. In other words, if the room is too hot, you can install a thermostatic valve on the radiator. Thereby achieving a more comfortable temperature in the room. Moreover, thermal valves are intended for steel, aluminum and similar radiators and convectors. That is, for quickly heating and quickly cooling devices. Thermal valves will work on cast iron heating radiators. However, it is not very effective.
Thermostatic valve VALTEC – angular, with thermal head
In some cases, a thermal valve can help even when the radiator heats poorly. If your home's heating system is poorly balanced. For example, the first radiators from the boiler heat up strongly, while the last ones are barely warm. But by installing thermal valves on the first heating radiators along the coolant flow, this imbalance can be corrected. And of course, achieve stronger heating of those radiators that previously heated weakly.
Setup and operation
In principle, you can use temperature sensors with industrial settings. But they will almost certainly differ from the optimal parameters. The adjustment begins with starting the heating system without a regulator and measuring the resulting temperature. This measurement is made strictly in the place that needs to be serviced first. Please note: when setting up, doors and windows are thoroughly closed, without leaving even small gaps.
The head of the thermostat is set to a mode that provides a completely open lumen. As soon as the temperature exceeds the desired value by 5 degrees, the regulator is switched to the closed position. Having detected a drop in temperature to the most acceptable level, you should smoothly open the control device. Then, having noticed noise and the beginning of warming up of the radiator, you should stop further manipulations and record the current position of the regulator. Subsequently, in order to live comfortably, you will have to indicate exactly this position of the regulator.
Of course, there will be no universal position for it. Additional settings are made when the season changes or during a sharp cold snap (thaw). If the device will be configured manually, it is advisable to immediately mount it where access is most convenient. However, for automated systems the same rule applies in most cases. After all, access will still be needed for installation, initial setup, maintenance, repair and subsequent dismantling.
Before setting up, it is recommended to turn off hoods and air conditioning equipment. If the regulator is made on the basis of modern electronics, the setting comes down to the choice of heat supply modes. In suburban housing and dachas, the most common choice is intensive heating on weekends and preventing the system from freezing on weekdays. Of course, depending on individual needs, the situation may be completely different. Other configuration details depend on the characteristics of the equipment used.
Installation and configuration features
When installing thermal valves in various sections of the pipeline, certain difficulties arise.
Knowing in advance about the installation features, these difficulties can be avoided:
- Before installing the control device, the supply of the working medium in the area being repaired is turned off, and the remaining water is drained.
- As the liquid or gas is supplied, a tap is installed in front of the thermoelement, with which you can, if necessary, turn off the unit with the thermal valve.
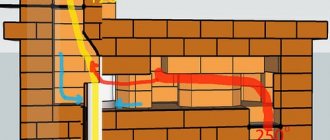
- Thermal valves in heating networks are installed on the supply pipe; when connected to heat exchange devices, on the incoming pipe or the section of pipe in front of it.
- In a dual-circuit system, a throttle is installed on the return pipe after exiting the heat exchange device, which serves to reduce the throughput of the return circuit. This way the pressure balance in the battery is achieved, and vacuum and airing do not occur.
- The control valves for automatic control and the remote thermocouple for remote control are installed in such a way as to be in contact with the air in the room. It is unacceptable to hide calibration elements behind curtains, furniture, or decorative trims.
- If located below 80 cm from the floor, the thermocouple may cool down, since the coldest zone is located below, and it will not be possible to regulate the temperature in the room correctly.
- The thermostatic element is not installed vertically so that the rising flows of warm air from the heat exchanger do not affect the accuracy of the device. The valve is located in the direction from the heat exchange device.
Note! The presence of a temperature control device under direct influence of sunlight, warm air from operating heating devices and electrical equipment negatively affects the accuracy of setting the parameters of the working environment. Therefore, you should not install the thermostat near stoves, water heaters, boilers, or refrigerators.
- In a house with central heating, control valves are installed on the batteries only if there is a bypass or jumper pipe between the supply and return pipes. Otherwise, the thermal valve will regulate the pressure in the riser and the temperature not only in “its” battery, but also in its neighbors.
- To connect radiators and heating registers, angle or straight thermal valves are selected depending on the geometry of the pipeline. In this case, the valve must be axial to exclude the possibility of accidental mechanical impact on it, for example, when moving furniture.
Note! There are devices specifically designed for installation on radiators on the right or left. You cannot install the fittings in the opposite direction, since if the position is incorrect, the valve will open not due to a change in temperature, but under the pressure of the working medium, and the adjustment will be disrupted.
- In a water heated floor system, valves with a side valve are installed, this makes access to the settings easier.
- In front of water distribution units in a private household or apartment, it is optimal to use a mixer equipped with a thermostatic valve or a manually adjusted thermovalve.
- It is advisable to equip water supply systems in public premises with a thermal valve with remote control or pre-setting to exclude the possibility of interference in the operation of the system by outsiders.
- FUM tape cannot be used as a sealant for the threaded connection of a thermostatic valve with a pipeline, since it can leak at the slightest reverse movement of the thread due to thermal expansion of the pipes. A reliable connection is obtained by sealing the assembly with sealing threads: polymer or linen with heat-resistant paint.
We recommend that you read: Features of the production and use of ceramic sewer pipes
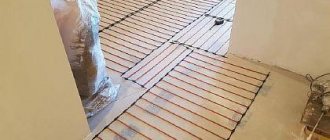
Installation of a thermal valve in a “warm floor” system
Installation of a thermal valve in a horizontal heat exchange circuit has its own characteristics. Since polymer pipes are usually used to equip a warm water floor, the temperature of the coolant should be lower than in the batteries. In addition, this prevents the floor from overheating, which means walking on it will be more comfortable. Therefore, the main task of a thermal valve is to maintain the temperature in the pipes at a level sufficient to create a comfortable climate and not dangerous for the pipeline and residents of the house.
It is important to correctly select and install a temperature control device that matches the size and purpose of the room.
- Non-residential premises and small living rooms. In the hallway, bathroom or kitchen, as well as in small rooms, a warm floor can be the only source of heat - as a rule, this is enough. The working medium does not require high pressure to pass through a short circuit, so a simple thermostat without mixing is installed. If the water coming from the boiler is heated above the permissible temperature, the valve closes, preventing hot water from entering the pipeline and preventing overheating of the pipes and floor. In this case, the coolant remains in the pipes and continues to give off heat to the floor. When the working medium in the heat exchange circuit cools down, the valve opens, hot water enters the pipes, which, when mixed with cooled water, reaches the desired temperature.
- Small living spaces where underfloor heating is an additional source of heat. As a rule, the main heating comes from the heat transfer of the batteries, and the thermal circuit under the flooring adds comfort. A thermostatic valve with mixing is installed at the entrance to the first of the room's radiators to regulate the pressure of incoming hot water from the boiler. Another thermostat fits into the return line, regulating the temperature of the energy carrier entering the water floor pipeline after the radiators.
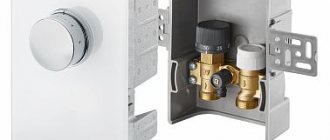
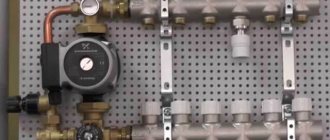
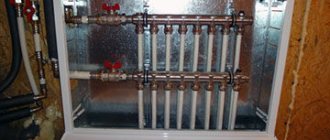
- Large living spaces or a single thermal circuit of a private house. Three-way thermostatic valves are installed with mixing, that is, with connection to the cold water supply system. Such a thermal valve regulates the distribution of the working medium into the radiators and the water floor: coolant with a temperature of 90 degrees is supplied to radiators or registers, and for supply to the horizontal heat exchanger, cold water is mixed with hot water, the finished mixture with a temperature of about 50 degrees heats the floor. Such a system can heat rooms in several ways: by simultaneous operation of radiators and heated floors, or by turning on only one circuit, when a large heat transfer surface is not needed.
- In public buildings or apartment buildings, the heating network is complex and branched, since it is necessary to heat rooms of various purposes and sizes. Several thermal circuits and a mixing unit are installed, in which a three-way valve with mixing is located, supplying coolant at a set temperature to the collector. And already from the collector there are branches to each circuit. If individual temperature control is required, separate thermal valves can be installed in each room.
We recommend that you read: How to select and install a polypropylene ball valve?
How to regulate the heating system using a thermostatic valve
Having installed the thermal valve, it is necessary to calibrate it in such a way that further adjustment of the heating process occurs with minimal human intervention:
- Open the valve completely.
- They wait until the air temperature stops rising.
- Completely close the balancing valve.
- When a comfortable temperature has been established in the room, they begin to gradually open the thermal valve again.
- When the housing becomes warm again, stop the opening process and leave the control valve in this position until a new adjustment is required.
Regulator setting
In order for the device to work correctly and maintain the desired temperature, it is necessary to carry out preliminary settings. When the heating is on in the room, close the doors, install a thermometer where you think it is correct to monitor the temperature. Now let's start setting up:
- Open the coolant flow completely. This is done by turning the thermal head all the way to the left.
- The temperature will begin to rise. When it becomes 5-6oC higher, move on to the next point.
- Shut off the coolant flow by turning the thermostat head to the right until it stops. The room will gradually become cooler.
- When the desired temperature is reached, begin to gradually open the valve. As soon as you hear that the coolant is noisy and the body becomes warm to the touch, stop rotating. This will be the position of the thermal heads at which a comfortable temperature for you will be maintained. Usually there are marks on the cap - numbers - you can use them to navigate.
Adjusting the thermostat is a simple procedure, but it is what allows you to calibrate it to your requirements. For the most part the sequence is standard, but sometimes it may differ. Then the entire sequence of actions should be described in the product passport. Some companies have even made videos that clearly demonstrate how to install and adjust their products.
Material of manufacture
The valve body is made of corrosion-resistant metal, and the top is nickel or chrome plated.
Valves are made from the following materials:
- bronze with nickel or chromium coating;
- brass with nickel layer;
- made of stainless steel.
Stainless steel valves are considered the best. They are chemically neutral, do not corrode, and do not react with other metals. Their price is higher than nickel or chrome plated. Stainless steel valves are not often on sale, so most often in houses or apartments you can see bronze or brass products.
Valves made of bronze or brass do not differ in terms of service life. It all depends on how well the alloy is made. As for products from well-known manufacturers, there is no question of quality. Whether or not to trust unknown manufacturers is a moot point
However, when purchasing, you need to pay attention to the fact that the flux vector is depicted on the body. Without this arrow, the product is not of high quality.
What types of thermostatic radiator heads are there?
Thermostatic heads are of the following types:
- manual;
- mechanical;
- electronic.
They have the same purpose, but the user properties are different:
- Manual devices operate on the principle of conventional valves. When you turn the regulator in one direction or another, the coolant flow opens or closes. Such a system will not be expensive, it is reliable, but not very comfortable. To change the heat transfer, you must adjust the head yourself.
- Mechanical ones are more complex in design; they can maintain the desired temperature in a given mode. The device is based on a bellows filled with gas or liquid. When heated, the temperature agent expands, the cylinder increases in volume and presses on the rod, increasingly blocking the coolant passage channel. Thus, less coolant passes into the radiator. When the gas or liquid cools, the bellows decreases, the rod opens slightly, and a larger volume of coolant flow rushes into the radiator. A mechanical thermostat for a heating radiator is quite convenient to use and popular among consumers due to its ease of maintenance.
- Electronic thermostats are large in size. In addition to massive thermostatic elements, they come with two batteries. The rod is controlled by a microprocessor. The models have quite a lot of functionality. You can set the temperature in the room for a certain time. For example, the bedroom will be cooler at night and warmer in the morning. During those hours when the family is at work, the temperature can be lowered and raised in the evening. Such models are large in size; they must be installed on high-quality heating devices in order to operate without problems for several years. Their prices are quite high.
Is there a difference between liquid and gas bellows? It is believed that gas responds better to temperature changes, but such devices are more complex and expensive. Liquid ones do their job well, but are a little slow in reaction. You can set the required temperature and maintain it with an accuracy of 1 degree. Therefore, a thermostat with a liquid bellows successfully solves the problems of regulating the supply of coolant to the heating device.
Installation and adjustment
The thermostat works well when its installation is carried out according to all the rules and taking into account some nuances. In order for its operation to be effective, durable, and correct, it is necessary to initially ensure free access, especially if these are mechanical control devices. The automatic thermostatic element must not be covered with curtains or radiator screens. As a result, the analysis of temperature fluctuations may have errors.
Before directly installing the thermostat, all water is drained from the heating system. Prepare the necessary equipment and installation kit for connection, not forgetting the components. The device must be installed perpendicular to the location of the radiator panel. It is worth remembering that the direction of the heat supply flow must coincide with the direction of the thermostat arrow.
If the position of the thermal head after installation is vertical, this will affect the correct operation of the bellows. However, this nuance does not apply to devices with a remote sensor or an external control unit. You cannot install the thermostat where it will be constantly exposed to sunlight. In addition, the device does not always operate correctly if its location is near large household appliances that generate thermal radiation. The same rule applies to hidden-type options that are hidden inside niches to increase the aesthetic appeal of the interior of the room.
How to do?
If there is no heating in the apartment or house when connecting, you need to open the thermostat completely. This will save the valve from deformation and the regulator from clogging. If the installation is carried out in a private house with two or more floors, work starts from the top, since warm air always rises
It is important to take into account rooms where temperature fluctuations are more pronounced. These include the kitchen, rooms filled with sun, and rooms where household members often gather
Regardless of the circuit, the thermostat is always installed on the supply pipe. Until the valve is ready, the thermal head is not removed from the packaging. The horizontal line pipes are cut at the required distance from the battery. If a tap was previously installed on the battery, it is disconnected. The shanks with nuts are unscrewed from the valve, as well as the locking element. They are fixed into the heating radiator plugs.
After assembly, the piping in the selected location is attached to the horizontal pipes of the riser supply. The valve is screwed to the battery inlet, ensuring that its position is horizontal. You can install a ball valve in front of it in the system
This will make it easier to replace the thermostat if necessary, and will prevent increased load, which is important when using the valve as a shut-off valve
The valve is connected to the line supplying coolant
After this, open the water, fill the system with it and check the tightness of the connections, which is especially important when you need to install the device on old batteries. There should be no leaks or seepage of water.
This must be eliminated by tightening the fastening points. Preset the valve as necessary. To do this, pull out the locking ring, then align the mark with the required division. After this, the ring is locked.
All that remains is to install the thermal head on the valve. In this case, it can be secured using a union nut or a snap mechanism. It is possible to install a thermostat on a battery if the material of its manufacture is aluminum or steel, and also if the radiator design is bimetallic. Cast iron ones are characterized by high thermal inertia, so there is no point in installing these devices for such batteries.
How to setup?
If you need to adjust the thermostat to avoid confusion in the operation of the sensor, you must initially create the correct conditions in a particular room.
The work can be carried out according to the following scheme:
- close windows, doors, turn off existing air conditioners or fans;
- a thermometer is placed in the room;
- the coolant supply valve is opened completely, turning to the left until it stops;
- after 7-8 minutes, close the radiator by turning the valve all the way to the right;
- wait until the decreasing temperature becomes comfortable;
- smoothly open the valve until the noise of the coolant is clearly heard, indicating the most comfortable temperature conditions in the room;
- rotation is stopped, leaving the valve in this position;
- if you need to change the comfort of the temperature, use the thermohead regulator.
How to install and configure a thermostat on a heating radiator, see the video below.
Connection of thermostatic valve
The installation location for the thermostatic valve, regardless of the type of heating system wiring, is the supply pipe. At the same time, in a single-pipe system it is necessary to install a bypass. This is a pipe that acts as a jumper between the pressure and return lines connected to the battery. The presence of a bypass allows the coolant to bypass the radiator when the supply valve to it is shut off. In two-pipe systems there is no need to install a bypass.
Procedure for installing a thermostatic valve on a radiator:
- Preparatory stage. The coolant supply in the riser is shut off, and the remaining water is drained into a bucket.
- On the outlet side of the pipeline, a thread is cut using a die (on metal pipes) or connecting fittings with “American” are installed (on polypropylene pipes). A locknut is installed on the outlet from the radiator.
- Using locknuts, the thermostat is screwed to the outlets. At the final stage of installation, both nuts are tightened simultaneously using two wrenches. Sealing of threaded connections is ensured using fum tape.
To ensure correct operation of the thermal head, it is important to install it in the correct position. If the thermostat is mounted in the upper part of the radiator, then the thermal head cannot be installed vertically (with the valve handle up). In this position, it will be heated by rising currents of warm air from the battery and limit the coolant supply too early. If the thermostat is installed on the lower pipe, then there are no restrictions on the position of the thermal head - it can be installed either horizontally or vertically.
How to install correctly
Now about how to hang the radiator. It is very desirable that the wall behind the radiator is level - this makes it easier to work. Mark the middle of the opening on the wall, draw a horizontal line 10-12 cm below the window sill line. This is the line along which the top edge of the heating device is leveled. The brackets must be installed so that the top edge coincides with the drawn line, that is, it is horizontal. This arrangement is suitable for heating systems with forced circulation (with a pump) or for apartments. For systems with natural circulation, a slight slope is made - 1-1.5% - along the flow of the coolant. You can’t do more - there will be stagnation.
Correct installation of heating radiators
Wall mount
This must be taken into account when installing hooks or brackets for heating radiators. Hooks are installed like dowels - a hole of a suitable diameter is drilled in the wall, a plastic dowel is installed in it, and the hook is screwed into it. The distance from the wall to the heating device is easily adjusted by screwing in and unscrewing the hook body.
Hooks for cast iron batteries are thicker. This is a fastener for aluminum and bimetallic
When installing hooks under heating radiators, keep in mind that the main load falls on the upper fasteners. The lower one serves only to fix it in a given position relative to the wall and is installed 1-1.5 cm lower than the lower collector. Otherwise, you simply will not be able to hang the radiator.
One type of brackets
When installing the brackets, they are applied to the wall in the place where they will be mounted. To do this, first attach the battery to the installation location, see where the bracket “fits,” and mark the location on the wall. After placing the battery, you can attach the bracket to the wall and mark the location of the fasteners on it. In these places, holes are drilled, dowels are inserted, and the bracket is screwed. Having installed all the fasteners, hang the heating device on them.
Floor fixing
Not all walls can support even lightweight aluminum batteries. If the walls are made of lightweight concrete or covered with plasterboard, floor installation is required. Some types of cast iron and steel radiators come directly with legs, but not everyone is satisfied with their appearance or characteristics.
Legs for installing aluminum and bimetallic radiators on the floor
Floor installation of heating radiators made of aluminum and bimetallic is possible. There are special brackets for them. They are attached to the floor, then the heating device is installed, and the lower collector is secured with an arc to the installed legs. Similar legs are available with adjustable height and some with a fixed height. The method of fastening to the floor is standard - with nails or dowels, depending on the material.
Design and operating principle of a three-way valve
Most often, the product looks like a regular tee made of brass or bronze, with an adjusting washer installed on top. Underneath there is a heat-sensitive element that presses on the working rod extending from the housing. Inside, a cone is attached to the rod and fits hermetically into the seat. To understand how a three-way valve works, you need to study its cross-sectional structure:
Three Way Thermostatic Mixing Valve
Water circulates through the front and right nozzles until its temperature rises or falls to the set value. The task and principle of operation of the three-way valve is to maintain the temperature of the coolant at the outlet within specified limits by mixing cold or hot water (depending on the circuit) from the left pipe. When the coolant parameters go beyond the specified limits, the external drive presses on the rod. When it moves, the cone comes out of the seat and opens communication between all three channels. The process continues until the front inlet pipe is completely blocked, if the water temperature parameters do not stop changing.
Three way valve with thermal head
There is a different type of internal valve mechanism that is similar in design to a ball valve. Such a three-way switching valve, instead of a seat with a cone, has a ball inside with a specially shaped recess. To redistribute coolant flows in such products, the drive must not press, but rotate the rod on which the ball is attached. Valves with a ball element are not manufactured with a large flow capacity and are usually used in domestic heating systems. Another type of mechanism is that there is not a ball installed on the rod, but a sector, whose working part completely or partially blocks one or two flows, respectively.
Three way valve operation