Who wouldn’t want to reduce heating costs, especially in the face of constantly rising energy costs?
The simplest way to achieve this is to absorb solar heat, which can be consumed without any conversion.
Of course, in winter it comes to our latitudes in very meager quantities, but this should not be neglected. Moreover, to collect it you will need an extremely simple and cheap device that you can easily make yourself.
In this article we will talk about how to make an air solar collector with your own hands for heating a house - device, diagrams, designs.
Design and principle of operation of a solar collector
In its design, the solar collector is the opposite of the radiator of the heating system. If the walls of the radiator are heated by the coolant, then in the collector, on the contrary, the coolant is heated by the walls.
The walls themselves, in turn, heat up due to the absorption of solar heat (they are painted black), due to which this part of the collector is usually called an absorber.
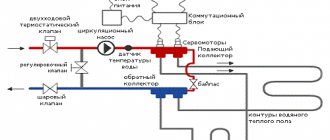
Solar system in an autonomous heating system
The absorber material must have high thermal conductivity, so at home it should be made of copper or aluminum. In factory-made collectors, the absorber is made of special alloys, which are characterized not only by high thermal conductivity, but also by low intensity of infrared radiation.
For obvious reasons, it is advisable to make the contact area of the coolant with the absorber as large as possible, so the latter is usually equipped with ribs or similar structural elements.
Alternative heating is used quite rarely, and many people wonder whether a solar collector is effective in winter. Types and expediency of its use.
Tips for making a solar collector with your own hands are presented here.
It makes sense to make a solar water heater with your own hands, if only because the energy obtained from its operation will be absolutely free. In this topic you will find instructions for making such a unit.
What types of solar collectors are there?
The classification of types of solar collectors is carried out according to several principles. The first one is performance. The determining criterion is the temperature that can be reached by the plates that extract the energy.
According to this principle, solar collectors are distinguished:
- High temperatures are mainly industrial collectors that cannot be assembled at home.
- Average temperatures. Such devices are capable of heating water up to 80C. This makes them quite suitable for use in heating circuits.
- Low temperatures - compact devices with which you can heat a small volume of water up to 50C.
Important! When choosing a suitable solar collector option, be guided by the following standard requirements: the device must provide a volume of 100 liters of water per person per day, although the average consumption is 30-50 liters. For the productivity of every 100 liters at a temperature of 45-50C, a device area of 2 m2 will be required.
Depending on the form and functionality, the following design solutions are distinguished:
- Flat solar collector. This device is a flat box, most often made of metal. There is a black plate inside it, which attracts sunlight. The box is closed with a glass lid, which enhances the efficiency of energy supply to the plate itself. The low efficiency of only 10% can be increased by using an additional layer of amorphous semiconductor.
Important! The advantages of this collector are minimal assembly costs, the ability to install at any angle, high productivity in summer and the property of self-cleaning from snow and ice. They are installed mainly when designing heating systems in premises, for various domestic needs and for heating swimming pools.
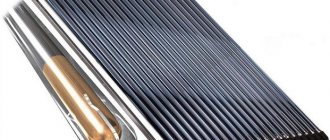
- Vacuum tubular solar collector. The main structural element of such systems is glass tubes with a highly selective coating. They are designed to capture solar energy and also serve as a direct conductor of heat. When designing, the tubes are distributed over the area - some are located outside, others inside. There is a vacuum between them, which ensures long-term preservation of the resulting heat. High tightness of the device is achieved through the installation of laminated glass.
Important! Such devices are quite effective even in low light conditions or at low temperatures. In addition, there are other undeniable advantages - small windage, ease of assembly, long period of operation of the collector around the clock, low heat loss.
Depending on the type of coolant, the following devices are distinguished:
- Liquid (water) solar collector. Liquid circulates in these systems. Depending on the complexity of the design and the requirements for efficiency, they can be designed with open and closed heat exchange circuits, with or without glazing.
- Airborne solar collector. This type differs in that it is not the water that is heated, but the air itself. They are mainly used for drying agricultural products. To improve the quality of the result, they can be equipped with fans for forced convection, which makes them more expensive to maintain. The main advantage of air collectors is that they do not freeze in winter.
Important! In addition to these varieties, there are a number of more complex designs that are used mainly to solve larger problems.
DIY solar air collector for heating: diagram
To avoid heat loss due to contact with street air, the absorber of a homemade collector is placed in a well-insulated wooden case, covered on top with transparent plastic (polycarbonate or plexiglass) or durable tempered glass.
For factory-made collectors, the absorber tubes are placed in evacuated flasks, so that the heat is stored in them, like in a thermos.
Solar collector assembly diagram
Both air and a liquid medium - water or antifreeze - can be used as a coolant. We will consider the air manifold, since it is easier to manufacture.
How to make a solar collector with your own hands?
Making a solar collector for heating or hot water supply is not as difficult as you might imagine. Below are several options - both the simplest designs and more complex but effective ones. Determine which one to choose yourself, based on personal requirements, the availability of a particular material and professional construction skills.
Important! The examples are listed in order of difficulty of assembly and cost of consumables.
Method 1. Hose manifold
You have probably noticed more than once, when cultivating your own plot in the summer, that if you water a flowerbed from a hose that has been lying in the sun for a long time, quite warm water will flow from it. Based on this observation, the following design was developed.
Important! This device is easy and quick to install. An excellent option for a summer residence where there is no need for high consumption of hot water. From one hose 100 m long and with a cross-section of 20 mm, you can get about 20-30 liters of ready-made hot water. If there is a need for a larger volume, you will have to use not only a storage tank, but also a circulation pump to create forced circulation of water, or make several collectors from a hose.
Assembly instructions:
- Buy one or several pipes with a cross-section of 20-25 mm of a suitable length - 50, 100, 150, 200 meters made of polyethylene or a regular dark-colored hose with the same characteristics.
- Lay the pipe in a spiral on a flat area on the roof of the house or directly on the ground.
Important! Please note that PVC reinforced hoses are not suitable for this idea, as their walls are too thick.
If the roof slope is quite sharp, take additional steps:
- Make a box for fixing the rolled hose using plywood sheets 6 mm thick and bars with a cross-section of 40 * 40 mm.
- Treat the finished base with an antiseptic.
- Paint the box black.
- Lay the hose inside in a spiral.
- Secure the position of the coils with metal or plastic clamps, regular or slate roofing nails, driving them between the pipe rings.
Important! The last action will help prevent deformation of the collector when exposed to temperature and water. Once you are sure how efficiently such a solar collector works, make a calculation of the amount you need to obtain a certain amount of water per day. Please note that the use of such modules is only advisable in summer.
Method 2. Window frame collector
Today, wooden windows are used somewhat less, but, nevertheless, many have retained the old frames when replacing them with plastic ones or new ones made of wood. This part of the window is just right for constructing a solar collector, since the frame is a ready-made box for a natural battery.
Assembly instructions:
- Open the frame.
- Remove the glass.
- Place a layer of heat insulation on the bottom, the thickness of which is at least 3 cm.
- Apply sealing rubber around the entire perimeter.
- Take a galvanized steel sheet that is the size of the window frame.
- Paint it black with matte paint.
- Place this sheet on top of the thermal insulation material - it will attract solar energy.
- Buy 1/2 inch plastic, PE or copper pipe.
- Lay it over the surface of the sheet in a spiral or “snake”.
- Secure the pipe with clamps.
- Cover the frame with the other half.
- Tighten it with screws to ensure high-quality fixation and solidity of the structure.
Important! Install such a collector at an angle of 15 degrees in summer and vertically in winter or autumn.
Method 3. Plastic bottle collector
Another fairly simple design option, the cost of which is low. Its main advantage is that even during sunrise and sunset, energy is extracted, and the rays penetrate almost at an angle of 90 degrees into the bottles.
The set of materials for such a solar collector is accessible:
- used juice or milk pouches;
- plastic bottles of the same shape;
- PVC pipe with an external cross-section of 20 mm for hot water;
- tees suitable for designing hot water pipelines.
Assembly instructions:
- Select the number of bottles you need.
- Rinse them and remove the labels.
- Make a template from cardboard by rolling a 30-centimeter sheet into a tube and placing it on the bottle.
- Cut the bottom of the bottle along the cardboard line.
- Rinse all tetra packs.
- Rinse them thoroughly to remove all remaining liquid and eliminate the unpleasant smell of rotting in the future.
- Paint them black using matte paint.
- Paint the pipes black as well.
- Wait for all parts to dry completely.
- Place the first bottle, neck first, onto the bottle.
- Then put on the tetra pack with the narrow part first.
- Insert it into the bottle as far as it will go.
- Repeat the procedure with up to 5 bottles with a pipe length of 105 cm.
- Install the pipes on a metal or wooden support.
Important! When placing the storage tank, choose a place 30-50 cm above the collector itself. Forced circulation is not required in this design, since the water, when heated, will naturally rise upward, and the cold water will descend from the collector. If you need to maintain the temperature of the water in the storage tank for as long as possible, insulate it. It is advisable to change bottles at least once every 5 years, since their light transmission decreases over time.
Method 4. Manifold from an old refrigerator
An old refrigerator that has broken down can also come in handy. A capacitor is used from it for the solar collector, which will reduce the time for assembling the heat exchanger. The only caveat is that, since freon and oil were still circulating in it, it is advisable to use such water exclusively for technical needs, but not as drinking water.
Important! In addition to the condenser from the refrigerator, you can also use a car radiator in this system. In this case, the operating efficiency of the device will be higher.
Additional materials that will be required for this type of collector are:
- rubber mat - it is used for the backing;
- foil;
- scotch;
- wooden beams with a cross section of 50*50 mm - use them to mount the body;
- glass - suitable from a window frame.
Assembly instructions:
- Pull out the rear condenser grille of the refrigerator.
- Measure it.
- Prepare bars of the required size based on the measurements taken.
- Assemble the body from the prepared parts.
- Place a sheet of foil on the bottom of the housing to ensure that the heat exchanger is also heated from the back.
- Cover all cracks around the perimeter of the frame with tape.
- Nail the beams to the back of the manifold to securely fix the heat exchanger.
- Make grooves in the frame for the pipes to exit.
- Bend the top tube of the heat exchanger upward to ensure effective natural circulation.
Important! If you do not bend the condenser tube, you will need a pump for forced circulation. In this case, even an aquarium pump will do, and the storage tank can be installed anywhere. In case of natural movement of liquid during heating, place the storage tank above the collector.
- To secure the capacitor inside, use holders from the refrigerator.
- At the bottom of the frame, screw in 2-3 screws that will keep the glass from sliding.
- Cover the entire structure with glass.
- Seal around the entire perimeter with tape.
Important! You can calculate the effectiveness of such a collector in advance based on tests already carried out. The data obtained when testing the system at a temperature of 25C corresponded to:
- 44C for a volume of water of 20 liters after 2 hours;
- 77C of water in the heat exchanger in the absence of circulation in 5 minutes.
Method 5. Polypropylene manifold
This polypropylene structure is a solar flat battery with dimensions of 2400*550 mm. Such parameters were chosen taking into account the location features - between the rafters in the attic. The efficiency of the device is quite high, since every square centimeter comes under direct contact with water. Another advantage of this option is that you can independently determine the appropriate parameters and change as necessary.
Important! To see how expedient it is to spend time and money assembling such a solar collector, check out the testing data:
- system power - about 530 W;
- heating water with a volume of 20 liters to 47C at a temperature of 24C occurs in 1 hour;
Materials for work:
- cellular polypropylene (not polycarbonate!);
- polypropylene pipes with a cross section of 1 1/4 inches;
- sheet of plywood 5-10 mm thick;
- garden hose with a cross section corresponding to the pipes used;
- foam sheet 2 cm thick;
- special adhesive for PE products, for example, 3M Scotch-Weld™ DP-8005, or special equipment for joining polyethylene parts is suitable if it is already available.
Important! This solar collector design is more complex than all the methods described above. Therefore, it is advisable to have certain skills in working with polyethylene material in order to obtain a high-quality result, and to be extremely careful while performing the work.
Assembly instructions:
- Drill holes in the plugs with a diameter suitable for the pipe ends.
- Make a cut in the pipe with a circular saw to insert sheet polypropylene into it - the width of the cut is identical to the width of the sheet.
- Assemble the structure and make sure that it is reliable and that all parts fit snugly.
Important! Proceed only if there are no defects.
- Degrease all surfaces that will be joined using acetone.
- Apply glue sequentially and immediately connect the necessary elements, as it dries very quickly.
- Coat all corners with glue.
- Make a technical break of 24 hours so that the adhesive composition is completely cured.
- Connect the manifold to the water supply with a garden hose.
- Check the tightness of the structure.
Important! If leaks are found, dry these areas, degrease and seal.
- Take a sheet of plywood and cut it to the required size, based on the parameters of the collector - this will be the base of the device.
Important! Please note that the installation features of this design do not require the presence of a conventional housing. The rafters themselves will serve as the frame.
- Drill holes for the outlets.
- Place a 2 cm thick sheet of foam plastic at the collector installation site to prevent heat leakage from the reverse side.
- Paint the collector surface matte black.
- Install the finished device in the chosen location.
Important! Please note that this solar collector must be installed at an angle, and the storage tank must be installed above the device itself. After filling with water, make sure that all air has left the system - there are no bubbles inside. Otherwise the efficiency will be much lower.
Determining the installation location and available space
The installation location of the collector must meet the following requirements:
- The device should be located as close as possible to the consumer, that is, the room into which the heated air enters.
- The panel should face as far as possible due south or as close to this direction as possible. In this case, it is highly desirable to position its surface at right angles to the sun’s rays, as a result of which losses due to reflection will be minimal.
- The location where the collector is installed should not be shaded by trees, pipes or buildings.
There are no restrictions regarding the choice of collector area: the larger it is, the higher its productivity will be and, accordingly, the lower the amount of heating bills will be.
How to make air heating of a private house from the sun
The advantages of solar heating are obvious - the homeowner only invests in the purchase of equipment, and the heat source itself costs nothing. Solar power plants pay for themselves in about three years, and their service life is ten times longer (up to 30 years).
There are two types of solar heating: from solar panels and from solar collectors.
Advantages of solar heating:
- absolute environmental safety;
- ease of operation;
- constant development of production technology and reduction in equipment costs.
Among the shortcomings we note:
- low station productivity on cloudy days;
- the still high cost of equipment and installation;
- the need for accurate calculation and correct placement of equipment for maximum productivity.
Solar powered installations
The operating principle of such installations is based on the formation of direct current by sunlight when it hits special semiconductors. The converter converts direct current into alternating current. The voltage that appears in the solar panels is transferred to the heating system. The energy can also be stored by the battery and then used in cloudy weather.
Solar batteries are technically difficult; their production will require knowledge and skills. In addition, such equipment is usually used to generate electricity. This type of heating is used where there is electric heating - underfloor heating or electric heaters. If the installation power is sufficient, then you can provide the house with hot water.
The efficiency of batteries depends mainly on the amount of solar energy. In middle and northern latitudes, where there is not enough sun, it is recommended to use combined installations in which solar panels will play a supporting role.
Installations on solar collectors
The principle of operation of such installations is also based on the collection and conversion of solar energy, only the transformation occurs not into electrical, but into thermal energy. The coolant in the collector heats up under the influence of sunlight and releases its heat into the room. The performance of such an installation also depends on the amount of sunlight.
Heating installations are classified according to the type of coolant:
- water and antifreeze;
- air.
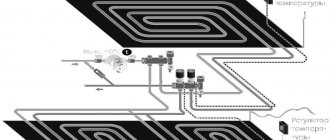
An example of a simple solar air heating system
The procedure for installing a solar collector:
- Insulate the wall on the south side of the house with polystyrene foam and paint it with black paint.
- Sew wooden slats on top.
- Punch 2 convection holes for cold air from below through the wall of the house and the insulation from the edges, and 1 from above for hot air. The diameter of the holes is 20 cm.
- Sew corrugated sheeting onto the slats and cover the top with black plastic film (preferably glass).
The principle of operation of the collector is very simple: cold air circulates from the house through the lower openings, heated air enters the house through the upper convection opening.
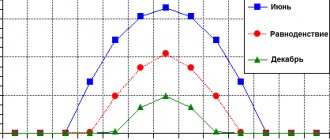
In November, at noon at a temperature of 9 degrees on a sunny day, the air supplied to the house is heated by the collector to 46 degrees.
Scheme of solar air heating of a private house
Selecting a collector absorber design
It is proposed to make the absorber tubular, that is, consisting of several parallel tubes connected at the inlet and outlet by distribution combs.
In this case, for the manufacture of this part of the collector, you can use a very affordable and convenient material - aluminum cans for carbonated drinks.
They are ideal for this purpose, as they have a number of advantages:
- Aluminum, as already mentioned, has high thermal conductivity.
- The thin wall of the can can be easily cut with a regular knife.
- In the vast majority of cases, beverage cans have a standardized size (with a volume of 0.5 liters - 168x66 mm).
- For ease of storage and transportation, the cans are specially shaped so that they fit well together (the upper edge is narrowed to a diameter of 59 mm, and the bottom is given a concave shape).
- After consuming the contents of the can, they are usually thrown into the trash, so this material is absolutely free for the future owner of the collector.
Sometimes cans are made of steel. It is not difficult to identify such containers, since, unlike aluminum ones, they are attracted to a magnet. They should be discarded.
Before assembling the panel, be sure to wash the cans with detergent, otherwise the air passed through them will have an unpleasant odor.
Manufacturing of the collector body and its thermal insulation
The manifold proposed for production will consist of 8 tubes of 8 cans each. Moreover, its body will have dimensions of 1400x670 mm. To make all the elements of the box (case), you will need a sheet of plywood measuring 1525x1525x21 mm. The following parts need to be cut from it:
- Bottom size 1400x670 mm - 1 pc.
- Walls measuring 1400x116 mm - 2 pcs.
- Parts measuring 630x116 mm - 4 pieces (2 are used as walls, the other 2 as guides for cans).
The edges of the parts will most likely have to be processed, for which when marking you should leave an allowance of 3 to 5 mm.
Since the collector will be installed outside, all wooden parts must be treated with an antiseptic or painted.
Creating a collector
When assembling the box, the parts are fastened together using corners and some kind of screws, for example, furniture screws measuring 6.3x50 mm (they are called confirmats). The holes for installing such screws are made with a drill with a diameter of 4 mm.
Each part must be sealed with silicone sealant during assembly to ensure the box is airtight.
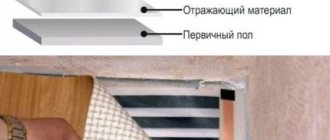
From the inside, the bottom and walls are covered with foam plastic 20 mm thick, and then with any foil thermal insulation (foil inward, that is, towards the absorber).
Air heating using beer cans
When the task is to design and assemble an airborne solar collector with your own hands, the first thing that is taken into account is the maximum simplicity of the final design. Using available materials will speed up the assembly process and reduce the cost, but their properties should not be neglected.
It was already mentioned above that the best option for the adsorber of an airborne solar unit is copper or aluminum, due to their high heat capacity, but in the retail network such sheet metal has a high cost. It turns out that you can replace it in the design with a simple can of beer or Coca-Cola - who said that the adsorber of a solar collector with air circulation should be flat. A manganese-aluminum alloy is used for their manufacture, and all sizes are standardized and the same.
Interesting! Using simple calculations, it turns out that if you lay out 64 cans (8x8 square) on the site and connect them together, their area will be equal to the area of the sheet 1400x670 mm.
In addition to the cans themselves, you will have to make the body of the airborne solar collector, for which it is advisable to use sheet plywood or chipboard. To ensure sufficient rigidity and strength, the thickness of the solar heat exchanger plates should be approximately 16-20 mm. To cut parts to size, you need to use a circular saw together with a template - this will make the cutting surface of the boards more even.
Important! When marking, you need to leave an allowance for the cut and future processing of about 3-5 mm per side.
The boards of the air manifold housing are fastened together with screws or confirmations with a mandatory layer of sealant. If plywood is used, then the entire structure must be treated with a protective varnish or impregnation.
The internal walls of the air solar heat exchanger housing are insulated. The easiest way for these purposes is to use tile polystyrene foam (EPS, EPPS), which adheres to any adhesive. Rolled aluminum foil is laid on top of them as a reflective layer. Its joints are glued with aluminized tape.
The cans are attached end to end - the bottom is inserted into the neck, which is pre-cut with metal scissors and pressed into the body. Several holes are made in the bottom of the can with a drill to organize air circulation, and when connecting, the joints must be treated with sealant. In order for the assembled columns (8 pieces of 8 cans each) to be securely located in a wooden case, guides should be made for them - tube grids, holes for which are made with core drills.
When the air collector structure is ready, it should be painted. To do this, you can use automotive matte (this is important!) paint in cans. The outside of the jars is closed with tempered or plexiglass. It provides high beam transmission and protection for air ducts inside the housing.
Holes are pre-made on the back wall to ensure air circulation. To give a more aesthetic appearance, the finished structure can be refined by using cladding from lining or furniture profiles.
Before starting operation, you will also have to think through the operating diagram of the air collector. Natural circulation may be used or a fan will have to be installed to force the air to circulate.
Manufacturing guides for the absorber
In each of the guides, using a crown, you need to drill 8 holes, the diameter of which corresponds to the diameter of the can. In this case, the jar should fit tightly enough into the hole.
The guides are installed on both sides of the box, and the absorber tubes are installed between them.
Thus, the cans in the tube are pressed against each other without any clamps.
Manufacturing of absorbers
We assemble the tubes as follows:
- The wall covering the top of the jar (in which there is a hole) is cut with metal scissors into “petals” that are bent inward. It is convenient to bend the “petals” by placing the can on a plastic pipe of the maximum possible diameter (so that it fits inside the can).
- In the bottom of each can, using a conical drill, you need to make 3 holes with a diameter of 20 mm, so that their centers are at the vertices of an equilateral triangle.
- Now you can collect tubes from the cans - 8 pieces each. in each. The joints of the cans should be sealed with high-temperature chimney sealant, for example, High Heat Mortar brand. This composition should be applied to a previously degreased and moistened surface. The composition is leveled with your fingers, wearing rubber gloves, which should also be moistened with water.
To ensure that the tubes are perfectly straight, when assembling the cans, they should be placed in a template made from two boards and shaped like an equal angle. It is installed at a slight angle to the vertical (you can lean it against the wall).
A weight must be placed on top of the newly assembled tube, located in the template, until the sealant is completely cured.
Stages of manufacturing a solar collector
Having received the maximum knowledge from everything that is available on the Internet, we will calculate our material capabilities and make a choice for our first collector design.
Advice! In the absence of experience and practical results, it would be optimal to make a solar collector from small corrugated sheets. Such construction, thanks to the use of scraps and leftover materials, can provide invaluable experience and avoid mistakes in the manufacture of powerful devices.
After determining the approximate dimensions of the collector, based on the materials at our disposal, we proceed to assembling the heat exchanger. The base of the collector is easiest to make from OSB boards 8-10mm thick. In addition, we will make inlet and outlet air channels from the same material.
Let's perform a number of basic technological operations in the following sequence:
- We will place a sheet of corrugated sheets or a homemade aluminum profile on top of the OSB sheet blank and mark the location of the air inlet and outlet and the side walls of the box. The pressed wood blank should be 10-15mm larger than the corrugated sheet on the sides and 100mm for mounting the upper and lower air ducts;
- We cut out two blanks from OSB with a width of 50-60mm, depending on the height of the corrugated sheet rib; the size of the board must be made to match the width of the future heat exchanger. We place the workpiece on its edge and apply it to the end of the steel sheet, using a pencil or marker to trace the outline of the profile on the workpiece. Next, use a jigsaw to make a cutout on the broken line workpiece; if necessary, adjust it with a grinding tool so that the contour of the cutout coincides with the bends of the corrugated board. We perform a similar operation for the second end of the profile sheet;
- From the resulting blanks we will make box-shaped air ducts from the remnants of OSB; the ends of the walls should be made with minimal gaps. If the air supply and exhaust to the heat exchanger will be carried out through the side windows, a plug should be made for the second hole. Alternatively, the flow can be supplied and discharged through an additional window in the center of the duct;
- We carefully prime the back wall - the OSB base and paint it with several layers of light paint or cover it with aluminum foil used for culinary purposes. The best option would be to make the coating from a solid sheet of metal, preferably galvanized.
- On top of the coating, exactly according to the markings, we install a sheet of corrugated sheets; the edges of the sheet and the ribs adjacent to the base coating can be treated with oil paint or sealant. We will make additional fastening along the perimeter of the sheet using wood screws.
- After the paint has dried, we install the box-shaped air ducts and side walls. The ends of the side walls and the walls of the air ducts should be in the same plane, which will allow a sheet of glass or monolithic polycarbonate to be glued on top. After installing the glass, its ends should be sealed with fabric tape to make it less sensitive to accidental impacts or chips.
Advice! A difficult operation is blackening the surface of the corrugated sheet. Chemical blackening is often used, but if there is no experience, it is better to resort to the old technique using varnish and soot.
To make the constructed solar collector a full-fledged heating device, it is necessary to attach corrugated pipes and an electric fan to the air supply and exhaust windows, which can be borrowed from a kitchen hood or dryer. At the selected installation location, bring the corrugation into the heated room and connect the fan to the power supply.
Testing of the solar collector should be done under a wide variety of weather conditions and sun positions. The device has low inertia; within 10-15 minutes of exposure to direct sunlight, the temperature of the outlet air should rise to at least 70°C or higher.
Assembly of an air solar collector
Having laid the tubes on a horizontal surface in the form of a battery, each of them is lubricated on one side with sealant and installed in the guide. On the other hand, a second guide is installed on the battery, also using sealant. Before the sealant hardens, the guides should be tightened with an elastic band. At this stage, the battery along with the guides on top should be painted with matte black paint.
Bonding aluminum cans for solar collector
Next, the assembled absorber is installed in the box. Before this, grooves for the guides should be cut in the foam. The space available on each side between the wall of the box and the guide will act as a distribution comb. At this point, holes should be cut in the bottom of the panel to connect the collector to the air ducts. The top of this space needs to be covered with plastic clapboard.
A sheet of transparent plastic (plexiglass made of polycarbonate or acrylic) is installed above the absorber, which is placed on the sealant and screwed to the walls with screws and a press washer.
How to make air heating with your own hands from a stove
When calculating air heating, it is assumed that 1 kW of heating device power can heat 10 sq.m of a well-insulated room. Fireplace inserts with a power of 10 kW are respectively capable of heating a house with an area of 100 sq.m.
Natural convection systems
An air heating system from a stove (fireplace) involves the distribution of heat to other rooms of the house by streams of heated air. For this purpose, flexible heat-insulating channels coming from the fireplace are usually used.
The movement of heated air flows can be natural or forced. If the air flow is directed vertically, then natural movement will be ensured; if hot air needs to be supplied over long distances horizontally, then forced supply is needed. A project for air heating a house from a fireplace should make maximum use of natural convection, which requires large-section air ducts.
Fireproof materials and minimal aerodynamic resistance are the main requirements for air ducts. The length of the air duct from the fireplace to the room should be no more than 3 m. There should be no narrowings or bends on it. The natural air movement heating system can heat no more than 4 rooms. During installation, special attention is paid to insulating sections of air ducts near flammable building materials.
Forced convection systems
The principle is to collect air in a convection chamber and pump it from there into different rooms of the house with one or more duct-type fans. The heat supply distance is no more than 10 m. Flexible ventilation ducts or air ducts of small diameters are used.
Scheme of air heating from a forced convection oven
Connection
The collector is fixed to the roof using a bracket and connected to two air ducts leading into the room. A fan with a capacity of about 150 cubic meters should be installed on the inlet air duct. m/h.
Factory-made solar panels are very expensive, and they will not pay off soon. Do-it-yourself solar panels are much cheaper to manufacture, and assembling the structure is not so difficult.
Types of solar panels for home heating are presented in this review. And also about the pros and cons of each option.